
Popular categories
Looking for a yarn?


|
||||||||||||||||
Highland Homecoming |
||||||||||||||||
 |
 |
|||||||||||||||
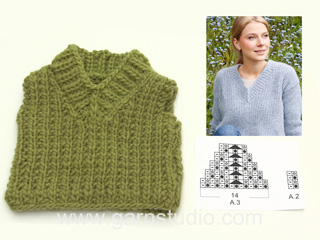
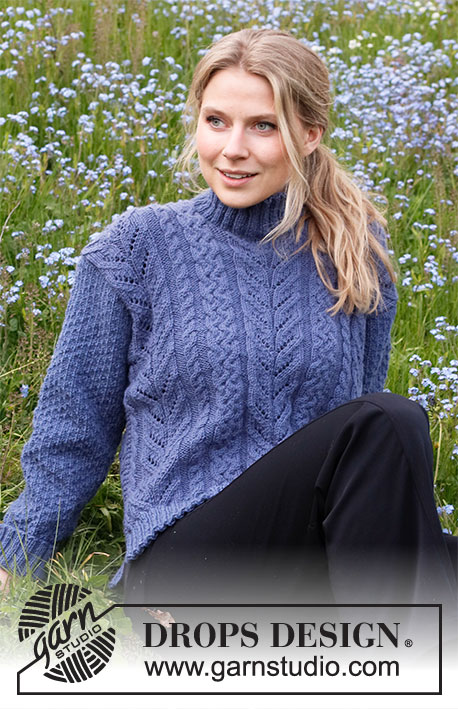
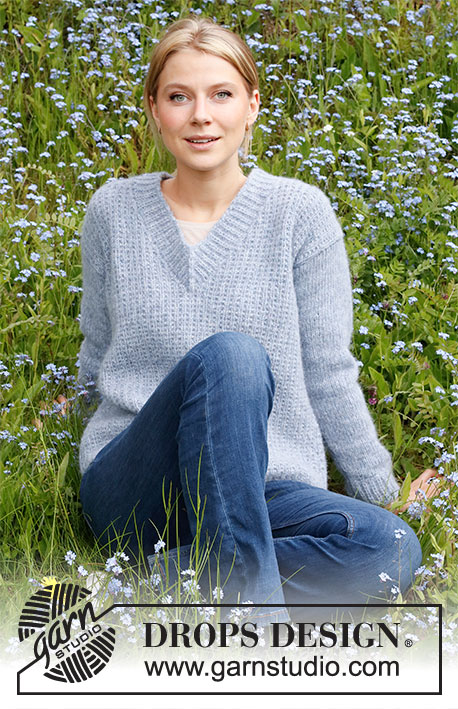
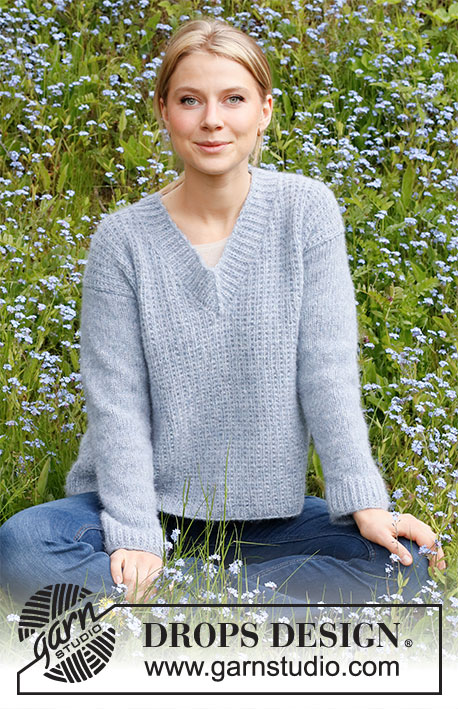
Knitted jumper with V-neck and textured pattern in DROPS Air. Sizes XS - XXXL.
DROPS 216-5 |
||||||||||||||||
|
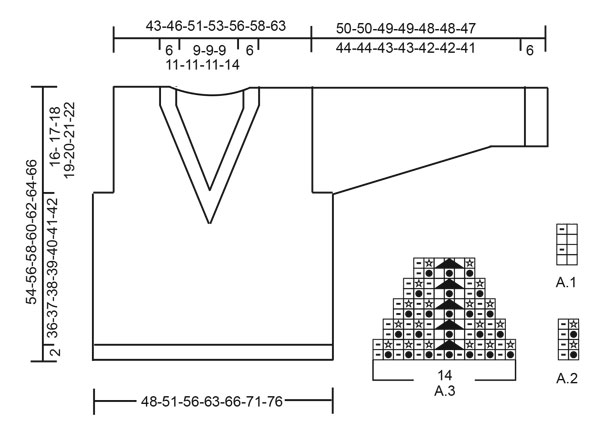
------------------------------------------------------- EXPLANATIONS FOR THE PATTERN: ------------------------------------------------------- RIDGE/GARTER STITCH (worked back and forth): Knit all rows. 1 ridge in height = Knit 2 rows. PATTERN: See diagrams A.1, A.2 and A.3. The diagrams show all rows in the pattern from the right side. RIB (worked back and forth): ROW 1 (= right side): * Knit 1, purl 1 *, work from *-*. ROW 2 (= wrong side): * 1 yarn over, slip 1 stitch as if to purl, knit 1 *, work from *-*. ROW 3 (= right side): * Knit together the yarn over and slipped stitch, purl 1 *, work from *-*. Repeat rows 2 and 3. INCREASE TIP (for sleeves): All increases are worked from the right side! Work 1 edge stitch in garter stitch, knit 1, 1 yarn over (= 1 stitch increased), knit until there are 2 stitches left, 1 yarn over (= 1 stitch increased), knit 1 and 1 edge stitch in garter stitch. CASTING-OFF TIP: To avoid the cast-off edge being tight you can cast off with a larger size needle. If the edge is still tight, make 1 yarn over after approx. each 4th stitch at the same time as casting off; the yarn overs are cast off as normal stitches. ------------------------------------------------------- START THE PIECE HERE: ------------------------------------------------------- JUMPER – SHORT OVERVIEW OF THE PIECE: The piece is worked back and forth in sections and then sewn together. The neck is worked to finish. BACK PIECE: Cast on 79-83-91-103-107-115-123 stitches (including 1 edge stitch on each side) with circular needle size 4.5 mm and Air. Purl 1 row from the wrong side, then work as follows from the right side: Work 1 edge stitch in GARTER STITCH – read description above, work RIB – read description above – until there is 1 stitch left (the rib starts and ends with a knitted stitch) and finish with 1 edge stitch in garter stitch. When the rib measures 2 cm, change to circular needle size 5.5 mm. Continue as follows from the right side: Work 1 edge stich in garter stitch, A.1 until there is 2 stitches left, work first stitch in A.1, 1 edge stitch in garter stitch. Continue this pattern. REMEMBER THE KNITTING TENSION! When the piece measures 38-39-40-41-42-43-44 cm, cast off the first 4 stitches at the beginning of the next 2 rows for the armholes = 71-75-83-95-99-107-115 stitches. Working the armholes is finished in sizes XS, S and M, but continue as follows in the other sizes: SIZES L-XL-XXL-XXXL: On the next row from the right side work 1 edge stitch in garter stitch, slip 1 stitch as if to knit, knit 1 and pass the slipped stitch over the knitted stitch (= 1 stitch decreased), work pattern as before until there are 3 stitches left, knit 2 together (= 1 stitch decreased) and finish with 1 edge stitch in garter stitch. Continue with pattern as before and decrease like this every row from the right side a total of 4-4-6-6 times = 87-91-95-103 stitches. ALL SIZES: = 71-75-83-87-91-95-103 stitches. Continue with pattern as before. When the piece measures 48-50-52-54-56-58-60 cm, cast off the middle 29-29-29-33-33-33-37 stitches for the neck on the next row from the right side, each shoulder is finished separately (= 21-23-27-27-29-31-33 stitches on each shoulder). RIGHT SHOULDER: Continue with pattern as before. On the next row from the right side decrease for the neck as follows: Work 1 stitch in garter stitch, work pattern until there are 3 stitches left, knit 2 together (= 1 stitch decreased) and finish with 1 stitch in garter stitch. Decrease like this every row from the right side a total of 2 times = 19-21-25-25-27-29-31 stitches. Continue working pattern until the piece measures 54-56-58-60-62-64-66 cm. Cast off with knit from the right side – read CASTING-OFF TIP! LEFT SHOULDER: Continue with pattern as before. On the next row from the right side decrease for the neck as follows: Work 1 stitch in garter stitch, slip 1 stitch as if to knit, knit 1 and pass the slipped stitch over the knitted stitch (= 1 stitch decreased), work pattern as before and finish with 1 stitch in garter stitch. Decrease like this every row from the right side a total of 2 times = 19-21-25-25-27-29-31 stitches. Continue working pattern until the piece measures 54-56-58-60-62-64-66 cm. Cast off with knit from the right side. FRONT PIECE: Cast on 79-83-91-103-107-115-123 stitches and work in the same way as the back piece until the piece measures 30-31-32-33-34-35-36 cm. Now work the V-neck on the next row from the right side as follows: 1 edge stitch in garter stitch, work pattern as before over the next 38-40-44-50-52-56-60 stitches, knit 1 and place the knitted stitch on a thread for the neck, work pattern as before over the next 38-40-44-50-52-56-60 stitches and finish with 1 edge stitch in garter stitch = 39-41-45-51-53-57-61 stitches on each shoulder. Each shoulder is finished separately. RIGHT SHOULDER: Continue with pattern to finished length (first row from the wrong side). Decrease for the neck AT THE SAME TIME as you cast off for the armhole as follows: V-NECK: On the next row from the right side decrease 1 stitch for the neck as follows: 1 stitch in garter stitch, slip 1 stitch as if to knit, knit 1 and pass the slipped stitch over the knitted stitch (= 1 stitch decreased), work pattern as before to end of row. Decrease like this alternately on every 2nd and 4th row a total of 16-16-16-18-18-18-20 times. ARMHOLE: When the piece measures 38-39-40-41-42-43-44 cm, cast off 4 stitches at the beginning of the next row from the wrong side for the armhole. Working the armholes in sizes XS, S and M is now finished but continues as follows in the other sizes: SIZES L-XL-XXL-XXXL: On the next row from the right side work as follows: Work pattern as before until there are 3 stitches left, knit 2 together (= 1 stitch decreased) and finish with 1 edge stitch in garter stitch. Continue with pattern as before and decrease like this every row from the right side a total of 4-4-6-6 times. ALL SIZES: When all the decreases for the V-neck and armhole are finished there are 19-21-25-25-27-29-31 stitches on the shoulder. Continue working pattern until the piece measures 54-56-58-60-62-64-66 cm. Cast off with knit from the right side. LEFT SHOULDER: = 39-41-45-51-53-57-61 stitches. Continue with pattern to finished length (first row from the wrong side). Decrease for the neck AT THE SAME TIME as you cast off for the armhole as follows: V-NECK: On the next row from the right side decrease 1 stitch for the neck as follows: Work until there are 3 stitches left, knit 2 together (= 1 stitch decreased) and finish with 1 stitch in garter stitch Decrease like this alternately on the 2nd and 4th rows a total of 16-16-16-18-18-18-20 times. ARMHOLE: When the piece measures 38-39-40-41-42-43-44 cm, cast off 4 stitches at the beginning of the next row from the right side for the armhole. Working the armholes in sizes XS, S and M is now finished but continues as follows in the other sizes: SIZES L-XL-XXL-XXXL: On the next row from the right side work as follows: Work 1 edge stitch in garter stitch, slip 1 stitch as if to knit, knit 1 and pass the slipped stitch over the knitted stitch(= 1 stitch decreased), work pattern as before to end of row. Continue with pattern as before and decrease like this every row from the right side a total of 4-4-6-6 times. ALL SIZES: When all the decreases for the V-neck and armhole are finished there are 19-21-25-25-27-29-31 stitches on the shoulder. Continue working pattern until the piece measures 54-56-58-60-62-64-66 cm. Cast off with knit from the right side. SLEEVE: Cast on 42-44-46-48-52-54-54 stitches (including 1 edge stitch on each side) with circular needle size 4.5 mm and Air. Purl 1 row from the wrong side, then work RIB (described above) starting from the right side, with 1 edge stitch in garter stitch on each side. When the rib measures 6 cm, change to circular needle size 5.5 mm. On the next row from the right side work as follows: 1 edge stitch in garter stitch, knit 40-42-44-46-50-52-52 and decrease 6-6-6-6-8-8-8 stitches evenly over these stitches, finish with 1 edge stitch in garter stitch = 36-38-40-42-44-46-46 stitches. Continue with stocking stitch and 1 edge stitch in garter stitch on each side. When the sleeve measures 8 cm, increase 1 stitch inside the 2 edge stitches on each side – read INCREASE TIP! Increase like this every 5-4½-4-4-3½-3-2½ cm a total of 8-9-10-10-11-12-13 times = 52-56-60-62-66-70-72 stitches. Continue working until the sleeve measures 47-47-46-46-45-45-44 cm. Insert 1 marker on each side of the sleeve – they mark the bottom of the armhole. Cast off with knit from the right side when the sleeve measures 50-50-49-49-48-48-47 cm. Work the other sleeve in the same way. ASSEMBLY: Sew the shoulder seams. Sew in the sleeves and the bottom of the armholes – the markers on the sleeve should match the bottom of the armhole. Sew the side and sleeve seams in one go, inside the 1 edge stitch. NECK: Knit up stitches inside the 1 edge stitch, from the right side with circular needle size 4.5 mm and Air as follows: Start mid-back and knit up approx. 46 to 60 stitches as far as the stitch on the thread mid-front (number of stitches must be divisible by 2), place the stitch from the thread on the needle and knit this stitch (= mid-stitch), knit up 1 more stitch on the left side (i.e. the number of stitches must be divisible by 2 + 1 (approx. 47 to 61 stitches) = approx. 94 to 122 stitches altogether. Make sure the neck stitches are neither too tight nor too loose; you can knit up more or less stitches if necessary. Insert 1 marker in the mid-stitch (knitted stitch with the marker mid-front). Work A.2 until 6 stitches remains before mid-stitch with marker, work A.3 over the next 14 stitches, work A.2 over the remaining stitches on round. Continue like this in the round. Decreasing in this way will keep the mid-stitch on the neck in a straight line. Work and decrease like this until the neck measures 6 cm in the knitting direction. Cast off with knit. |
||||||||||||||||
Diagram explanations |
||||||||||||||||
|
||||||||||||||||
|
||||||||||||||||
|
Have you made this or any other of our designs? Tag your pictures in social media with #dropsdesign so we can see them! Do you need help with this pattern?You'll find tutorial videos, a Comments/Questions area and more by visiting the pattern on garnstudio.com. © 1982-2024 DROPS Design A/S. We reserve all rights. This document, including all its sub-sections, has copyrights. Read more about what you can do with our patterns at the bottom of each pattern on our site. |
||||||||||||||||


With over 40 years in knitting and crochet design, DROPS Design offers one of the most extensive collections of free patterns on the internet - translated to 17 languages. As of today we count 304 catalogues and 11422 patterns - 11422 of which are translated into English (UK/cm).
We work hard to bring you the best knitting and crochet have to offer, inspiration and advice as well as great quality yarns at incredible prices! Would you like to use our patterns for other than personal use? You can read what you are allowed to do in the Copyright text at the bottom of all our patterns. Happy crafting!
Comments / Questions (26)
Hallo, ich habe eine Frage. Gibt es eine Anleitung, wo man mit so einem V-Ausschnitt in Rundenstrickt? Würde gerne in Runden stricken und dann auch bei den Armen keine naht haben. Da ich allerdings noch keine V-Ausschnitt gestrickt habe, bin ich mir nicht sicher, ob das so funktioniert :) Vielen Dank VG Christin
23.01.2024 - 08:34DROPS Design answered:
Liebe Christin, hier finden Sie Pullover mit V-Ausschnitt, die in Runden gestrickt sind, hoffentlich kann das Ihnen helfen. Viel Spaß beim stricken!
24.01.2024 - 07:20Der står at der er rettelse til denne opskrift. Men der står ikke hvilke rettelse. Er de rettet til i opskriften nu.
14.01.2023 - 17:54DROPS Design answered:
Hei Jane. Husk å klikke på den røde rettelselinken for å se hva som er blir rettet i oppskriften. Slik står det: Opdateret online: 09.09.2020 Rettelse: Diagram for mønster og v-hals lagt til opskriften. Tekst opdateret i henhold til diagram. mvh DROPS Design
16.01.2023 - 11:28Sorry. Correction to the second of my previous 2 questions. Concerning knitting the 1 edge stitch in garter stitch; garter stitch knitted flat would mean Knitting RS & WS. Would that mean knitting the edge stitches?
19.04.2022 - 18:47DROPS Design answered:
Dear Rhonda, correct, the edge stitches are worked in garter stitch, this means the first and the last stitch will be knitted on every row. Happy knitting!
20.04.2022 - 07:10Hello. regarding the phrase 1 edge stitch, for example in Cast on 79-83-91-103-107-115-123 stitches (including 1 edge stitch on each side), does this mean a cast on of 79 PLUS 1 edge stitch at the beginning and 1 at the end of the row; ie 81 stitches? And regarding Work 1 edge stitch in GARTER STITCH, does this mean work the edge stitch the way it would be worked if the rows were Garter stitch.. ie knit RS, purl WS? The terminology is new for me. Many thanks for the pattern and support!
19.04.2022 - 18:01DROPS Design answered:
Hi Rhonda, The 79 stitches include the edge stitches (2 edge stitches and 77 other stitches on the row). The edge stitches are knitted both from the right and the wrong side (which is the definition of garter stitch when working back and forth). Happy knitting!
20.04.2022 - 07:05Hello Merci beaucoup pour ce modèle que j'ai terminé et qui me plaît, bien expliqué et bien taillé.
27.03.2022 - 15:29Bonjour. Je suis en train de faire le col, mais en suivant le diagramme, les cotes sont à l'envers: l'endroit se trouve à l'intérieur du pull... Pour info, je tricote en rond. Merci de m'aiguiller.
23.01.2022 - 19:21DROPS Design answered:
Bonjour Mme Van Lerberghe, cette vidéo montre justement comment tricoter le col en suivant les diagrammes A.2 et A.3, peut-être pourra-t-elle vous aider?
24.01.2022 - 09:56Hej När jag kontrollerar stickfastheten så ser jag att för slätstickning så stämmer antal maskor med 16 maskor med stickor 51/2, men om jag stickar mönster enligt beskrivning så blir det istället 18 maskor. Bör jag justera mina stickor så att jag får 16 maskor på 10 cm vid mönsterstickning för att få rätt mått på tröjan, eller bör man fått samma antal maskor både för slätstickning som vid mönsterstickningen ? Tack på förhand
08.10.2021 - 13:44DROPS Design answered:
Hei Elisabeth. I denne oppskriften er strikkefastheten oppgitt i glattstrikk (slätstickning). Når du strikker mønster, vil arbeidet trekke seg litt sammen / du får flere masker på 10 cm. Så du har den korrekte strikkefastheten på din prøvelapp på pinne 5,5 :) mvh DROPS Design
11.10.2021 - 09:21Hej, jag tänkte sticka en tröja där det rekommenderade garnet är ett garn från garngrupp C. Jag vill däremot göra en tröja med ett tjockare garn från garngrupp E. Går det på något sätt att anpassa så jag kan följa samma mönster men med ett tjockare garn? Och i så fall hur anpassar jag mönstret till det?
01.09.2021 - 08:52DROPS Design answered:
Hei Ebba. Alle mål til denne genseren er for garn i garngruppe C, garn fra garngruppe E vil ikke passe og design avd har dessverre ikke muligheten til å omregne maskeantall, mål på målskisse og garnmengde m.m. enn hva genseren er skrevet for. mvh DROPS design
06.09.2021 - 13:38Bonjour pour le col la maille du milieu en attente, est elle comptée dans le relevé des mailles de gauche ou de droite ou est elle comptée en plus des mailles relevées car moi je ne tombe jamais juste par exemple je relève 40 mailles à gauche qui est divisible par deux et 41 mailles à droite car il faut une maille en plus, la maille fait partie des mailles relevées ou alors est que cela fait 40 +41 +1 la maille du milieu Merci pour votre réponse Mme AMBROSET
23.04.2021 - 15:54DROPS Design answered:
Bonjour Mme Ambroset, le nombre de mailles total doit être multiple de 2 ; ajustez si besoin le nombre de mailles au 1er rang en ajoutant des augmentations/diminutions; Cette vidéo montre ensuite comment tricoter le col en suivant les diagrammes A.2 et A.3. Bon tricot!
26.04.2021 - 07:07Bonjour je ne comprends pas pour faire le col, il faut relever les mailles en commençant par le milieu du dos ensuite relever les mailles pour le col devant gauche et devant droit et ensuite que fait-on des mailles restantes du dos, vous ne dites rien sur le modèle Ensuite les diminutions je ne comprends Merci par avance Mme AMBROSET
04.02.2021 - 13:36