DROPS Cotton Merino
DROPS Cotton Merino
50% Wool, 50% Cotton
from 3.70 € /50g
Get the yarn to make this pattern from 33.30€.

The yarn cost is calculated from the pattern’s smallest size and the yarn’s cheapest product type. Looking for an even better price? You might find it on the DROPS Deals!

DROPS SS24

Wild Mint Sweater

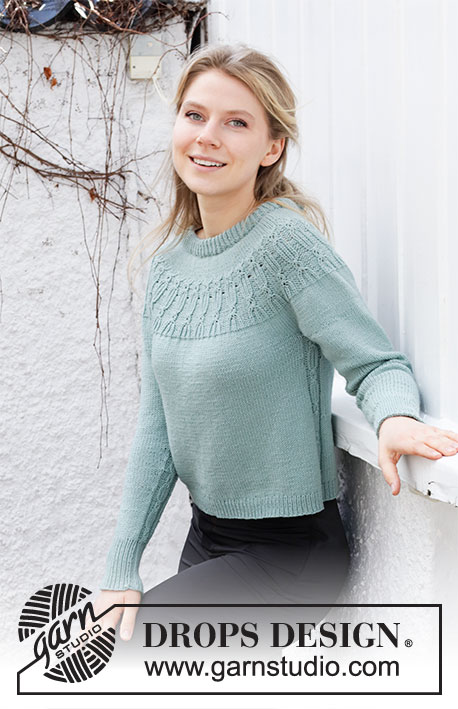
Knitted jumper in DROPS Cotton Merino. Piece is knitted top down with double neck, round yoke and texture pattern. Size: S - XXXL

DROPS 215-16
DROPS design: Pattern cm-127
Yarn group B
-------------------------------------------------------

SIZE:
S - M - L - XL - XXL - XXXL

MATERIALS:
DROPS COTTON MERINO from Garnstudio (belongs to yarn group B)
450-500-550-600-650-750 g colour 29, sea green

KNITTING TENSION:
21 stitches in width and 28 rows vertically in stocking stitch = 10 x 10 cm.

NEEDLES:
DROPS DOUBLE POINTED NEEDLES SIZE 4 mm
DROPS CIRCULAR NEEDLE SIZE 4 mm : Length 40 and 60 or 80 cm for stocking stitch.
DROPS DOUBLE POINTED NEEDLES SIZE 3 mm
DROPS CIRCULAR NEEDLE SIZE 3 mm : Length 40 and 80 cm for rib.
DROPS CABLE NEEDLE - for cables.
Needle size is only a suggestion! If you have too many stitches on 10 cm switch to a larger needle size. If you have too few stitches on 10 cm switch to a smaller needle size.

-------------------------------------------------------

Alternative Yarn – See how to change yarns here
Yarn Groups A to F – Use the same pattern and change the yarn here
Yarn usage using an alternative yarn – Use our yarn converter here

-------------------------------------------------------

DROPS Cotton Merino
DROPS Cotton Merino
50% Wool, 50% Cotton
from 3.70 € /50g
Get the yarn to make this pattern from 33.30€.

The yarn cost is calculated from the pattern’s smallest size and the yarn’s cheapest product type. Looking for an even better price? You might find it on the DROPS Deals!

Pattern instructions

-------------------------------------------------------

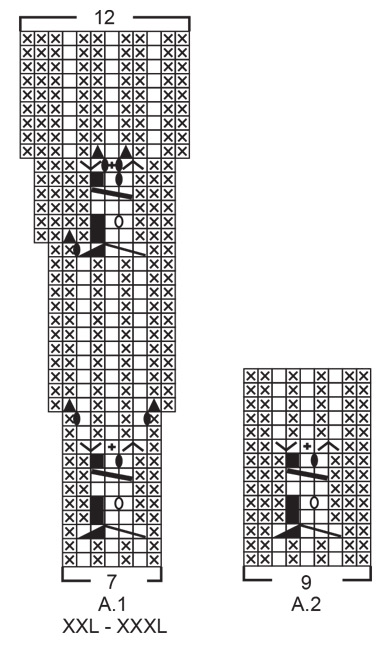
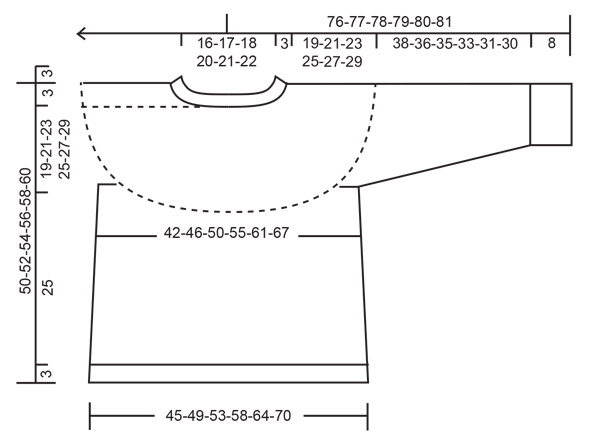
EXPLANATION FOR THE PATTERN:

-------------------------------------------------------

PATTERN:
See diagrams A.1 and A.2. Choose diagram for your size (applies to A.1).

INCREASE TIP-1 (evenly):
To calculate how to increase evenly, use the total number of stitches on row (e.g. 94 stitches) and divide stitches by number of increases to be done (e.g. 32) = 2.9. 
In this example increase by making 1 yarn over after approx. every 3rd stitch. On next round knit yarns over twisted to avoid holes.

INCREASE TIP-2 (applies to sides of body):
Increase 1 stitch on each side of A.2 in each side on body, i.e. increase as follows: Work until 1 stitch remains before A.2, make 1 yarn over, work 1 stitch in stocking stitch, work A.2 (= 9 stitches), work 1 stitch in stocking stitch, and make 1 yarn over (= 2 stitches increased in the side and 4 stitches increased in total on round.) On next round knit yarn overs twisted to avoid holes. Then work the new stitches in stocking stitch. 

DECREASE TIP (applies to mid under sleeves):
Decrease 1 stitch on each side of A.2 mid under sleeve, i.e. work as follows: Work A.2 as before over the first 9 stitches, slip 1 stitch knitwise, knit 1, pass slipped stitch over stitch worked, work in stocking stitch until 2 stitches remain before A.2, knit 2 together (= 2 stitches decreased).

CAST-OFF TIP:
To avoid a tight cast-off edge you may use a larger needle size. If this also is too tight, work a 1 yarn over after approx. every 6th stitch while casting off (cast off yarn overs as regular stitches).

-------------------------------------------------------

START THE PIECE HERE:

-------------------------------------------------------

JUMPER - SHORT OVERVIEW OF THE PIECE:
Double neck edge and yoke in the round on circular needle from mid back, top down. Now divide yoke for body and sleeves. Body is worked in the round on circular needle, top down. Work sleeves in the round on double pointed needles/short circular needle, top down.

NECK EDGE:
Cast on 94-98-102-108-112-116 stitches on a short circular needle size 3 mm with Cotton Merino. Work rib in the round = knit 1/purl 1 for 7 cm. Knit 1 round while increasing 32-32-34-36-38-38 stitches evenly - read INCREASE TIP-1 = 126-130-136-144-150-154 stitches. Insert 1 marker in the middle of round (= mid front). Measure yoke from this marker. Then work yoke as explained below.

YOKE:
Switch to circular needle size 4 mm and work in stocking stitch in the round. REMEMBER THE KNITTING TENSION!
When piece measures 4 cm from marker in all sizes, increase 42-32-34-36-50-52 stitches evenly – remember INCREASE TIP-1 = 168-162-170-180-200-206 stitches.
Continue until piece measures 4-5-6-7-7-8 cm - increase at the same time 0-18-10-18-31-39 stitches evenly on last round = 168-180-180-198-231-245 stitches.
Now work A.1 in the round (= 28-30-30-33-33-35 repetitions of 6-6-6-6-7-7 stitches). When A.1 has been worked vertically, there are 280-300-330-363-396-420 stitches on row, and piece measures approx. 15-16-18-19-21-22 cm from marker at the neck.
Continue in stocking stitch - increase at the same time 4-8-2-9-0-8 stitches evenly on first round = 284-308-332-372-396-428 stitches.
When piece measures 19-21-23-25-27-29 cm from marker at the neck, divide yoke for body and sleeves. I.e. work next round as follows from mid back: Work 41-45-48-53-59-65 stitches in stocking stitch (= ½ back piece), slip the next 60-64-70-80-80-84 stitches on 1 stitch holder for sleeve, cast on 7-7-9-9-11-11 new stitches on needle (= in the side under sleeve), work 82-90-96-106-118-130 stitches in stocking stitch (= front piece), slip the next 60-64-70-80-80-84 stitches on 1 stitch holder for sleeve, cast on 7-7-9-9-11-11 new stitches on needle (= in the side under sleeve), and work the remaining 41-45-48-53-59-65 stitches in stocking stitch as before (= ½ back piece). Finish body and sleeves separately! NOW MEASURE PIECE FROM HERE!

BODY:
= 178-194-210-230-258-282 stitches. Insert 1 marker in each side on body - in the middle of the 7-7-9-9-11-11 stitches cast on under each sleeve.
Work in stocking stitch over back piece until 4 stitches before first stitch with marker - round begin here now.
Work A.2 (= 9 stitches – marker is in the middle of these 9 stitches), work 80-88-96-106-120-132 stitches in stocking stitch, work A.2 (= 9 stitches – marker is in the middle of these 9 stitches), work 80-88-96-106-120-132 stitches in stocking stitch. Continue pattern like this.
When piece measures 6 cm from division in all sizes, increase 1 stitch on each side of A.2 in each side on body - read INCREASE TIP (= 4 stitches increased). Increase like this every 6 cm 3 times in total in each side = 190-206-222-242-270-294 stitches.
Work until piece measures 25 cm from division. Approx. 3 cm remain until finished measurements, try the jumper on and work until desired length.
On next round increase stitches evenly, i.e. work next round as follows: Work A.2 as before, work 86-94-102-112-126-138 stitches in stocking stitch and increase at the same time 19-21-23-25-27-29 stitches evenly over these stitches in stocking stitch, work A.2 as before, work 86-94-102-112-126-138 stitches in stocking stitch and increase at the same time 19-21-23-25-27-29 stitches evenly over these stitches in stocking stitch = 228-248-268-292-324-352 stitches. NOTE! Increase to avoid the rib to be worked from contracting the piece.
Switch to circular needle size 3 mm. Work next round as follows: Work A.2 as before over the first 9 stitches, * knit 1, purl 1 *, work from *-* until 1 stitch remains before A.2 in the other side of piece, knit 1, work A.2 as before over the next 9 stitches, * knit 1, purl 1 *, work from *-* until 1 stitch remains on round, and finish with knit 1.
Continue rib like this for 3 cm. Cast off with knit over knit and purl over purl - read CAST-OFF TIP. Jumper measures approx. 50-52-54-56-58-60 cm from shoulder and down.

SLEEVES:
Slip the 60-64-70-80-80-84 stitches from stitch holder in one side of piece on double pointed needles or a short circular needle size 4 mm and pick in addition up 1 stitch in each of the 7-7-9-9-11-11 new stitches cast on under sleeve = 67-71-79-89-91-95 stitches.
Insert 1 marker in the middle of the 7-7-9-9-11-11 stitches. Begin round 4 stitches before stitch with marker, work A.2 (= 9 stitches – marker is in the middle of these 9 stitches), work the remaining stitches in stocking stitch. Continue pattern like this.
When sleeve measures 3 cm from division in all sizes, decrease 1 stitch on each side of A.2 - read DECREASE TIP (= 2 stitches decreased). Decrease like this every 3½-3-2-1½-1½-1½ cm 10-11-14-18-18-18 times in total = 47-49-51-53-55-59 stitches.
Work until sleeve measures 38-36-35-33-31-30 cm from division. Approx. 8 cm remain until finished measurements, try the jumper on and work until desired length. NOTE! Shorter measurements in the larger sizes because of wider neck and longer yoke.
On next round increase stitches evenly, i.e. work next round as follows: Work A.2 as before, then work 38-40-42-44-46-50 stitches in stocking stitch and increase at the same time 9-9-11-11-11-11 stitches evenly over these stitches in stocking stitch = 56-58-62-64-66-70 stitches.
Switch to double pointed needles size 3 mm. Work next round as follows: Work A.2 over the first 9 stitches, * knit 1, purl 1 *, work from *-* until 1 stitch remains before A.2 and finish with knit 1. Continue rib like this for 8 cm. Cast off with knit over knit and purl over purl - read CAST-OFF TIP. Sleeve measures approx. 46-44-43-41-39-38 cm from division. Work the other sleeve the same way.

ASSEMBLY:
Fold the neck edge towards wrong side, and fasten with neat, little stitches.

This pattern has been corrected.

Updated online: 16.06.2023
New diagram A.1 in size L-XL and XXL-XXXL

Diagram

symbols = knit
symbols = purl
symbols = between 2 stitches make 2 somewhat tight yarn overs, on next round drop one yarn over off the needle, and knit second yarn over (should make a hole)
symbols = knit 3, pass first stitch worked over the other 2 so that stitch is around the other two (= 1 stitch decreased)
symbols = slip 1 stitch on cable needle in front of piece, purl 1, knit 1 from cable needle
symbols = slip 1 stitch on cable needle behind piece, knit 1, purl 1 from cable needle
symbols = slip 1 stitch on cable needle in front of piece, purl 1, knit 1 from cable needle, knit 1, slip 1 stitch on a cable needle behind piece, knit 1, lift the innermost of the 3 knit stitches at the edge of right needle over the 2 outermost knit stitches so that stitch is around the other two (= 1 stitch decreased), purl 1 from cable needle
symbols = this square is not a stitch because stitch was decreased earlier, go directly to next symbol in diagram
symbols = between 2 stitches make 1 somewhat tight yarn over, on next round work yarn over twisted as shown in diagram to avoid holes
symbols = knit yarn over twisted (it should not make a hole)
symbols = purl yarn over twisted (it should not make a hole)
diagram
diagram
diagram

Each of our patterns has specific tutorial videos to help you.

Do you have a question? See a list of frequently asked questions (FAQ)

Knitting tension is what determines the final measurements of your work, and is usually measured per 10 x 10 cm. It is provided like so: number of stitches in width x number of rows in height - eg: 19 stitches x 26 rows = 10 x 10 cm.

The knitting tension is very individual; some people knit/crochet loosely while others work tightly. You adjust the knitting tension with the needle size, which is why the suggested needle size is only meant as a guide! You need to adjust this (up or down) to ensure that YOUR knitting tension matches the knitting tension provided in the pattern. If you work with a different knitting tension than provided you will have a different yarn consumption, and your work will have different measurements than what the pattern suggests.

The knitting tension also determines which yarns can replace each other. As long as you achieve the same knitting tension you can replace one yarn with another.

See DROPS lesson: How to measure your tension/gauge

See DROPS video: How to make a gauge tension swatch

The required amount of yarn is provided in grams, eg: 450 g. To calculate how many balls you’ll need you first need to know how many grams are in 1 ball (25g, 50g or 100g). This information is available if you click on the individual yarn quality on our pages. Divide the amount required with the amount of each ball. For example, if each ball is 50g (the most common amount), the calculation will be as follows: 450 / 50 = 9 balls.

The important thing when changing from one yarn to another is that the knitting/crochet tension remains the same. This is so that the measurements of the finished piece will be the same as on the sketch provided. It is easier to achieve the same knitting tension using yarns from the same yarn group. It is also possible to work with multiple strands of a thinner yarn to achieve the knitting tension of a thicker one. Please try our yarn converter. We recommend you to always work a test swatch.

Please NOTE: when changing yarn the garment might have a different look and feel to the garment in the photo, due to individual properties and qualities of each yarn.

See DROPS lesson: Can I use a different yarn than the one mentioned in the pattern?

All our yarns are categorised into yarn groups (from A to F) according to thickness and knitting tension – group A contains the thinnest yarns and group F the thickest. This makes it easier for you to find alternative yarns to our patterns, should you wish to switch yarn. All yarns within the same group have a similar knitting tension and can easily replace each other. However, different yarn qualities have different structures and properties which will give the finished work a unique look and feel.

Click here for an overview of the yarns in each yarn group

At the top of all our patterns you’ll find a link to our yarn calculator, which is a helpful tool should you wish to use a different yarn than suggested. By filling in the yarn quality you wish to replace, the amount (in your size) and number of strands, the calculator will present good alternative yarns with the same knitting tension. Additionally it will tell you how much you’ll require in the new qualities and whether you’ll need to work with multiple strands. Most skeins are 50g (some are 25g or 100g).

If the pattern is worked with multiple colours, every colour will have to be calculated separately. Similarly, if the pattern is worked with several strands of different yarns (for example 1 strand Alpaca and 1 strand Kid-Silk) you will have to find alternatives for each, individually.

Click here to see our yarn calculator

Since different yarns have different qualities and textures we have chosen to keep the original yarn in our patterns. However, you can easily find options among our available qualities by using our yarn calculator, or simply pick a yarn from the same yarn group.

It is possible that some retailers still have discontinued yarns in stock, or that someone has a few skeins at home that they would like to find patterns for.

The yarn calculator will provide both alternative yarn as well as required amount in the new quality.

If you think it's hard to decide what size to make, it can be a good idea to measure a garment you own already and like the size of. Then you can pick the size by comparing those measures with the ones available in the pattern's size chart.

You'll find the size chart at the bottom of the pattern.

See DROPS lesson: How to read size chart

The needle size provided in the pattern serves only as a guide, the important thing is to follow the knitting tension. And since knitting tension is very individual, you will have to adjust the needle size to ensure that YOUR tension is the same as in the pattern – maybe you’ll have to adjust 1, or even 2 needle sizes, up or down to achieve the correct tension. For this, we recommend that you work test swatches.

Should you work with a different knitting tension than the one provided, the measurements of the finished garment might deviate from the measurement sketch.

See DROPS lesson: How to measure your tension/gauge

See DROPS video: How to make a tension/gauge swatch

Working a garment top-down provides more flexibility and room for personal adjustment. For example it is easier to try the garment on while working, as well as making adjustments to length of yoke and shoulder caps.

The instructions are carefully explaining every step, in the correct order. Diagrams are adjusted to the knitting direction and are worked as usual.

The diagram depicts all rows/rounds, and every stitch seen from the right side. It is read from bottom to top, from right to left. 1 square = 1 stitch.

When working back and forth, every other row is worked from the right side and every other row is worked from the wrong side. When working from the wrong side, the diagram will have to be worked reversed: from left to right, knit stitches are purled, purl stitches are knit etc.

When working in the round every round is worked from the right side and the diagram are worked from right to left on all rounds.

See DROPS lesson: How to read knitting diagrams

The diagram depicts all rows/rounds, and every stitch seen from the right side. It is worked from bottom to top, from right to left.

When working back and forth every other row is worked from the right side: from right to left and every other row is worked from the wrong side: from left to right.

When working in the round, every row in the diagram are worked from the right side, from right to left.

When working a circular diagram you start in the middle and work your way outwards, counter clockwise, row by row.

The rows usually start with a given number of chain stitches (equivalent to the height of the following stitch), this will either be depicted in the diagram or explained in the pattern.

See DROPS lesson: How to read crochet diagrams

Instructions for working several diagrams after each other on the same row/round, will often be written like so: “work A.1, A.2, A.3 a total of 0-0-2-3-4 times". This means you work A.1 once, then A.2 is worked once, and A.3 is repeated (in width) the number of times provided for your size – in this case like so: S = 0 times, M = 0 times, L=2 times, XL= 3 times and XXL = 4 times.

The diagrams are worked as usual: begin with the first row in A.1, then work the first row in A.2 etc.

See DROPS lesson: How to read knitting diagrams

See DROPS lesson: How to read crochet diagrams

The total width of the garment (from wrist-to-wrist) will be larger in the larger sizes, despite the actual sleeves being shorter. The larger sizes have longer sleeve caps and wider shoulders, so there will be a good fit in all sizes.

The measurement sketch/schematic drawing provides information regarding the full length of the garment. If it’s a jumper or a jacket the length is measured from the highest point on the shoulder closest to the neckline, and straight down to the bottom of the garment. It is NOT measured from the tip of shoulder. Similarly, the length of yoke is measured from the highest point on the shoulder and down to where yoke is split into body and sleeves.

On a jacket measures are never taken along bands, unless specifically stated. Always measure inside band stitches when measuring the length.

See DROPS lesson: How to read a schematic drawing

Diagrams are often repeated on the round or in height. 1 repeat is the diagram the way it appears in the pattern. If it says to work 5 repeats of A.1 in the round, then you work A.1 a total of 5 times after/next to each other in the round. If it says to work 2 repeats of A.1 vertically/in height you work the entire diagram once, then begin again at the start and work the entire diagram one more time.

Chain stitches are slightly narrower than other stitches and to avoid working the cast-on edge too tight, we simply chain more stitches to begin with. The stitch count will be adjusted on the following row to fit the pattern and measurement sketch.

The rib edge is more elastic and will contract slightly compared to, for example, stocking stitch. By increasing before the rib edge, you avoid a visible difference in width between the rib edge and the rest of the body.

It’s very easy to cast off too tightly, and by making yarn overs while casting off (and simultaneously casting these off) you avoid a too tight cast off edge.

See DROPS video: How to bind off with yarn overs (yo)

To achieve an even increase (or decrease) you can increase on, for example: every 3rd and 4th row alternately, like so: work 2 rows and increase on the 3rd row, work 3 rows and increase on the 4th. Repeat this until the increase is complete.

See DROPS lesson: Increase or decrease 1 st on every 3rd and 4th row alternately

Should you prefer to work in the round instead of back and forth, you may of course adjust the pattern. You’ll need to add steeks mid-front (usually 5 stitches), and follow the instructions. When you would normally turn and work from the wrong side, simply work across the steek and continue in the round. At the end you’ll cut the piece open, pick up stitches to work bands, and cover the cut edges.

See DROPS video: How to knit steeks and cut open

Should you prefer to work back and forth instead of in the round, you may of course adjust the pattern so you work the pieces separately and then assemble them at the end. Divide the stitches for the body in 2, add 1 edge stitch in each side (for sewing) and work the front and back pieces separately.

See DROPS lesson: Can I adapt a pattern for circular needles into straight needles?

Pattern repeats can vary slightly in the different sizes, in order to get the correct proportions. If you’re not working the exact same size as the garment in the photo, yours might deviate slightly. This has been carefully developed and adjusted so that the complete impression of the garment is the same in all sizes.

Make sure to follow instructions and diagrams for your size!

If you have found a pattern you like which is available in women’s size it’s not very difficult to convert it to men’s size. The biggest difference will be the length of sleeves and body. Start working on the women size that you think would fit across the chest. The additional length will be worked right before you cast off for the armhole/sleeve cap. If the pattern is worked top-down you can add the length right after the armhole or before the first decrease on sleeve.

Regarding additional yarn amount, this will depend on how much length you add, but it is better with a skein too many than too few.

All yarns will have excess fibres (from production) that might come off as lint or shedding. Brushed yarns (ie hairier yarns) have more of these loose, excess fibres, causing more shedding.

Shedding also depends on what is worn under or over the garment, and whether this pulls at the yarn fibres. It’s therefore not possible to guarantee that there will be no shedding

Below are some tips on how to get the best result when working with hairier yarns:

1. When the garment is finished (before you wash it) shake it vigorously so the looser hairs come off. NOTE: do NOT use a lint roller, brush or any method that pulls at the yarn.

2. Place the garment in a plastic bag and put it in your freezer - the temperature will cause the fibres to become less attached to each other, and excess fibres will come off easier.

3. Leave in the freezer for a few hours before taking it out and shaking it again.

4. Wash the garment according to the instructions on the yarn label.

Pilling is a natural process that happens to even the most exclusive of fibers. It's a natural sign of wear and tear that is hard to avoid, and that is most visible in high friction areas of your garment like a sweater's arms and cuffs.

You can make your garment look as new by removing the pilling, using a fabric comb or a pill/lint remover.

Still can't find the answer you need? Then scroll down and leave your question so one of our experts can try to help you. This will be done normally within 5 to 10 working days.
In the meantime, you can read the questions and answers that others have left to this pattern or join the DROPS Workshop on Facebook to get help from fellow knitters/crocheters!

You might also like...

Post a comment to pattern DROPS 215-16

We would love to hear what you have to say about this pattern!

If you want to leave a question, please make sure you select the correct category in the form below, to speed up the answering process. Required fields are marked *.

Comments / Questions (15)

country flag Lenka wrote:

A diagramhoz vonatkozó szöveges jelmagyarázatnál hiba van (az A1 sor 3.-ik sorában (is) szereplő fordított szemután levő jelnél). Kérem javítsák ki!

30.08.2023 - 21:43

country flag Virginia wrote:

El patrón A2 de repite tantas veces como largo sea el jersey?

17.06.2023 - 20:54

DROPS Design answered:

Hola Virginia, el diagrama A.2 se repite en el cuerpo del jersey y las mangas hasta el remate, incluyendo en el borde elástico final. Si quieres alargar el jersey, tendrías que continuar con las repeticiones de A.2 y los puntos del elástico (en el borde) o punto jersey (antes del borde) entre las repeticiones de A.2.

18.06.2023 - 20:08

country flag Sabine wrote:

Ich habe eine Frage zu Musterreihe 22 von Diagramm A.1 (L-XL). Kann es sein, dass das 7. und 8. Symbol (von rechts gelesen) vertauscht sind? Denn so liegt das schwarze Dreieck (Umschlag links verschränkt stricken) nicht über der Stelle, an der sich der Umschlag der Vorreihe befindet, sondern über der linken Masche davor. Vielen Dank schon mal für die Hilfe!

01.06.2023 - 13:26

DROPS Design answered:

Liebe Sabine, Sie sind ja recht, wie der Umschlag so ist, dann wird er bei der nächsten Runde zwischen den beiden linken Maschen gestrickt, danke für den Hinweis, unser Design-Team wird das mal prüfen. Viel Spaß beim stricken!

01.06.2023 - 16:37

country flag Marianne wrote:

Det ved jeg godt. Der er en fejl i jeres beskrivelse

06.07.2022 - 08:08

DROPS Design answered:

Hej Marianne, Vi skriver .... "slå om, strik 1 maske glatstrik, strik A.2 (= 9 masker), strik 1 maske glatstrik, og slå om (= 2 masker taget ud i siden "

06.07.2022 - 08:12

country flag Marianne Rafen wrote:

Er der ikke en fejl i : UDTAGNINGSTIPS-2 (gælder i siderne på ryg- og forstykke) i forhold til jeres billeder? Der ser det ud som om der er taget ud efter sidste maske og ikke i den næst sidste maske? Her nu strikket hele kroppen og se det først nu. Så øv. Må så tage ind på ærmerne, så det passer, i næst sidste maske. Men for jo så ikke det mønster i opskriften.

05.07.2022 - 21:02

DROPS Design answered:

Hej Marianne, du tager ud med 1 omslag på hver side af 1ret-A.2-1ret. God fornøjelse!

06.07.2022 - 08:04

country flag Chiara wrote:

Are you sure about the 7 cm rib at the beginning? It looks a lot shorter in photographs.

17.12.2021 - 17:47

DROPS Design answered:

Dear Chiara, yes, it is 7 cm because as the pattern states at the very wnd, that ribbing at the neck should be folded over and sewn down. Happy Knitting!

18.12.2021 - 04:36

country flag Laurien Stegeman wrote:

Een over drop 215-16. Bij de derde regel bij het onderwerp Lijf : De regel brei in tricotsteek tot er 4 steken voor de eerste steek met de markeerdraad zijn. Mijn vraag is de markeerdraad van middenachter of ?????? Groetjes.Laurien.

02.08.2021 - 15:50

DROPS Design answered:

Dag Laurien,

Nee, dit betreft de markeerdraad die je vlak daarvoor hebt ingevoegd in de zijkant van het werk. Dit is nu het begin van de naald.

18.08.2021 - 19:46

country flag Laurien Stegeman wrote:

Heb een vraag:Ik snap het niet . Het gaat over \"Drops Design 215-16\": dat stukje van het lijf de 3e regel over tot er 4 steken.markeerdraad - de naald begint hier.\r\n\r\nEn daarna moet ik a2 breien.\r\n\r\nBedankt.Laurien.

26.07.2021 - 17:06

DROPS Design answered:

Dag Laurien,

Ja, dat klopt. Je breit eerst tot 4 steken voor de eerste steek met de markeerdraad. Dan begin je inderdaad met A.2 zoals aangegeven in de beschrijving.

19.08.2021 - 14:06

country flag Jian wrote:

Do you use two cable needles (small needles) for A.1 row 3? Many thanks!

20.05.2021 - 13:49

DROPS Design answered:

Dear Jian, just one is enough, when working the 7th symbol from diagram key, use first the cable needle there: slip 1 stitch on cable needle in front of piece, purl 1, knit 1 from cable needle => there is no stitch anymore on the cable needle, then knit 1, and use cable needle one more time: slip 1 stitch on a cable needle behind piece, knit 1, lift the innermost of the 3 knit stitches at the edge of right needle over the 2 outermost knit stitches so that stitch is around the other two (= 1 stitch decreased), purl 1 from cable needle => there is no stitch anymore on the cable needle. Hope this will help. Happy knitting!

20.05.2021 - 16:00

country flag Carol Ann Flaherty wrote:

My question is about row 3 in diagram A-1 L-LX. I am having a problem with the part that starts with: lift the innermost of the 3 knit sts at the edge of the right hand needle etc.. Do I pass the 3 sts off the rt needle onto the lefthand needle. add the 2 outermost sts onto the lefthand needle and pass the 3 sts over the 2 sts and then back onto the rt needle?

21.12.2020 - 11:18

DROPS Design answered:

Dear Mrs Flaherty, count 3 sts from the tip of right needle (= from the tip you have 2 sts from the small cable over 2 sts and the knit stitch from the first small cable, this knit stitch is the one you will pas over the last 2 knitted stitch. Happy knitting!

21.12.2020 - 14:14