
Popular categories
Looking for a yarn?


|
|||||||||||||||||||
Herringbone Hill Jacket |
|||||||||||||||||||
 |
 |
||||||||||||||||||
Knitted jacket in DROPS Sky and DROPS Kid-Silk. The piece is worked top down, with raglan, cables and Fisherman’s rib stitches. Sizes S - XXXL.
DROPS 215-3 |
|||||||||||||||||||
|
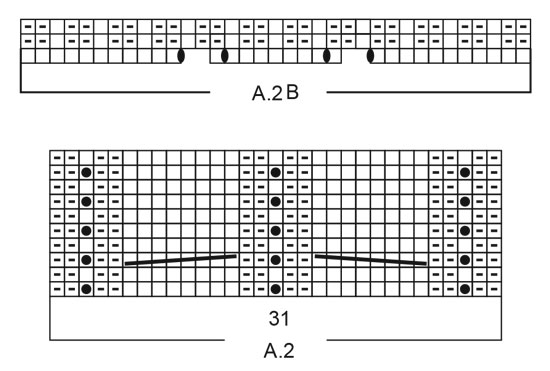
------------------------------------------------------- EXPLANATIONS FOR THE PATTERN: ------------------------------------------------------- RIDGE/GARTER STITCH (worked back and forth): Knit all rows. 1 ridge in height = Knit 2 rows. PATTERN: See diagrams A.1 to A.3. The diagrams show all rows in the pattern from the right side. INCREASE TIP (evenly spaced): To work out how to increase evenly, count the total number of stitches on the needle (e.g. 84 stitches) minus bands (e.g. 8 stitches) and divide the remaining stitches by the number of increases to be made (e.g. 27) = 2.8. In this example, increase by making 1 yarn over after alternately each 2nd and 3rd stitch. Do not increase on bands. On the next row work the yarn overs twisted to avoid holes. RAGLAN: All increases are worked from the right side! Increase 1 stitch on each side of the raglan-stitch, by making 1 yarn over (8 stitches increased on each increase-row). On the next row (wrong side) purl the yarn overs twisted to avoid holes. Then work the new stitches in stockinette stitch. DECREASE TIP (for sleeves): Decrease 1 stitch on either side of the marker thread as follows: Work until there are 3 stitches left before the marker thread, knit 2 together, knit 2 (marker thread sits between these 2 stitches), slip 1 stitch as if to knit, knit 1 and pass the slipped stitch over the knitted stitch. BINDING-OFF TIP: To avoid the bind-off edge being tight you can bind off with a larger size needle. If the edge is still tight, make 1 yarn over after approx. each 4th stitch at the same time as binding off; the yarn overs are bind off as normal stitches. BUTTONHOLES: Work buttonholes on right band (when garment is worn). Work from the right side when there are 3 stitches left on row as follows: Make 1 yarn over, knit 2 together and knit the last stitch. On the next row (wrong side) knit the yarn over to leave a hole. The first buttonhole is worked 1 cm = ⅜" below the neck. The other 4-4-4-5-5-5 buttonholes are worked with 8-9 cm = 3⅛"-3½" between each one. ------------------------------------------------------- START THE PIECE HERE: ------------------------------------------------------- JACKET – SHORT OVERVIEW OF THE PIECE: The neck and yoke are worked back and forth with circular needle from mid front and top down. The yoke is divided for body and sleeves and the body continued back and forth. The sleeves are worked in the round with short circular needle/double pointed needles, top down. NECK: Cast on 87-90-93-99-102-105 stitches (including 1 edge stitch on each side towards mid front) with circular needle size 4 mm = US 6 and 1 strand Sky and 1 strand Kid-Silk (= 2 strands). Purl 1 row (= wrong side). The next row is worked as follows from the right side: 1 edge stitch in GARTER STITCH – read description above, * knit 1, purl 2 *, work from *-* until there are 2 stitches left on the row, knit 1 and 1 edge stitch in garter stitch. Continue this rib for 10 cm = 4" (double neck). YOKE: When the rib is finished, change to circular needle size 5.5 mm = US 9 and work the next row as follows from the right side: Knit 1, knit the next 6 stitches together 2 and 2 (3 stitches decreased = 4 stitches for the band), knit 73-76-79-85-88-91 and increase 26-27-28-26-27-28 stitches evenly over these stitches – read INCREASE TIP, knit the next 6 stitches together 2 and 2, knit 1 (3 stitches decreased = 4 stitches for the band) = 107-111-115-119-123-127 stitches. Insert 1 marker after the band at the beginning of the row; the yoke is measured from this marker! Purl 1 row from the wrong side (yarn overs purled twisted and the bands worked in garter stitch). Now work pattern as follows: 4 band stitches in garter stitch, A.1 over the next 16 stitches, knit 2-3-4-5-6-7 (= left front piece), 1 yarn over, knit 1 (= raglan-stitch), 1 yarn over, knit 12 (= sleeve), 1 yarn over, knit 1 (= raglan-stitch), 1 yarn over, knit 2-3-4-5-6-7, A.2 over the next 31 stitches, knit 2-3-4-5-6-7 (= back piece), 1 yarn over, knit 1 (= raglan-stitch), 1 yarn over, knit 12 (= sleeve), 1 yarn over, knit 1 (= raglan-stitch), 1 yarn over, knit 2-3-4-5-6-7, A.3 over the next 16 stitches, 4 band stitches in garter stitch (= right front piece). AT THE SAME TIME work BUTTONHOLE on the right band – read description above. You have now increased 1 stitch to RAGLAN on each side of all the raglan-stitches in the transitions between the body and sleeves – read description above. Continue this pattern back and forth and increase to raglan every 2nd row a total of 18-20-22-23-27-29 times = 251-271-291-303-339-359 stitches. REMEMBER THE KNITTING GAUGE! Continue with the pattern without further increases to raglan until the yoke measures 21-24-26-28-31-35 cm = 8¼"-9½"-10¼"-11"-12¼"-13¾" from the marker. Now divide the yoke for the body and sleeves on the next row from the wrong side as follows: Work the first 41-44-47-49-54-57 stitches (= right front piece), place the next 48-52-56-58-66-70 stitches on a thread for the sleeve, cast on 6-6-6-8-8-10 new stitches on the needle (= in side under the sleeve), work the next 73-79-85-89-99-105 stitches (= back piece), place the next 48-52-56-58-66-70 stitches on a thread for the sleeve, cast on 6-6-6-8-8-10 new stitches on the needle (= in side under the sleeve), work the last 41-44-47-49-54-57 stitches (= left front piece). Body and sleeves are finished separately. THE PIECE IS NOW MEASURED FROM HERE. BODY: = 167-179-191-203-223-239 stitches. Continue back and forth with 4 band stitches in garter stitch on each side, patterns A.1, A.2 and A.3 as before and stockinette stitch over the other stitches. Continue working until the piece measures 19-18-18-18-17-15 cm = 7½"-7"-7"-7"-6¾"-6" from the division – adjust so you finish on row 5 in A.1, A.2 and A.3. Change to circular needle size 4 mm = US 6. Now work as follows from the wrong side: 4 band stitches in garter stitch, A.3b over the next 16 stitches (2 stitches increased = 18 stitches), purl 48-54-60-66-76-84 and increase 10-10-13-13-15-16 stitches evenly over these stitches (= 58-64-73-79-91-100 stitches), A.2b over the next 31 stitches (4 stitches increased = 35 stitches), purl 48-54-60-66-76-84 stitches and increase 10-10-13-13-15-16 stitches evenly over these stitches (= 58-64-73-79-91-100 stitches), A.1b over the next 16 stitches (2 stitches increased = 18 stitches), 4 band stitches in garter stitch. There are 195-207-225-237-261-279 stitches on the needle. Now work rib (knit 1, purl 2) inside the 4 band stitches in garter stitch on each side and continue with A.1b over A.1, A.2b over A.2 and A.3b over A.3 – first row from the right side. NOTE! There should now be knit 1, purl 2 over all stitches between the bands. When the rib measures 10 cm = 4", bind off with knit over knit and purl over purl – read BINDING-OFF TIP. The jacket measures approx. 54-56-58-60-62-64 cm = 21¼"-22"-22¾"-23⅝"-24⅜"-25¼" from the shoulder down. SLEEVE: Place the 48-52-56-58-66-70 stitches from the thread on the one side of the piece on double pointed needles/short circular needle size 5.5 mm = US 9 and knit up 1 stitch in each of the new stitches under the sleeve = 54-58-62-66-74-80 stitches. Insert a marker thread in the middle of the new stitches (= 3-3-3-4-4-5 new stitches on each side of the thread). Work stockinette stitch in the round. When the sleeve measures 4 cm = 1½" from the division, decrease 2 stitches under the sleeve – read DECREASE TIP-1. Decrease like this every 3½-3-2½-2-1½-1 cm = 1¼"-1⅛"-⅞"-¾"-½"-⅜" a total of 9-10-11-12-15-17 times = 36-38-40-42-44-46 stitches. When the sleeve measures 34-32-30-29-26-23 cm = 13⅜"-12½"-11¾"-11⅜"-10¼"-9" (shorter measurements in larger sizes due to wider neck and longer yoke) knit 1 round where you increase 9-7-8-9-7-8 stitches = 45-45-48-51-51-54 stitches. Change to double pointed needles size 4 mm = US 6 and work rib (= knit 1, purl 2) for 6 cm = 2⅜". Bind off with knit over knit and purl over purl. The sleeve measures approx. 40-38-36-35-32-29 cm = 15¾"-15"-14¼"-13¾"-12½"-11⅜" from the division. Work the other sleeve in the same way. ASSEMBLY: Fold the neck to the inside and sew down. To avoid the neck being tight and rolling outwards, it is important the seam is elastic. Sew the buttons onto the left band. |
|||||||||||||||||||
Diagram explanations |
|||||||||||||||||||
|
|||||||||||||||||||
|
|||||||||||||||||||

|
|||||||||||||||||||

|
|||||||||||||||||||
|
Have you made this or any other of our designs? Tag your pictures in social media with #dropsdesign so we can see them! Do you need help with this pattern?You'll find tutorial videos, a Comments/Questions area and more by visiting the pattern on garnstudio.com. © 1982-2024 DROPS Design A/S. We reserve all rights. This document, including all its sub-sections, has copyrights. Read more about what you can do with our patterns at the bottom of each pattern on our site. |
|||||||||||||||||||


With over 40 years in knitting and crochet design, DROPS Design offers one of the most extensive collections of free patterns on the internet - translated to 17 languages. As of today we count 304 catalogs and 11422 patterns - 11417 of which are translated into English (US/in).
We work hard to bring you the best knitting and crochet have to offer, inspiration and advice as well as great quality yarns at incredible prices! Would you like to use our patterns for other than personal use? You can read what you are allowed to do in the Copyright text at the bottom of all our patterns. Happy crafting!
Comments / Questions (16)
Ich bitte Sie, die angegebene Maschenprobe zu kontrollieren. Die Nadelstärke 5,5 kann unmöglich für 15M und 17 R passen. Bei den empfohlenen Garnkombinationen steht für Sky und Kid Silk folgendes: "Die Maschenprobe für diese Kombination ist wie folgt: 14 Maschen x 22 Reihen = 10 x 10 cm, mit Nadel Nr. 7, was perfekt für unsere Anleitungen der Garngruppe D ist." Da muß doch ein Irrtum vorliegen. Gruppe C oder D ? Was stimmt ?
29.06.2021 - 11:01DROPS Design answered:
Liebe Undine, ja nach der gewünschte Textur wird die Maschenprobe unterschiedlich sein, bei diesem Modell haben die Designerinnen so entschieden, mit einer Maschenprobe von 15 Maschen = 10 cm zu stricken, ; Hier lesen Sie mehr über die Maschenprobe. Viel Spaß beim stricken!
29.06.2021 - 15:43Do you have any suggestions for colour mixes for the two yarns or should they be the same shade? Are there any illustrations anywhere?
08.05.2021 - 18:43DROPS Design answered:
Dear Jennifer, it is up to you, which you chose. If You choose similar colors, the result will be more unicolored, if you choose contrasting colors, the result will be more heatherer, slitghtly tweedy effect. You can see more about the DROPS Sky+ Kid Silk combo HERE. Happy Knitting!
08.05.2021 - 19:05Beste Drops Design, ik heb een probleem met het patroon van de Herringbone Hill Jacket na de boord. Je moet dan meerderen voor de raglan en tgltijd het patroon in breien. De 1e en 2e nld is geen probleem maar daarna heb je meer steken op de naald en dan kom je met naald 3 niet goed uit. Als ik de aanwijzingen aanhoud komt het patroon niet meer uit omdat je meer steken hebt. Hoe doe je dat? Graag hoor ik van u. Hgr, Maria
31.10.2020 - 09:55DROPS Design answered:
Dag Maria,
Je breit steeds A.1 boven A.1, A.2 boven A.2 etc. De gemeerderde raglansteken worden in tricotsteek gebreid.
03.11.2020 - 13:50Bij mij klopt de stekenverhouding niet, terwijl ik de aangeraden wol en bijbehorende pennen bij het patroon gebruik. Ik brei niet bijzonder strak of los, dus ik snap niet hoe dat kan. Bij de aanwijzingen zie ik staan dat de naalddikte slechts een richtlijn is en als je te veel steken hebt op de 10 cm : dan moet je dikkere naalden gebruiken en bij te weinig dunnere. Dat moet toch precies andersom zijn? Of vergis ik me nu? Hoor het graag.
20.10.2020 - 22:14DROPS Design answered:
Dag Maria,
Als je te veel steken op 10 cm hebt, moet je dikkere naalden gebruiken en opnieuw een proeflapje maken, totdat je de juiste stekenverhouding hebt. Het juiste aantal steken in de breedte is daarbij het belangrijkst. Het is normaal dat je stekenverhouding afwijkt, want iedereen breit anders. Zelf moet ik bijvoorbeeld altijd dunnere naalden hebben.
21.10.2020 - 10:41Bonjour, je souhaiterai faire ce gilet dans une laine câblée, mais étant donné que dans le modèle deux fils sont utilisés je ne suis pas sûre de pouvoir me fier à l outil de conversion proposé. Merci par avance!
19.09.2020 - 07:10DROPS Design answered:
Bonjour Marguerite, vous trouverez plus d'infos sur les alternatives ici - en cas de doute, merci de bien vouloir contacter le magasin où vous avez acheté votre laine, on saura vous conseiller et vous assister. Bon tricot!
21.09.2020 - 08:34Hallo. Opmerking voor alle Drops modellen... Zoveel mooie wol, zoveel mooie modellen maar helaas altijd te breien van boven naar onder. Ik kan nooit geen wol kopen en een model breien van Drops om die reden. Wij zijn gewoon om met twee lange breinaalden van onder naar boven te breien. Het zou goed zijn om modellen ook op die manier te beschrijven. Mvg, Carine.
18.09.2020 - 08:43DROPS Design answered:
Dag Carine,
Helaas zijn niet alle patronen geschikt om met rechte naalden te breien, met name de patronen met een ronde pas, waarbij het ingebreide patroon helemaal in de rondte doorloopt. We zijn in Nederland inderdaad gewend om met rechte naalden te breien, deze patronen komen oorspronkelijk uit Noorwegen. Er zitten trouwens wel patronen bij die met rechte naalden gebreid kunnen worden. Dit zijn vaak de patronen zonder de hierboven beschreven ronde pas. We hebben ook een uitleg gemaakt hoe je een patroon aan kunt passen om met rechte naalden te breien. Deze uitleg vind je hier
18.11.2020 - 22:48