DROPS Kid-Silk uni colour 75% Mohair, 25% Silk |
25.00 RON /25g |
Order |
Clicking the ORDER button will redirect you to Andrele website
The yarn cost is calculated from the pattern’s smallest size and the yarn’s cheapest product type. Looking for an even better price? You might find it on the DROPS Deals!
-------------------------------------------------------
Alternative Yarn – See how to change yarns here
Yarn Groups A to F – Use the same pattern and change the yarn here
Yarn usage using an alternative yarn – Use our yarn converter here
-------------------------------------------------------
DROPS Kid-Silk uni colour 75% Mohair, 25% Silk 25.00 RON /25g Order |
Clicking the ORDER button will redirect you to Andrele website
The yarn cost is calculated from the pattern’s smallest size and the yarn’s cheapest product type. Looking for an even better price? You might find it on the DROPS Deals!
= knit from right side, purl from wrong side | |
= purl from right side, knit from wrong side | |
= insert the right needle through the stitch from the previous row, knit 1 and slip the stitch from the needle (= Fisherman’s rib stitch) | |
= place 4 stitches on cable needle behind piece, knit 4, knit 4 from cable needle | |
= place 4 stitches on cable needle in front of piece, knit 4, knit 4 from cable needle | |
= between 2 stitches make 1 yarn over; on the next row work the yarn over twisted to avoid a hole |
Each of our patterns has specific tutorial videos to help you.
These step-by-step tutorials might also help you:
Why is the knitting/crochet tension so important?
Knitting tension is what determines the final measurements of your work, and is usually measured per 10 x 10 cm. It is provided like so: number of stitches in width x number of rows in height - eg: 19 stitches x 26 rows = 10 x 10 cm.
The knitting tension is very individual; some people knit/crochet loosely while others work tightly. You adjust the knitting tension with the needle size, which is why the suggested needle size is only meant as a guide! You need to adjust this (up or down) to ensure that YOUR knitting tension matches the knitting tension provided in the pattern. If you work with a different knitting tension than provided you will have a different yarn consumption, and your work will have different measurements than what the pattern suggests.
The knitting tension also determines which yarns can replace each other. As long as you achieve the same knitting tension you can replace one yarn with another.
See DROPS lesson: How to measure your tension/gauge
See DROPS video: How to make a gauge tension swatch
How do I know how many balls of yarn I need?
The required amount of yarn is provided in grams, eg: 450 g. To calculate how many balls you’ll need you first need to know how many grams are in 1 ball (25g, 50g or 100g). This information is available if you click on the individual yarn quality on our pages. Divide the amount required with the amount of each ball. For example, if each ball is 50g (the most common amount), the calculation will be as follows: 450 / 50 = 9 balls.
Can I use a different yarn than what the pattern suggests?
The important thing when changing from one yarn to another is that the knitting/crochet tension remains the same. This is so that the measurements of the finished piece will be the same as on the sketch provided. It is easier to achieve the same knitting tension using yarns from the same yarn group. It is also possible to work with multiple strands of a thinner yarn to achieve the knitting tension of a thicker one. Please try our yarn converter. We recommend you to always work a test swatch.
Please NOTE: when changing yarn the garment might have a different look and feel to the garment in the photo, due to individual properties and qualities of each yarn.
See DROPS lesson: Can I use a different yarn than the one mentioned in the pattern?
What are the yarn groups?
All our yarns are categorised into yarn groups (from A to F) according to thickness and knitting tension – group A contains the thinnest yarns and group F the thickest. This makes it easier for you to find alternative yarns to our patterns, should you wish to switch yarn. All yarns within the same group have a similar knitting tension and can easily replace each other. However, different yarn qualities have different structures and properties which will give the finished work a unique look and feel.
How do I use the yarn calculator?
At the top of all our patterns you’ll find a link to our yarn calculator, which is a helpful tool should you wish to use a different yarn than suggested. By filling in the yarn quality you wish to replace, the amount (in your size) and number of strands, the calculator will present good alternative yarns with the same knitting tension. Additionally it will tell you how much you’ll require in the new qualities and whether you’ll need to work with multiple strands. Most skeins are 50g (some are 25g or 100g).
If the pattern is worked with multiple colours, every colour will have to be calculated separately. Similarly, if the pattern is worked with several strands of different yarns (for example 1 strand Alpaca and 1 strand Kid-Silk) you will have to find alternatives for each, individually.
Why do you show discontinued yarns in the patterns?
Since different yarns have different qualities and textures we have chosen to keep the original yarn in our patterns. However, you can easily find options among our available qualities by using our yarn calculator, or simply pick a yarn from the same yarn group.
It is possible that some retailers still have discontinued yarns in stock, or that someone has a few skeins at home that they would like to find patterns for.
The yarn calculator will provide both alternative yarn as well as required amount in the new quality.
What size should I knit?
If you think it's hard to decide what size to make, it can be a good idea to measure a garment you own already and like the size of. Then you can pick the size by comparing those measures with the ones available in the pattern's size chart.
You'll find the size chart at the bottom of the pattern.
See DROPS lesson: How to read size chart
Why do I get the wrong knitting tension with the suggested needle size?
The needle size provided in the pattern serves only as a guide, the important thing is to follow the knitting tension. And since knitting tension is very individual, you will have to adjust the needle size to ensure that YOUR tension is the same as in the pattern – maybe you’ll have to adjust 1, or even 2 needle sizes, up or down to achieve the correct tension. For this, we recommend that you work test swatches.
Should you work with a different knitting tension than the one provided, the measurements of the finished garment might deviate from the measurement sketch.
See DROPS lesson: How to measure your tension/gauge
See DROPS video: How to make a tension/gauge swatch
Why is the pattern worked top-down?
Working a garment top-down provides more flexibility and room for personal adjustment. For example it is easier to try the garment on while working, as well as making adjustments to length of yoke and shoulder caps.
The instructions are carefully explaining every step, in the correct order. Diagrams are adjusted to the knitting direction and are worked as usual.
How do I work according to a knitting diagram?
The diagram depicts all rows/rounds, and every stitch seen from the right side. It is read from bottom to top, from right to left. 1 square = 1 stitch.
When working back and forth, every other row is worked from the right side and every other row is worked from the wrong side. When working from the wrong side, the diagram will have to be worked reversed: from left to right, knit stitches are purled, purl stitches are knit etc.
When working in the round every round is worked from the right side and the diagram are worked from right to left on all rounds.
See DROPS lesson: How to read knitting diagrams
How do I work according to a crochet diagram?
The diagram depicts all rows/rounds, and every stitch seen from the right side. It is worked from bottom to top, from right to left.
When working back and forth every other row is worked from the right side: from right to left and every other row is worked from the wrong side: from left to right.
When working in the round, every row in the diagram are worked from the right side, from right to left.
When working a circular diagram you start in the middle and work your way outwards, counter clockwise, row by row.
The rows usually start with a given number of chain stitches (equivalent to the height of the following stitch), this will either be depicted in the diagram or explained in the pattern.
See DROPS lesson: How to read crochet diagrams
How do I work several diagrams simultaneously on the same row/round?
Instructions for working several diagrams after each other on the same row/round, will often be written like so: “work A.1, A.2, A.3 a total of 0-0-2-3-4 times". This means you work A.1 once, then A.2 is worked once, and A.3 is repeated (in width) the number of times provided for your size – in this case like so: S = 0 times, M = 0 times, L=2 times, XL= 3 times and XXL = 4 times.
The diagrams are worked as usual: begin with the first row in A.1, then work the first row in A.2 etc.
See DROPS lesson: How to read knitting diagrams
See DROPS lesson: How to read crochet diagrams
Why are the sleeves shorter in larger sizes?
The total width of the garment (from wrist-to-wrist) will be larger in the larger sizes, despite the actual sleeves being shorter. The larger sizes have longer sleeve caps and wider shoulders, so there will be a good fit in all sizes.
Where on the garment is the length measured?
The measurement sketch/schematic drawing provides information regarding the full length of the garment. If it’s a jumper or a jacket the length is measured from the highest point on the shoulder closest to the neckline, and straight down to the bottom of the garment. It is NOT measured from the tip of shoulder. Similarly, the length of yoke is measured from the highest point on the shoulder and down to where yoke is split into body and sleeves.
On a jacket measures are never taken along bands, unless specifically stated. Always measure inside band stitches when measuring the length.
See DROPS lesson: How to read a schematic drawing
What is a repeat?
Diagrams are often repeated on the round or in height. 1 repeat is the diagram the way it appears in the pattern. If it says to work 5 repeats of A.1 in the round, then you work A.1 a total of 5 times after/next to each other in the round. If it says to work 2 repeats of A.1 vertically/in height you work the entire diagram once, then begin again at the start and work the entire diagram one more time.
Why does the piece start with more chain stitches than it’s worked with?
Chain stitches are slightly narrower than other stitches and to avoid working the cast-on edge too tight, we simply chain more stitches to begin with. The stitch count will be adjusted on the following row to fit the pattern and measurement sketch.
Why increase before the rib edge when the piece is worked top-down?
The rib edge is more elastic and will contract slightly compared to, for example, stocking stitch. By increasing before the rib edge, you avoid a visible difference in width between the rib edge and the rest of the body.
Why increase in the cast-off edge?
It’s very easy to cast off too tightly, and by making yarn overs while casting off (and simultaneously casting these off) you avoid a too tight cast off edge.
See DROPS video: How to bind off with yarn overs (yo)
How do I increase/decrease on every 3rd and 4th row/round alternately?
To achieve an even increase (or decrease) you can increase on, for example: every 3rd and 4th row alternately, like so: work 2 rows and increase on the 3rd row, work 3 rows and increase on the 4th. Repeat this until the increase is complete.
See DROPS lesson: Increase or decrease 1 st on every 3rd and 4th row alternately
How can I work a jacket in the round instead of back and forth?
Should you prefer to work in the round instead of back and forth, you may of course adjust the pattern. You’ll need to add steeks mid-front (usually 5 stitches), and follow the instructions. When you would normally turn and work from the wrong side, simply work across the steek and continue in the round. At the end you’ll cut the piece open, pick up stitches to work bands, and cover the cut edges.
See DROPS video: How to knit steeks and cut open
Can I work a jumper back and forth instead of in the round?
Should you prefer to work back and forth instead of in the round, you may of course adjust the pattern so you work the pieces separately and then assemble them at the end. Divide the stitches for the body in 2, add 1 edge stitch in each side (for sewing) and work the front and back pieces separately.
See DROPS lesson: Can I adapt a pattern for circular needles into straight needles?
Why is the pattern slightly different than what I see in the photo?
Pattern repeats can vary slightly in the different sizes, in order to get the correct proportions. If you’re not working the exact same size as the garment in the photo, yours might deviate slightly. This has been carefully developed and adjusted so that the complete impression of the garment is the same in all sizes.
Make sure to follow instructions and diagrams for your size!
How do I make a women’s size garment into a men’s size one?
If you have found a pattern you like which is available in women’s size it’s not very difficult to convert it to men’s size. The biggest difference will be the length of sleeves and body. Start working on the women size that you think would fit across the chest. The additional length will be worked right before you cast off for the armhole/sleeve cap. If the pattern is worked top-down you can add the length right after the armhole or before the first decrease on sleeve.
Regarding additional yarn amount, this will depend on how much length you add, but it is better with a skein too many than too few.
How do I prevent a hairy garment from shedding?
All yarns will have excess fibres (from production) that might come off as lint or shedding. Brushed yarns (ie hairier yarns) have more of these loose, excess fibres, causing more shedding.
Shedding also depends on what is worn under or over the garment, and whether this pulls at the yarn fibres. It’s therefore not possible to guarantee that there will be no shedding
Below are some tips on how to get the best result when working with hairier yarns:
1. When the garment is finished (before you wash it) shake it vigorously so the looser hairs come off. NOTE: do NOT use a lint roller, brush or any method that pulls at the yarn.
2. Place the garment in a plastic bag and put it in your freezer - the temperature will cause the fibres to become less attached to each other, and excess fibres will come off easier.
3. Leave in the freezer for a few hours before taking it out and shaking it again.
4. Wash the garment according to the instructions on the yarn label.
Why does my garment pill?
Pilling is a natural process that happens to even the most exclusive of fibers. It's a natural sign of wear and tear that is hard to avoid, and that is most visible in high friction areas of your garment like a sweater's arms and cuffs.
You can make your garment look as new by removing the pilling, using a fabric comb or a pill/lint remover.
Herringbone Hill Jacket |
|||||||||||||||||||
|
|
||||||||||||||||||
Knitted jacket in DROPS Sky and DROPS Kid-Silk. The piece is worked top down, with raglan, cables and Fisherman’s rib stitches. Sizes S - XXXL.
DROPS 215-3 |
|||||||||||||||||||
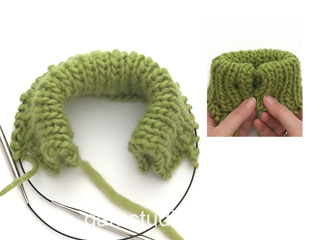
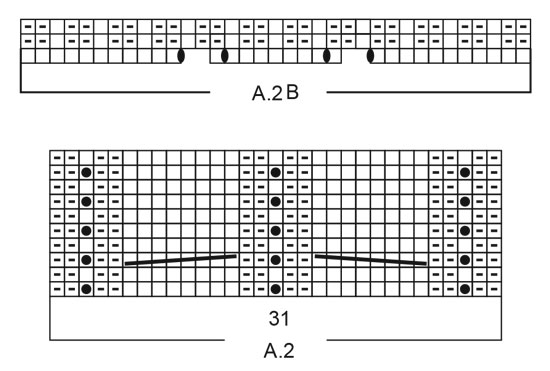
------------------------------------------------------- EXPLANATIONS FOR THE PATTERN: ------------------------------------------------------- RIDGE/GARTER STITCH (worked back and forth): Knit all rows. 1 ridge in height = Knit 2 rows. PATTERN: See diagrams A.1 to A.3. The diagrams show all rows in the pattern from the right side. INCREASE TIP (evenly spaced): To work out how to increase evenly, count the total number of stitches on the needle (e.g. 84 stitches) minus bands (e.g. 8 stitches) and divide the remaining stitches by the number of increases to be made (e.g. 27) = 2.8. In this example, increase by making 1 yarn over after alternately each 2nd and 3rd stitch. Do not increase on bands. On the next row work the yarn overs twisted to avoid holes. RAGLAN: All increases are worked from the right side! Increase 1 stitch on each side of the raglan-stitch, by making 1 yarn over (8 stitches increased on each increase-row). On the next row (wrong side) purl the yarn overs twisted to avoid holes. Then work the new stitches in stocking stitch. DECREASE TIP (for sleeves): Decrease 1 stitch on either side of the marker thread as follows: Work until there are 3 stitches left before the marker thread, knit 2 together, knit 2 (marker thread sits between these 2 stitches), slip 1 stitch as if to knit, knit 1 and pass the slipped stitch over the knitted stitch. CASTING-OFF TIP: To avoid the cast-off edge being tight you can cast off with a larger size needle. If the edge is still tight, make 1 yarn over after approx. each 4th stitch at the same time as casting off; the yarn overs are cast off as normal stitches. BUTTONHOLES: Work buttonholes on right band (when garment is worn). Work from the right side when there are 3 stitches left on row as follows: Make 1 yarn over, knit 2 together and knit the last stitch. On the next row (wrong side) knit the yarn over to leave a hole. The first buttonhole is worked 1 cm below the neck. The other 4-4-4-5-5-5 buttonholes are worked with 8-9 cm between each one. ------------------------------------------------------- START THE PIECE HERE: ------------------------------------------------------- JACKET – SHORT OVERVIEW OF THE PIECE: The neck and yoke are worked back and forth with circular needle from mid front and top down. The yoke is divided for body and sleeves and the body continued back and forth. The sleeves are worked in the round with short circular needle/double pointed needles, top down. NECK: Cast on 87-90-93-99-102-105 stitches (including 1 edge stitch on each side towards mid front) with circular needle size 4 mm and 1 strand Sky and 1 strand Kid-Silk (= 2 strands). Purl 1 row (= wrong side). The next row is worked as follows from the right side: 1 edge stitch in GARTER STITCH – read description above, * knit 1, purl 2 *, work from *-* until there are 2 stitches left on the row, knit 1 and 1 edge stitch in garter stitch. Continue this rib for 10 cm (double neck). YOKE: When the rib is finished, change to circular needle size 5.5 mm and work the next row as follows from the right side: Knit 1, knit the next 6 stitches together 2 and 2 (3 stitches decreased = 4 stitches for the band), knit 73-76-79-85-88-91 and increase 26-27-28-26-27-28 stitches evenly over these stitches – read INCREASE TIP, knit the next 6 stitches together 2 and 2, knit 1 (3 stitches decreased = 4 stitches for the band) = 107-111-115-119-123-127 stitches. Insert 1 marker after the band at the beginning of the row; the yoke is measured from this marker! Purl 1 row from the wrong side (yarn overs purled twisted and the bands worked in garter stitch). Now work pattern as follows: 4 band stitches in garter stitch, A.1 over the next 16 stitches, knit 2-3-4-5-6-7 (= left front piece), 1 yarn over, knit 1 (= raglan-stitch), 1 yarn over, knit 12 (= sleeve), 1 yarn over, knit 1 (= raglan-stitch), 1 yarn over, knit 2-3-4-5-6-7, A.2 over the next 31 stitches, knit 2-3-4-5-6-7 (= back piece), 1 yarn over, knit 1 (= raglan-stitch), 1 yarn over, knit 12 (= sleeve), 1 yarn over, knit 1 (= raglan-stitch), 1 yarn over, knit 2-3-4-5-6-7, A.3 over the next 16 stitches, 4 band stitches in garter stitch (= right front piece). AT THE SAME TIME work BUTTONHOLE on the right band – read description above. You have now increased 1 stitch to RAGLAN on each side of all the raglan-stitches in the transitions between the body and sleeves – read description above. Continue this pattern back and forth and increase to raglan every 2nd row a total of 18-20-22-23-27-29 times = 251-271-291-303-339-359 stitches. REMEMBER THE KNITTING TENSION! Continue with the pattern without further increases to raglan until the yoke measures 21-24-26-28-31-35 cm from the marker. Now divide the yoke for the body and sleeves on the next row from the wrong side as follows: Work the first 41-44-47-49-54-57 stitches (= right front piece), place the next 48-52-56-58-66-70 stitches on a thread for the sleeve, cast on 6-6-6-8-8-10 new stitches on the needle (= in side under the sleeve), work the next 73-79-85-89-99-105 stitches (= back piece), place the next 48-52-56-58-66-70 stitches on a thread for the sleeve, cast on 6-6-6-8-8-10 new stitches on the needle (= in side under the sleeve), work the last 41-44-47-49-54-57 stitches (= left front piece). Body and sleeves are finished separately. THE PIECE IS NOW MEASURED FROM HERE. BODY: = 167-179-191-203-223-239 stitches. Continue back and forth with 4 band stitches in garter stitch on each side, patterns A.1, A.2 and A.3 as before and stocking stitch over the other stitches. Continue working until the piece measures 19-18-18-18-17-15 cm from the division – adjust so you finish on row 5 in A.1, A.2 and A.3. Change to circular needle size 4 mm. Now work as follows from the wrong side: 4 band stitches in garter stitch, A.3b over the next 16 stitches (2 stitches increased = 18 stitches), purl 48-54-60-66-76-84 and increase 10-10-13-13-15-16 stitches evenly over these stitches (= 58-64-73-79-91-100 stitches), A.2b over the next 31 stitches (4 stitches increased = 35 stitches), purl 48-54-60-66-76-84 stitches and increase 10-10-13-13-15-16 stitches evenly over these stitches (= 58-64-73-79-91-100 stitches), A.1b over the next 16 stitches (2 stitches increased = 18 stitches), 4 band stitches in garter stitch. There are 195-207-225-237-261-279 stitches on the needle. Now work rib (knit 1, purl 2) inside the 4 band stitches in garter stitch on each side and continue with A.1b over A.1, A.2b over A.2 and A.3b over A.3 – first row from the right side. NOTE! There should now be knit 1, purl 2 over all stitches between the bands. When the rib measures 10 cm, cast off with knit over knit and purl over purl – read CASTING-OFF TIP. The jacket measures approx. 54-56-58-60-62-64 cm from the shoulder down. SLEEVE: Place the 48-52-56-58-66-70 stitches from the thread on the one side of the piece on double pointed needles/short circular needle size 5.5 mm and knit up 1 stitch in each of the new stitches under the sleeve = 54-58-62-66-74-80 stitches. Insert a marker thread in the middle of the new stitches (= 3-3-3-4-4-5 new stitches on each side of the thread). Work stocking stitch in the round. When the sleeve measures 4 cm from the division, decrease 2 stitches under the sleeve – read DECREASE TIP-1. Decrease like this every 3½-3-2½-2-1½-1 cm a total of 9-10-11-12-15-17 times = 36-38-40-42-44-46 stitches. When the sleeve measures 34-32-30-29-26-23 cm (shorter measurements in larger sizes due to wider neck and longer yoke) knit 1 round where you increase 9-7-8-9-7-8 stitches = 45-45-48-51-51-54 stitches. Change to double pointed needles size 4 mm and work rib (= knit 1, purl 2) for 6 cm. Cast off with knit over knit and purl over purl. The sleeve measures approx. 40-38-36-35-32-29 cm from the division. Work the other sleeve in the same way. ASSEMBLY: Fold the neck to the inside and sew down. To avoid the neck being tight and rolling outwards, it is important the seam is elastic. Sew the buttons onto the left band. |
|||||||||||||||||||
Diagram explanations |
|||||||||||||||||||
|
|||||||||||||||||||
Have you made this or any other of our designs? Tag your pictures in social media with #dropsdesign so we can see them! Do you need help with this pattern?You'll find tutorial videos, a Comments/Questions area and more by visiting the pattern on garnstudio.com. © 1982-2024 DROPS Design A/S. We reserve all rights. This document, including all its sub-sections, has copyrights. Read more about what you can do with our patterns at the bottom of each pattern on our site. |
With over 40 years in knitting and crochet design, DROPS Design offers one of the most extensive collections of free patterns on the internet - translated to 17 languages. As of today we count 304 catalogues and 11422 patterns - 11422 of which are translated into English (UK/cm).
We work hard to bring you the best knitting and crochet have to offer, inspiration and advice as well as great quality yarns at incredible prices! Would you like to use our patterns for other than personal use? You can read what you are allowed to do in the Copyright text at the bottom of all our patterns. Happy crafting!
Comments / Questions (16)
Julia wrote:
I like the white sky and light beige kid silk combination but am wondering whether there are there any other color combinations of these two yarns that you can recommend? I have trouble judging from the online color choices. Perhaps something a bit darker. Thanks.
03.11.2023 - 04:50DROPS Design answered:
Dear Julia, you will find some more example of yarn combinations of Sky and Kid-Silk at the bottom of the shadecardbut your DROPS store will be able to suggest you even more combination, do not hesitate to contact them even per mail or telephone. Happy knitting!
03.11.2023 - 06:51Jenny Douglas wrote:
My question is about the raglan stitch. It it aleays the same stitch? If I divide the work into sections, there are 14 stitches in the sleeve to start with. After the first row there is yo, 1, yo, 12, yo, 1, yo. So there are 16 stitches after the purl row. On the third row, Should I yo, k1, yo, k14, yo, k1, yo Or k1, yo, k1, yo, k12, yo, k1, yo, k1 . ? Do the raglan stitches stay at the edge of the section and the middle increase, or do the middle stitches stay at 12.?
11.12.2022 - 20:27DROPS Design answered:
Dear Jenny, after the first increase, there will be 14 stitches in the sleeve. The raglan stitch is always 1 stitch that is worked on top of the previous raglan stitch. So you need to work: yo, k1, yo, k14, yo, k1, yo. Happy knitting!
11.12.2022 - 23:14Pia Myrlund wrote:
Kan man erstatte Drops Sky med Drops Soft Tweed, og vil jakken så blive mere "fast" og holde facon
17.08.2022 - 08:01DROPS Design answered:
Hei Pia. Både DROPS Sky og DROPS Soft Tweed tilhører samme garngruppe og kan brukes om hverandre. Soft Tweed`n vil nok gjøre at fasongen holder seg litt bedre da den er mer formsterk enn Sky. Du vil nok bruke mer garn enn Sky, da Soft Tweed har en kortere løpelengde. Sjekk ut vår Garnkalkulator (til høyre for bildet) og den vil regne ut hvor mye garn du trenger i den str. du skal strikke. Se også på garnsiden til Soft Tweed, scroll ned og se/les litt om DROPS Soft Tweed + DROPS Kid-Silk under Tips&Hjelp. God Fornøyelse!
22.08.2022 - 09:29Christine wrote:
Bonjour, Est-ce que dans cet ouvrage "gilet" ou veste, aig. circulaires, il y a des "endroit" et des "envers" parce que l'on fait des aller-retour, parce que l'ouvrage est ouvert devant. Autrement dit, l'on retourne l'ouvrage ? C'est la première fois que je ferais des torsades ; alors il serait préférable que je tricote le pull ? Merci par avance.
02.02.2022 - 04:15DROPS Design answered:
Bonjour Christine, ce gilet se tricote effectivement en rangs = en allers et retours, autrement dit alternativement sur l'endroit et sur l'envers - cette vidéo montre comment tricoter en allers et retours sur aiguille circulaire, cela pourra peut-être vous aider. Bon tricot!
02.02.2022 - 08:15Line wrote:
Bonjour Quand vous dites de monter 93 mailles ( y compris 1 maille lisière de chaque côté) Est-ce que vous voulez dire plus 2 = 95 mailles Merci
30.12.2021 - 19:37DROPS Design answered:
Bonsoir Line, vous devez monter 93 mailles (1 maille lisiere + 91 mailles + 1 maille lisiere). Bon tricot!
30.12.2021 - 19:57Line wrote:
Bonjour, Quand vous dites de monter 93 mailles (y compris 1 maille lisière de chaque côté) Est-ce que ça veut dire plus 2 mailles = 95 mailles. ? Merci
30.12.2021 - 19:34DROPS Design answered:
Bonjour Line, les mailles lisières sont comprises dans les 93 mailles et ne sont pas à ajouter, montez 93 mailles (et 2 d'entre elles seront les mailles lisières). Bon tricot!
03.01.2022 - 14:25Bulat Erzsébet wrote:
Kedves Joanette! Eltévesztettem a nevét az első levelemben... Nagyon sajnálom! 🤭 🙂
07.11.2021 - 10:06Bulat Erzsébet wrote:
Kedves Katherine! Nagyon szeretném megkötni ezt a kardigánt,de nem található a minta leírása. Segitség! 🙂 Köszönöm!
06.11.2021 - 13:59Katherine wrote:
Hello! This pattern is so beautiful and fun to make! I have 2 questions about it. 1. When it gives a total stitch count is that including the bands? For example I am making a size small so when it says you should have 251 stitches after the yoke increase, is this including the bands? 2. I forgot to place a stitch marker where it said so can i just measure the length of the yoke from the end of the ribbing for the neckline? Thank you!!
20.09.2021 - 14:20DROPS Design answered:
Dear Katherine, yes the stitches for the buttonbands are included in the given stitchnumber. The marker for measuring should have been put in the first row after the ribbing of the neck, so you can add it later, or make your measurments from that point. Happy Stitching!
20.09.2021 - 14:31Undine wrote:
Aber 15 M... das ist mit Nadelstärke 5,5 unmöglich !!!
29.06.2021 - 16:58