
Popular categories
Looking for a yarn?


|
|||||||||||||||||||||||||
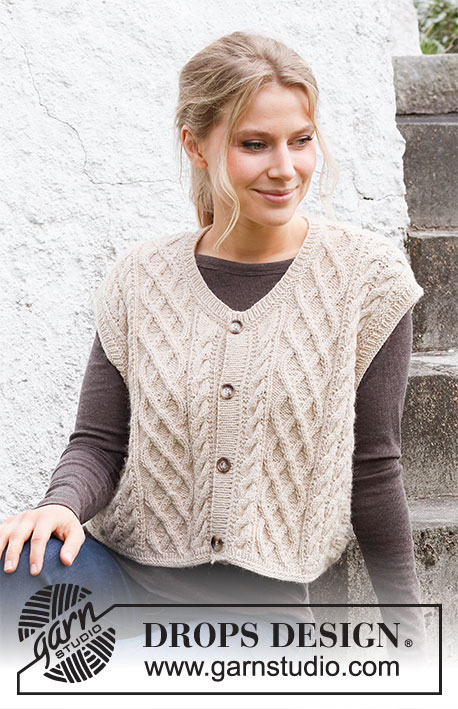
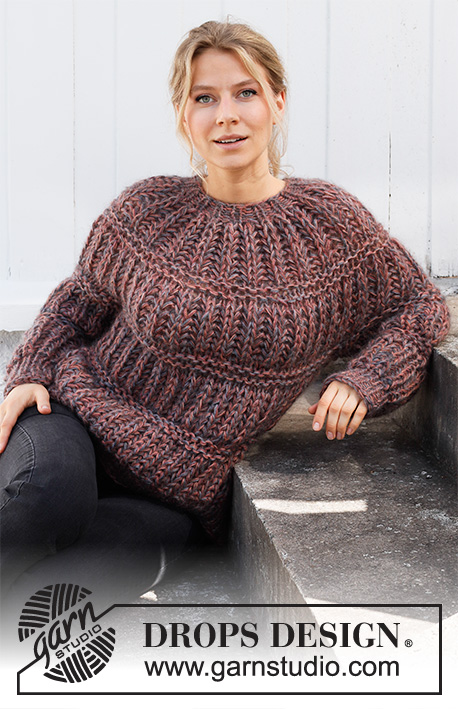
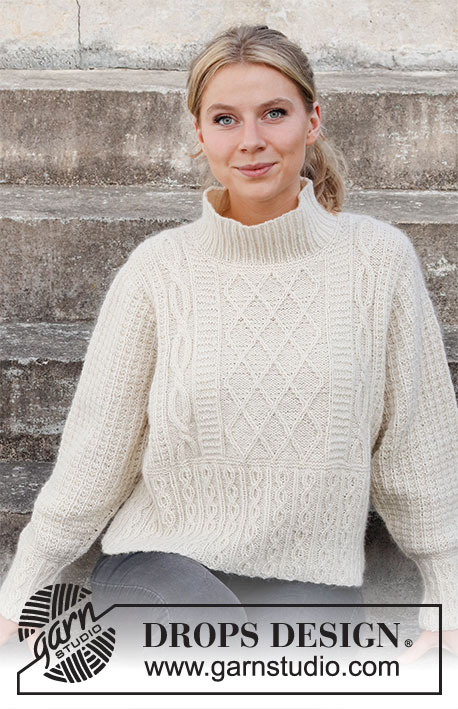
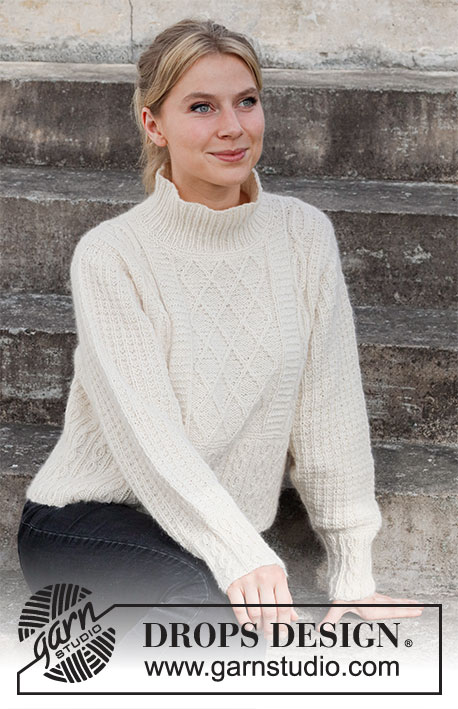
Ice Castles Sweater |
|||||||||||||||||||||||||
 |
 |
||||||||||||||||||||||||
Knitted sweater in DROPS Puna. Piece knitted with textured pattern and cables. Size: S - XXXL
DROPS 218-3 |
|||||||||||||||||||||||||
|
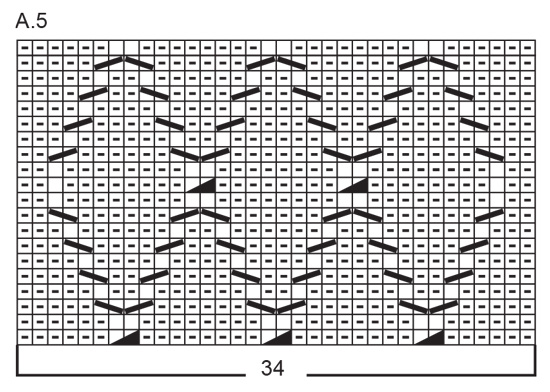
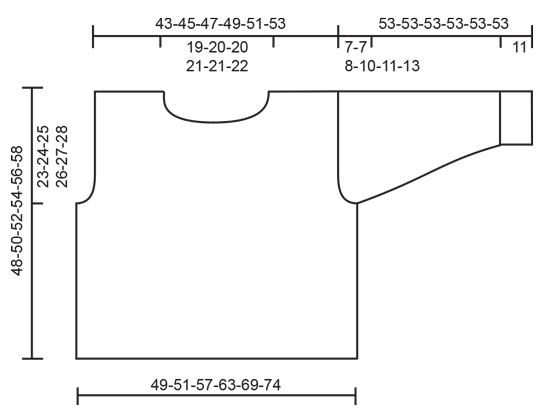
------------------------------------------------------- EXPLANATION FOR THE PATTERN: ------------------------------------------------------- GARTER STITCH (worked in the round): 1 ridge vertically = 2 rounds, i.e. knit 1 round and purl 1 round. PATTERN: See diagrams A.1 to A.6. INCREASE/DECREASE TIP (evenly): To calculate how to increase/decrease evenly, use the total number of stitches on row (e.g. 225 stitches) and divide stitches by number of increases/decreases to be done (e.g. 9) = 25. In this example increase by making 1 yarn over after approx. every 25th stitch. On next row work yarn overs twisted to avoid holes. To decrease in this example work every 24th and 25th stitch together. INCREASE TIP (applies to mid under sleeve): Work until 1 stitch remains before marker thread, 1 yarn over, knit 2 (marker thread is in the middle of these stitches), 1 yarn over. Work yarn overs twisted on next round to avoid holes - work the new stitches in A.2. ------------------------------------------------------- START THE PIECE HERE: ------------------------------------------------------- SWEATER - SHORT OVERVIEW OF THE PIECE: Piece is knitted in the round on circular needle up to armhole, then divide the piece and work front piece and back piece separately. Work sleeves in the round on a short circular needle/double pointed needles before decreasing for sleeve cap, and continue sleeve back and forth on needle. BODY: Cast on 207-225-243-261-288-315 stitches on circular needle size 4 mm = US 6 with Puna. Knit 1 round, then work pattern over all stitches according to A.1 (= 23-25-27-29-32-35 repetitions of 9 stitches on round). Continue with A.1 over all stitches until piece measures approx. 15-16-17-18-19-20 cm = 6"-6¼"-6¾"-7"-7½"-8", adjust after one whole repetition of A.1 vertically. Work 2 ridges in GARTER STITCH over all stitches – see explanation above, on last round adjust number of stitches to 204-216-240-264-288-312. Insert 1 marker thread in each side; one at the beginning of round and one after 102-108-120-132-144-156 stitches= sides. Then work pattern as follows - from beginning of round: A.2 over the first 14-17-23-29-35-41 stitches (finish with the first 2 stitches in A.2), A.3 (= 12 stitches), A.4 (= 8 stitches), A.5 (= 34 stitches), A.4, A.3, A.6 over the next 28-34-46-58-70-82 stitches (finish with first stitch in A.6), A.3, A.4, A.5, A.4, A.3, A.6 over the last 14-17-23-29-35-41 stitches (finish with the first 2 stitches in A.6). Continue this pattern. REMEMBER THE KNITTING GAUGE! When piece measures 25-26-27-28-29-30 cm = 9¾"-10¼"-10⅝"-11"-11⅜"-11¾", work next round as follows: Bind off the 3-3-3-4-4-4 first stitches on round, work 96-102-114-124-136-148 stitches, bind off 6-6-6-8-8-8 stitches, work 96-102-114-124-136-148 stitches, bind off the last 3-3-3-4-4-4 stitches. Each part is worked separately back and forth on needle. Slip the first 96-102-114-124-136-148 stitches on a stitch holder, and work over the last 96-102-114-124-136-148 stitches on back piece. BACK PIECE: = 96-102-114-124-136-148 stitches. Continue with pattern as before, and continue to bind off for armhole in each side on every other row as follows: 2 stitches 1-1-2-3-4-5 times and 1 stitch 1-2-4-5-6-8 times = 90-94-98-102-108-112 stitches. When piece measures 46-48-50-52-54-56 cm = 18"-19"-19¾"-20½"-21¼"-22", bind off the middle 38-40-40-42-42-44 stitches for neck, and finish each shoulder separately. Then bind off 1 stitch on next row towards the neck = 25-26-28-29-32-33 stitches. Continue with pattern until piece measures 48-50-52-54-56-58 cm = 19"-19¾"-20½"-21¼"-22"-22¾" (= 23-24-25-26-27-28 cm = 9"-9½"-9¾"-10¼"-10⅝"-11" from beginning of armhole), bind off. Work the other shoulder the same way. FRONT PIECE: = 96-102-114-124-136-148 stitches. Continue with pattern and to bind off for armhole in the sides as on back piece = 90-94-98-102-108-112 stitches. When piece measures 42-44-46-48-49-51 cm = 16½"-17¼"-18"-19"-19¼"-20", slip the middle 30-32-32-34-34-36 stitches on a stitch holder for neck, and finish shoulders separately. Then bind off stitches on every row from neck as follows: Bind off 2 stitches 1 time and 1 stitch 3 times = 25-26-28-29-32-33 stitches remain on each shoulder. Continue with pattern until piece measures 48-50-52-54-56-58 cm = 19"-19¾"-20½"-21¼"-22"-22¾" (= 23-24-25-26-27-28 cm = 9"-9½"-9¾"-10¼"-10⅝"-11" from beginning of armhole), bind off. Work the other shoulder the same way. ASSEMBLY: Sew the shoulder seams. SLEEVE: Work sleeves in the round on double pointed needles/ circular needle, bottom up. Divide piece when decreasing for sleeve cap and work back and forth on needle. Cast on 54-54-54-63-63-63 stitches on double pointed needles size 4 mm = US 6 with Puna. Knit 1 round, then work pattern over all stitches according to A.1 (= 6-6-6-7-7-7 repetitions of 9 stitches on round). Continue with A.1 over all stitches until piece measures approx. 11 cm = 4⅜", adjust after one whole repetition of A.1 vertically. Work 2 ridges in GARTER STITCH over all stitches – see explanation above, on last round adjust number of stitches to 54-56-58-60-64-66. Insert a marker thread at beginning of round = mid under sleeve. Continue as follows: 1 stitch in stockinette stitch, work A.2 over the next 52-54-56-58-62-64 stitches, finish with 1 stitch in stockinette stitch. Continue this pattern, AT THE SAME TIME when piece measures 12 cm = 4¾", increase 1 stitch on each side of marker thread - READ INCREASE TIP. Increase on every 2-1½-1½-1½-1-1 cm = ¾"-½"-½"-½"-⅜"-⅜" 17-18-20-21-23-24 times in total = 88-92-98-102-110-114 stitches. When piece measures 46-46-45-43-42-40 cm = 18"-18"-17¾"-17"-16½"-15¾", bind off 3 stitches on each side of marker thread (= 6 stitches bind off mid under sleeve), then work sleeve back and forth. Bind off for sleeve cap at beginning of every row in each side as follows: 2 stitches 4-4-4-5-5-6 times, 1 stitch 0-0-1-2-3-4 times. Then bind off 2 stitch in each side until piece measures 52 cm = 20½" in all sizes, bind off 3 stitches in each side, then bind off the remaining stitches. Sleeve measures 53 cm = 21" in all sizes. Work another sleeve the same way. NECK EDGE: Begin from right side with Puna and a short circular needle size 4 mm = US 6 - pick up approx. 96 to 106 stitches (including stitches from stitch holder and divisible by 2). Purl 1 round, knit 1 round, purl 1 round, knit 1 round. Work rib (knit 1/purl 1) in the round for 10 cm = 4". Bind off stitches with knit over knit and purl over purl. ASSEMBLY: Sew in sleeves. |
|||||||||||||||||||||||||
Diagram explanations |
|||||||||||||||||||||||||
|
|||||||||||||||||||||||||

|
|||||||||||||||||||||||||
|
|||||||||||||||||||||||||
|
|||||||||||||||||||||||||
|
Have you made this or any other of our designs? Tag your pictures in social media with #dropsdesign so we can see them! Do you need help with this pattern?You'll find tutorial videos, a Comments/Questions area and more by visiting the pattern on garnstudio.com. © 1982-2024 DROPS Design A/S. We reserve all rights. This document, including all its sub-sections, has copyrights. Read more about what you can do with our patterns at the bottom of each pattern on our site. |
|||||||||||||||||||||||||


With over 40 years in knitting and crochet design, DROPS Design offers one of the most extensive collections of free patterns on the internet - translated to 17 languages. As of today we count 304 catalogs and 11422 patterns - 11417 of which are translated into English (US/in).
We work hard to bring you the best knitting and crochet have to offer, inspiration and advice as well as great quality yarns at incredible prices! Would you like to use our patterns for other than personal use? You can read what you are allowed to do in the Copyright text at the bottom of all our patterns. Happy crafting!
Comments / Questions (69)
I’m knitting the smallest size (204 stitches in the body). I’m struggling to understand where the pattern lies ..... you only do A.2 once (14 stitches). I assumed the 2 markers are placed at the sides i.e. 102 stitches each for front and back so how does doing A.2 once only fit into the pattern - front and back are different?? Please explain. I’m considering re jigging the sections to make front and back the same (leave out A.2).
14.07.2021 - 07:56Thank you very much!!!
01.06.2021 - 14:16How can I work A3, A4 and A6 ( together 20 stitches) over 28 stitches? \r\nOr how can I work A.3, A.4, A.5, A.4, A.3, A.6 over the last 14 ? Thank you sooo much.
31.05.2021 - 16:20DROPS Design answered:
Dear Diana, it is always easier to answe if you specifya wich part you need help with (Sleeves? Front? ), and which size, the question relates to, I am just going to assume, that is the smalles size and the BODY at the beginning of the pattern. In there, you need the work A.3, THEN, A.4, and THEN repeat ,A.6 over 28 stitches (5 repeat + the first stitch). Then A.3, A.4, A.5, A.4, A.3,, and THEN repeat A.6 over the last 14 stitches (3 repeats + the first 2 stitches). Happy Knitting!
31.05.2021 - 16:40Hi, \r\nThank you for your quick response.\r\nBODY:\r\n Then work pattern as follows - from beginning of round: A.2 over the first 14-17-23-29-35-41 stitches (finish with the first 2 stitches in A.2), A.3 (= 12 stitches), A.4 (= 8 stitches), A.5 (= 34 stitches), A.4, A.3, A.6 over the next 28-34-46-58-70-82 stitches (finish with first stitch in A.6), A.3, A.4, A.5, A.4, A.3, A.6 over the last 14-17-23-29-35-41 stitches (finish with the first 2 stitches in A.6).
31.05.2021 - 16:18Hi Thank you for this knitting pattern I have one question: I do the ice castle sweater, size s How can I knitter a3, a6, and a4 (23) ober 28 ? That makes no sense. Thank you.
30.05.2021 - 21:06DROPS Design answered:
Dear Diana, please tell us, exactly which part of the pattern you need help with?
31.05.2021 - 02:40Can I ask when initially decreasing for the sleeve head I am decreasing 2 stitches each side for a total of 8 rows, and 1 stitch for a total of 2 rows leaving me with 80 stitches. Do I then continue to decrease 2 at each end of every row until 52cms ? The sleeve head doesn't look like it will fit in to the body wormhole, it looks far too short.
18.04.2021 - 18:41DROPS Design answered:
Dear Glenys, when you are making the sleeve cap, you first sast off 3-3 stitches on both side of the marker (all together 6 stitches), then 2-2 stitches at the beginning of each row 8 times (that is 2 stitches cast of 4 times (= 8 stitches) on each side (all together 16 stitches), and then 1 stitch 0-0-1-2-3-4 times (depending on size), and cast off 2 stitches at the beginning of each row (thus you are casting off both side), until the piece us 52 cm long. Happy Knitting!
18.04.2021 - 22:31Is there a video that demonstrates casting off in the round. In splitting the front and the back I cast off 3 stitches at the beginning, 6sts in the middle but when I come to cast off the last 3 sts (to make the second total of 6) I have 1 stitch left on my needle ( in the middle of the 6). Thanks
25.03.2021 - 23:04DROPS Design answered:
Hi Glenys, For this last stitch you cut the strand and pull it through the stitch. Then begin on the back piece. Happy knitting!
26.03.2021 - 07:48Hello, I have question reg. the Sleeve for size S After the 17 Increases (to 88 Stitches), what length should my piece be for Size S, 18" or 14 3/4"? Thank you, Marlena
19.03.2021 - 03:12DROPS Design answered:
Dear Mrs Otsuka, the last increase on sleeve should be worked when piece measures approx. 17,36 inches (= approx. 44 cm). Happy knitting!
19.03.2021 - 07:40I am doing the large,size, after the first section the stitches go down to 240 but the repeats of pattern are on 259 stitches, is it offset all the way round by 19 stitches ? Thank you
15.03.2021 - 11:36DROPS Design answered:
Dear Mrs Gallagher, work the 240 sts as follows: A.2 over the first 23 sts (repeat the 3 sts in diagram a total of 7 times and finish with the first 2 stitches), A.3 (= 12 sts), A.4 (= 8 sts), A.5 (= 34 sts ), A.4 (= 8 sts), A.3 (= 12 sts), A.6 over the next 46 (repeat the 3 sts a total of 15 times and finish with first st in A.6), A.3 (= 12 sts), A.4 (= 8 sts), A.5 (=34 sts), A.4 (= 8 sts), A.3 (= 12 sts), A.6 over the last 23 stitches (repeat the 3 sts in diagram a total of 7 times and finish with the first 2 stitches) = 23+12+8+34+8+12+46+12+8+34+8+12+23= 240 sts. Happy knitting!
15.03.2021 - 13:11Oh my goodness, now it makes sense to me . I tried knitting the sleeves on straight kneedles. Thank you so very much, Marlena
12.03.2021 - 09:22