
Popular categories
Looking for a yarn?


|
||||||||||||||||||||||||||||
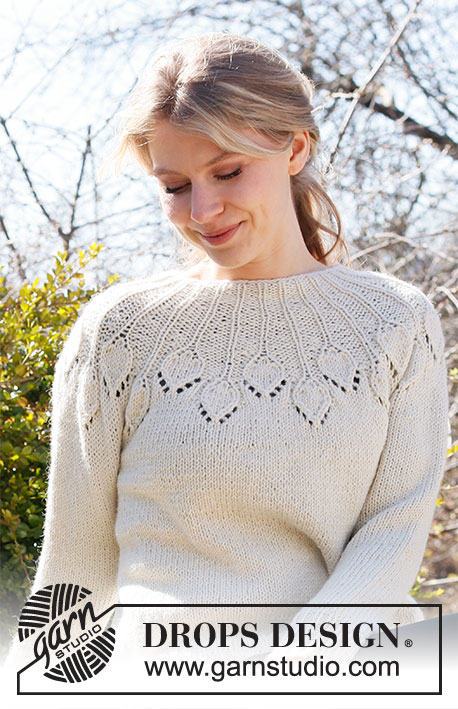
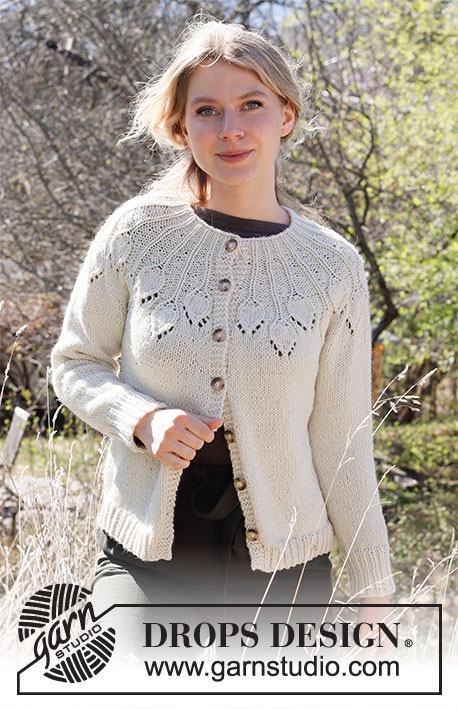
White Peacock Jacket |
||||||||||||||||||||||||||||
 |
 |
|||||||||||||||||||||||||||
Knitted jacket in DROPS Nepal. The piece is worked top down with round yoke and lace pattern. Sizes S - XXXL.
DROPS 217-3 |
||||||||||||||||||||||||||||
|
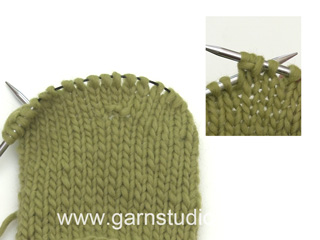
------------------------------------------------------- EXPLANATIONS FOR THE PATTERN: ------------------------------------------------------- RIDGE/GARTER STITCH (worked back and forth): Knit all rows. 1 ridge in height = Knit 2 rows. PATTERN: See diagrams A.1 to A.3. Choose diagram for your size (applies to A.1). The diagrams show all rows in the pattern from the right side. INCREASE TIP (evenly spaced): To work out how to increase evenly, count the total number of stitches on the needle (e.g. 221 stitches) minus the bands (e.g. 8 stitches) and divide the remaining stitches by the number of increases to be made (e.g. 3) = 71. In this example, increase by making 1 yarn over after each 71st stitch. Do not increase on the bands. On the next row work the yarn overs twisted to avoid holes. DECREASE TIP (for sleeves): Decrease 1 stitch on either side of the marker thread as follows: Work until there are 3 stitches left before the marker thread, knit 2 together, knit 2 (marker thread sits between these 2 stitches), slip 1 stitch as if to knit, knit 1 and pass the slipped stitch over the knitted stitch (2 stitches decreased). BUTTONHOLES: Work buttonholes on the right band (when the garment is worn). Work from the right side when there are 3 stitches left on the row as follows: Make 1 yarn over, knit 2 together and knit 1. On the next row (wrong side), knit the yarn over to leave a hole. The first buttonhole is worked when the rib on the neck measures approx. 1½-2 cm = ½"-¾". Then work the other 6-6-6-6-6-6 buttonholes with approx. 8-8-8½-8½-9-9½ cm = 3⅛"-3⅛"-3¼"-3¼"-3½"-3¾" between each one. BINDING-OFF TIP: To avoid the bind-off edge being tight you can bind off with a larger size needle. If the edge is still tight, make 1 yarn over after approx. each 6th stitch at the same time as binding off; the yarn overs are bind off as normal stitches. ------------------------------------------------------- START THE PIECE HERE: ------------------------------------------------------- JACKET – SHORT OVERVIEW OF THE PIECE. The neck and yoke are worked back and forth with circular needle, from mid front and top down. The yoke is divided for body and sleeves and the body continued back and forth with circular needle. The sleeves are worked in the round with double pointed needles/short circular needle, top down. NECK: Cast on 87-93-93-99-105-111 stitches (including 6 band stitches on each side towards mid-front) with circular needle size 4 mm = US 6 and Nepal. Purl 1 row (= wrong side). The next row is worked as follows from the right side: 1 edge stitch in GARTER STITCH – read description above, * knit 1, purl 2 *, work from *-* until there are 2 stitches left, knit 1 and 1 edge stitch in garter stitch. Continue this rib for 3½-4 cm = 1¼"-1½" – remember BUTTONHOLES on the right band – read description above. Change to circular needle size 5,5 mm = US 9 and insert 1 marker after the band at the beginning of the row; the yoke is measured from this marker! YOKE: Work pattern from the right side as follows: Knit 6 stitches and decrease 2 stitches evenly over these stitches (= 4 band-stitches), * A.1 – choose diagram for your size (= 3 stitches), A.2 (= 3 stitches) *, work from *-* 12-13-13-14-15-16 times, work A.3 over the next 3 stitches, knit the last 6 stitches and decrease 2 stitches evenly over these stitches (= 4 band-stitches). There are 83-89-89-95-101-107 stitches on the needle. The knitted and purled stitches in the pattern should match the knitted and purled stitches in the rib; the band-stitches are worked in garter stitch to finished length. Continue this pattern back and forth. REMEMBER THE KNITTING GAUGE! When A.1 - A.3 are finished in height there are 221-238-238-269-287-305 stitches and the piece measures approx. 19 cm = 7½" from the marker. Continue with stockinette stitch and 4 band-stitches in garter stitch on each side. At the same time increase in the different sizes as follows: Sizes S, M and L: On the next row from the right side increase 3-7-23 stitches evenly spaced – read INCREASE TIP = 224-245-261 stitches. Continue working until the yoke measures 20-22-23 cm = 8"-8¾"-9" from the marker on the neck. Go to All sizes. Sizes XL, XXL and XXXL: On the next row from the right side increase 10-11-14 stitches evenly spaced – read INCREASE TIP = 279-298-319 stitches. Continue working until the yoke measures 23-25-27 cm = 9"-9¾"-10⅝". Now work a row from the right side where you increase 10-11-13 stitches evenly spaced = 289-309-332 stitches. Continue working until the yoke measures 25-27-29 cm = 9¾"-10⅝"-11⅜" from the marker on the neck. Go to All sizes. All sizes: Divide the yoke for the body and sleeves on the next row from the wrong side as follows: Work as before over the first 35-38-40-44-48-53 stitches (= right front piece), place the next 46-50-54-60-62-64 stitches on a thread for the sleeves, cast on 8-8-10-10-12-12 new stitches on the needle (= in side under sleeve), work the next 62-69-73-81-89-98 stitches (= back piece), place the next 46-50-54-60-62-64 stitches on a thread for the sleeves, cast on 8-8-10-10-12-12 new stitches on the needle (= in side under sleeve), work the last 35-38-40-44-48-53 stitches as before (= left front piece). Body and sleeves are finished separately. THE PIECE IS NOW MEASURED FROM HERE. BODY: = 148-161-173-189-209-228 stitches. Continue back and forth with stockinette stitch and 4 band-stitches in garter stitch on each side. When the piece measures 26-26-27-27-27-27 cm = 10¼"-10¼"-10⅝"-10⅝"-10⅝"-10⅝", increase 23-25-28-30-34-36 stitches evenly spaced = 171-186-201-219-243-264 stitches. Change to circular needle size 4 mm = US 6 and work rib from the right side as follows: 4 band-stitches in garter stitch, * knit 1, purl 2 *, work from *-* until there are 5 stitches left, knit 1 and 4 band-stitches in garter stitch. When the rib measures 4 cm = 1½", bind off with knit over knit and purl over purl - read BINDING-OFF TIP. The jacket measures approx. 54-56-58-60-62-64 cm = 21¼"-22"-22¾"-23⅝"-24⅜"-25¼" from the shoulder down. SLEEVE: Place the 46-50-54-60-62-64 stitches from the thread on the one side of the piece on double pointed needles/short circular needle size 5.5 mm = US 9 and knit up 1 stitch in each of the 8-8-10-10-12-12 stitches cast on under the sleeve = 54-58-64-70-74-76 stitches. Insert a marker thread in the middle of the 8-8-10-10-12-12stitches under the sleeve. Work stockinette stitch in the round. When the sleeve measures 4 cm = 1½", decrease 1 stitch on each side of the marker thread - read DECREASE TIP. Decrease like this every 4-3½-2½-2-1½-1½ cm = 1½"-1¼"-⅞"-¾"-½"-½" a total of 8-9-11-13-15-15 times = 38-40-42-44-44-46 stitches. Continue with stockinette stitch until the sleeve measures 34-33-32-30-29-27 cm = 13⅜"-13"-12½"-11¾"-11⅜"-10⅝". NOTE: Shorter measurements in larger sizes due to wider neck and longer yoke. Increase 4-5-6-7-7-8 stitches evenly spaced = 42-45-48-51-51-54 stitches. Change to double pointed needles size 4 mm = US 6 and work rib (= knit 1, purl 2) for 7 cm = 2¾". Bind off with knit over knit and purl over purl - remember BINDING-OFF TIP. The sleeve measures 41-40-39-37-36-34 cm = 16⅛"-15¾"-15¼"-14½"-14¼"-13¾" from the division. Work the other sleeve in the same way. ASSEMBLY: Sew the buttons onto the left band. |
||||||||||||||||||||||||||||
Diagram explanations |
||||||||||||||||||||||||||||
|
||||||||||||||||||||||||||||

|
||||||||||||||||||||||||||||

|
||||||||||||||||||||||||||||

|
||||||||||||||||||||||||||||
|
Have you made this or any other of our designs? Tag your pictures in social media with #dropsdesign so we can see them! Do you need help with this pattern?You'll find tutorial videos, a Comments/Questions area and more by visiting the pattern on garnstudio.com. © 1982-2024 DROPS Design A/S. We reserve all rights. This document, including all its sub-sections, has copyrights. Read more about what you can do with our patterns at the bottom of each pattern on our site. |
||||||||||||||||||||||||||||


With over 40 years in knitting and crochet design, DROPS Design offers one of the most extensive collections of free patterns on the internet - translated to 17 languages. As of today we count 304 catalogs and 11422 patterns - 11417 of which are translated into English (US/in).
We work hard to bring you the best knitting and crochet have to offer, inspiration and advice as well as great quality yarns at incredible prices! Would you like to use our patterns for other than personal use? You can read what you are allowed to do in the Copyright text at the bottom of all our patterns. Happy crafting!
Comments / Questions (21)
Je suis tout à fait d'accord, c'est exactement ce que j'ai fais, mais je me retrouve avec 27 mailles endroits, et nom 14 mailles endroits pour poursuivre mon motif ?
26.03.2021 - 08:41DROPS Design answered:
Bonjour Annita, vous avez donc juste, pourquoi voulez-vous avoir 14 mailles endroit ? En taille M, vous aurez 13 fois (A.1, A.2) soit 13 fois 2 m end + 1 fois A.3 soit 1 m end = 2*13 + 1 = vous devez voir 27 m end au total, tout est donc juste ainsi. Bonne continuation!
26.03.2021 - 11:27Bonjour ! Je fais la taille M .
26.03.2021 - 07:26DROPS Design answered:
Re-bonjour Anita et merci :) en M vous allez tricoter ainsi: les 6 premières mailles (= 1 m lis, 1 m end, 2 m env, 1 m end, 1 m env) à l'endroit en diminuant 2 m = 4 m point mousse, puis vous allez tricoter les 78 m suivantes ainsi (A.1, A.3) x 13, tricotez ensuite A.3, il vous reste 6 m (= 1 m env,1 m end 2 m env, 1 m end, 1 m lis) que vous tricotez à l'endroit en diminuant 2 m = 4 m de bordure devant. Vous avez maintenant vos: 4+78+3+4=89 m et les mailles endroit des côtes sont prolongées dans A.1, A.2 et A.3. Bon tricot!
26.03.2021 - 08:06Je ne comprends toujours pas, car j'ai 27 mailles endroits, et nom 14.
25.03.2021 - 17:29DROPS Design answered:
Bonjour Annita, indiquez-nous votre taille, ce sera ainsi plus facile de vous le détailler :)
26.03.2021 - 06:58Bonjour, je ne comprends pas le début de l'ouvrage. Après les côtes, j'ai beaucoup trop de mailles endroits, par rapport au tiges comportant les futures feuilles. J'ai refais et défait, je n'y arrive pas, merci par avance de votre aide .
25.03.2021 - 15:32DROPS Design answered:
Bonjour Annita, vérifiez que sur l'endroit, les côtes se présentent bien avec 1 m end, 2 m env. et n'oubliez pas de bien diminuer dans les 6 premières et 6 dernière m (= les 6 premières et les 6 dernières m = 4 m), entre ces 2 x 6 m diminuées à 4, il doit vous rester 13-14-14-15-16-17 m end que vous allez tricoter ainsi: (A.1, A.2)x12-13-13-14-15-16 et A.3. Bon tricot!
25.03.2021 - 16:20Muchísimas gracias por resolverme las dudas.Un saludo
16.02.2021 - 13:45Mi pregunta principal era si en todo el canesú se trabaja con los tres gráficos,A1,A2 y A3 en ese orden toda la vuelta y se repiten tantas veces como sea necesario durante todo el proceso del canesú.No se si hay un problema de traducción pero es la primera vez que me ocurre con sus patrones.
15.02.2021 - 14:51DROPS Design answered:
Hola Maria, "6 puntos derechos y disminuir 2 puntos distribuidos equitativamente sobre estos puntos (= 4 puntos del borde delantero), * A.1 – elegir el diagrama para tu talla (= 3 puntos), A.2 (= 3 puntos) *, tejer de *a* 12-13-13-14-15-16 veces, tejer A.3 sobre los 3 puntos siguientes, tejer de derecho sobre los últimos 6 puntos y disminuir 2 puntos distribuidos equitativamente sobre estos puntos (= 4 puntos del borde delantero)". > Entonces se repiten los diagramas A.1 y A.2 en toda la fila, el diagrama A.3 esta al final, una sola vez. Estos 3 diagramas son trabajados una vez de alto. Buen trabajo!
16.02.2021 - 11:06Estoy un poco perdida con este patrón, con el canesú, en todo el canesú se trabaja con los tres gráficos ,A1,A2,A3, talla Como en la primera vuelta del canesú ? O solo se continúa con A1 y A3. También me pueden decir si los gráficos solo traen las vueltas del lado derecho y por el lado revés se tejen los puntos como se presentan ,si es de derecho , derecho y si es revés ,revés. Gracias espero me puedan ayudar.
13.02.2021 - 11:36DROPS Design answered:
Hola Maria Luz, cómo leer los diagramas de punto se encuentra AQUI. Si tienes mas preguntas despues, ecribeme. Buen trabajo!
15.02.2021 - 10:21Bonjour, la laine Drops Népal est-elle une laine qui pique ou est-elle douce ? Merci pour la réponse.
15.10.2020 - 19:12DROPS Design answered:
Bonjour Fleur, la sensibilité de chacune étant différente, nous vous recommandons de vous adresser directement à votre magasin qui saura vous conseiller et vous orienter si besoin, même par mail ou téléphone. Bon tricot!
16.10.2020 - 08:58Er ferdig med halskanten på jakken. Og skal begynne på bærestykke. Beskrivelse av stolpene skjønner jeg, men det i mellom skjønner jeg ikke. Skal A1 og A2 strikkes 13 ganger? Og A3 1 gang til slutt? Jeg har gjort det, men får det ikke til å stemme.
05.10.2020 - 10:08DROPS Design answered:
Hej Marit, jo du strikker 6m (tages ind til 4) + 6x13=78 + 3 + 6 (tages ind til 4) = 93 masker som tages ind til 89 masker. God fornøjelse!
07.10.2020 - 10:33On page 3, for NECK, we are told to cast on using size 4 mm needles. A few sentences later, we are told to change to size 5mm needles. However, at the start of the pattern, we are told we will need needle sizes 4mm and 5.5 mm (not 5 mm). Is this an error? Secondly, for tension, we are told 16 stitches to 10 cm. However, we are not told what size needle to use for the check. Please would you clarify both these points. Thank you!
03.09.2020 - 16:15DROPS Design answered:
Dear Mrs Segal, yes pattern will be edited thanks for your feedback you are supposed to work with needle size 5,5 mm (not 5 mm). Happy knitting!
03.09.2020 - 16:51