DROPS Nepal
DROPS Nepal
65% Wool, 35% Alpaca
from 2.60 € /50g
Get the yarn to make this pattern from 23.40€.

The yarn cost is calculated from the pattern’s smallest size and the yarn’s cheapest product type. Looking for an even better price? You might find it on the DROPS Deals!

DROPS SS24

White Peacock

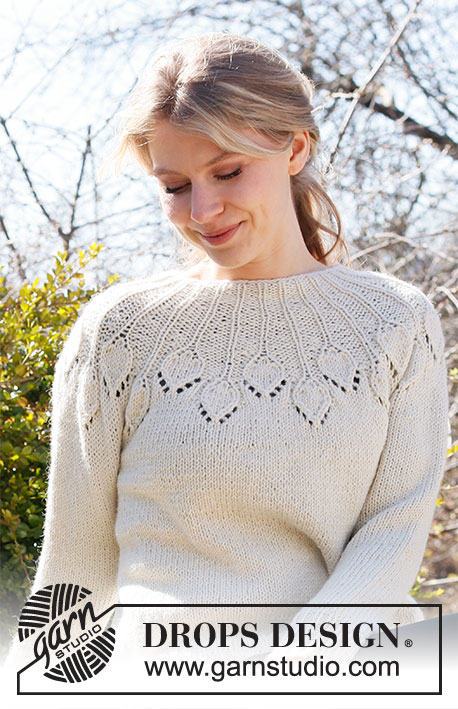
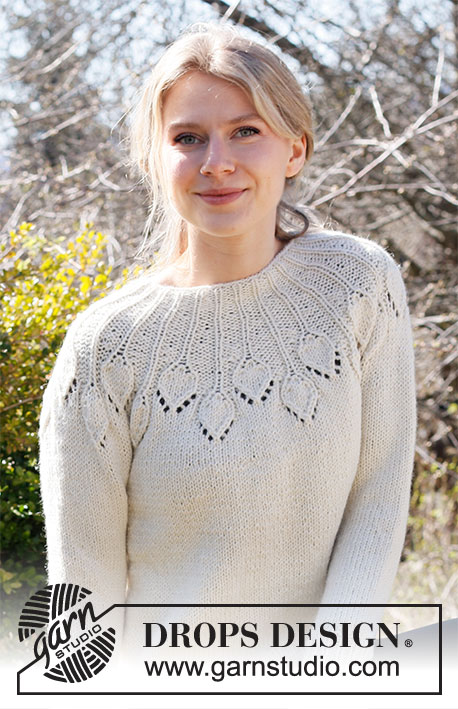
Knitted jumper in DROPS Nepal. The piece is worked top down with round yoke and lace pattern. Sizes S - XXXL.

DROPS 217-4
DROPS Design: Pattern no ne-335
Yarn group C or A + A
-------------------------------------------------------

SIZES: 
S - M - L - XL - XXL - XXXL

MATERIALS: 
DROPS NEPAL from Garnstudio (belongs to yarn group C)
450-500-550-650-700-750 g colour 0100, off white

KNITTING TENSION:
16 stitches in width and 20 rows in height with stocking stitch = 10 x 10 cm.

NEEDLES:
DROPS DOUBLE POINTED NEEDLES SIZE 5.5 MM.
DROPS CIRCULAR NEEDLE SIZE 5.5 MM: Length 40 cm and 80 cm for stocking stitch/pattern.
DROPS DOUBLE POINTED NEEDLES SIZE 4 MM.
DROPS CIRCULAR NEEDLE SIZE 4 MM: Length 40 cm and 80 cm for rib.
Needle size is only a guide. If you get too many stitches on 10 cm, change to a larger needle size. If you get too few stitches on 10 cm, change to a smaller needle size.

-------------------------------------------------------

Alternative Yarn – See how to change yarns here
Yarn Groups A to F – Use the same pattern and change the yarn here
Yarn usage using an alternative yarn – Use our yarn converter here

-------------------------------------------------------

DROPS Nepal
DROPS Nepal
65% Wool, 35% Alpaca
from 2.60 € /50g
Get the yarn to make this pattern from 23.40€.

The yarn cost is calculated from the pattern’s smallest size and the yarn’s cheapest product type. Looking for an even better price? You might find it on the DROPS Deals!

Pattern instructions

-------------------------------------------------------

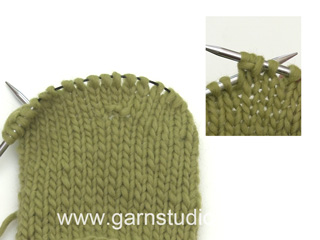
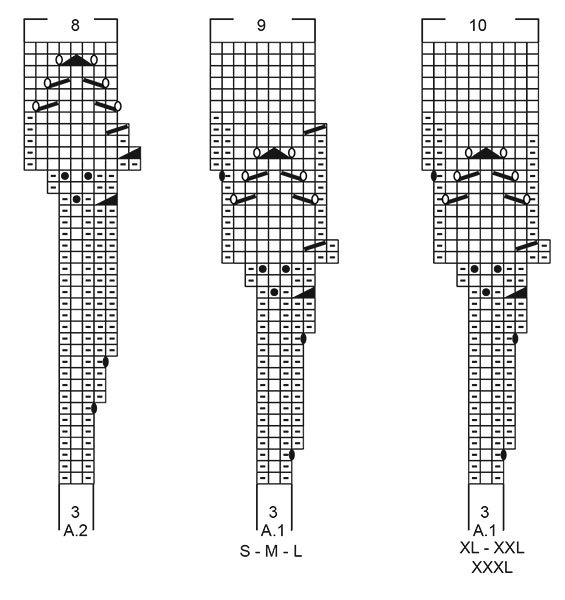
EXPLANATIONS FOR THE PATTERN:

-------------------------------------------------------

PATTERN: 
See diagrams A.1 and A.2. Choose diagram for your size – applies to A.1.

INCREASE TIP (evenly spaced):
To work out how to increase evenly, count the total number of stitches on the needle (e.g. 221 stitches) and divide by the number of increases to be made (e.g. 5) = 44.2. 
In this example, increase by making 1 yarn over after approx. each 44th stitch. On the next round work the yarn overs twisted to avoid holes.

DECREASE TIP (for sleeves): 
Decrease 1 stitch on either side of the marker thread as follows: Work until there are 3 stitches left before the marker thread, knit 2 together, knit 2 (marker thread sits between these 2 stitches), slip 1 stitch as if to knit, knit 1 and pass the slipped stitch over the knitted stitch (2 stitches decreased).

CASTING-OFF TIP:
To avoid the cast-off edge being tight you can cast off with a larger size needle. If the edge is still tight, make 1 yarn over after approx. each 6th stitch at the same time as casting off; the yarn overs are cast off as normal stitches.

-------------------------------------------------------

START THE PIECE HERE:

-------------------------------------------------------

JUMPER – SHORT OVERVIEW OF THE PIECE:
The neck and yoke are worked in the round with circular needle, top down from mid back. The yoke is divided for body and sleeves and the body continued in the round with circular needle. The sleeves are worked in the round with short circular needle/double pointed needles, top down.

NECK:
Cast on 78-78-84-90-90-96 stitches with short circular needle size 4 mm and Nepal. Knit 1 round, then work rib as follows: Purl 1, * knit 1, purl 2 *, work from *-* until there are 2 stitches left on the round, knit 1 and purl 1. Continue this rib in the round for 3½-4 cm. Change to circular needle size 5.5 mm. Insert 1 marker at the beginning of the round (= mid-back); the yoke is measured from this marker!

YOKE:
Now work pattern as follows: * A.1, A.2 *, work from *-* to end of round. The knitted and purled stitches in the pattern should match the knitted and purled stitches in the rib. REMEMBER THE KNITTING TENSION
When A.1 and A.2 have been completed in height there are 221-221-238-270-270-288 stitches and the piece measures approx. 19 cm from the marker.
Continue with stocking stitch in the round. At the same time increase in the different sizes as follows:

Sizes S, M and L:
On the next round increase 5-17-16 stitches evenly spaced – read INCREASE TIP = 226-238-254 stitches. Continue working until the yoke measures 20-22-23 cm from the marker on the neck. Go to All sizes.

Sizes XL, XXL and XXXL:
On the next round increase 6-16-18 stitches evenly spaced – read INCREASE TIP = 276-286-306 stitches. Continue working until the yoke measures 23-25-27 cm. Now work 1 round where you increase 6-16-18 stitches evenly spaced = 282-302-324 stitches. Continue working until the yoke measures 25-27-29 cm. Go to All sizes.

All sizes:
Divide the yoke for the body and sleeves on the next round as follows:
Work the first 25-38-32-39-33-44 stitches as before (= half back piece), place the next 48-50-54-60-62-64 stitches on a thread for the sleeves, cast on 6-8-10-10-12-12 new stitches on the needle (= in side under sleeve), work the next 65-69-73-81-89-98 stitches (= front piece), place the next 48-50-54-60-62-64 stitches on a thread for the sleeves, cast on 6-8-10-10-12-12 new stitches on the needle (= in side under sleeve) and work the last 40-31-41-42-56-54 stitches as before. Body and sleeves are finished separately. THE PIECE IS NOW MEASURED FROM HERE.

BODY:
= 142-154-166-182-202-220 stitches. Work stocking stitch in the round. When the piece measures 26-26-27-27-27-27 cm, increase 20-23-26-28-32-35 stitches evenly spaced = 162-177-192-210-234-255 stitches. Change to circular needle size 4 mm and work rib (= knit 1, purl 2) for 4 cm. Cast off with knit over knit and purl over purl - read CASTING-OFF TIP. The jumper measures approx. 54-56-58-60-62-64 cm from the shoulder down.

SLEEVE:
Place the 48-50-54-60-62-64 stitches from the thread on the one side of the piece on double pointed needles/short circular needle size 5.5 mm and knit up 1 stitch in each of the 6-8-10-10-12-12 stitches cast on under the sleeve = 54-58-64-70-74-76 stitches. Insert a marker thread in the middle of the 6-8-10-10-12-12 stitches under the sleeve. Work stocking stitch in the round.
When the sleeve measures 4 cm, decrease 1 stitch on each side of the marker thread - read DECREASE TIP. Decrease like this every 4-3½-2½-2-1½-1½ cm a total of 8-9-11-13-15-15 times = 38-40-42-44-44-46 stitches.
Continue with stocking stitch until the sleeve measures 34-33-32-30-29-28 cm. NOTE: Shorter measurements in larger sizes due to wider neck and longer yoke.
Increase 4-5-6-7-7-8 stitches evenly spaced = 42-45-48-51-51-54 stitches.
Change to double pointed needles size 4 mm and work rib (= knit 1, purl 2) for 7 cm.
Cast off with knit over knit and purl over purl - remember CASTING-OFF TIP. The sleeve measures 41-40-39-37-36-35 cm from the division.
Work the other sleeve in the same way. 

Diagram

symbols = knit
symbols = purl
symbols = between 2 stitches make 1 yarn over; on the next round purl the yarn over twisted to avoid a hole
symbols = between 2 stitches make 1 yarn over; on the next round knit the yarn over to leave a hole
symbols = increase 2 stitches in 1 stitch as follows: knit 1 but do not slip it from the needle, make 1 yarn over, knit 1 in the same stitch (= 2 stitches increased)
symbols = knit 2 together (= 1 stitch decreased)
symbols = slip 1 stitch as if to knit, knit 1 and pass the slipped stitch over (= 1 stitch decreased)
symbols = slip 1 stitch as if to knit, knit 2 together and pass the slipped stitch over the knitted together stitches (= 2 stitches decreased)
symbols = purl 2 together
diagram
diagram

Each of our patterns has specific tutorial videos to help you.

Do you have a question? See a list of frequently asked questions (FAQ)

Knitting tension is what determines the final measurements of your work, and is usually measured per 10 x 10 cm. It is provided like so: number of stitches in width x number of rows in height - eg: 19 stitches x 26 rows = 10 x 10 cm.

The knitting tension is very individual; some people knit/crochet loosely while others work tightly. You adjust the knitting tension with the needle size, which is why the suggested needle size is only meant as a guide! You need to adjust this (up or down) to ensure that YOUR knitting tension matches the knitting tension provided in the pattern. If you work with a different knitting tension than provided you will have a different yarn consumption, and your work will have different measurements than what the pattern suggests.

The knitting tension also determines which yarns can replace each other. As long as you achieve the same knitting tension you can replace one yarn with another.

See DROPS lesson: How to measure your tension/gauge

See DROPS video: How to make a gauge tension swatch

The required amount of yarn is provided in grams, eg: 450 g. To calculate how many balls you’ll need you first need to know how many grams are in 1 ball (25g, 50g or 100g). This information is available if you click on the individual yarn quality on our pages. Divide the amount required with the amount of each ball. For example, if each ball is 50g (the most common amount), the calculation will be as follows: 450 / 50 = 9 balls.

The important thing when changing from one yarn to another is that the knitting/crochet tension remains the same. This is so that the measurements of the finished piece will be the same as on the sketch provided. It is easier to achieve the same knitting tension using yarns from the same yarn group. It is also possible to work with multiple strands of a thinner yarn to achieve the knitting tension of a thicker one. Please try our yarn converter. We recommend you to always work a test swatch.

Please NOTE: when changing yarn the garment might have a different look and feel to the garment in the photo, due to individual properties and qualities of each yarn.

See DROPS lesson: Can I use a different yarn than the one mentioned in the pattern?

All our yarns are categorised into yarn groups (from A to F) according to thickness and knitting tension – group A contains the thinnest yarns and group F the thickest. This makes it easier for you to find alternative yarns to our patterns, should you wish to switch yarn. All yarns within the same group have a similar knitting tension and can easily replace each other. However, different yarn qualities have different structures and properties which will give the finished work a unique look and feel.

Click here for an overview of the yarns in each yarn group

At the top of all our patterns you’ll find a link to our yarn calculator, which is a helpful tool should you wish to use a different yarn than suggested. By filling in the yarn quality you wish to replace, the amount (in your size) and number of strands, the calculator will present good alternative yarns with the same knitting tension. Additionally it will tell you how much you’ll require in the new qualities and whether you’ll need to work with multiple strands. Most skeins are 50g (some are 25g or 100g).

If the pattern is worked with multiple colours, every colour will have to be calculated separately. Similarly, if the pattern is worked with several strands of different yarns (for example 1 strand Alpaca and 1 strand Kid-Silk) you will have to find alternatives for each, individually.

Click here to see our yarn calculator

Since different yarns have different qualities and textures we have chosen to keep the original yarn in our patterns. However, you can easily find options among our available qualities by using our yarn calculator, or simply pick a yarn from the same yarn group.

It is possible that some retailers still have discontinued yarns in stock, or that someone has a few skeins at home that they would like to find patterns for.

The yarn calculator will provide both alternative yarn as well as required amount in the new quality.

If you think it's hard to decide what size to make, it can be a good idea to measure a garment you own already and like the size of. Then you can pick the size by comparing those measures with the ones available in the pattern's size chart.

You'll find the size chart at the bottom of the pattern.

See DROPS lesson: How to read size chart

The needle size provided in the pattern serves only as a guide, the important thing is to follow the knitting tension. And since knitting tension is very individual, you will have to adjust the needle size to ensure that YOUR tension is the same as in the pattern – maybe you’ll have to adjust 1, or even 2 needle sizes, up or down to achieve the correct tension. For this, we recommend that you work test swatches.

Should you work with a different knitting tension than the one provided, the measurements of the finished garment might deviate from the measurement sketch.

See DROPS lesson: How to measure your tension/gauge

See DROPS video: How to make a tension/gauge swatch

Working a garment top-down provides more flexibility and room for personal adjustment. For example it is easier to try the garment on while working, as well as making adjustments to length of yoke and shoulder caps.

The instructions are carefully explaining every step, in the correct order. Diagrams are adjusted to the knitting direction and are worked as usual.

The diagram depicts all rows/rounds, and every stitch seen from the right side. It is read from bottom to top, from right to left. 1 square = 1 stitch.

When working back and forth, every other row is worked from the right side and every other row is worked from the wrong side. When working from the wrong side, the diagram will have to be worked reversed: from left to right, knit stitches are purled, purl stitches are knit etc.

When working in the round every round is worked from the right side and the diagram are worked from right to left on all rounds.

See DROPS lesson: How to read knitting diagrams

The diagram depicts all rows/rounds, and every stitch seen from the right side. It is worked from bottom to top, from right to left.

When working back and forth every other row is worked from the right side: from right to left and every other row is worked from the wrong side: from left to right.

When working in the round, every row in the diagram are worked from the right side, from right to left.

When working a circular diagram you start in the middle and work your way outwards, counter clockwise, row by row.

The rows usually start with a given number of chain stitches (equivalent to the height of the following stitch), this will either be depicted in the diagram or explained in the pattern.

See DROPS lesson: How to read crochet diagrams

Instructions for working several diagrams after each other on the same row/round, will often be written like so: “work A.1, A.2, A.3 a total of 0-0-2-3-4 times". This means you work A.1 once, then A.2 is worked once, and A.3 is repeated (in width) the number of times provided for your size – in this case like so: S = 0 times, M = 0 times, L=2 times, XL= 3 times and XXL = 4 times.

The diagrams are worked as usual: begin with the first row in A.1, then work the first row in A.2 etc.

See DROPS lesson: How to read knitting diagrams

See DROPS lesson: How to read crochet diagrams

The total width of the garment (from wrist-to-wrist) will be larger in the larger sizes, despite the actual sleeves being shorter. The larger sizes have longer sleeve caps and wider shoulders, so there will be a good fit in all sizes.

The measurement sketch/schematic drawing provides information regarding the full length of the garment. If it’s a jumper or a jacket the length is measured from the highest point on the shoulder closest to the neckline, and straight down to the bottom of the garment. It is NOT measured from the tip of shoulder. Similarly, the length of yoke is measured from the highest point on the shoulder and down to where yoke is split into body and sleeves.

On a jacket measures are never taken along bands, unless specifically stated. Always measure inside band stitches when measuring the length.

See DROPS lesson: How to read a schematic drawing

Diagrams are often repeated on the round or in height. 1 repeat is the diagram the way it appears in the pattern. If it says to work 5 repeats of A.1 in the round, then you work A.1 a total of 5 times after/next to each other in the round. If it says to work 2 repeats of A.1 vertically/in height you work the entire diagram once, then begin again at the start and work the entire diagram one more time.

Chain stitches are slightly narrower than other stitches and to avoid working the cast-on edge too tight, we simply chain more stitches to begin with. The stitch count will be adjusted on the following row to fit the pattern and measurement sketch.

The rib edge is more elastic and will contract slightly compared to, for example, stocking stitch. By increasing before the rib edge, you avoid a visible difference in width between the rib edge and the rest of the body.

It’s very easy to cast off too tightly, and by making yarn overs while casting off (and simultaneously casting these off) you avoid a too tight cast off edge.

See DROPS video: How to bind off with yarn overs (yo)

To achieve an even increase (or decrease) you can increase on, for example: every 3rd and 4th row alternately, like so: work 2 rows and increase on the 3rd row, work 3 rows and increase on the 4th. Repeat this until the increase is complete.

See DROPS lesson: Increase or decrease 1 st on every 3rd and 4th row alternately

Should you prefer to work in the round instead of back and forth, you may of course adjust the pattern. You’ll need to add steeks mid-front (usually 5 stitches), and follow the instructions. When you would normally turn and work from the wrong side, simply work across the steek and continue in the round. At the end you’ll cut the piece open, pick up stitches to work bands, and cover the cut edges.

See DROPS video: How to knit steeks and cut open

Should you prefer to work back and forth instead of in the round, you may of course adjust the pattern so you work the pieces separately and then assemble them at the end. Divide the stitches for the body in 2, add 1 edge stitch in each side (for sewing) and work the front and back pieces separately.

See DROPS lesson: Can I adapt a pattern for circular needles into straight needles?

Pattern repeats can vary slightly in the different sizes, in order to get the correct proportions. If you’re not working the exact same size as the garment in the photo, yours might deviate slightly. This has been carefully developed and adjusted so that the complete impression of the garment is the same in all sizes.

Make sure to follow instructions and diagrams for your size!

If you have found a pattern you like which is available in women’s size it’s not very difficult to convert it to men’s size. The biggest difference will be the length of sleeves and body. Start working on the women size that you think would fit across the chest. The additional length will be worked right before you cast off for the armhole/sleeve cap. If the pattern is worked top-down you can add the length right after the armhole or before the first decrease on sleeve.

Regarding additional yarn amount, this will depend on how much length you add, but it is better with a skein too many than too few.

All yarns will have excess fibres (from production) that might come off as lint or shedding. Brushed yarns (ie hairier yarns) have more of these loose, excess fibres, causing more shedding.

Shedding also depends on what is worn under or over the garment, and whether this pulls at the yarn fibres. It’s therefore not possible to guarantee that there will be no shedding

Below are some tips on how to get the best result when working with hairier yarns:

1. When the garment is finished (before you wash it) shake it vigorously so the looser hairs come off. NOTE: do NOT use a lint roller, brush or any method that pulls at the yarn.

2. Place the garment in a plastic bag and put it in your freezer - the temperature will cause the fibres to become less attached to each other, and excess fibres will come off easier.

3. Leave in the freezer for a few hours before taking it out and shaking it again.

4. Wash the garment according to the instructions on the yarn label.

Pilling is a natural process that happens to even the most exclusive of fibers. It's a natural sign of wear and tear that is hard to avoid, and that is most visible in high friction areas of your garment like a sweater's arms and cuffs.

You can make your garment look as new by removing the pilling, using a fabric comb or a pill/lint remover.

Still can't find the answer you need? Then scroll down and leave your question so one of our experts can try to help you. This will be done normally within 5 to 10 working days.
In the meantime, you can read the questions and answers that others have left to this pattern or join the DROPS Workshop on Facebook to get help from fellow knitters/crocheters!

You might also like...

White Peacock

Sopiimunpirtaan, Finland

White Peacock

IntreccidiCeci, Italy

White Peacock

Agnes_strikk, Norway

Post a comment to pattern DROPS 217-4

We would love to hear what you have to say about this pattern!

If you want to leave a question, please make sure you select the correct category in the form below, to speed up the answering process. Required fields are marked *.

Comments / Questions (20)

country flag Fréderique MARTINEZ wrote:

Bonjour concernant les diagrammes faut il tricoter 1 tour A1 et le tour suivant A2 ? Merci pour votre aide.

07.10.2023 - 15:59

DROPS Design answered:

Bonjour Mme Martinez, non, vous devez alterner les diagrammes ainsi: `tricotez A.1, puis tricotez A.2* et répétez de *à* tout le tour. Bon tricot!

09.10.2023 - 09:56

country flag Fréderique MARTINEZ wrote:

Bonjour , concernant les diagrammes faut il tricoter 1 tour A1 et le tour suivant A2 ? Merci pour votre aide.

07.10.2023 - 15:57

country flag Frederike wrote:

Wat een snelle reactie, bedankt! Ik vind vooral in m’n proeflapje de gaten in het telpatroon zo groot lijken, terwijl verder m’n stekenverhouding inderdaad wel klopt met een halve maat meer. Ik ga nog wel even goed kijken en denken wat ik kan doen. Bedankt in ieder geval. Mvg Frederike

17.02.2022 - 14:08

DROPS Design answered:

Dag Frederike,

Je zou ook kunnen kijken of je het mooier vindt om met 3 draden te breien en dan een dunnere naald gebruiken, zodat je dezelfde stekenverhouding krijgt als in het patroon, zodat je het patroon kan volgen. Het breiwerk wordt dan wel wat dichter/stijver.

18.02.2022 - 14:41

country flag Frederike wrote:

Wat een mooi patroon. Ik zou het graag breien, maar brei vaak te strak. Soms is een halve naald dikker dan een oplossing, maar ik koos voor 2x een a garen en dat in combinatie met een dikkere naald maakt het patroon minder mooi dan het kan zijn. Kan ik in de juiste naald het patroon in een maat groter breien zodat ik het pas? of zou het dan echt verkeerd gaan qua model? Vriendelijke groet, Frederike

17.02.2022 - 13:46

DROPS Design answered:

Dag Frederike,

Als jouw stekenverhouding overeenkomt met de stekenverhouding van het patroon, dan kun je gewoon het patroon volgen, het maakt dan niet uit dat je dikkere naalden nodig hebt, want dit geeft hetzelfde effect omdat de stekenverhouding klopt. Als je een grotere maat neemt zou je op basis van de stekenverhouding uit kunnen rekenen of de breedtes die je dan krijgt kloppen. Let er ook op dat je de meerderingen en hoe vaak je deze in de hoogte doet, misschien aan moet passen.

17.02.2022 - 13:53

country flag Clara Majlis wrote:

Donde encuentro las medidas correspondientes a cada talla, para saber cuál me corresponde hacer?

18.01.2022 - 13:05

DROPS Design answered:

Hola Clara, puedes ver todas las medidas en cm en el diagrama bajo el patrón. El 1º número de cada serie se corresponde a la 1ª talla (en este caso, la talla S) y así sucesivamente.

23.01.2022 - 19:51

country flag Rose-Marie Andersson wrote:

Modell ne-335 tröja 217-4 Storlek XL diagram A1 A2, hur läser man diagrammet när det inte är bredvid varandra? Försöker... Ska bägge sticka över 18 maskor eller som bilden visar växla mellan 1an och 2an? Sen aviga mellan diagrammen M. V. H Rose-Marie Andersson

02.03.2021 - 19:01

DROPS Design answered:

Hei Rose-Marie. Når du er ferdig med halskanten og har 90 masker skal du strikke A.1 + A.2 omgangen rundt, 15 repetisjoner, (A.1+A.2+ A.1+A.2+ A.1+A.2+ A.1+A.2+ A.1+A.2+ A.1+A.2+ A.1+A.2+ A.1+A.2+A.1+A.2+ A.1+A.2+ A.1+A.2+ A.1+A.2+ A.1+A.2+ A.1+A.2+ A.1+A.2). Vrangmaskene ser du i diagrammene (-) og det økes blant annet på 3., 7., 11. og 13. omgang slik at det blir flere vangmasker mellom rett masken i diagrammene. mvh DROPS design

10.03.2021 - 13:16

country flag Barbro wrote:

Kan det stemme at det er en feil i oppskriften. La opp 90 masker og strikket mønster, etterspå skulle str XL og XXL ha 270 masker, men jeg har fått 288 som passer til en XXXL.

16.02.2021 - 13:46

DROPS Design answered:

Hej Barbro, hvis du strikker A.1 og A.2 15 gange, så har du 10+8 masker x 15 når du er klar med diagrammet = 270 masker. God fornøjelse!

16.02.2021 - 14:25

country flag Victoria wrote:

En la parte de la manga no entiendo a qué se refiere con la siguiente frase: recoger 1 puntos en cada uno de los 6-8-10-10-12-12 puntos montados bajo la manga = 54-58-64-70-74-76 puntos. Insertar 1 marcapuntos en el medio de los 6-8-10-10-12-12 puntos montados bajo la manga ¿Hay algún video explicativo al respecto? Gracias

04.02.2021 - 18:48

country flag Winsome wrote:

The yarn for this pattern was listed as group C or A+A. Do you have a list of the yarns in those categories, is the list available on your website ? Thank you, Winsome

06.01.2021 - 04:01

DROPS Design answered:

Hi Winsome, If you click on Yarn at the top of the page you can find a list of the different yarn groups. Happy crafting!

06.01.2021 - 06:46

country flag Natalie wrote:

Bonsoir, j’aimerais bcp essayer ce modèle, mais je ne comprends pas comment lire les diagrammes A 1 et A 2... tout le reste, je sais le faire. Pouvez-vous m’aider ?

28.11.2020 - 02:27

DROPS Design answered:

Bonjour Natalie, vous en lirez plus sur les diagrammes dans cette leçon - vous allez tricoter sur un même tour, A.1 et A.2 alternativement - lisez le diagramme de droite à gauche tous les tours (en rond) et suivez bien la légende des symboles. Vous pouvez mettre un marqueur entre chaque diagramme, ceci vous aidera à toujours bien vérifier le nombre de mailles pour chaque tour. Bon tricot!

30.11.2020 - 08:15