
Popular categories
Looking for a yarn?


|
||||||||||
Autumn Days |
||||||||||
 |
 |
|||||||||
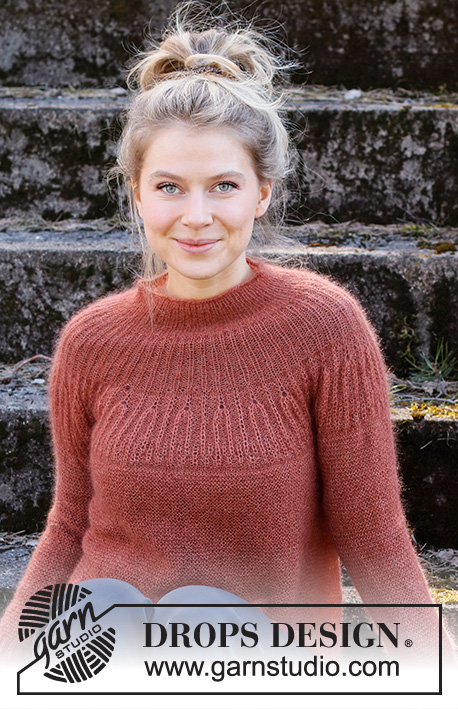
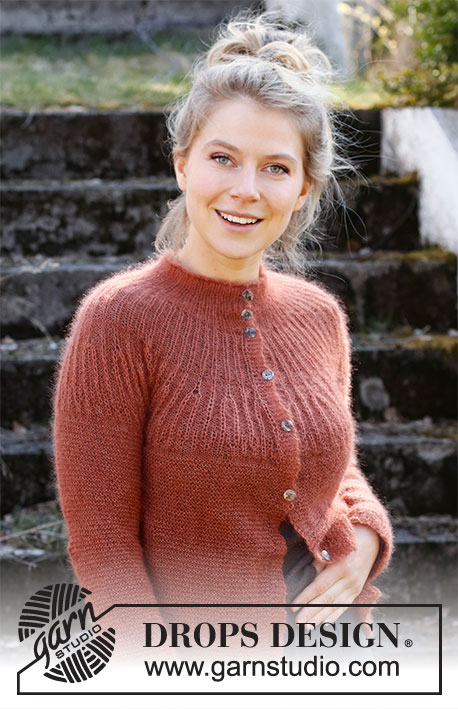
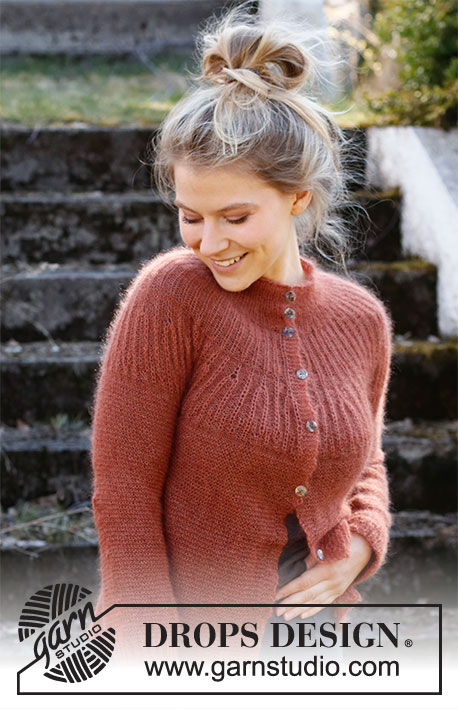
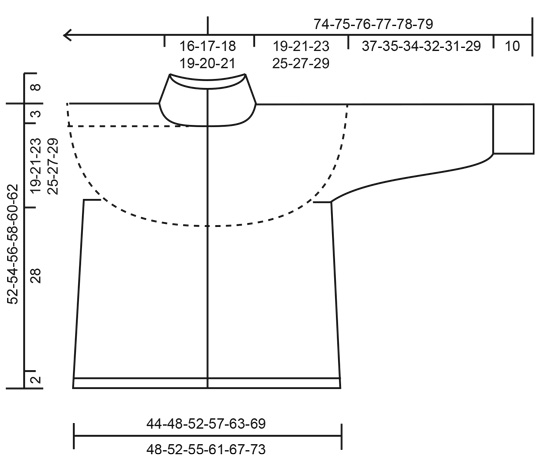
Knitted jacket in DROPS Kid-Silk. The piece is worked top down with round yoke, textured pattern on the yoke and garter stitch on the body and sleeves. Sizes S - XXXL.
DROPS 217-21 |
||||||||||
|
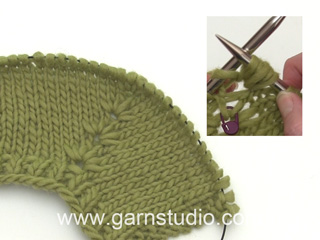
------------------------------------------------------- EXPLANATIONS FOR THE PATTERN: ------------------------------------------------------- RIDGE/GARTER STITCH (worked back and forth): Knit all rows. 1 ridge in height = Knit 2 rows. PATTERN: See diagrams A.1 to A.4. Choose diagrams for your size (applies to A.2, A.3 and A.4). The diagrams show all rows in the pattern from the right side. INCREASE/DECREASE TIP (evenly spaced): To work out how to increase/decrease evenly, count the total number of stitches on the needle (e.g. 315 stitches) minus the bands (e.g. 10 stitches) and divide the remaining stitches by the number of increases/decreases to be made (e.g. 14) = 21.8. In this example, increase by making 1 yarn over after approx. each 22nd stitch. Do not increase on the bands. On the next row, work the yarn overs twisted to avoid holes. When decreasing, knit together approx. each 21st and 22nd stitch. INCREASE TIP-1 (increasing the rib on yoke): Increase 1 stitch at the beginning of each purled section (from the right side) by making 1 yarn over. On the next row work the yarn overs twisted to avoid holes. Subsequently, knit the new stitches from the wrong side and purl them from the right side. NOTE: The 3 largest sizes increase 3 times in the purled sections. It is neatest to increase first at the beginning of the purled sections, then at the end and finally at the beginning again. INCREASE TIP-2 (for increases in Fisherman’s rib stitches): Increase 4 stitches in 1 Fisherman’s rib stitch by working 5 stitches in the same stitch as follows (from the right side): Knit 1 in the stitch under the next stitch, but do not slip this stitch from the left needle, * make 1 yarn over the right needle, knit 1 in the same stitch on the left needle *, work from *-* a total of 2 times, then slip the stitches from the left needle = 5 stitches (i.e. 4 stitches increased). INCREASE TIP-3 (for sides of body): Work until there are 2 stitches left before the marker thread, make 1 yarn over, knit 4 (the marker thread sits between these 4 stitches), make 1 yarn over. On the next row knit the yarn overs twisted to avoid holes. Then work the new stitches in garter stitch. DECREASE TIP (for each side of sleeve): Decrease as follows after the 1 edge stitch: Slip 1 stitch as if to knit, knit 1 and pass the slipped stitch over the knitted stitch (= 1 stitch decreased). Decrease as follows before the 1 edge stitch: Start 2 stitches before the edge stitch and knit 2 together (= 1 stitch decreased). BUTTONHOLES: Work buttonholes on right band (when garment is worn). Work from the right side when there are 3 stitches left on row as follows: Make 1 yarn over, knit 2 together and knit the last stitch. On the next row (wrong side) knit the yarn over to leave a hole. The first buttonhole is worked when the neck measures 2 cm, the second when the neck measures 5 cm and the third when the neck measures 8 cm. The other 6-6-6-7-7-7 buttonholes are worked with approx. 7½-8-8½-7½-8-8 cm between each one. CASTING-OFF TIP: To avoid the cast-off edge being tight you can cast off with a larger size needle. If the edge is still tight, make 1 yarn over after approx. each 4th stitch at the same time as casting off; the yarn overs are cast off as normal stitches. ------------------------------------------------------- START THE PIECE HERE: ------------------------------------------------------- JACKET – SHORT OVERVIEW OF THE PIECE: The neck and yoke are worked back and forth with circular needle from mid front and top down. The yoke is divided for the body and sleeves and the body continued back and forth with circular needle. The sleeves are worked back and forth with circular needle, top down as far as the rib. The rib is worked in the round with double pointed needles. The sleeve seams and the openings under the sleeves are sewn together to finish. NECK: Cast on 111-115-123-127-131-135 stitches (including 5 band stitches on each side towards mid front) with circular needle size 3.5 mm and 2 strands Kid-Silk. Remove the one strand – the rest of the piece is worked with 1 strand Kid-Silk. Change to short circular needle size 3 mm and purl 1 row (= wrong side). The next row is worked as follows from the right side: 1 edge stitch which is purled on each row, * knit 1 purl 1 *, work from *-* until there are 2 stitches left on the row, knit 1 and finish with 1 edge stitch which is purled on each row. Continue this rib but remember BUTTONHOLES on the right band – read description above. AT THE SAME TIME when the neck measures 8 cm, and the next row is from the wrong side, increase 50-52-56-58-60-62 stitches evenly spaced as described below: Work as before over the first 5 stitches, purl 1, * make 1 yarn over, knit 1, purl 1 *, work from *-* until there are 5 stitches left on the row and finish with 5 stitches in rib as before = 161-167-179-185-191-197 stitches on the row. Change to circular needle size 3.5 mm and insert 1 marker inside the band mid front. The yoke will be measured from this marker. YOKE: Work 2 rows of stocking stitch with 5 band stitches on each side towards mid front (The yarn overs are knitted twisted on the first row and the 5 stitches are now purled on every row to finished length). The next row is worked as follows from the right side: 5 purled band stitches, work A.1 until there are 6 stitches left on the row (= 50-52-56-58-60-62 repeats of 3 stitches), work the first stitch in A.1 (so the pattern is the same on both sides towards mid front) and finish with 5 purled band stitches. Continue A.1 like this AT THE SAME TIME as you increase in the purled sections as described below. REMEMBER THE KNITTING TENSION! S, M and L: When A.1 measures 7-8-8 cm and the next row is from the wrong side, increase all purl 2 (seen from the right side) to purl 3 by making 1 yarn over between each of the knitted stitches on the wrong side = 50-52-56 stitches increased = 211-219-235 stitches. Continue from ALL SIZES. XL, XXL and XXXL: When A.1 measures 3-3-3 cm, increase all purl 2 to purl 3 – read INCREASE TIP-1 = 58-60-62 stitches increased = 243-251-259 stitches. When A.1 measures 6-6-7 cm, increase all purl 3 to purl 4 = 58-60-62 stitches increased = 301-311-321 stitches. When A.1 measures 9-9-10 cm and the next row is from the wrong side, increase all purl 4 (seen from the right side) to purl 5 = 58-60-62 stitches increased = 359-371-383 stitches. Continue from ALL SIZES. ALL SIZES: = 211-219-235-359-371-383 stitches. Start from the right side and work 2 rows of stocking stitch with 5 purled band stitches on each side (the yarn overs are knitted twisted on the first row). The next row is worked as follows from the right side: 5 purled band stitches, work A.2 until there are 6 stitches left on the row (= 50-52-56-58-60-62 repeats of 4-4-4-6-6-6 stitches), work the first stitch in A.2 (so the pattern is the same on both sides towards mid front) and finish with 5 purled band stitches. Continue this pattern but when you have worked 6 rows in A.2, increase in the Fisherman’s rib stitches from the right side as described below: S, M and L: 5 purled band stitches, * increase 4 stitches in the Fisherman’s rib stitch – read INCREASE TIP-2, purl 3, work 1 Fisherman’s rib stitch as usual without increasing, purl 3 *, work from *-* until there are 6 stitches left on the row, increase 4 stitches in the last Fisherman’s rib stitch and finish with 5 purled band stitches = 315-327-351 stitches. Continue from ALL SIZES. XL: Start increasing in the 2nd Fisherman’s rib stitch from the edge and increase 4 stitches in every 4th Fisherman’s rib stitch throughout the row – read INCREASE TIP-2 (a total of 15 Fisherman’s rib stitches increased on the row) = 419 stitches. Continue from ALL SIZES. XXL: Start increasing in the first Fisherman’s rib stitch from the edge and increase 4 stitches in every 3rd Fisherman’s rib stitch throughout the row – read INCREASE TIP-2 (a total of 21 Fisherman’s rib stitches increased on the row) = 455 stitches. Continue from ALL SIZES. XXXL: Start to increase in the 2nd Fisherman’s rib stitch from the edge and increase 4 stitches in every 3rd Fisherman’s rib stitch throughout the row – read INCREASE TIP-2 (a total of 21 Fisherman’s rib stitches increased on the row) = 467 stitches. Continue from ALL SIZES. ALL SIZES: = 315-327-351-419-455-467 stitches. Continue the pattern in the same way, but where the Fisherman’s rib stitches were increased, work the 5 stitches as follows (from the right side): 1 Fisherman’s rib stitch, purl 3, 1 Fisherman’s rib stitch (see A.2B). When the yoke measures 15-17-17-19-19-21 cm from the marker, work the next row as follows from the right side: 5 purled band stitches, work A.3 until there are 6 stitches left on the row, but in XL, XXL and XXXL work A.4 over A.2B, so the pattern matches neatly. When there are 6 stitches left on the row, work the first stitch in A.3 (so the pattern is the same on both sides) and finish with 5 purled band stitches. Continue this pattern until A.3 measures 3-3-3-5-5-5 cm. The yoke now measures approx. 18-20-20-24-24-26 cm from the marker on the neck. Work 2 rows of stocking stitch over all stitches (purl band stitches as before) and increase, at the same time, 14-30-34-6-2-26 stitches evenly on the first row – read INCREASE/DECREASE TIP = 329-357-385-425-457-493 stitches. Continue with GARTER STITCH – read description above with the 5 band stitches purled as before – in this way, the bands stand out from the garter stitch on the body. When the yoke measures 19-21-23-25-27-29 cm from the marker on the neck, divide for the body and sleeves on the next row as follows: Work 52-57-60-66-72-79 stitches as before (= front piece), place the next 66-70-78-86-90-94 stitches on 1 thread for the sleeve, cast on 8-8-10-10-12-12 new stitches on the needle (= in side under sleeve), work 93-103-109-121-133-147 stitches in garter stitch (= back piece), place the next 66-70-78-86-90-94 stitches on 1 thread for the sleeve, cast on 8-8-10-10-12-12 new stitches on the needle (= in side under sleeve) and work the remaining 52-57-60-66-72-79 stitches as before (= front piece). Body and sleeves are finished separately. THE PIECE IS NOW MEASURED FROM HERE! BODY: = 213-233-249-273-301-329 stitches. Insert 1 marker thread 56-61-65-71-78-85 stitches in from each side (= sides of body). There are 101-111-119-131-145-159 stitches between the threads on the back piece. Allow the threads to follow your work onwards; they will be used when increasing in the sides. Continue back and forth with garter stitch and 5 purled band stitches on each side. When the piece measures 5 cm from the division increase 1 stitch on each side of both marker threads – read INCREASE TIP-3 (= 4 stitches increased). Increase like this every 6 cm a total of 4 times = 229-249-265-289-317-345 stitches. Continue working until the piece measures 28 cm from the division. There is approx. 2 cm left to finished length; you can try the jacket on and work to desired length. Knit 1 row from the right side where you increase 58-62-67-73-78-86 stitches evenly spaced– remember INCREASE/DECREASE TIP = 287-311-332-362-395-431 stitches. NOTE: This is done to avoid the rib being tight. Change to circular needle size 3 mm and work the next row from the wrong side as follows: 5 purled band stitches, * purl 1, knit 2 *, work from *-* until there are 6 stitches left on the row, purl 1 and finish with 5 purled band stitches. Continue this rib for 2 cm. Loosely cast off with garter stitch over garter stitch, knit over knit and purl over purl – read CASTING-OFF TIP! The jacket measures approx. 52-54-56-58-60-62 cm from the shoulder down. SLEEVE: Cast on 4-4-5-5-6-6 stitches with circular needle size 3.5 mm and Kid-Silk, knit the 66-70-78-86-90-94 stitches from the thread on the one side of the piece and cast on 4-4-5-5-6-6 new stitches at the end of the row = 74-78-88-96-102-106 stitches. Work garter stitch back and forth over all stitches. AT THE SAME TIME when the sleeve measures 2 cm from the division in all sizes, decrease 1 stitch on each side – read DECREASE TIP. Decrease like this every 2½-2½-1½-1½-1-1 cm a total of 7-8-12-15-16-17 times on each side = 60-62-64-66-70-72 stitches. Continue working until the sleeve measures 37-35-34-32-31-29 cm from the division. There is approx. 10 cm left to finished length; you can try the jacket on and work to desired length. NOTE: Shorter measurements in larger sizes due to wider neck and longer yoke. The rest of the sleeve (the rib) is worked in the round with double pointed needles. Divide the stitches between double pointed needles size 3 mm and work 2 rounds of stocking stitch where the number of stitches is adjusted to 60-63-63-66-69-72 stitches on the first round. Then work rib in the round (= knit 1, purl 2) for 10 cm. Loosely cast off with knit over knit and purl over purl – remember CASTING-OFF TIP! The sleeve measures approx. 47-45-44-42-41-39 cm from the division. Work the other sleeve in the same way. ASSEMBLY: Sew the sleeve seams, sewing in the outermost loop of the outermost stitch so the seam is flat. Sew the openings under the sleeves (where stitches were cast on). Sew the buttons onto the left band. |
||||||||||
Diagram explanations |
||||||||||
|
||||||||||

|
||||||||||
|
||||||||||
|
Have you made this or any other of our designs? Tag your pictures in social media with #dropsdesign so we can see them! Do you need help with this pattern?You'll find tutorial videos, a Comments/Questions area and more by visiting the pattern on garnstudio.com. © 1982-2024 DROPS Design A/S. We reserve all rights. This document, including all its sub-sections, has copyrights. Read more about what you can do with our patterns at the bottom of each pattern on our site. |
||||||||||


With over 40 years in knitting and crochet design, DROPS Design offers one of the most extensive collections of free patterns on the internet - translated to 17 languages. As of today we count 304 catalogues and 11422 patterns - 11422 of which are translated into English (UK/cm).
We work hard to bring you the best knitting and crochet have to offer, inspiration and advice as well as great quality yarns at incredible prices! Would you like to use our patterns for other than personal use? You can read what you are allowed to do in the Copyright text at the bottom of all our patterns. Happy crafting!
Comments / Questions (12)
Jeg er i gang med størrelse L og det er første udtagning, næste udtagning jeg ikke kan forstå. Og patentmaske kan jeg ikke fine noget om på jeres hjemmeside ? Hilsen Rita Kragh
08.03.2023 - 14:47DROPS Design answered:
Hej Rita, vi har flere videoer med udtagning i patent. Her ser du en af dem: tag 4 masker ud i patent
09.03.2023 - 09:18Jeg forstår ikke helt den måde som jeg skal tage ud på og hvor mange masker jeg skal tage ud ? Hilsen Rita
05.03.2023 - 17:19DROPS Design answered:
Hej Rita, Hvilken størrelse strikker du og hvor er du i opskriften?
08.03.2023 - 09:36Hi there, I'm working on the size s. After Diagram A2 ( Fisherman’s rib stitches from the right side as described below), 315 stitches on the needle. I believe at this point pattern would be on the wrong side, but next steps will be continue to work on the right side again. What have I missed?
24.01.2023 - 22:46DROPS Design answered:
Dear Reiko, after you have increased from RS you will work the next row from WS and adjust so that the 5 sts will be worked (seen from RS: 1 st in English rib, P3, 1 st in English rib) as 2nd row in A.2B = from WS purl the stitches in English rib and knit the 3 sts. Happy knitting!
25.01.2023 - 11:54Hej, Hvor store er knapperne i opskriften? :)
26.09.2022 - 12:10Komplicerat mönster framförallt med det garnet.
26.08.2021 - 08:52Hej! Förstår inte beskrivningen till mönstret. Diagram A.1 rätmaska från rätsidan, avigmaska från avigsidan och avigmaska från rätsidan, rätmaska från avigsidan. Enligt er så ska man läsa mönstret från rätsidan men hur stickar man det från avigsidan.
26.08.2021 - 08:50DROPS Design answered:
Hej Mona. Diagrammet är sett från rätsidan, men vi har förklarat hur symbolerna ska stickas både från rätsidan och avigsidan. Den första symbolen (vit fyrkant) stickar du alltså rät när du stickar på rätsidan. När du sedan har vänt arbetet och stickar på avigsidan så stickar du den symbolen som en avigmaska istället. Mvh DROPS Design
26.08.2021 - 10:35Hallo Ich habe versehentlich die erste Masche der Frontblende nicht immer links gestrickt sondern in der Rückreihe wie die übrigen 4 Maschen der Blende rechts. Jetzt rollt sich die Blende vorne auf. Ich habe den Fehler erst realisiert als ich schon weit hinter der Passe war und will auf gar keinen Fall alles wieder auf machen. Was hilft? Am Ende der Arbeit seitlich quer zwei Reihen an die Blende dran stricken?
24.08.2021 - 09:29DROPS Design answered:
Liebe Anna, Entschuldigung für die späte Antwort; Sie können die Jacke am Ende mit Stecknadeln auf einer geeigneten Unterlage spannen, anfeuchten (z.B. mit einer Sprühflasche für Blumen) und trocknen lassen, danach entfernen Sie die Stecknadeln, dann sollte sich der Rand nicht mehr rollen.
03.01.2022 - 08:08Hallo, wie strickt man eine Randmasche links? Wird die erste Masche in Hin- und Rückreihe links gestrickt und die letzte Masche auch links?
22.05.2021 - 20:58DROPS Design answered:
Liebe Anette, ja genau so werden die erste + die letzte Masche gestrickt. Viel Spaß beim stricken!
25.05.2021 - 07:47Hello. I'm quite thin and wear a xs size. I'm not a very experienced knitter and have often trouble trying to adapt the patterns. Could you please help me with this one? And could you consider including xs size in your designs? Best regards.
26.10.2020 - 12:11DROPS Design answered:
Dear Maria, we are unfortunately not able to adapt every pattern to every single request, we do have some patterns in size XS - you might find one of them to inspire you. Feel free to request any individual assistance from your DROPS store or any knitting forum. Happy knitting!
26.10.2020 - 12:51The neckline is very elegant and it gives this cardigan a vintage touch. I’ve been searching for a pattern like this!
15.06.2020 - 16:36