
Popular categories
Looking for a yarn?


|
|
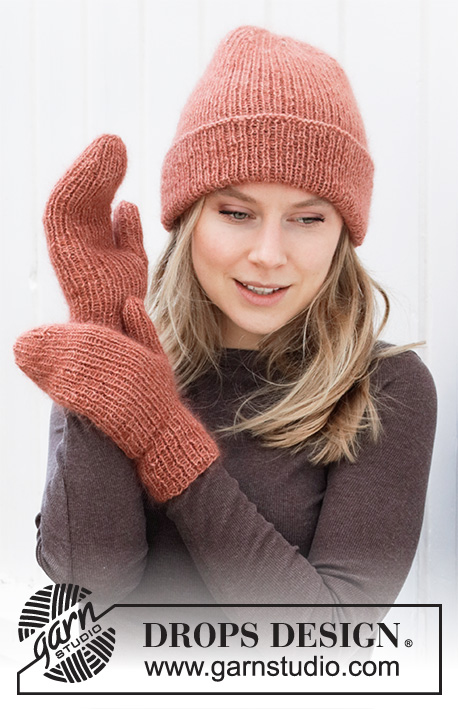
Blushing Fall |
|
 |
 |
Knitted beanie / hipster hat and mittens in DROPS Alpaca and DROPS Kid-Silk. The piece is worked in rib.
DROPS 214-2 |
|
|
------------------------------------------------------- EXPLANATIONS FOR THE PATTERN: ------------------------------------------------------- DECREASE TIP-1 (for hat): Decrease 8 stitches on each decrease-round. Work until there are 5 stitches left before the stitch with the marker, knit 2 together, work rib as before over the next 7 stitches, slip 1 stitch as if to knit, knit 1 and pass the slipped stitch over. Repeat at all the other markers. DECREASE TIP-2 (for mittens): Decrease 1 stitch on each side of the marker thread as follows: Work until there are 5 stitches left before the stitch with the marker, knit 2 together, work rib as before over the next 7 stitches (the middle of these stitches has the marker thread), slip 1 stitch as if to knit, knit 1 and pass the slipped stitch over. INCREASE TIP (for mittens): Increase 1 stitch by making 1 yarn over. On the next round work the yarn over twisted to avoid a hole. Then work the new stitch in rib. ------------------------------------------------------- START THE PIECE HERE: ------------------------------------------------------- HAT – SHORT OVERVIEW OF THE PIECE: The piece is worked in the round with circular needle, bottom up. Change to double pointed needles when necessary. HAT: Cast on 120 stitches with circular needle size 3.5 mm and 1 strand Alpaca and 1 strand Kid-Silk (= 2 strands). Purl 1 round. Work rib (= knit 1, purl 1) in the round. REMEMBER THE KNITTING TENSION! When the piece measures 23 cm, insert 4 markers as follows: Insert the first marker in the first knitted stitch on the round (in the stitch, not between 2 stitches) and the other 3 markers with 29 stitches between each marker-stitch. All the markers are inserted into knitted stitches. Continue with rib and on the next round begin to decrease - read DECREASE TIP-1. Decrease like this every 2nd round 10 times = 40 stitches left. The next round is worked as follows: * Rib as before over the first 4 stitches, slip 1 stitch as if to knit, knit 2 together and pass the slipped stitch over the knitted-together stitches (= 2 stitches decreased), rib over the next 3 stitches *, work from *-* a total of 4 times on the round = 32 stitches. Work 1 round with knit over knit and purl over purl. Knit all stitches together 2 and 2 = 16 stitches. Cut the strand, thread it through the remaining stitches, tighten and fasten well. The hat measures approx. 25 cm with a 6 cm turn-up (= a total of 31 cm). ------------------------------------------------------- MITTENS – SHORT OVERVIEW OF THE PIECE: The piece is worked in the round with double pointed needles. RIGHT MITTEN: Cast on 40-48 stitches with double pointed needles size 3.5 mm and 1 strand Alpaca and 1 strand Kid-Silk (= 2 strands). Insert a marker thread at the beginning of the round and work rib (= knit 1, purl 1) in the round for 8-8 cm. REMEMBER THE KNITTING TENSION! Insert a marker in the first stitch (a knitted stitch = thumb-stitch). Continue with rib and increase 1 stitch on each side of the thumb-stitch (= 2 stitches increased) – read INCREASE TIP! Increase like this, on each side of the increased stitches, every 2nd round a total of 5-6 times = 50-60 stitches. Now place the 11-13 thumb-stitches on a thread. Continue in the round with rib and cast on 1 stitch behind the thumb-stitches on the next round = 40-48 stitches. When the mitten measures 22-22 cm (there is approx. 5-7 cm left to finished length; you can try the mitten on and work to desired length), insert 2 marker threads (in the stitch, not between 2 stitches) as follows: Insert the first thread in the 11th-13th stitch (= 1 knitted stitch under the mitten) and the other thread in the 31st-33rd stitch (= 1 knitted stitch on top of the mitten). Continue with rib and begin to decrease on the next round - read DECREASE TIP-2. Decrease like this every 4th round 1-1 time then every 2nd round 4-6 times = 20-20 stitches. Knit all stitches together 2 and 2; 5-5 stitches left. Cut the strand, thread it through the remaining stitches, tighten and fasten well. The mitten measures approx. 27-29 cm. THUMB: Place the 11-13 thumb-stitches from the thread back on double pointed needles size 3.5 mm and knit up 3-3 stitches behind the thumb = 14-16 stitches. Work rib in the round until the thumb measures 5½-6 cm (there is approx. ½ cm left to finished length; you can try the mitten on and work to desired length). Knit all stitches together 2 and 2 until there are 4 stitches left. Cut the strand, thread it through the remaining stitches, tighten and fasten well. LEFT MITTEN: Cast on 40-48 stitches with double pointed needles size 3.5 mm and 1 strand Alpaca and 1 strand Kid-Silk (= 2 strands). Insert a marker thread at the beginning of the round and work rib (= knit 1, purl 1) in the round for 8-8 cm. Insert a marker in the 19th-23rd stitch on the round (= thumb-stitch). Continue with rib and increase 1 stitch on each side of the thumb-stitch (= 2 stitches increased) – remember INCREASE TIP! Increase like this, on each side of the increased stitches, every 2nd round a total of 5-6 times = 50-60 stitches. Now place the 11-13 thumb-stitches on a thread. Continue with rib and cast on 1 stitch behind the thumb-stitches on the next round = 40-48 stitches. When the mitten measures 22-22 cm (there is approx. 5-7 cm left to finished length; you can try the mitten on and work to desired length), insert 2 marker threads (in the stitch, not between 2 stitches) as follows: Insert the first thread in the 11th-13th stitch (= 1 knitted stitch under the mitten) and the other thread in the 31st-33rd stitch (= 1 knitted stitch on top of the mitten). Continue with rib and begin to decrease on the next round - remember DECREASE TIP-2. Decrease like this every 4th round 1-1 time then every 2nd round 4-6 times = 20-20 stitches. Knit all stitches together 2 and 2; there are 5-5 stitches left. Cut the strand, thread it through the remaining stitches, tighten and fasten well. The mitten measures approx. 27-29 cm. THUMB: Work in the same way as the right thumb. |
|
|
Have you made this or any other of our designs? Tag your pictures in social media with #dropsdesign so we can see them! Do you need help with this pattern?You'll find tutorial videos, a Comments/Questions area and more by visiting the pattern on garnstudio.com. © 1982-2024 DROPS Design A/S. We reserve all rights. This document, including all its sub-sections, has copyrights. Read more about what you can do with our patterns at the bottom of each pattern on our site. |
|


With over 40 years in knitting and crochet design, DROPS Design offers one of the most extensive collections of free patterns on the internet - translated to 17 languages. As of today we count 304 catalogues and 11422 patterns - 11422 of which are translated into English (UK/cm).
We work hard to bring you the best knitting and crochet have to offer, inspiration and advice as well as great quality yarns at incredible prices! Would you like to use our patterns for other than personal use? You can read what you are allowed to do in the Copyright text at the bottom of all our patterns. Happy crafting!
Comments / Questions (16)
Opmerking bij de want maat M/L: De tweede markeerdraad voor de minderingen moet volgens mij in steek 37 geplaatst worden en niet in steek 33. Anders zijn de minderingen niet symmetrisch en overlappen ze elkaar uiteindelijk.
18.01.2024 - 09:12W opisie wykonania prawej rękawiczki brakuje informacji, gdzie umieścić markery, które wyznaczają kciuk i dodawanie oczek. Bardzo proszę o uzupełnienie.
02.12.2023 - 23:52DROPS Design answered:
Witaj Aniu, informacje, o których piszesz są zawarte we wzorze. Pozdrawiamy!
04.12.2023 - 08:56Hallo liebe Team, Übersetzungsfehler bei den Handschuhen: Im Norwegische. Original steht es eigentlich so: Auf diese Weise in jeder 4. Runde 1-1 x abnehmen, dann in jeder 2. Runde 4-6 x abnehmen = 20-20 Maschen. Für Anfänger ist es missverständlich, hier steht nur: Weiter in Runden im Rippenmuster stricken, dabei in der nächsten 4. Runde mit den Abnahmen beginnen - ABNAHMETIPP-2 beachten. Dann in jeder 2. Runde 4-6 x abnehmen = 20-20 Maschen. Danke!
21.11.2022 - 11:39DROPS Design answered:
Liebe Barbara, hier ist es anders gemeint, dh nach der 1. Abnahmen stricken Sie 3 Reihen, dann nehmen Sie in jeder 2. Runde 4-6 Mal ab. Viel Spaß beim stricken!
21.11.2022 - 16:28Muchísimas gracias por vuestra atención, ahora lo entiendo perfectamente
06.03.2022 - 18:47Gracias por vuestra respuesta pero no me cuadra con esto, que es lo que pone en el patrón para hacer las disminuciones, perdonad si voy errada pero no me acaba de cuadrar... "Tejer hasta que resten 5 puntos antes del punto con el marcador, tejer 2 puntos juntos de derecho, tejer en resorte como antes sobre los 7 puntos siguientes, deslizar 1 punto como de derecho, tejer 1 punto derecho y pasar el punto deslizado por encima. Repetir en todos los otros marcadores." Muchas gracias
04.03.2022 - 11:48DROPS Design answered:
Hola Alicia, sí, perdona, pensaba que se trataba de 2 puntos juntos de derecho, no 2 derechos seguidos. Es habitual que al trabajar disminuciones queden 2 puntos iguales (derechos o reveses) seguidos. En este caso se trabajarían como se presentan los puntos (los dos de derecho o de revés). En la última foto del gorro pueden ver que se empieza a interrumpir el punto elástico de esta manera.
06.03.2022 - 12:51Hola, tengo una duda con el gorro, después de hacer una vuelta de disminuciones, en la siguiente vuelta me encuentro puntos del derecho juntos, cómo debo hacer? sigo tejiendo uno del derecho y uno del revés o tejo los dos del derecho? gracias
28.02.2022 - 11:32DROPS Design answered:
Hola Alicia, la disminución se trabaja como sigue: deslizar 1 punto de derecho, 2 puntos juntos de derecho y pasar el punto deslizado sobre los puntos trabajados juntos. Por lo que de 3 puntos queda 1 punto. Esto debería cuadrar bien en el punto elástico de la siguiente vuelta.
28.02.2022 - 16:46Hi! Can I work this hat and mitten patterns using the yarn Sky? I have many Sky at the moment, and DK yarns are abundant in my stash. According to your Ravelry page of this particular pattern, this seems to be DK pattern. Please advise if it is ok to use your yarn Sky using this pattern.
20.01.2022 - 14:19DROPS Design answered:
Dear Ellie, work a swatch and check your tension/texture, you might work with Sky (it might just look somewhat different). Happy knitting!
20.01.2022 - 17:23Witam serdecznie. Czy zamiast włóczki kid silk w tym wzorze mogę użyć jako alternatywę brushed alpaca silk?
16.11.2021 - 20:30DROPS Design answered:
Witaj Justyno, spróbuj, ale wcześniej zrób próbkę i zobacz czy nie trzeba będzie zmniejszyć początkowej liczby oczek w czapce, gdyż Brushed Alpaca Silk jest znacznie grubsza od Kid-Silka. Pozdrawiamy!
17.11.2021 - 08:20Bonjour, lors des diminutions un tour sur deux sur le bonnet, sur le rang sans diminution, tricote-on en côte en suivant les côtes des mailles du rang précédent (on se retrouvé avec plusieurs mailles endroit à la suite ) ou tricote-on en côte en ignorant les mailles du rang précédent entre les diminutions? Merci!
18.03.2021 - 17:43DROPS Design answered:
Bonjour Jessie, au tour suivant les diminutions, tricotez les mailles comme elles se présentent (= les mailles endroit à l'endroit et les mailles envers à l'envers). Bon tricot!
19.03.2021 - 06:28Kan man bruge brushed alpaca silk til huen? Hvor meget garn skal bruges og er det bare 1 tråd, der skal strikkes med?
20.01.2021 - 21:19DROPS Design answered:
Hej Lene, prøv garnomregneren, vælg DROPS Alpaca - garnforbrug til din størrelse x 2 - og vælg 2 tråde - God fornøjelse!
26.01.2021 - 16:17