
Popular categories
Looking for a yarn?


|
|||||||||||||||||||||||||
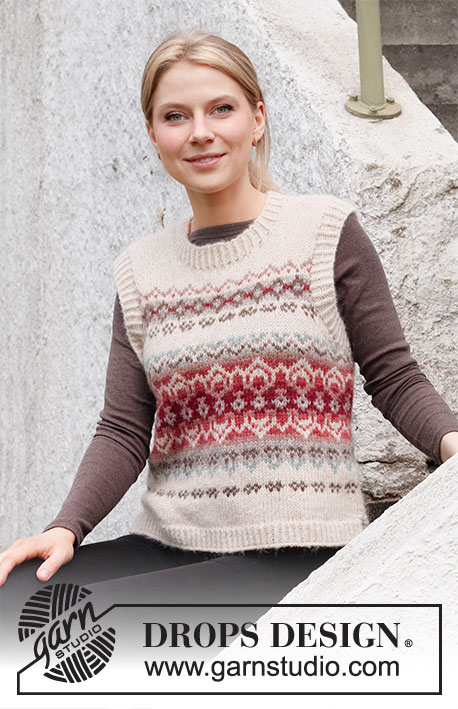
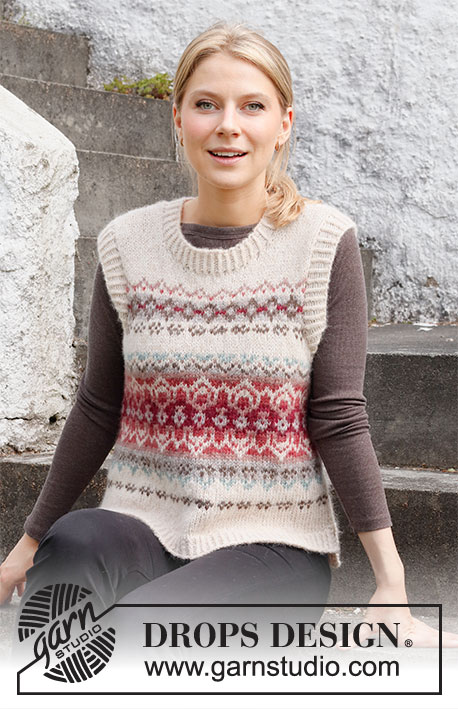
Mistletoe Muse Vest |
|||||||||||||||||||||||||
 |
 |
||||||||||||||||||||||||
Knitted vest / slipover in DROPS Air. The piece is worked with Nordic pattern. Sizes S - XXXL.
DROPS 217-2 |
|||||||||||||||||||||||||
|
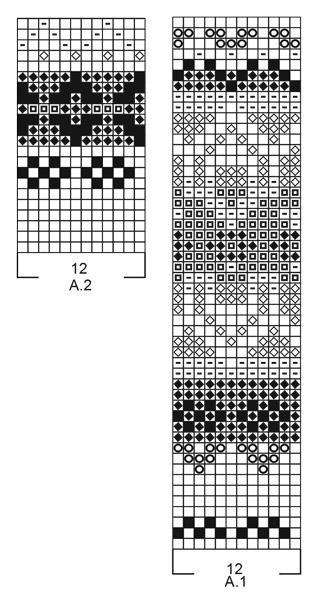
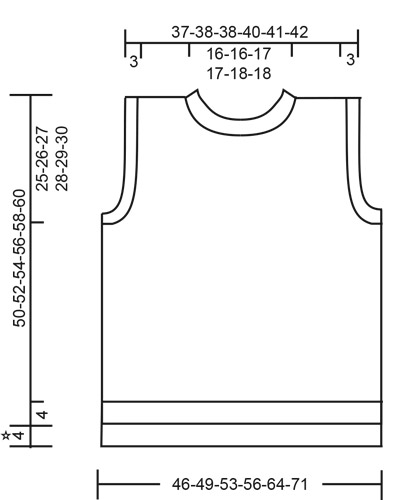
------------------------------------------------------- EXPLANATIONS FOR THE PATTERN: ------------------------------------------------------- RIDGE/GARTER STITCH (worked back and forth): Knit all rows. 1 ridge in height = Knit 2 rows. PATTERN: See diagrams A.1 and A.2. KNITTING TIP: To avoid the knitting tension becoming tighter when working pattern, it is important that the strands at the back are not tight. Use a size larger needle when working pattern if this is a problem. If the knitting tension is not correct in height and you work too tightly, the patterned section will be short – you can correct for this by regularly working an extra row in the 1-coloured sections. If you work loosely, the patterned section will be too long – you can correct for this by regularly working 1 round less in the 1-coloured sections. DECREASE TIP (evenly spaced): To work out how to decrease evenly, count the total number of stitches on needle (e.g. 93 stitches) minus the edge stitches (i.e. 4 stitches) and divide the remaining stitches by the number of decreases to be made (e.g. 14) = 6.4. In this example decrease by alternately knitting together each 5th and 6th stitch and each 6th and 7th stitch. ------------------------------------------------------- START THE PIECE HERE: ------------------------------------------------------- VEST – SHORT OVERVIEW OF THE PIECE: To start with the piece is worked back and forth to make the split in the sides. The back piece is 4 cm longer than the front piece. Then the front and back pieces are placed on the same circular needle and the piece is continued in the round as far as the armholes. The front and back pieces are then finished separately, back and forth. The neck and sleeve edges are worked to finish. BACK PIECE: Cast on 93-101-109-115-129-145 stitches with circular needle size 4 mm and wheat. Purl 1 row (= wrong side). Then work rib as follows: ROW 1 (right side): Work 2 edge stitches in GARTER STITCH – read description above, * knit 1 twisted, purl 1 *, work from *-* until there are 3 stitches left on the row, knit 1 twisted and 2 edge stitches in garter stitch. ROW 2 (wrong side): Work 2 edge stitches in garter stitch, * purl 1 twisted, knit 1, *, work from *-* until there are 3 stitches left on the row, purl 1 twisted and 2 edge stitches in garter stitch. Repeat these 2 rows until the rib measures 8 cm. Knit 1 row from the right side where you decrease 14-16-18-18-20-24 stitches evenly spaced - read DECREASE TIP = 79-85-91-97-109-121 stitches. Purl 1 row from the wrong side. Lay the piece to one side and work the front piece. FRONT PIECE: Cast on 93-101-109-115-129-145 stitches with circular needle size 4 mm and wheat. Purl 1 row (= wrong side). Then work rib as follows: ROW 1 (right side): Work 2 edge stitches in garter stitch, * knit 1 twisted, purl 1 *, work from *-* until there are 3 stitches left on the row, knit 1 twisted and 2 edge stitches in garter stitch. ROW 2 (wrong side): Work 2 edge stitches in garter stitch, * purl 1 twisted, knit 1, *, work from *-* until there are 3 stitches left on the row, purl 1 twisted and 2 edge stitches in garter stitch. Repeat these 2 rows until the rib measures 4 cm. Knit 1 row from the right side where you decrease 14-16-18-18-20-24 stitches evenly spaced - remember DECREASE TIP = 79-85-91-97-109-121 stitches. Purl 1 row from the wrong side. Now work the 2 sections together as follows: Change to circular needle size 5 mm and knit until there is 1 stitch left on the front piece, knit together the last stitch on the front piece and the first stitch on the back piece (= 1 stitch decreased), knit until there is 1 stitch left on the back piece, knit together the last stitch on the back piece and the first stitch on the front piece (= 1 stitch decreased) = 156-168-180-192-216-240 stitches. Insert a marker in each side, i.e. where the stitches are knitted together. These markers will be used when casting off for the armholes later. To make the pattern symmetric mid front, it is important that the round begins as described below. In sizes M, XL, XXL and XXXL begin the round at one of the stitches with a marker. In sizes S and L begin the round at the 3rd stitch before one of the stitches with a marker (i.e. the stitch with the marker is now the 4th stitch on the round) – you can insert an extra marker at the beginning of the round if you wish. BODY: Knit in the round. REMEMBER THE KNITTING TENSION! When the piece measures 6-8-9-11-12-14 cm from the cast-on edge on the front piece, work A.1 the whole round (= 13-14-15-16-18-20 repeats of 12 stitches) – read KNITTING TIP. When the piece measures 25-26-27-28-29-30 cm from the cast-on edge on the front piece, cast off 9-9-11-11-13-13 stitches on each side of the piece (i.e. the stitch with the marker plus 4-4-5-5-6-6 stitches on each side) = 69-75-79-85-95-107 stitches on the front and back pieces. The front and back pieces are finished separately. Insert 1 marker in the middle stitch on both the front and the back pieces. THE PIECES ARE NOW MEASURED FROM HERE! FRONT PIECE: Continue back and forth with stocking stitch, 1 edge stitch in garter stitch on each side and A.1 as before – the pattern should continue above each repeat as before and you work as much pattern as you have room for towards the armholes. AT THE SAME TIME cast off for the armholes at the beginning of each row on both sides as follows: Cast off 3 stitches 1-1-1-1-2-3 times, 2 stitches 1-2-3-4-4-5 times and 1 stitch 2-2-2-2-3-3 times = 55-57-57-59-61-63 stitches. When A.1 has been finished in height continue with A.2 over A.1 – the pattern should continue above each repeat as before and you work as much pattern as you have room for towards the armholes. When A.2 has been finished in height the piece measures 39-41-42-44-45-47 cm, as long as the knitting tension has been maintained in height. Continue with wheat to finished length. When the piece measures 15-16-16-17-17-18 cm from the marker, place the middle 15-15-17-17-19-19 stitches on a thread for the neck and each shoulder is finished separately. Continue to cast off for the neck at the beginning of each row from the neck as follows: Cast off 2 stitches 2 times and 1 stitch 2 times = 14-15-14-15-15-16 stitches on the shoulder. When the piece measures 25-26-27-28-29-30 cm from the marker cast off with knit from the right side. The vest measures approx. 50-52-54-56-58-60 cm from the shoulder down. Work the other shoulder in the same way. BACK PIECE: Continue back and forth with stocking stitch, 1 edge stitch in garter stitch on each side and A.1 as before – the pattern should continue above each repeat as before and you work as much pattern as you have room for towards the armholes. AT THE SAME TIME cast off for the armholes at the beginning of each row on both sides as follows: Cast off 3 stitches 1-1-1-1-2-3 times, 2 stitches 1-2-3-4-4-5 times and 1 stitch 2-2-2-2-3-3 times = 55-57-57-59-61-63 stitches. When A.1 has been finished in height continue with A.2 over A.1 - the pattern should continue above each repeat as before and you work as much pattern as you have room for towards the armholes. When A.2 has been finished in height the piece measures 39-41-42-44-45-47 cm (as long as the knitting tension has been maintained in height). Continue with wheat to finished length. When the piece measures 23-24-25-26-27-28 cm from the marker, cast off the middle 25-25-27-27-29-29 stitches for the neck and each shoulder is finished separately. On the next row from the neck cast off 1 stitch = 14-15-14-15-15-16 stitches. When the piece measures 25-26-27-28-29-30 cm, cast off with knit from the right side. The vest measures approx. 54-56-58-60-62-64 cm from the shoulder down. Work the other shoulder in the same way. ASSEMBLY: Sew the shoulder seams with grafting stitches inside the cast-off edges – make sure the seam is not tight. NECK: Start on top of the shoulder with short circular needle size 4 mm and wheat. Knit up approx. 78-84 stitches around the neck (number of stitches must be divisible by 2). Work rib (= knit 1 twisted, purl 1) in the round for 3 cm. Cast off with knit over knit and purl over purl - read CASTING-OFF TIP. SLEEVE EDGES: Start from the right side at the bottom of the armhole. Using circular needle size 4 mm and wheat, knit up approx. 82 to 106 stitches around the armhole (number of stitches must be divisible by 4). Work rib (= knit 1 twisted, purl 1) in the round for 3 cm. Cast off with knit over knit and purl over purl. |
|||||||||||||||||||||||||
Diagram explanations |
|||||||||||||||||||||||||
|
|||||||||||||||||||||||||
|
|||||||||||||||||||||||||
|
|||||||||||||||||||||||||
|
Have you made this or any other of our designs? Tag your pictures in social media with #dropsdesign so we can see them! Do you need help with this pattern?You'll find tutorial videos, a Comments/Questions area and more by visiting the pattern on garnstudio.com. © 1982-2024 DROPS Design A/S. We reserve all rights. This document, including all its sub-sections, has copyrights. Read more about what you can do with our patterns at the bottom of each pattern on our site. |
|||||||||||||||||||||||||


With over 40 years in knitting and crochet design, DROPS Design offers one of the most extensive collections of free patterns on the internet - translated to 17 languages. As of today we count 304 catalogues and 11422 patterns - 11422 of which are translated into English (UK/cm).
We work hard to bring you the best knitting and crochet have to offer, inspiration and advice as well as great quality yarns at incredible prices! Would you like to use our patterns for other than personal use? You can read what you are allowed to do in the Copyright text at the bottom of all our patterns. Happy crafting!
Comments / Questions (13)
Hello, I’m thinking of doing this in stripes, I think with all the different colours it’s 450g, how much yarn does it need if one colour was used please? Thanks
23.11.2023 - 19:05DROPS Design answered:
Dear Mrs Woods, you can get helped from any other similar patterns (see all our slipovers in Air here to inspire you. Happy knitting!
24.11.2023 - 07:42Drops steenrood 28 is helaas niet meer leverbaar. Welke kleur kan ik als alternatief hiervoor gebruiken? Dank
29.04.2023 - 08:20DROPS Design answered:
Dag Janneke,
In plaats van steenrood zou je bijvoorbeeld oranje 13 kunnen kiezen of framboos 25. Ik zie dat oudroze er ook niet meer is. Hiervoor zou je bijvoorbeeld blus 32 kunnen kiezen.
30.04.2023 - 16:46Hei, Hvor mye garn ville man ha brukt hvis man ikke hadde strikket mønster, men alt i samme farge? I størrelse L?
20.02.2023 - 23:31DROPS Design answered:
Hej Inger, prøve at søge på slipover og DROPS Air, så kan du se garnforbruget på en ensfarvet DROPS Air :)
23.02.2023 - 15:46Hola, que es "trigo"? (Montar 93-101-109-115-129-145 puntos con una aguja circular de 4 mm y trigo. )
08.11.2022 - 13:38DROPS Design answered:
Hola Mariana, trigo es el color con el que empiezas a trabajar; un ovillo del color nº02 o el color principal.
13.11.2022 - 16:51Hello! Based on the pattern diagram, the bust of the XL size measure 80cm around (40cm front + 40cm back). Is that correct? It seems a little small for XL. Thanks!
10.11.2021 - 15:05DROPS Design answered:
Dear Dee, the 40 cm is the distance between the two shoulder edges.. for the complete width of the west see the bottom of the drawing, according to which, the piece in XL size is 2 X 54 cm around. Happy Stitching!
10.11.2021 - 20:55Bonjour, je souhaite réaliser le modèle mistletoe muse vest en taille S mais au lieu d'utiliser 7 couleurs comme proposées, j'aimerais utiliser le blé et pour le jacquard brume ref 15, bleu marine ref9 et bleu uni ref 16, dans ce cas, combien de pelotes dois-je prévoir en plus des 3 pelotes pour le blé la couleur principale ?
01.11.2021 - 11:27DROPS Design answered:
Bonjour Mme Chenbeault, nous ne sommes malheureusement pas en mesure de pouvoir adapter chacun de nos modèles à chaque demande, votre magasin DROPS saura vous conseiller, même par mail ou téléphone. Merci pour votre compréhension. Bon tricot!
03.11.2021 - 07:37Hejsa Jeg ville gerne, at der var en størrelses-anvisning i opskriften. Hvad måler vesten i størrelse S, M, L osv. Det er rart, når man f.eks. er usikker på, om man skal vælge S eller M
29.10.2020 - 08:29DROPS Design answered:
Hej Mette, Jo men det findes, du finder vestens mål i måleskitsen nederst i opskriften. God fornøjelse!
29.10.2020 - 08:42Rättelsen 19.10 gäller väl BAKSTYCKET ?
25.10.2020 - 22:47DROPS Design answered:
Hei Sofia. Her har den svenske rettelse teksten for bakstykket ikke blitt lagt inn. Det skal vi få gjort, i mellomtiden kan du se på den norske eller danske rettelse teksten. Takk for at du gjorde oss oppmerkom på denne feilen. mvh DROPS design
26.10.2020 - 15:30Ved bagstykket står i 10. linie: “ når arbejdet måler 23-24–25-26-27-28 cm fra mærket, lukkes de midterste 25-25-27-27.... masker af til hals. Lidt længere nede står der i 13. linie “når arbejder målet 22- 23-24-25-26-27 cm, lukkes der af med ret....... Hvordan kan det være at Arbejdet først skal være 24 cm og så blive mindre til 23 cm? Burde det ikke være omvendt?
09.10.2020 - 21:20DROPS Design answered:
Hei Pernille. Ja, her er det noen tall som er feil. Det vil bli lagt ut en rettelse snart. God Fornøyelse!
19.10.2020 - 08:43Jeg kan ikke få masketal og strikkefasthed til at passe med målskitsen. I str S skal man have 93 m. Med en strikkefasthed på 17m=10 cm giver det knap 55cm, men ifølge målskitsen skal det give 46 cm,. Det er en ret stor afvigelse. Har jeg misforstået noget?
07.10.2020 - 07:04DROPS Design answered:
Hej Hanne. Du börjar med att sticka rib så det är därför du inte får det att stämma. Stickfastheten är uppgett i glatstrik/mönster. När du börjar sticka glatstrik minskar du till 79 m och då stämmer det med målskitsen. Mvh DROPS Design
07.10.2020 - 08:33