
Popular categories
Looking for a yarn?


|
|||||||||||||
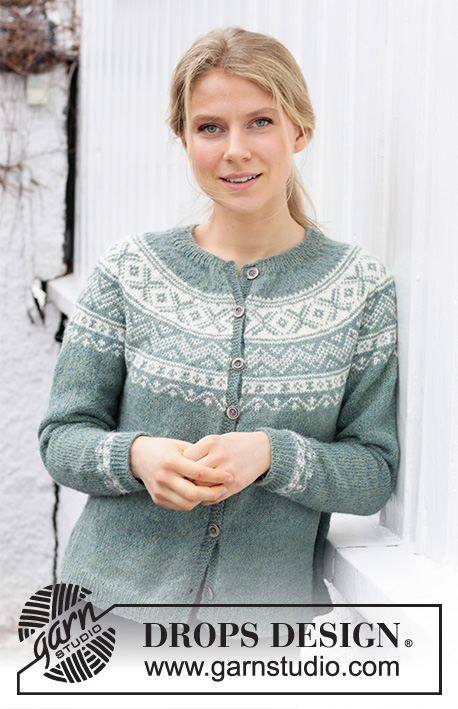
Scent of Pine Jacket |
|||||||||||||
 |
 |
||||||||||||
Knitted jacket in DROPS Alpaca. The piece is worked top down with round yoke and Nordic pattern on the yoke and on the bottom of the sleeves. Sizes S - XXXL.
DROPS 215-7 |
|||||||||||||
|
------------------------------------------------------- EXPLANATIONS FOR THE PATTERN: ------------------------------------------------------- RIDGE/GARTER STITCH (worked back and forth): Knit all rows. 1 ridge in height = Knit 2 rows. INCREASE TIP-1 (evenly spaced): To work out how to increase evenly, count the total number of stitches on the needle (e.g. 111 stitches) divide by the number of increases to be made (e.g. 37) = 3. In this example, increase by making 1 yarn over after each 3rd stitch. On the next row work the yarn overs twisted to avoid holes. If there are edge or band stitches on each side, deduct these from the total number of stitches before dividing. Do not increase on bands/edge stitches. PATTERN: See diagrams A.1 to A.3. Choose diagram for your size (applies to A.1 and A.2). The whole pattern is worked in stockinette stitch. KNITTING TIP: To avoid the knitting gauge becoming tighter when working pattern it is important that the strands at the back are not tight. Use a size larger needle when working pattern if this is a problem. ELEVATION (back of neck): So the jacket is slightly higher at the back of the neck when working the yoke, you can work an elevation as described here. Skip this section if you do not want an elevation. Insert a marker in the middle of the row. Start from the right side with sea fog and knit 14-15-16-16-17-18 stitches past the marker, turn, tighten strand and purl 28-30-32-32-34-36 stitches back. Turn, tighten the strand and knit 42-45-48-48-51-54 stitches, turn, tighten strand and purl 56-60-64-64-68-72 stitches back. Turn, tighten the strand and knit 70-75-80-80-85-90 stitches, turn, tighten strand and purl 84-90-96-96-102-108 stitches back. Turn, tighten the strand, knit to end of row, turn and purl 1 row back (bands worked in garter stitch). Then work YOKE as described in the text. INCREASE TIP-2 (for sides of body): Work until there are 2 stitches left before the marker thread, make 1 yarn over, knit 4 (marker thread sits between these 4 stitches) make 1 yarn over (= 2 stitches increased at each marker thread). On the next row work the yarn overs twisted to avoid holes. Then work the new stitches in stockinette stitch. DECREASE TIP (for mid under sleeve): Decrease 1 stitch on either side of the stitch with the marker as follows: Work until there are 2 stitches left before the stitch with the marker, knit 2 together, knit the stitch with the marker, slip 1 stitch as if to knit, knit 1 and pass the slipped stitch over the knitted stitch (= 2 stitches decreased). BUTTONHOLE: Work buttonholes on the right band (when the garment is worn). Work from the right side when there are 3 stitches left on the row as follows: Make 1 yarn over, knit 2 together and knit 1. On the next row knit the yarn over to leave a hole. The first buttonhole is worked when the rib on the neck measures approx. 1½-2 cm = 1/2-¾". Then work the other 6-6-6-7-7-7 buttonholes with approx. 7½-8-8-7½-7½-8 cm = 2⅞"-3⅛"-3⅛"-2⅞"-2⅞"-3⅛" between each one. BINDING-OFF TIP: To avoid the bind-off edge being tight you can bind off with a larger size needle. If the edge is still tight, make 1 yarn over after approx. each 6th stitch at the same time as binding off; the yarn overs are bind off as normal stitches. ------------------------------------------------------- START THE PIECE HERE: ------------------------------------------------------- JACKET – SHORT OVERVIEW OF THE PIECE: The neck and yoke are worked back and forth with circular needle from mid front and top down. Parts of the bands are worked separately and sewn on to finish. The yoke is divided for body and sleeves and the body continued back and forth. The sleeves are worked in the round with short circular needle/double pointed needles, top down. NECK: Cast on 121-125-131-135-139-145 stitches (including 5 band stitches on each side) with circular needle size 2.5 mm = US 1,5 and sea fog. Purl 1 row (= wrong side). The next row is worked as follows from the right side: 5 band stitches in GARTER STITCH – read description above, * knit 1, purl 1 *, work from *-* until there are 6 stitches left on the row, knit 1 and finish with 5 band stitches in garter stitch. Continue this rib for 3 cm = 1⅛", but remember the BUTTONHOLES on the right band – read description above. Finish the rib after a row from the wrong side. The next row is worked as follows from the right side: Work 5 band stitches as before and then place them on a thread or extra needle, cast on 1 new stitch (= edge stitch for the seam), knit 111-115-121-125-129-135 stitches and increase 37-38-40-42-43-45 stitches evenly spaced – read INCREASE TIP-1, cast on 1 new stitch (= edge stitch for the seam), and place the last 5 band stitches on 1 thread or extra needle = 150-155-163-169-174-182 stitches on the needle. (The bands are finished later and then sewn onto the front pieces). Change to circular needle size 3 mm = US 2,5. Purl 1 row from the wrong side (the yarn overs are purled twisted and the edge stitches are worked in garter stitch). Insert 1 marker after the edge stitch at the beginning of the row; the yoke will be measured from this marker! You can work an ELEVATION in the back of the neck – read description above. If you do not want an elevation, go straight to YOKE. YOKE: Read the whole section before starting! Work stockinette stitch back and forth with 1 edge stitch in garter stitch on each side towards mid front and using sea fog. When the piece measures 1½-2-2-3-3-3 cm = ½"-¾"-¾"-1⅛"-1⅛"-1⅛" from the marker on the neck, increase 49-52-54-56-57-59 stitches evenly spaced = 199-207-217-225-231-241 stitches. When the piece measures 2-3-3-4-4-5 cm = ¾"-1⅛"-1⅛"-1½"-1½"-2" from the marker on the neck start the pattern on the next row from the right side as follows: 1 edge stitch in garter stitch, work A.1 until there are 2 stitches left on the row (the 14 stitches do not fit until after increasing on the row with arrow-1 (S, M, and L) and arrow-2 (XL, XXL and XXXL), work the first stitch in A.1 so the pattern is the same on both front pieces and finish with 1 edge stitch in garter stitch. Read KNITTING TIP and continue this pattern (when A.1 is finished in height, work A.2 in the same way). AT THE SAME TIME on each row marked with an arrow in A.1 and A.2 increase as described below – remember INCREASE TIP-1! S, M and L: Arrow-1: Increase 42-48-52 stitches evenly spaced = 241-255-269 stitches (there is now room for 17-18-19 repeats of A.1 with 14 stitches). Arrow-2: Increase 50-48-58 stitches evenly spaced = 291-303-327 stitches (there is now room for 24-25-27 repeats of A.1 with 12 stitches). Arrow-3: Increase 36-40-48 stitches evenly spaced = 327-343-375 stitches (there is now room for 40-42-46 repeats of A.2 with 8 stitches, then work the first 5 stitches in A.2 so the pattern is the same on both front pieces). Arrow-4: Increase 12-20-24 stitches evenly spaced = 339-363-399 stitches (there is now room for 28-30-33 repeats of A.2 with 12 stitches). Work up to and including the row before arrow-5 in A.2. XL, XXL and XXXL: Arrow-1: Increase 30-40-50 stitches evenly spaced = 255-271-291 stitches. Arrow-2: Increase 28-40-48 stitches evenly spaced = 283-311-339 stitches (there is now room for 20-22-24 repeats of A.1 with 14 stitches). Arrow-3: Increase 28-32-36 stitches evenly spaced = 311-343-375 stitches. Arrow-4: Increase 28-32-36 stitches evenly spaced = 339-375-411 stitches (there is now room for 28-31-34 repeats of A.2 with 12 stitches). Arrow-5: Increase 52-56-60 stitches evenly spaced = 391-431-471 stitches (there is now room for 48-53-58 repeats of A.2 with 8 stitches, then work the first 5 stitches in A.2 so the pattern is the same on both front pieces). Arrow-6: Increase 44-40-36 stitches evenly spaced = 435-471-507 stitches (there is now room for 36-39-42 repeats of A.2 with 12 stitches). Work up to and including the row before arrow-7 in A.2. ALL SIZES: Leave the yoke on the needle and work the bands: Place the 5 band stitches from the thread on the left front piece on needle size 3 mm = US 2,5. Work garter stitch back and forth with sea fog for approx. 17-18-18-22-22-23 cm = 6¾"-7"-7"-8¾"-8¾"-9" – control the length to match the yoke; the band needs to be stretched slightly. Place the stitches on 1 thread or extra needle. Work the right band in the same way but remember the buttonholes on the right band. Then work the row marked with arrow-5 in A.2 (S, M and L) and arrow-7 in A.2 (XL, XXL and XXXL) as follows: Place the 5 band stitches from the left front piece onto the circular needle and work these 5 stitches in garter stitch as before, bind off the 1 edge stitch, knit with sea fog the next 337-361-397-433-469-505 stitches AT THE SAME TIME as you increase 3-11-3-7-7-7 stitches evenly spaced over these stitches, bind off the 1 edge stitch and work the 5 band stitches on the right band in garter stitch = 350-382-410-450-486-522 stitches on the needle. Finish A.2. The piece now measures 19-20-20-24-24-25 cm = 7½"-8"-8"-9½"-9½"-9¾" from the marker on the neck. Continue back and forth in stockinette stitch with sea fog and 5 band stitches in garter stitch on each side (size S: only continue working if the piece measures less than 19 cm = 7½" when A.2 has been completed). When the piece measures 19-21-23-25-27-29 cm = 7½"-8¼"-9"-9¾"-10⅝"-11⅜" from the marker on the neck, divide the yoke for the body and sleeves on the next row as follows: Work 55-60-63-69-76-83 stitches as before (= front piece), place the next 70-76-84-92-96-100 stitches on 1 thread for the sleeve, cast on 6-6-8-8-10-10 new stitches on the needle (= in side under the sleeve), work 100-110-116-128-142-156 stitches in stockinette stitch (= back piece), place the next 70-76-84-92-96-100 stitches on 1 thread for the sleeve, cast on 6-6-8-8-10-10 new stitches on the needle (= in side under the sleeve) and work the remaining 55-60-63-69-76-83 stitches as before (= front piece). Body and sleeves are finished separately. THE PIECE IS NOW MEASURED FROM HERE! BODY: = 222-242-258-282-314-342 stitches. Insert 1 marker thread 58-63-67-73-81-88 stitches in from each side (= sides of body). There are 106-116-124-136-152-166 stitches between threads on the back piece. Allow the threads to follow your work onwards; they will be used when increasing in the sides. Continue back and forth with sea fog, stockinette stitch and 5 band stitches in garter stitch on each side. When the piece measures 5 cm = 2" from the division, increase 1 stitch on each side of both marker threads – read INCREASE TIP-2 (= 4 stitches increased). Increase like this every 5 cm = 2" a total of 4 times = 238-258-274-298-330-358 stitches. Continue working until the piece measures 26 cm = 10¼" from the division. There is approx. 4 cm = 1½" to finished length; you can try the jacket on and work to desired length. Knit 1 row from the right side where you increase 59-65-69-75-83-89 stitches evenly spaced = 297-323-343-373-413-447 stitches (this is done to avoid the rib being tight). Change to circular needle size 2.5 mm = US 1,5 and work as follows from the wrong side: 5 band stitches in garter stitch, * purl 1, knit 1 *, work from *-* until there are 6 stitches left on the row, purl 1 and finish with 5 band stitches in garter stitch. Continue this rib for 4 cm = 1½". Bind off with garter stitch over garter stitch, knit over knit and purl over purl – read BINDING-OFF TIP! The jacket measures approx. 52-54-56-58-60-62 cm = 20½"-21¼"-22"-22¾"-23⅝"-24⅜" from the shoulder down. SLEEVE: Place the 70-76-84-92-96-100 stitches from the thread on the one side of the piece on double pointed needles/short circular needle size 3 mm = US 2,5 and knit up 1 stitch in each of the 6-6-8-8-10-10 stitches cast on under the sleeve = 76-82-92-100-106-110 stitches. Now insert 2 markers in the piece (without working the stitches). Start mid under the sleeve in the middle of the 6-6-8-8-10-10 stitches and insert 1 marker in the first stitch after the middle, count 37-40-45-49-52-54 stitches, insert 1 marker in the next stitch = 37-40-45-49-52-54 left on the round after the marker. The marker under the sleeve is used when decreasing, the one on top of the sleeve is used to find the beginning of the pattern. Allow the markers to follow your work onwards. Start under the sleeve with stitch with the marker and work stockinette stitch in the round with sea fog. When the piece measures 3-3-3-3-2-2 cm = 1⅛"-1⅛"-1⅛"-1⅛"-¾"-¾" from the division, decrease 2 stitches under the sleeve – read DECREASE TIP. Decrease like this every 3-2½-2-1½-1½-1 cm = 1⅛"-⅞"-¾"-½"-½"-⅜" a total of 12-14-17-20-22-23 times = 52-54-58-60-62-64 stitches. Work until the sleeve measures 36-35-33-31-29-28 cm = 14¼"-13¾"-13"-12¼"-11⅜"-11" from the division. There is approx. 9 cm = 3½" to finished length; you can try the jacket on and work to desired length; be aware that in some sizes, the decreases under the sleeve are not yet finished. NOTE: Shorter measurements in larger sizes due to wider neck and longer yoke. Now work A.3 (count out from the marker on top of the sleeve to where the pattern starts – the stitch marked with a star in A.3 matches the stitch with the marker). When A.3 has been completed, the sleeve measures approx. 41-40-38-36-34-33 cm = 16⅛"-15¾"-15"-14¼"-13⅜"-13" from the division. The rest of the sleeve is worked with sea fog. Knit 1 round where you increase 12-12-14-14-16-16 stitches evenly spaced = 64-66-72-74-78-80 stitches. Change to double pointed needles size 2.5 mm = US 1,5 and work rib (= knit 1, purl 1) for 4 cm = 1½". Bind off with knit over knit and purl over purl – remember BINDING-OFF TIP. The sleeve measures approx. 45-44-42-40-38-37 cm = 17¾"-17¼"-16½"-15¾"-15"-14½" from the division. Work the other sleeve in the same way. ASSEMBLY: Sew the bands neatly inside the 1 edge stitch on the yoke. Sew the buttons onto the left band. |
|||||||||||||
Diagram explanations |
|||||||||||||
|
|||||||||||||

|
|||||||||||||

|
|||||||||||||

|
|||||||||||||
|
Have you made this or any other of our designs? Tag your pictures in social media with #dropsdesign so we can see them! Do you need help with this pattern?You'll find tutorial videos, a Comments/Questions area and more by visiting the pattern on garnstudio.com. © 1982-2024 DROPS Design A/S. We reserve all rights. This document, including all its sub-sections, has copyrights. Read more about what you can do with our patterns at the bottom of each pattern on our site. |
|||||||||||||


With over 40 years in knitting and crochet design, DROPS Design offers one of the most extensive collections of free patterns on the internet - translated to 17 languages. As of today we count 304 catalogs and 11422 patterns - 11417 of which are translated into English (US/in).
We work hard to bring you the best knitting and crochet have to offer, inspiration and advice as well as great quality yarns at incredible prices! Would you like to use our patterns for other than personal use? You can read what you are allowed to do in the Copyright text at the bottom of all our patterns. Happy crafting!
Comments / Questions (18)
Bonjours pourquoi quand je suis arrivé à la flèche 2 en taille XXL j'ai 311 mailles je ne peux donc pas faire 22 motifs de 14 mailles !!!!! cordialement
19.03.2024 - 09:06DROPS Design answered:
Bonjour Marie, vous avez 311 mailles et tricotez ainsi: 1 m lis, répétez 22 fois les 14 mailles de A.1, tricotez la 1ère maille de A.1 (pour que le motif soit symétrique) et terminez par 1 m lisière = 1+ (22x14)+1+1=311 mailles. Bon tricot!
19.03.2024 - 11:26Welke kleur wordt gebruikt voor de ribbrlsteek tijdens het breien van het patroon? Na meerderen bij pijl 1 blijven er 3 steken over na 18 herhalingen, waarvan 2 ribbelsteken ( begin en eind). Wat is de 3e steek? Dank voor uw antwoord.
15.03.2024 - 15:54DROPS Design answered:
Dag Mieke,
De ribbelsteken voor de voorbies worden in de hoofdkleur zeemist gebreid. Helaas begrijp ik je vraag niet goed. Pijl 3 zit op een naald waar je allen met zeemist breit en op deze naald meerder je steken. Hetzelfde geldt voor pijl 1. Op deze naalden meerder je steken verdeeld over de hele naald en hoef je geen rekening te houden met het patroon. Na een meerdernaald maak je meer patroonherhalingen in totaal op de naald.
17.03.2024 - 19:10Hej! Jag undrar om det går att sticka denna som en tröja istället för en kofta och i så fall hur?
16.02.2024 - 08:30DROPS Design answered:
Hej Helena, ja det är DROPS 215-8 :)
23.02.2024 - 10:46Kan jag sticka koftan 215-7 med Nepal istället för med Alpaca? Hur många nystan behöver jag då av varje färg?
24.12.2023 - 16:11Hei hva betyr åpne felt i Diagramm
01.10.2023 - 16:57DROPS Design answered:
Hej Irene, du gentager rapporten som går over 8 masker omgangen rundt, øvrige rapport går over 12 masker, som alle er tegnet ind i diagrammet :)
04.10.2023 - 07:24Hej. Er begyndt på denne, men undrer mig over, hvordan man skal strikke én pind i en farve og så den næste i den anden farve, når man strikker frem og tilbage? Den anden garnfarve følger jo ikke med over…
29.08.2023 - 13:29DROPS Design answered:
Hej Jette, du kan strikke med flere nøgler, eller så kan du strikke fra den side hvor garnet er :)
08.09.2023 - 15:18Why , the further I go into the sweater , the more it curls. Am I doing something wrong?
16.03.2022 - 20:56DROPS Design answered:
Dear Mrs Fedel, not sure what you mean here, do you have correct tension in width? Even working with the stranded pattern? Make sure you stil have 24 sts = 10 cm in width. If you are still unsure, you can show your work to your store (even sending them a picture per mail), so that they can check with you. Happy knitting!
17.03.2022 - 09:44The question didn't seem to get there so i'll put it again. I have a problem with A. 3. The pattern fails with the (52) number of loops. Could i have a help video from A.3?
23.09.2021 - 12:31DROPS Design answered:
Dear Anxu, you can find all the available videos related to this pattern linked just below the pattern and the diagrams. I hope you will find what you are looking for. Happy Stitching!
23.09.2021 - 21:14Hello, lovely knit
23.09.2021 - 11:19Har begynt på bærestykke. Etter forhøyningen skal det strikkes til merke i nakken og så likt på det andre siden av merket eller skal det strikkes fram og tilbake på hele pinnen,
19.09.2021 - 22:39