DROPS Muskat
DROPS Muskat
100% Cotton
from 2.15 € /50g
Get the yarn to make this pattern from 17.20€.

The yarn cost is calculated from the pattern’s smallest size and the yarn’s cheapest product type. Looking for an even better price? You might find it on the DROPS Deals!

DROPS SS24

Lavender Charm Top

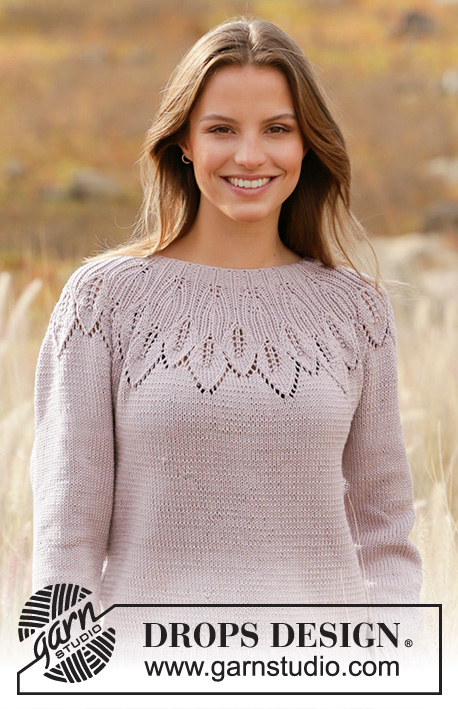
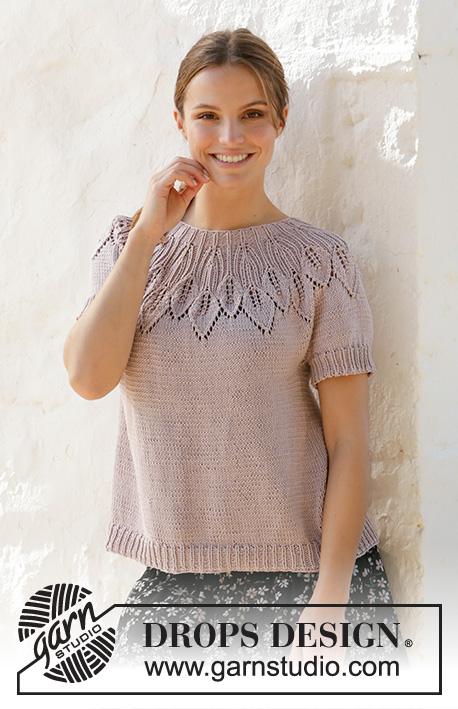
Knitted top with round yoke in DROPS Muskat. The piece is worked top down with leaf pattern and lace pattern. Sizes S - XXXL.

DROPS 213-22
DROPS Design: Pattern no r-764
Yarn group B
-------------------------------------------------------

SIZES:
S - M - L - XL - XXL - XXXL

MATERIALS:
DROPS MUSKAT from Garnstudio (belongs to yarn group B)
400-400-450-500-550-600 g colour 82, silver fox

KNITTING TENSION:
21 stitches in width and 28 rows in height with stocking stitch = 10 x 10 cm.

NEEDLES:
DROPS DOUBLE POINTED NEEDLES SIZE 4 MM.
DROPS CIRCULAR NEEDLE SIZE 4 MM: Length 40 cm and 80 cm for stocking stitch.
DROPS DOUBLE POINTED NEEDLES SIZE 3 MM.
DROPS CIRCULAR NEEDLE SIZE 3 MM: Length 40 cm and 80 cm for rib.
Needle size is only a guide. If you get too many stitches on 10 cm, change to a larger needle size. If you get too few stitches on 10 cm, change to a smaller needle size.

-------------------------------------------------------

Alternative Yarn – See how to change yarns here
Yarn Groups A to F – Use the same pattern and change the yarn here
Yarn usage using an alternative yarn – Use our yarn converter here

-------------------------------------------------------

DROPS Muskat
DROPS Muskat
100% Cotton
from 2.15 € /50g
Get the yarn to make this pattern from 17.20€.

The yarn cost is calculated from the pattern’s smallest size and the yarn’s cheapest product type. Looking for an even better price? You might find it on the DROPS Deals!

Pattern instructions

NOTE: This pattern is written in British English. All measurements in charts are in cm. For conversion from cm to inches - click here. There are different terms for crocheting in British and American English. If this pattern includes crochet, click for "crochet terms" here. For this pattern in American English, please click here.
-------------------------------------------------------

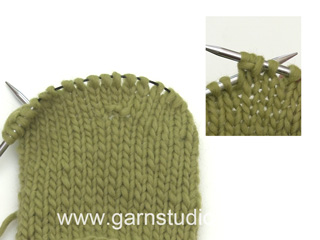
EXPLANATIONS FOR THE PATTERN:

-------------------------------------------------------

PATTERN: 
See diagram A.1. Choose diagram for your size.

INCREASE TIP (for sides of body):
Work until there are 2 stitches left before the marker thread, make 1 yarn over, knit 4 (marker thread sits between these 4 stitches) make 1 yarn over.
On the next round knit the yarn overs twisted to avoid holes. Then work the new stitches in stocking stitch

DECREASE TIP (for sleeves): 
Decrease 1 stitch on each side of the marker thread as follows: Work until there are 3 stitches left before the marker thread, knit 2 together, knit 2 (marker thread sits between these 2 stitches), slip 1 stitch as if to knit, knit 1 and pass the slipped stitch over the knitted stitch.

CASTING-OFF TIP:
To avoid the cast-off edge being tight you can cast off with a larger size needle. If the edge is still tight, make 1 yarn over after approx. each 4th stitch at the same time as casting off and the yarn overs are cast off as normal stitches.

-------------------------------------------------------

START THE PIECE HERE:

-------------------------------------------------------

TOP – SHORT OVERVIEW OF THE PIECE:
The neck and yoke are worked in the round with circular needle, from mid back and top down. The yoke is divided for body and sleeve-edges and the body is continued in the round with circular needle. The sleeve-edges are worked in the round with double pointed needles, top down.

NECK:
Cast on 96-96-102-114-114-120 stitches with circular needle size 3 mm and Muskat. Knit 1 round.
Work rib (= purl 2 / knit 1).
When the piece measures 3 cm, change to circular needle size 4 mm. Insert 1 marker at the beginning of the round, mid-back; the yoke will be measured from this marker!

YOKE:
Work A.1 (= 6 stitches) in the round over all stitches (= 16-16-17-19-19-20 times in width). REMEMBER THE KNITTING TENSION!
When A.1 has been worked 1 time in height there are 288-320-340-380-418-440 stitches on the needle and the piece measures approx. 14-16-16-16-18-18 cm from the marker. Knit in the round until the piece measures 19-21-22-24-26-28 cm from the marker. Now divide the piece for body and sleeves as follows:
Work the first 40-45-49-53-60-65 stitches (= half back-piece), place the next 63-69-72-84-89-90 stitches on a thread for the sleeve-edge and cast on 6-6-6-6-8-10 new stitches under the sleeve, work the next 81-91-98-106-120-130 stitches (= front piece), place the next 63-69-72-84-89-90 stitches on a thread for the sleeve-edge and cast on 6-6-6-6-8-10 new stitches under the sleeve, work the last 41-46-49-53-60-65 stitches (= half back-piece).

BODY:
= 174-194-208-224-256-280 stitches.
Insert 1 marker thread in the middle of the 6-6-6-6-8-10 stitches under each sleeve (= sides of body). There are 87-97-104-112-128-140 stitches between threads on both front and back pieces. Allow the threads to follow your work onwards; they will be used when increasing in the sides. Knit.
When the piece measures 4 cm from the division, increase 1 stitch on each side of both marker threads – read INCREASE TIP (= 4 stitches increased).
Increase like this every 4 cm a total of 5-4-4-5-5-5 times = 194-210-224-244-276-300 stitches.
When the piece measures 28-28-29-29-29-29 cm from the division, increase 13-12-13-14-15-15 stitches evenly spaced = 207-222-237-258-291-315 stitches.
Change to circular needle size 3 mm and work rib (= knit 1 / purl 2) for 4 cm.
Cast off with knit – read CASTING-OFF TIP. The piece measures 32-32-33-33-33-33 cm from the division.

SLEEVE-EDGE:
Place the 63-69-72-84-89-90 stitches from the thread on the one side of the piece on double pointed needles size 4 mm and knit up 1 stitch in each of the 6-6-6-6-8-10 stitches cast on under the sleeve = 69-75-78-90-97-100 stitches. Work stocking stitch in the round for 2 cm. Change to double pointed needles size 3 mm and work rib (= knit 1 / purl 2) AT THE SAME TIME as you decrease, on the first round, 0-0-0-0-1-1 stitch = 69-75-78-90-96-99 stitches. Cast off when the rib measures 4 cm, with knit over knit and purl over purl. Work the other sleeve-edge in the same way.

This pattern has been corrected.

Updated online: 11.01.2021
Correction: Diagram A.1 in sizes XXL-XXXL updated.

Diagram

symbols = knit
symbols = purl
symbols = knit 2 together
symbols = slip 1 stitch as if to knit, knit 1 and pass the slipped stitch over the knitted stitch
symbols = between 2 stitches make 1 yarn over
symbols = between 2 stitches make 1 yarn over; on the next round work the yarn-over twisted into the pattern
symbols = slip 1 stitch as if to knit, knit 2 together and pass the slipped stitch over the knitted together stitches
symbols = work 3 stitches in stitch as follows: Knit the stitch but wait to drop the stitch off the needle, make 1 yarn over on right needle and knit the stitch 1 more time, then drop the stitches of the needle = 3 stitches (= 2 stitches increased).
symbols = on the first repeat of A.1, the round is displaced by 1 stitch as follows: Slip the first stitch onto the right needle without working it, then work A.1 in the round
symbols = purl 2 together
diagram
diagram
diagram

Each of our patterns has specific tutorial videos to help you.

Do you have a question? See a list of frequently asked questions (FAQ)

Knitting tension is what determines the final measurements of your work, and is usually measured per 10 x 10 cm. It is provided like so: number of stitches in width x number of rows in height - eg: 19 stitches x 26 rows = 10 x 10 cm.

The knitting tension is very individual; some people knit/crochet loosely while others work tightly. You adjust the knitting tension with the needle size, which is why the suggested needle size is only meant as a guide! You need to adjust this (up or down) to ensure that YOUR knitting tension matches the knitting tension provided in the pattern. If you work with a different knitting tension than provided you will have a different yarn consumption, and your work will have different measurements than what the pattern suggests.

The knitting tension also determines which yarns can replace each other. As long as you achieve the same knitting tension you can replace one yarn with another.

See DROPS lesson: How to measure your tension/gauge

See DROPS video: How to make a gauge tension swatch

The required amount of yarn is provided in grams, eg: 450 g. To calculate how many balls you’ll need you first need to know how many grams are in 1 ball (25g, 50g or 100g). This information is available if you click on the individual yarn quality on our pages. Divide the amount required with the amount of each ball. For example, if each ball is 50g (the most common amount), the calculation will be as follows: 450 / 50 = 9 balls.

The important thing when changing from one yarn to another is that the knitting/crochet tension remains the same. This is so that the measurements of the finished piece will be the same as on the sketch provided. It is easier to achieve the same knitting tension using yarns from the same yarn group. It is also possible to work with multiple strands of a thinner yarn to achieve the knitting tension of a thicker one. Please try our yarn converter. We recommend you to always work a test swatch.

Please NOTE: when changing yarn the garment might have a different look and feel to the garment in the photo, due to individual properties and qualities of each yarn.

See DROPS lesson: Can I use a different yarn than the one mentioned in the pattern?

All our yarns are categorised into yarn groups (from A to F) according to thickness and knitting tension – group A contains the thinnest yarns and group F the thickest. This makes it easier for you to find alternative yarns to our patterns, should you wish to switch yarn. All yarns within the same group have a similar knitting tension and can easily replace each other. However, different yarn qualities have different structures and properties which will give the finished work a unique look and feel.

Click here for an overview of the yarns in each yarn group

At the top of all our patterns you’ll find a link to our yarn calculator, which is a helpful tool should you wish to use a different yarn than suggested. By filling in the yarn quality you wish to replace, the amount (in your size) and number of strands, the calculator will present good alternative yarns with the same knitting tension. Additionally it will tell you how much you’ll require in the new qualities and whether you’ll need to work with multiple strands. Most skeins are 50g (some are 25g or 100g).

If the pattern is worked with multiple colours, every colour will have to be calculated separately. Similarly, if the pattern is worked with several strands of different yarns (for example 1 strand Alpaca and 1 strand Kid-Silk) you will have to find alternatives for each, individually.

Click here to see our yarn calculator

Since different yarns have different qualities and textures we have chosen to keep the original yarn in our patterns. However, you can easily find options among our available qualities by using our yarn calculator, or simply pick a yarn from the same yarn group.

It is possible that some retailers still have discontinued yarns in stock, or that someone has a few skeins at home that they would like to find patterns for.

The yarn calculator will provide both alternative yarn as well as required amount in the new quality.

If you think it's hard to decide what size to make, it can be a good idea to measure a garment you own already and like the size of. Then you can pick the size by comparing those measures with the ones available in the pattern's size chart.

You'll find the size chart at the bottom of the pattern.

See DROPS lesson: How to read size chart

The needle size provided in the pattern serves only as a guide, the important thing is to follow the knitting tension. And since knitting tension is very individual, you will have to adjust the needle size to ensure that YOUR tension is the same as in the pattern – maybe you’ll have to adjust 1, or even 2 needle sizes, up or down to achieve the correct tension. For this, we recommend that you work test swatches.

Should you work with a different knitting tension than the one provided, the measurements of the finished garment might deviate from the measurement sketch.

See DROPS lesson: How to measure your tension/gauge

See DROPS video: How to make a tension/gauge swatch

Working a garment top-down provides more flexibility and room for personal adjustment. For example it is easier to try the garment on while working, as well as making adjustments to length of yoke and shoulder caps.

The instructions are carefully explaining every step, in the correct order. Diagrams are adjusted to the knitting direction and are worked as usual.

The diagram depicts all rows/rounds, and every stitch seen from the right side. It is read from bottom to top, from right to left. 1 square = 1 stitch.

When working back and forth, every other row is worked from the right side and every other row is worked from the wrong side. When working from the wrong side, the diagram will have to be worked reversed: from left to right, knit stitches are purled, purl stitches are knit etc.

When working in the round every round is worked from the right side and the diagram are worked from right to left on all rounds.

See DROPS lesson: How to read knitting diagrams

The diagram depicts all rows/rounds, and every stitch seen from the right side. It is worked from bottom to top, from right to left.

When working back and forth every other row is worked from the right side: from right to left and every other row is worked from the wrong side: from left to right.

When working in the round, every row in the diagram are worked from the right side, from right to left.

When working a circular diagram you start in the middle and work your way outwards, counter clockwise, row by row.

The rows usually start with a given number of chain stitches (equivalent to the height of the following stitch), this will either be depicted in the diagram or explained in the pattern.

See DROPS lesson: How to read crochet diagrams

Instructions for working several diagrams after each other on the same row/round, will often be written like so: “work A.1, A.2, A.3 a total of 0-0-2-3-4 times". This means you work A.1 once, then A.2 is worked once, and A.3 is repeated (in width) the number of times provided for your size – in this case like so: S = 0 times, M = 0 times, L=2 times, XL= 3 times and XXL = 4 times.

The diagrams are worked as usual: begin with the first row in A.1, then work the first row in A.2 etc.

See DROPS lesson: How to read knitting diagrams

See DROPS lesson: How to read crochet diagrams

The total width of the garment (from wrist-to-wrist) will be larger in the larger sizes, despite the actual sleeves being shorter. The larger sizes have longer sleeve caps and wider shoulders, so there will be a good fit in all sizes.

The measurement sketch/schematic drawing provides information regarding the full length of the garment. If it’s a jumper or a jacket the length is measured from the highest point on the shoulder closest to the neckline, and straight down to the bottom of the garment. It is NOT measured from the tip of shoulder. Similarly, the length of yoke is measured from the highest point on the shoulder and down to where yoke is split into body and sleeves.

On a jacket measures are never taken along bands, unless specifically stated. Always measure inside band stitches when measuring the length.

See DROPS lesson: How to read a schematic drawing

Diagrams are often repeated on the round or in height. 1 repeat is the diagram the way it appears in the pattern. If it says to work 5 repeats of A.1 in the round, then you work A.1 a total of 5 times after/next to each other in the round. If it says to work 2 repeats of A.1 vertically/in height you work the entire diagram once, then begin again at the start and work the entire diagram one more time.

Chain stitches are slightly narrower than other stitches and to avoid working the cast-on edge too tight, we simply chain more stitches to begin with. The stitch count will be adjusted on the following row to fit the pattern and measurement sketch.

The rib edge is more elastic and will contract slightly compared to, for example, stocking stitch. By increasing before the rib edge, you avoid a visible difference in width between the rib edge and the rest of the body.

It’s very easy to cast off too tightly, and by making yarn overs while casting off (and simultaneously casting these off) you avoid a too tight cast off edge.

See DROPS video: How to bind off with yarn overs (yo)

To achieve an even increase (or decrease) you can increase on, for example: every 3rd and 4th row alternately, like so: work 2 rows and increase on the 3rd row, work 3 rows and increase on the 4th. Repeat this until the increase is complete.

See DROPS lesson: Increase or decrease 1 st on every 3rd and 4th row alternately

Should you prefer to work in the round instead of back and forth, you may of course adjust the pattern. You’ll need to add steeks mid-front (usually 5 stitches), and follow the instructions. When you would normally turn and work from the wrong side, simply work across the steek and continue in the round. At the end you’ll cut the piece open, pick up stitches to work bands, and cover the cut edges.

See DROPS video: How to knit steeks and cut open

Should you prefer to work back and forth instead of in the round, you may of course adjust the pattern so you work the pieces separately and then assemble them at the end. Divide the stitches for the body in 2, add 1 edge stitch in each side (for sewing) and work the front and back pieces separately.

See DROPS lesson: Can I adapt a pattern for circular needles into straight needles?

Pattern repeats can vary slightly in the different sizes, in order to get the correct proportions. If you’re not working the exact same size as the garment in the photo, yours might deviate slightly. This has been carefully developed and adjusted so that the complete impression of the garment is the same in all sizes.

Make sure to follow instructions and diagrams for your size!

If you have found a pattern you like which is available in women’s size it’s not very difficult to convert it to men’s size. The biggest difference will be the length of sleeves and body. Start working on the women size that you think would fit across the chest. The additional length will be worked right before you cast off for the armhole/sleeve cap. If the pattern is worked top-down you can add the length right after the armhole or before the first decrease on sleeve.

Regarding additional yarn amount, this will depend on how much length you add, but it is better with a skein too many than too few.

All yarns will have excess fibres (from production) that might come off as lint or shedding. Brushed yarns (ie hairier yarns) have more of these loose, excess fibres, causing more shedding.

Shedding also depends on what is worn under or over the garment, and whether this pulls at the yarn fibres. It’s therefore not possible to guarantee that there will be no shedding

Below are some tips on how to get the best result when working with hairier yarns:

1. When the garment is finished (before you wash it) shake it vigorously so the looser hairs come off. NOTE: do NOT use a lint roller, brush or any method that pulls at the yarn.

2. Place the garment in a plastic bag and put it in your freezer - the temperature will cause the fibres to become less attached to each other, and excess fibres will come off easier.

3. Leave in the freezer for a few hours before taking it out and shaking it again.

4. Wash the garment according to the instructions on the yarn label.

Pilling is a natural process that happens to even the most exclusive of fibers. It's a natural sign of wear and tear that is hard to avoid, and that is most visible in high friction areas of your garment like a sweater's arms and cuffs.

You can make your garment look as new by removing the pilling, using a fabric comb or a pill/lint remover.

Still can't find the answer you need? Then scroll down and leave your question so one of our experts can try to help you. This will be done normally within 5 to 10 working days.
In the meantime, you can read the questions and answers that others have left to this pattern or join the DROPS Workshop on Facebook to get help from fellow knitters/crocheters!

You might also like...

Lavender Charm Top

Gillian Johnstone, Cyprus

Lavender Charm Top

MissTknits, France

Lavender Charm Top

MissTknits, France

Lavender Charm Top

MissTknits, France

Post a comment to pattern DROPS 213-22

We would love to hear what you have to say about this pattern!

If you want to leave a question, please make sure you select the correct category in the form below, to speed up the answering process. Required fields are marked *.

Comments / Questions (58)

country flag Vaillant Isabelle wrote:

Bonsoir, voilà je ne comprend pas bien dans les explications on nous demande de décaler le motif ,mais c est tout les motifs ? Je suis désolée je n arrive pas a comprendre . Merci par avance Isabelle.

28.03.2024 - 23:05

DROPS Design answered:

Bonjour Mme Vaillant, procédez comme indiqué par le symbole du carré noir dans la légende: glissez la 1ère maille du tour sur l'aiguille droite, sans la tricoter, et continuez le diagramme comme indiqué: la dernière maille de chaque motif se tricote avec la 1ère maille du motif suivant, autrement dit, la 1ère maille du tour sera tricotée avec la dernière diminution du dernier motif du tour. Bon tricot!

02.04.2024 - 14:00

country flag Anja wrote:

Hej, Hvilken størrelse pinde skal jeg lave strikkeprøven på? Mvh Anja

15.02.2024 - 11:05

DROPS Design answered:

Hei Anja. Bruk den pinnestr. som selve plagget strikkes i (ikke vrangbord). Strikkefastheten er oppgitt i glattstrikk. På denne modellen er det pinne 4 :) mvh DROPS Design

15.02.2024 - 12:15

country flag Anna-Lena Karlsson wrote:

Har en fråga om varv 23. 20 m på varvet innan. Tolkar det som att, lyft en maska utan att sticka den, följ mönstret. Men jag får inte maskorna att räcka i slutet? Ska jag inte sticka en rät mellan omslagen i slutet? Saknas en maska för sista sticka ihop maskor i slutet av rapporten? Hoppas ni förstår vad jag menar😊 Tacksam för hjälp

02.09.2023 - 09:21

DROPS Design answered:

Hei Anna-Lena Når du har 1 maske igjen på omgangen, skal denne masken og den masken du løftet over i begynnelsen av omgangen strikkes sammen (= ta 1 maske løs av pinnen som om den skulle strikkes rett, strikk 1 rett, løft den løse masken over masken som ble strikket). Da skal du ha nok masker. mvh DROPS Design

11.09.2023 - 13:59

country flag Pam Monty wrote:

En las referencias del diagrama en español, para los 3 puntos en el mismo punto dice \"2 puntos disminuidos \". Es incorrecto debería ser \"2 puntos aumentados\".

29.08.2023 - 09:39

country flag Amanda Ellynor Kristensen wrote:

Hejsa, Jeg skal til at starte mønster A.1 i M, hvor der er en masse hvide hvide feltet som ikke er “tegnet op” som hvis feltet men ligner blot “luft”. Skal disse forstås som hvide felter, altså retstrik eller hvorledes skal det forståes. På forhånd mange tak og tak for gode opskrifter Mvh Amanda

27.07.2023 - 11:05

DROPS Design answered:

Hei Amanda. Nei, der er det ingen maske, hopp frem til neste blanke rute. Og når du har økt nok masker vil diagrammet komme sammen. mvh DROPS Design

27.07.2023 - 14:59

country flag Mitzi Russell wrote:

Please help! Doing size M and completed round 19 with k2tgether, k, y.o., k, y.o., k. Round 20 starts. with 3 knits, but I only have 2 knits?? The pattern so far seems to be aligned.

18.07.2023 - 15:49

DROPS Design answered:

Dear Mitzi, round 20 is worked similarly to round 18, where you need to take into account that the pattern has been displaced. The last stitch on round 19 compensates for the first stitch on round 20 and corresponds to the blank square seen at the beginning of round 20. So, in the first repeat of round 20, the first knit stitch is the last knit stitch on the previous round and then knit 2, purl 2 and continue with the chart . Then, on the second repeat, you work the first knit stitch over the last stitch of the previous repeat in the previous round. Happy knitting!

20.07.2023 - 14:11

country flag Breige McShane wrote:

Exactly as you said - you finish row 17 with the slip stitch. (which is the 1st purl stitch.) Then on row 18 you have the 2nd purl stitch at the beginning of the row?????You show beginning of row with a knit stitch. I am stuck and do not know how I can begin row 18 with a knit

17.07.2023 - 16:50

DROPS Design answered:

Dear Breige, round 17 is finished with k2tog, where you work the together the last stitch on the round and the slipped stitch (previous first stitch of the round). This last stitch will look like a knit stitch and corresponds to the blank square seen at the beginning of round 18. So, in the first repeat of round 18, you don't have to work the first knit stitch, you immediately start on the purl stitch over the purl stitch. Then, on the second repeat, you work the knit stitch over the last stitch of the previous repeat in the previous round. Happy knitting!

20.07.2023 - 14:05

country flag Breige McShane wrote:

Truly I am not getting this and need a very explicit explanation. I have started row 17 with a slip stich which is the first purl stitch. Then I start A1 with the second purl stitch. I complete all of A1 finishing with the first slipped stitch which is the first purl stitch and then I have the second purl stitch to start the row. You show the next row starting with l knit stitch and then one purl stitch.

16.07.2023 - 16:55

DROPS Design answered:

Dear Breige, we have slipped the first stitch in order to work the decrease at the end of the last repeat of A.1, where you will work ssk (slip stitch, knit 1 and pass over slipped stitch over knit stitch). Then, we continue the next row as indicated: knit over purl and purl over knit.

17.07.2023 - 13:49

country flag Breige McShane wrote:

I have completed row 17 with k2tog, 1yo, k1,yo, k1sl1,psso - I get this and end with the 5 stiches Then on row 18 it says to start with a k1, p1. At the beginning of this row I have 1 purl stitch and then a knit stitch? What am I missing?

12.07.2023 - 00:57

DROPS Design answered:

Dear Breige, we have slipped the first stitch in order to work the decrease at the end of the last repeat of A.1, where you will work ssk (slip stitch, knit 1 and pass over slipped stitch over knit stitch). Then, we continue the next row as indicated: knit over purl and purl over knit. Happy knitting!

17.07.2023 - 13:50

country flag Dorte Lindholm wrote:

Hej, Str. S Rk. 15 skal mønster forskydes og 1. m. flyttes over på v. p. og den bruges så til at strikke sm. med sidste m. \r\nRk. 16 starter med en retm. vil det så sige, at omgangens start rykkes tilbage igen, så det er den sammenstrikkede m., der pludselig er 1. maske ?\r\nJeg synes, jeg skal blive ved med at flytte min startmarkør - er det rigtigt ?\r\nHåber I kan forstå, hvad jeg mener.\r\nHilsen Dorte

22.06.2023 - 08:47

DROPS Design answered:

Hej Dorte, det som er vigtigt er at vrangmaskerne kommer ovenpå hinanden ifølge diagrammet :)

22.06.2023 - 14:52