
Popular categories
Looking for a yarn?


|
|||||||||||||||||||||||||||||||
Mermaid Magic |
|||||||||||||||||||||||||||||||
 |
 |
||||||||||||||||||||||||||||||
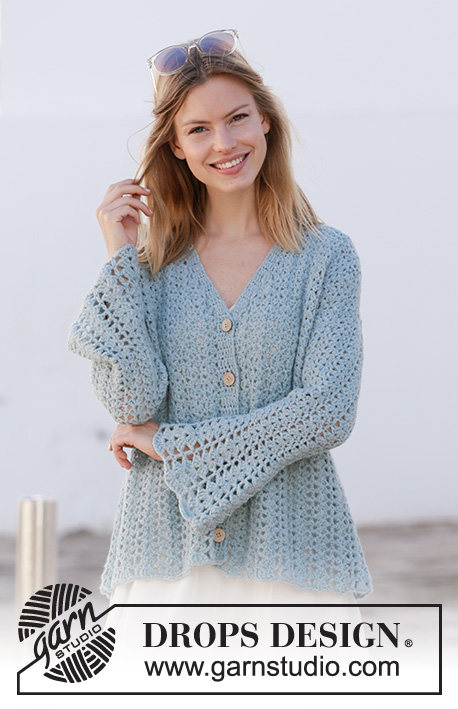
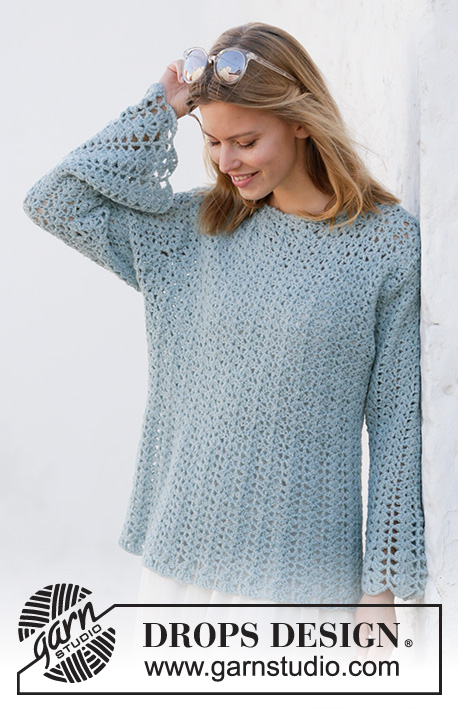
Crocheted jumper in DROPS Sky. Piece is crocheted top down with A-shape, fan pattern and wing sleeves. Size XS/S - XXXL.
DROPS 210-7 |
|||||||||||||||||||||||||||||||
|
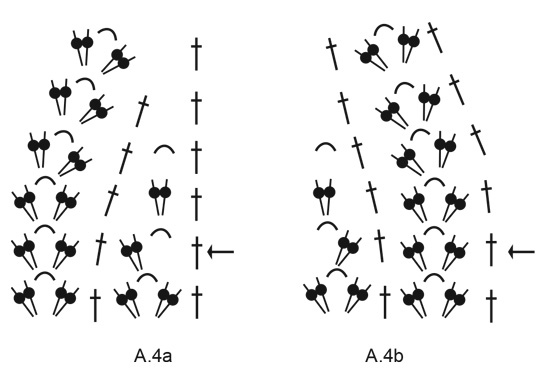
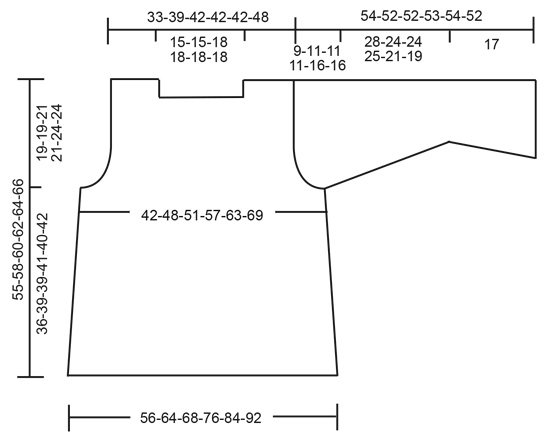
---------------------------------------------------------- EXPLANATION FOR THE PATTERN: ---------------------------------------------------------- CROCHET TIP (applies when working in the round): To make the texture the same when working back and forth, turn the piece for every round worked. I.e. work every other round from right side and wrong side as follows: Work first round from right side of piece. Finish round with 1 slip stitch in 3rd chain stitch/4th chain stitch at the beginning of round. Turn piece and work next round from wrong side of piece. Finish round with 1 slip stitch in 3rd chain stitch/4th chain stitch at the beginning of round. Turn piece and work next round from right side of piece. Work back and forth like this, with alternately one round from right side and one round from wrong side. CROCHET TIP FOR CHAIN STITCH: If you work at the end of crochet hook the chain stitch will often be too tight. 1 chain stitch should be just as long as 1 treble crochet/double treble crochet is wide. CROCHET INFORMATION: At beginning of every round with treble crochets, work 3 chain stitches that replace first treble crochet. Finish round with 1 slip stitch in 3rd chain stitch at beginning of round. At beginning of every round with double treble crochets, work 4 chain stitches that replace first double treble crochet. Finish round with 1 slip stitch in 4th chain stitch at beginning of round. PATTERN: See diagrams A.1 to A.5. ---------------------------------------------------------- START THE PIECE HERE: ---------------------------------------------------------- JUMPER - SHORT OVERVIEW OF THE PIECE: Work top down. Work back and front pieces back and forth down to armhole, then work parts together and continue body in the round, at the same time turn for every round - read CROCHET TIP. Work sleeve top down, first back and forth until sleeve cap is done, then work in the round, at the same time turn piece for every round the same way as on body. BACK PIECE: Left shoulder: Work 19-25-25-25-25-31 chain stitches- read CROCHET TIP FOR CHAIN STITCH, on hook size 4.5 mm with Sky. Work pattern as follows: ROW 1 (right side): Work A.1a over the first 6 chain stitches, A.1b over the next 6-12-12-12-12-18 chain stitches (= 1-2-2-2-2-3 repetitions), A.1c over the last 7 chain stitches. Cut the yarn and put piece aside. Right shoulder: Work 19-25-25-25-25-31 chain stitches on hook size 4.5 mm with Sky. Work pattern as follows: ROW 1 (right side): Work A.1a over the first 6 chain stitches, A.1b over the next 6-12-12-12-12-18 chain stitches (= 1-2-2-2-2-3 repetitions), A.1c over the last 7 chain stitches. ROW 2 (wrong side): Work next row in diagrams over right shoulder. At the end of row work 29-29-35-35-35-35 loose chain stitches (= neck), continue over left shoulder from wrong side in pattern as before. Right and left shoulder are now worked together and there are 29-29-35-35-35-35 chain stitches for neck in the middle of piece. Turn and work next row from right side as follows: Work pattern as before until chain stitches for neck, then work from row with arrow in A.1b 5-5-6-6-6-6 times in total over chain stitches for neck, continue with pattern as before the rest of row. There are now 11-13-14-14-14-16 repetitions with fans on row. REMEMBER THE CROCHET TENSION! Continue back and forth with pattern until 10-10-12-12-10-10 rows with fans have been worked in total. Piece should now measure approx. 13-13-15-15-13-13 cm. Now work pattern in the different sizes as follows: Size XS/S, M, L and XL: Now increase for armhole in each side of piece by working A.2a over A.1a and A.2c over A.1c. When next to last row in A.2a and A.2c has been worked (finish row with the last 2 chain stitches on next to last row in A.2a), enough stitches have been increased for 1 new fan in each side of piece. Cut the yarn. Put piece aside. Piece measures approx. 18-18-20-20 cm (approx. 1 cm remains before armhole is done vertically). Size XXL and XXXL: Now increase for armhole in each side of piece by working A.2a over A.1a and A.2c over A.1c. When diagrams have been worked vertically, repeat pattern from row after row with arrow until you have worked up to next to last row in diagrams (finish row with the last 2 chain stitches on next to last row in A.2a). 2 fans have been increased in each side of piece. Cut the yarn. Put piece aside. Piece measures approx. 23-23 cm (approx. 1 cm remains before armhole is done vertically). FRONT PIECE: Right shoulder: Work 19-25-25-25-25-31 chain stitches- read CROCHET TIP FOR CHAIN STITCH, on hook size 4.5 mm with Sky. Work pattern as follows: ROW 1 (right side): Work A.1a over the first 6 chain stitches, A.1b over the next 6-12-12-12-12-18 chain stitches (= 1-2-2-2-2-3 repetitions), A.1c over the last 7 chain stitches. ROW 2-5: Work as the last 2 rows in A.1a until A.1c. Cut the yarn and put piece aside. Left shoulder: Work 19-25-25-25-25-31 chain stitches on hook size 4.5 mm with Sky. Work pattern as follows: ROW 1 (right side): Work A.1a over the first 6 chain stitches, A.1b over the next 6-12-12-12-12-18 chain stitches (= 1-2-2-2-2-3 repetitions), A.1c over the last 7 chain stitches. ROW 2-5: Work as the last 2 rows in A.1a until A.1c. ROW 6 (wrong side): Work pattern as before over all stitches on left shoulder. At the end of row work 29-29-35-35-35-35 loose chain stitches (= neck), then work over right shoulder from wrong side in pattern as before. Right and left shoulder are now worked together and there are 29-29-35-35-35-35 chain stitches for neck in the middle of piece. Then work pattern and increase for armhole in each side the same way as on back piece but do not cut the yarn when armhole is done. CROCHET FRONT PIECE AND BACK PIECE TOGETHER: Now work front piece and back piece together as follows: Work last row in A.2a, continue with fan pattern as before over front piece until 2 fans remain, work as shown on last row in A.2c, work 5-5-5-17-17-17 loose chain stitches (= in the side under sleeve), work 1 treble crochet in the outermost of the 2 loose chain stitches work at the end of last row on back piece, and continue with last row in A.2a (the first symbol, i.e. 3 chain stitches are replaced by 1 treble crochet), work fan pattern as before over front piece until 2 fans remain, work as shown on last row in A.2c, work 5-5-5-17-17-17 loose chain stitches (= in the side under sleeve), and finish round with 1 slip stitch in 3rd chain stitch at the beginning of round. Then work in the round but turn piece for every round - read CROCHET TIP and CROCHET INFO. Insert a marker thread here. NOW MEASURE PIECE FROM HERE! BODY: Continue in the round with fan pattern and work 1-1-1-3-3-3 fans as shown on first row in A.1b over chain stitches in the side under sleeve = 28-32-34-38-42-46 repetitions in the round. When piece measures approx. 12 cm work as shown on row with arrow in A.3. Repeat this row until piece measures 32-35-35-37-36-36 cm Then work as shown on last round until piece measures 36-39-39-41-40-42 cm. Piece measures approx. 55-58-60-62-64-66 cm from shoulder and down. Cut and fasten the yarn. SLEEVES: Work 55-43-49-37-37-37 chain stitches on hook size 4.5 mm with Sky. Work pattern from row with arrow in diagrams as follows: Work A.1a over the first 6 chain stitches, A.1b over the next 42-30-36-24-24-24 chain stitches (= 7-5-6-4-4-4 repetitions in width), A.1c over the last 7 chain stitches, work 2 chain stitches at the end of row (= increase in the side as shown at the end of A.2c). Turn and work fans back and forth, at the same time increase fans in each side of piece as shown in A.2c and A.2a. When diagram has been worked vertically, repeat the pattern from row after the one with arrow. When 1-2-2-2-3-3 fans have been increased in each side, there are 11-11-12-10-12-12 fans on row and piece measures approx. 6-11-11-11-16-16 cm – adjust to finish after a row that is last row in A.2a and A.2c. In size XS/S continue to work with fans without increase in the sides until piece measures 9 cm (= approx. 2 row without increase). Then work in all sizes as follows: At the end of last row work 5-5-5-17-17-17 chain stitches (= mid under sleeve), then work 1 slip stitch in 3rd chain stitch at the beginning of row (= in first symbol in A.2a). NOW MEASURE PIECE FROM HERE! Then work in the round – remember CROCHET TIP and CROCHET INFO, and work fan pattern as before. Over the new chain stitches under sleeve work 1-1-1-3-3-3 new fans the same way as in the side under sleeve on body = 12-12-13-13-15-15 fans on round. When piece measures approx. 3 cm, decrease on each side of the middle fan under sleeve as follows: Work as shown in A.4a after the middle fan (seen from right side) and as shown in A.4b before the middle fan (seen from right side). Repeat A.4a and A.4b until 2 fans have been decreased on each side of the middle fan under sleeve = 8-8-9-9-11-11 fans on round. Then work until sleeve measures 28-24-24-25-21-19 cm from the new chain stitches under sleeve – shorter sleeves in the larger sizes because of wider shoulders. Approx. 17 cm remains until finished measurements. Now work row with arrow in A.5 for 4 cm, then work next row in diagram for 5 cm, then work last row in diagram until sleeve measures 45-41-41-42-38-36 cm from the new chain stitches under sleeve. Cut and fasten the yarn. Work the other sleeve the same way ASSEMBLY: Work shoulder seams together through both layers from wrong side as follows: Place shoulder together right side against right side and fasten strand with 1 double crochet through both layers towards the shoulder. Work * 2 chain stitches, skip ½-1 cm, 1 double crochet around both layers *, work from *-* along the shoulder. Cut and fasten the yarn. Work the other shoulder the same way. Work sleeves to body through both layers from wrong side as follows: Place parts together right side against right side and fasten strand with 1 double crochet approx. mid under sleeve, work * 2 chain stitches, skip ½-1 cm, 1 double crochet around both layers *, work from *-* around the entire sleeve. Cut and fasten the yarn. Work the other sleeve to body the same way. NECK EDGE: Work with Sky and hook size 4.5 mm as follows: Fasten strand with 1 slip stitch mid on top of shoulder and work from right side as follows: * 2 chain stitches, skip ½-1 cm, 1 double crochet *, work from *-* around the neck and finish with 1 slip stitch in first stitch. Cut and fasten the yarn. |
|||||||||||||||||||||||||||||||
Diagram explanations |
|||||||||||||||||||||||||||||||
|
|||||||||||||||||||||||||||||||

|
|||||||||||||||||||||||||||||||

|
|||||||||||||||||||||||||||||||
|
|||||||||||||||||||||||||||||||
|
|||||||||||||||||||||||||||||||
|
Have you made this or any other of our designs? Tag your pictures in social media with #dropsdesign so we can see them! Do you need help with this pattern?You'll find tutorial videos, a Comments/Questions area and more by visiting the pattern on garnstudio.com. © 1982-2024 DROPS Design A/S. We reserve all rights. This document, including all its sub-sections, has copyrights. Read more about what you can do with our patterns at the bottom of each pattern on our site. |
|||||||||||||||||||||||||||||||


With over 40 years in knitting and crochet design, DROPS Design offers one of the most extensive collections of free patterns on the internet - translated to 17 languages. As of today we count 304 catalogues and 11422 patterns - 11422 of which are translated into English (UK/cm).
We work hard to bring you the best knitting and crochet have to offer, inspiration and advice as well as great quality yarns at incredible prices! Would you like to use our patterns for other than personal use? You can read what you are allowed to do in the Copyright text at the bottom of all our patterns. Happy crafting!
Comments / Questions (30)
After row 2 on the back piece, it says "continue back and forth with pattern until 10 rows with fans have been worked in total." do these 10 rows include the rows before the chain, as in the ones that are pieced before? or only the rows after the chain's addition? thanks :)
08.01.2024 - 01:22DROPS Design answered:
Dear Annie, measure from top on shoulder, ie including the first row worked separately in each shoulder (piece should measure approx. 13 cm with 8 rows = 10 cm). Happy crocheting!
08.01.2024 - 11:03Dziękuję za odpowiedz. Pierwszy raz robię sweter i zupełnie nie mam wiedzy na ten temat, jak widac myślałam dokładnie odwrotnie. Serdecznie pozdrawiam.
13.01.2023 - 11:42Dziękuję za odpowiedz. Pierwszy raz robię sweter i zupełnie nie mam wiedzy na ten temat, jak widac myślałam dokładnie odwrotnie. Serdecznie pozdrawiam.
13.01.2023 - 11:42Nie rozumiem dlaczego w rękawach jest taki opis 55-43-49-37-37-37, wynikalo by z tego, ze dla rozmiaru xs/s trzeba nabrac 55 oczek, a dla rozmiaru xxl tylko 37. To jest nielogiczne. Czy ten zapis, zgodnie ze stylem stosowanym w opisie przodu i tylu nie powinien byc 37-37-37-43-49-55? Czy wielkosc rekawa nie zalezy od rozmiaru?
12.01.2023 - 20:37DROPS Design answered:
Witaj Dagno, we wzorze nie ma błędu. To o czym piszesz wynika z konstrukcji rękawa. Główka rękawa w mniejszych rozmiarach (gdzie podkrój rękawa jest krótszy a ramiona węższe) jest krótsza i szersza na górze (spłaszczona). W większych rozmiarach główka rękawa jest dłuższa i węższa na górze. Pozdrawiamy!
13.01.2023 - 08:52Hej. I diagramforklaringen står der ved tegn fire: “1 standmaske”. Er det korrekt eller skulle der stå “stangmaske”? Hvis det er korrekt med standmaske, hvad er det i så fald?
24.09.2022 - 17:34DROPS Design answered:
Hei Ulla. Her var det bare en tastefeil på den danske siden. Det skal være stangmaske. Dette er nå ordnet, takk for at du gjorde oss oppmerksom på dette. mvh DROPS Design
26.09.2022 - 10:37I don't understand when to increase for the armholes. It says that the piece should measure 5 1/8" (for XXL) when increases start? How many times do I repeat the A2a and A2c? Very confusing. Thanks!
03.06.2022 - 22:54DROPS Design answered:
Dear Johanna, since the number of repeats may vary due to your personal gauge, it's more exact to indicate the amount of cm/ inches where you should start increasing for the armholes. For the armhole increases you work A.2a and A.2c, which include the increases and are worked once vertically in full and a second time from the row with the arrow to the next to last row. Happy crocheting!
04.06.2022 - 18:44When working the front piece, after connecting the left and right shoulder with a chain, how many rows should there be before increasing for the armhole? Is it 10, like with the back piece, or should I be increasing in the 7th row immediately after finishing the 6th?
01.05.2022 - 01:40DROPS Design answered:
Dear William, You work pattern and increase for armhole on front piece as you worked on back piece. You should have the same number of rows from the top of shoulder (foundation chain) on back and front piece before connecting them. Happy crocheting!
02.05.2022 - 08:49Bij het achterpand moeten er 10 toeren met waaiers gehaakt worden voor het meerderen. Tellen dan de toeren van de schouders al mee, of moet ik vanaf de halslijn tellen? En die 13cm, zelfde vraag is dat vanaf de schouder of de halslijn?
23.02.2022 - 22:25DROPS Design answered:
Dag Janneke,
Dit is vanaf de schouder geteld en gemeten.
26.02.2022 - 14:17On the body, A3, where the final rows have clusters of double treble stitches, the pattern shows a single treble stitch in between: should that be a single double treble stitch, as for the sleeve A5? I’ve done a couple of rows as per the pattern but I’m not convinced it isn’t curling up a little at the edge. Thanks for your help.
20.01.2022 - 10:15DROPS Design answered:
Dear Lorraine, yes, the idea is that the pattern becomes slightly curly or wavy at the end, both in the sleeve and on the body. But if you want it to be straight, you may work a double treble crochet. Happy crocheting!
05.02.2022 - 19:52I don't see any info to determine the size I need to make. How do I know? All I see on the pattern is sizes SX-XXL but usually patterns have a chart like using bust size to determine size to use.
31.10.2021 - 05:07DROPS Design answered:
Dear Nelly, the measurements of the finished piece are given on the shcematic drawing at the bottom of the pattern. We suggest that you take a garment that fits the intended user and compare those measurements. Happy Stitching!
31.10.2021 - 07:55