
Popular categories
Looking for a yarn?


|
||||||||||||||||||||||
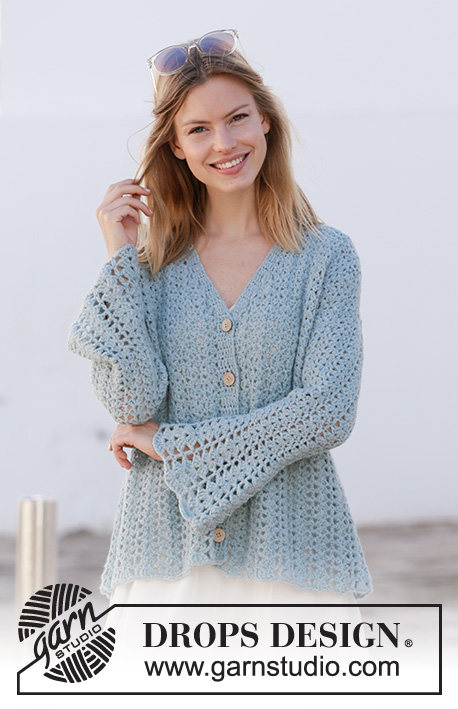
Mermaid Magic Jacket |
||||||||||||||||||||||
 |
 |
|||||||||||||||||||||
Crocheted jacket in DROPS Sky. Piece is crocheted top down with A-shape, fan pattern and wing sleeves. Size XS/S - XXXL.
DROPS 210-8 |
||||||||||||||||||||||
|
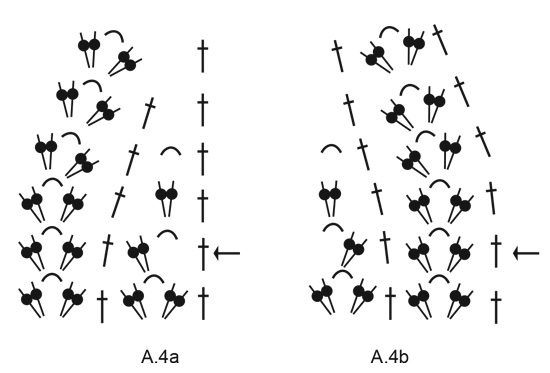
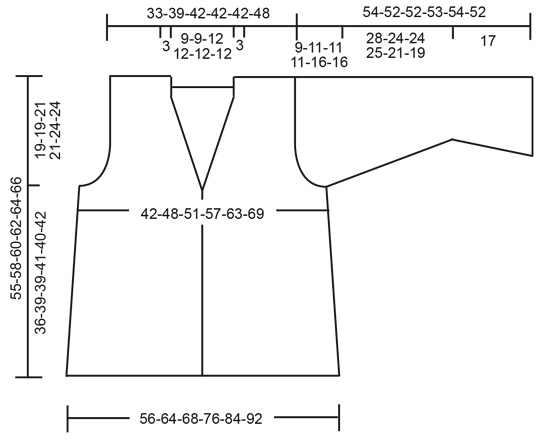
---------------------------------------------------------- EXPLANATION FOR THE PATTERN: ---------------------------------------------------------- CROCHET TIP FOR CHAIN STITCH: If you work at the end of crochet hook the chain stitch will often be too tight. 1 chain stitch should be just as long as 1 double crochet/treble crochet is wide. CROCHET INFORMATION: When piece is worked back and forth: At beginning of every row with double crochets, work 3 chain stitches that replace first double crochet on round. At beginning of every row with single crochets, work 4 chain stitches that replace first treble crochet on row. When working in the round (with turns): At beginning of every round with double crochets, work 3 chain stitches that replace first double crochet. Finish round with 1 slip stitch in 3rd chain stitch at beginning of round. At beginning of every round with treble crochets, work 4 chain stitches that replace first treble crochet. Finish round with 1 slip stitch in 4th chain stitch at beginning of round. CROCHET TIP (applies when working around the sleeves): To make the texture the same when working back and forth, turn the piece for every round worked. I.e. work every other round from right side and wrong side as follows: Work first round from right side of piece. Finish round with 1 slip stitch in 3rd chain stitch/4th chain stitch at the beginning of round. Turn piece and work next round from wrong side of piece. Finish round with 1 slip stitch in 3rd chain stitch/4th chain stitch at the beginning of round. Turn piece and work next round from right side of piece. Work back and forth like this, with alternately one round from right side and one round from wrong side. PATTERN: See diagrams A.1 to A.5. BUTTONHOLES: Decrease for buttonholes on right band (when garment is worn). Decrease from right side when 3 double crochets remain on row as follows: Work 1 chain stitch, skip 1 double crochet, work 1 double crochet in each of the remaining 2 stitches. On next row work 1 double crochet around chain stitch. Decrease first buttonhole on next row from right side when all increases for V-neck are done. Then decrease the next 4 approx. 7-7-7-8-8-8 cm = 2¾"-2¾"-2¾"-3⅛"-3⅛"-3⅛" between each. ---------------------------------------------------------- START THE PIECE HERE: ---------------------------------------------------------- JACKET - SHORT OVERVIEW OF THE PIECE: Work top down. Work back piece and front pieces separately, back and forth down to armhole. Then work the parts together and continue body back and forth. Work sleeve top down, first back and forth until sleeve cap is done, then work in the round, at the same time turn piece for every round to make the texture the same over the entire garment. BACK PIECE: Left shoulder: Work 19-25-25-25-25-31 chain stitches -read CROCHET TIP FOR CHAIN STITCH, on hook size 4.5 mm = US 7 with Sky. Work pattern as follows - read CROCHET INFO: ROW 1 (right side): Work A.1a over the first 12-18-18-18-18-24 chain stitches (= 2-3-3-3-3-4 repetitions), A.1b over the last 7 chain stitches. When first row is done, cut the yarn. Put piece aside. Right shoulder: Work 19-25-25-25-25-31 chain stitches on hook size 4.5 mm = US 7 with Sky. Work pattern as follows: ROW 1 (right side): Work A.1a over the first 12-18-18-18-18-24 chain stitches (= 2-3-3-3-3-4 repetitions), A.1b over the last 7 chain stitches. ROW 2 (wrong side): Work next row in diagrams over right shoulder. At the end of row work 29-29-35-35-35-35 loose chain stitches (= neck), continue over left shoulder from wrong side in pattern as before. Right and left shoulder are now worked together and there are 29-29-35-35-35-35 chain stitches for neck in the middle of piece. Turn and work next row from right side as follows: With pattern as before until chain stitches for neck, then work from row with arrow in A.1a over chain stitches for neck (= 5-5-6-6-6-6 fans), continue with pattern as before the rest of row. There are now 11-13-14-14-14-16 repetitions with fans on row. REMEMBER THE CROCHET GAUGE! Continue back and forth until 10-10-12-12-10-10 rows with fans have been worked in total. Piece measures approx. 13-13-15-15-13-13 cm = 5⅛"-5⅛"-6"-6"-5⅛"-5⅛" from shoulder. Now work pattern in the different sizes as follows: Size XS/S, M, L and XL: Now increase for armhole in each side of piece by working A.2a over A.1a and A.2b over A.1b. When next to last row in A.2a and A.2b has been worked (finish row with the last 2 chain stitches on next to last row in A.2a), enough stitches have been increased for 1 new fan in each side of piece. Cut the yarn. Put piece aside. Piece measures approx. 18-18-20-20 cm = 7"-7"-8"-8" from shoulder (1 row remains before armhole is done vertically). Size XXL and XXXL: Now increase for armhole in each side of piece by working A.2a over A.1a and A.2b over A.1b. When diagrams have been worked vertically, repeat pattern from row after row with arrow until you have worked up to next to last row in diagrams (finish row with the last 2 chain stitches on next to last row in A.2a). Enough stitches have been increased for 2 new fans in each side of piece. Cut the yarn. Put piece aside. Piece measures approx. 23-23 cm = 9"-9" from shoulder (1 row remains before armhole is done vertically). RIGHT FRONT PIECE: Work 7 chain stitches, on hook size 4.5 mm = US 7 with Sky. Turn and work 1 double crochet in 4th chain stitch from hook (= 2 double crochets) - remember CROCHET INFO, work 1 double crochet in each of the next 3 chain stitches (= 5 double crochets). Continue back and forth like this until band measures approx. 9-9-10-10-10-10 cm = 3½"-3½"-4"-4"-4"-4". Work 19-25-25-25-25-31 chain stitches at the end of row. Then work pattern as follows: ROW 1 (right side): Work A.1a over the first 12-18-18-18-18-24 chain stitches (= 2-3-3-3-3-4 repetitions), A.1b over the next 7 chain stitches, work 1 double crochet in each of the 5 double crochets for band. Continue back and forth with fan pattern and 5 double crochets for band, at the same time increase for V-neck and armholes as follows: V-neck: When 4-4-6-6-6-8 rows with fans have been worked, increase on next row from right side as follows: Work from row with arrow in A.2b over fan before band. When diagrams have been worked vertically, repeat pattern from row after row with arrow until enough stitches have been increased to work 3 new fans inside band. If the band is tight vertically when increasing for V-neck, work treble crochets instead of double crochets on approx. every other row. If the increases for V-neck are not done when increase for armholes is done, continue increase when working body. Armhole: When 10-10-12-12-10-10 rows with fans have been worked (piece measures approx. 13-13-15-15-13-13 cm = 5⅛"-5⅛"-6"-6"-5⅛"-5⅛" from shoulder), increase for armhole the same way as on back piece (i.e. enough stitches have been increased to work 1-1-1-1-2-2 new fans in the side). Last row worked is worked from wrong side and finished with 2 chain stitches as shown on next to last row in A.2a. Cut the yarn. Put piece aside. Piece measures approx. 18-18-20-20-23-23 cm = 7"-7"-8"-8"-9"-9" from shoulder and down (1 row now remains before armhole is done vertically). LEFT FRONT PIECE: Work 7 chain stitches, on hook size 4.5 mm = US 7 with Sky. Turn and work 1 double crochet in 4th chain stitch from hook (= 2 double crochets) - remember CROCHET INFO, work 1 double crochet in each of the next 3 chain stitches (= 5 double crochets). Continue back and forth like this until band measures approx. 9-9-10-10-10-10 cm = 3½"-3½"-4"-4"-4"-4". Work 19-25-25-25-25-31 loose chain stitches at the end of row. Cut the yarn. Work pattern as follows: ROW 1 (right side): Work 1 double crochet in each of the next 5 double crochets for band, A.1a over the first 12-18-18-18-18-24 chain stitches (= 2-3-3-3-3-4 repetitions), A.1b over the next 7 chain stitches. Continue back and forth with fan pattern and 5 double crochets for band, at the same time increase for V-neck and armholes as follows: V-neck: When 4-4-6-6-6-8 rows with fans have been worked, work on next row from right side as follows: Work from row with arrow in A.2a over fan after band. When diagrams have been worked vertically, repeat pattern from row after row with arrow until enough stitches have been increased to work 3 new fans inside band. If the band is tight vertically when increasing for V-neck, work treble crochets instead of double crochets on approx. every other row. If the increases for V-neck are not done when increase for armholes is done, continue increase when working body. Armhole: When 10-10-12-12-10-10 rows with fans have been worked (piece measures approx. 13-13-15-15-13-13 cm = 5⅛"-5⅛"-6"-6"-5⅛"-5⅛" from shoulder), increase for armhole the same way as on back piece (i.e. enough stitches have been increased to work 1-1-1-1-2-2 new fans in the side). Last row worked is worked from wrong side. Piece measures approx. 18-18-20-20-23-23 cm = 7"-7"-8"-8"-9"-9" from shoulder and down (1 row now remains before armhole is done vertically). Do not cut the thread, but work parts together as follows: CROCHET FRONT PIECES AND BACK PIECE TOGETHER: Now work front pieces and back piece together as follows: Work as before over stitches on left front piece (continue increase for V-neck until 3 fans have been increased inside band), work 5-5-5-17-17-17 loose chain stitches (= in the side under sleeves), work as shown on last row in A.2a (= the first 2 fans on back piece), continue with fans over back piece until 2 fans remain, work as shown on last row in A.2b (= the last 2 fans on back piece), work 5-5-5-17-17-17 loose chain stitches (= in the side under sleeve), work as shown on last row in A.2a (= the first 2 fans on right front piece), continue as before over stitches on right front piece (continue increase for V-neck until 3 fans have been increased inside band). Insert a marker thread here. NOW MEASURE PIECE FROM HERE! BODY: Continue back and forth with pattern like this, and work 1-1-1-3-3-3 fans as shown on first row in A.1a over chain stitches in the side under sleeve. When all increases for V-neck are done are done, there are 29-33-34-38-42-46 repetitions with fans on row. On next row from right side decrease BUTTONHOLES on right front band – read explanation above. When piece measures approx. 12 cm = 4¾", work as shown on row with arrow in A.3. Repeat this row until piece measures 32-35-35-37-36-36 cm = 12½"-13¾"-13¾"-14½"-14¼"-14¼" Then work as shown on last row in A.3 and work treble crochets in band in each side towards mid front instead of double crochets. When piece measures 36-39-39-41-40-42 cm = 14¼"-15¼"-15¼"-16⅛"-15¾"-16½", the jacket is finished. Piece measures 55-58-60-62-64-66 cm = 21⅝"-22¾"-23⅝"-24⅜"-25¼"-26" in total from shoulder and down. Cut and fasten the yarn. SLEEVES: Work 55-43-49-37-37-37 chain stitches on hook size 4.5 mm = US 7 with Sky. Work pattern from row with arrow in diagrams as follows: Work A.1a over the first 48-36-42-30-30-30 chain stitches (= 8-6-7-5-5-5 repetitions in width), A.1b over the last 7 chain stitches, work 2 chain stitches at the end of row (= increase in the side as shown at the end of row with arrow in A.2b). Turn and work fans back and forth, at the same time increase fans in each side of piece as shown in A.2a and A.2b. When diagrams have been worked vertically, repeat the pattern from row after the one with arrow. When 1-2-2-2-3-3 fans have been increased in each side, there are 11-11-12-10-12-12 fans on row and piece measures approx. 6-11-11-11-16-16 cm = 2⅜"-4⅜"-4⅜"-4⅜"-6¼"-6¼" – adjust to finish after a row that is last row in A.2a and A.2b. In size XS/S continue to work with fans without increase in the sides until piece measures 9 cm = 3½" (= approx. 2 row without increase). Then work in all sizes as follows: At the end of last row work 5-5-5-17-17-17 chain stitches (= mid under sleeve), then work 1 slip stitch in 3rd chain stitch at the beginning of row (= in first symbol in A.2a). NOW MEASURE PIECE FROM HERE! Then work in the round – read CROCHET TIP and CROCHET INFO, and work fan pattern as before. Over the new chain stitches under sleeve work 1-1-1-3-3-3 new fans the same way as in the side under sleeve on body = 12-12-13-13-15-15 fans on round. When piece measures approx. 3 cm = 1⅛", decrease on each side of the middle fan under sleeve as follows (the middle fan is not drawn into diagrams): Work as shown in A.4a after the middle fan (seen from right side) and as shown in A.4b before the middle fan (seen from right side). Repeat A.4a and A.4b until 2 fans have been decreased on each side of the middle fan under sleeve = 8-8-9-9-11-11 fans on round. Then work until sleeve measures 28-24-24-25-21-19 cm = 11"-9½"-9½"-9¾"-8¼"-7½" from the new chain stitches under sleeve (approx. 17 cm = 6¾" remain until finish measurements) – shorter sleeves in the larger sizes because of wider shoulders. Now work row with arrow in A.5 for 4 cm = 1½", then work next row in diagram for 5 cm = 2", then work last row in diagram until sleeve measures 45-41-41-42-38-36 cm = 17¾"-16⅛"-16⅛"-16½"-15"-14¼" from the new chain stitches under sleeve. Cut and fasten the yarn. Work the other sleeve the same way ASSEMBLY: Work shoulder seams together through both layers from wrong side as follows: Place shoulder together right side against right side and fasten strand with 1 single crochet through both layers towards the shoulder. Work * 2 chain stitches, skip ½-1 cm = ⅛"-⅜", 1 single crochet around both layers *, work from *-* along the shoulder. Cut and fasten the yarn. Work the other shoulder the same way. Work sleeves to body through both layers from wrong side as follows: Place parts together right side against right side and fasten strand with 1 single crochet approx. mid under sleeve, work * 2 chain stitches, skip ½-1 cm = ⅛"-⅜", 1 single crochet around both layers *, work from *-* around the entire sleeve. Cut and fasten the yarn. Work the other sleeve to body the same way. Sew bands together mid back and sew them on to neck line at the back of neck. Sew the buttons on to left band. |
||||||||||||||||||||||
Diagram explanations |
||||||||||||||||||||||
|
||||||||||||||||||||||

|
||||||||||||||||||||||

|
||||||||||||||||||||||
|
||||||||||||||||||||||
|
||||||||||||||||||||||
|
Have you made this or any other of our designs? Tag your pictures in social media with #dropsdesign so we can see them! Do you need help with this pattern?You'll find tutorial videos, a Comments/Questions area and more by visiting the pattern on garnstudio.com. © 1982-2024 DROPS Design A/S. We reserve all rights. This document, including all its sub-sections, has copyrights. Read more about what you can do with our patterns at the bottom of each pattern on our site. |
||||||||||||||||||||||


With over 40 years in knitting and crochet design, DROPS Design offers one of the most extensive collections of free patterns on the internet - translated to 17 languages. As of today we count 304 catalogs and 11422 patterns - 11417 of which are translated into English (US/in).
We work hard to bring you the best knitting and crochet have to offer, inspiration and advice as well as great quality yarns at incredible prices! Would you like to use our patterns for other than personal use? You can read what you are allowed to do in the Copyright text at the bottom of all our patterns. Happy crafting!
Comments / Questions (15)
I am just starting to increase for the sleeves - do I work all 6 rows of a2a & a2 b and then middle 2 again?
10.03.2024 - 23:04DROPS Design answered:
Dear Hannah, it depends on your size. On size XS/S, M, L and XL you don't work 1 whole repeat of A.2a and A.2b in the armhole decreases. You work the next to last row of the charts and then cut the thread. On size XXL and XXXL you work 1 whole repeat of the charts and then repeat from the arrow the middle 2 rows. Work the next to last row as indicated and cut the thread. Happy crochetting!
11.03.2024 - 00:32Miten kuvio A2b ja A2a toimivat? Esim. Takakappale pitääkö kuviota a2a toistaa koko ajan vai vaan reunoissa? Ja miten kääntyminen tapahtuu tässä kuviossa? Teetkö vain uuden rivin kuviosta ja luet sitä sitten väärin päin?
18.08.2022 - 14:59Bonjour, non une fois que l\'avant-dernier rang de A.2a est fini j\'ai que 1,5 motif de plus. Il faudrait que je fasse le dernier rang de A.2a et A.2b pour compléter le 2e motif éventail supplémentaire. Est-ce grave si je fais ce dernier rang?
03.05.2022 - 15:22DROPS Design answered:
Bonjour Diane, l'avant dernier rang de A.2a est sur l'envers, vous crochetez comme indiqué et terminez par les 2 mailles en l'air = ces 2 mailles qui permettent l'augmentation du demi-motif qui vous manque (et dont vous aurez besoin au rang suivant pour faire un motif complet). Bon crochet!
03.05.2022 - 16:27Bonjour, Est-il possible qu'il manque 2 mailles en l'air à la fin du dernier rang du diagramme A.2b quand je le termine la première fois? Et après l'avoir une 2e fois, en arrêtant à l'avant-dernier rang des diagrammes A.2a et A.2b, j'ai 1,5 éventails de plus et non 2. Serais-je mieux de faire le dernier rang de ces 2 diagrammes pour compléter le 2e éventail supplémentaire?
02.05.2022 - 21:26DROPS Design answered:
Bonjour Diane, effectivement, ces 2 ml sont à faire à la fin de A.2b, elles ne sont pas dans le diagramme mais expliquées dans le texte. L'avant-dernier rang deA.2a se crochète sur l'endroit et se termine par les 2 mailles en l'air (augmentation du demi-motif qui vous manque probablement). Bon crochet!
03.05.2022 - 09:42Er lidt nybegynder så forstår måske ikke helt at læse denne del af opskriften: Str xl ryg :"Nu tages der ud til ærmegab i hver side af arbejdet ved at hækle A.2a over A.1a og A.2b over A.1b" Der er jo hæklet to stykker efter A1a og A2a. Betyder det at der også skal være udtagninger midt inde i arbejdet? Plus til ærmegreb eller menes det at der hækle efter A2b i den ene side og A2a i den modsatte side? Vh Kia
02.04.2021 - 18:23DROPS Design answered:
Hej Kia, nej du hækler kun A.2a og A.2b over de yderste rapporter i hver side af arbejdet. God fornøjelse!
21.04.2021 - 15:53Hello, At the sleeve: after closing the lope (12 fans at M size) and crocheing 3 cm, I croched the A.4a and A.4b twice and came to 8 fans at 15 cm from the starting of the sleeve loop. According to the skeching the decrease has to continue until 24 cm. What did I miss? Gili
28.01.2021 - 14:49DROPS Design answered:
Dear Mrs Marx, chart is just standard, you have to crochet until piece measures 24 cm from the new chains cast on mid under sleeve/arm (= 11 cm + 24 cm = 35 cm in total) and now crochet A.5 increasing for the bottom of sleeve. Happy crocheting!
28.01.2021 - 16:19Hello, Thankyou for the pattern. I didn't understand the front piece: I did 5 double crochet for 9 cm ( the piece is 2.5x9 cm) and it doesn't fit the back in the neck. I can't see the place in the pictures because of the hair. What did I miss? Gili
16.12.2020 - 07:42DROPS Design answered:
Dear Gili, the first 9 cm over the 5 double crochets are worked for collar edge, this is supposed to be as long as the half of neckline on mid back - you will make a similar piece on left front piece and then sew together the foundation chains then sew these 9 cm x 2 pieces along neckline on back piece. Hapy crocheting!
16.12.2020 - 13:43Har väntat 4 månader på detta mönster. Vore trevligt att få det snart i dessa coronatider då man har tid att virka.
28.04.2020 - 21:14A quand les explications merci
23.04.2020 - 13:47J'adore ce modèle, j'aurai aimé le tricoter pendant le "Confinement".
17.03.2020 - 10:18