
Popular categories
Looking for a yarn?


|
||||||||||||||||
Summer Promise |
||||||||||||||||
 |
 |
|||||||||||||||
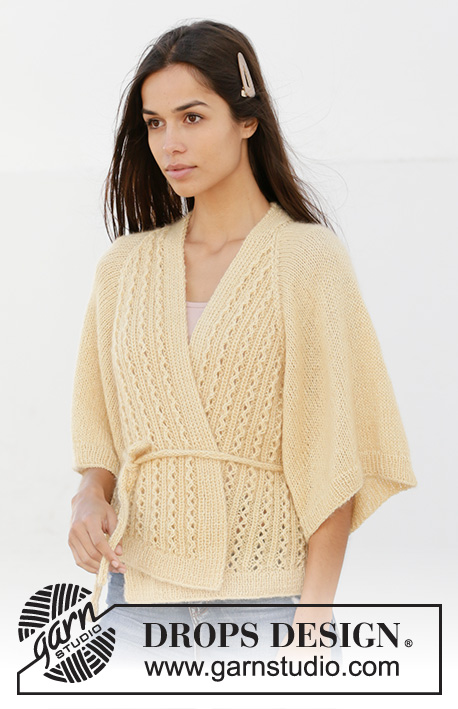
Knitted wrap-around jacket with raglan in DROPS BabyAlpaca Silk and DROPS Kid-Silk. Piece is knitted with lace pattern and ¾ sleeves. Size: S - XXXL
DROPS 213-24 |
||||||||||||||||
|
---------------------------------------------------------- EXPLANATION FOR THE PATTERN: ---------------------------------------------------------- GARTER STITCH (back and forth): Knit all rows. 1 ridge vertically = knit 2 rows. PATTERN: See diagrams A.1 to A.4. Diagrams show all rows in pattern seen from the right side. DECREASE TIP-1 (evenly): To calculate how to decrease evenly, use the total number of stitches on row (e.g. 261 stitches), minus bands (e.g. 22 stitches) and divide the remaining stitches by number of decreases to be done (e.g. 34) = approx. 7. In this example decrease by knitting approx. every 6th and 7th stitch together and do not decrease of the outermost 11 stitches in each side. DECREASE TIP-2 (applies to sides on front pieces): All decreases are done from the right side! Decrease in the side on right and left front piece (= 2 stitches decreased on row) as follows: Work until 2 stitches remain before marker thread in transition between right front piece and back piece, knit 2 together (= 1 stitch decreased), knit until marker thread in transition between back piece and left front piece, slip 1 stitch knitwise, knit 1, pass slipped stitch over stitch worked (= 1 stitch decreased). Where there is not enough stitches to work both yarn over and decrease in pattern (i.e. 2Nd and 3rd stitch in A.2 and 5th and 6th stitch in A.4), knit over these 2 stitches until they have been decreased. RAGLAN: Decrease 1 stitch before marker thread as follows: Work until 2 stitches remain before marker thread, knit the next 2 stitches together (= 1 stitch decreased). Decrease 1 stitch after marker thread as follows: Slip 1 stitch knitwise, knit 1, pass slipped stitch over (= 1 stitch decreased). Decrease 2 stitches before marker thread as follows: Work until 3 stitches remain before marker thread, knit the next 3 stitches together (= 2 stitches decreased). Decrease 2 stitches after marker thread as follows: Slip 1 stitch knitwise, knit 2 together, pass slipped stitch over stitches worked together (= 2 stitches decreased). ---------------------------------------------------------- START THE PIECE HERE: ---------------------------------------------------------- WRAP-AROUND JACKET - SHORT OVERVIEW OF THE PIECE: Work body back and forth on circular needle up to armholes. Work sleeves in the round on circular needle up to armholes. Then slip sleeves on to same circular needle as body, and work yoke back and forth. Then finish right and left band before sewing them together in the back of neck. BODY: Cast on 261-285-309-317-349-381 stitches on circular needle size 4 mm = US 6 (including 11 band stitches in each side) with 1 strand BabyAlpaca Silk and 1 strand Kid-Silk (= 2 strands). Purl 1 row (= wrong side). Work next row as follows from right side: 1 edge stitch in GARTER STITCH - read explanation above - * knit 1, purl 1 *, repeat from *-* until 2 stitches remain on needle, knit 1 and finish with 1 edge stitch in garter stitch. Continue rib like this for 4 cm = 1½", adjust so that next row is worked from right side. When rib is done, work next row as follows: A.1 over the first 11 stitches (= band), knit the next 239-263-287-295-327-359 stitches (i.e. until 11 stitches remain on row), AT THE SAME TIME decrease 34-37-40-41-45-49 stitches evenly over these stitches – read DECREASE TIP-1, A.3 over the last 11 stitches (= band) = 227-248-269-276-304-332 stitches. Purl 1 row from wrong side. Switch to circular needle size 5 mm = US 8. Insert 1 marker thread after 69-76-83-83-90-97 stitches in from each side (= in the side of body). There are 89-96-103-110-124-138 stitches between marker threads on back piece. Move the marker threads upwards when working; they should be used for decrease later on front pieces. Now work pattern and short rows on front pieces, begin from right side. ROW 1 (= right side): Work A.1 over the first 11 stitches (pattern should fit with knit over knit and purl over purl), slip next stitch purlwise, place yarn on right side of work, lift outermost stitch on right needle back on left needle, turn piece and tighten yarn. ROW 2: Work back in pattern. ROW 3: Work A.1 over the first 11 stitches, A.2 over the next 7 stitches, slip next stitch purlwise, place yarn on right side of work, lift outermost stitch on right needle back on left needle, turn piece and tighten yarn. ROW 4: Work back in pattern. Continue back and forth like this, and work a new repetition of A.2 over the next 7 stitches on row every time a row is worked from right side – adjust to begin alternately on 1st and 3rd row in pattern every time a new repetition of A.2 is started, so that lace pattern (decrease + yarn over) is worked the same in the different repetitions on row. REMEMBER THE KNITTING GAUGE! When there has been worked short rows and 8-9-10-10-11-12 repetitions with A.2 in width (2 stitches remain before marker thread in the side), work pattern from right side over the remaining stitches on row as follows: Purl 1, knit 1, marker thread is here, purl 1, A.4 over the next 84-91-98-105-119-133 stitches (= 12-13-14-15-17-19 repetitions of 7 stitches), purl 1, knit 1, purl 2, marker thread is here, knit 1, purl 1, A.4 over the next 56-63-70-70-77-84 stitches, A.3 over the last 11 stitches. Now work short rows the same way as on right front piece as follows: ROW 1 (= wrong side): Work A.3 over the first 11 stitches (pattern should fit with knit over knit and purl over purl), slip next stitch purlwise, place yarn on wrong side of work, lift outermost stitch on right needle back on left needle, turn piece and tighten yarn. ROW 2: Work back in pattern. ROW 3: Work A.3 over the first 11 stitches, A.4 over the next 7 stitches, slip next stitch purlwise, place yarn on wrong side of work, lift outermost stitch on right needle back on left needle, turn piece and tighten yarn. ROW 4: Work back in pattern. Continue back and forth like this, and work a new repetition of A.4 over the next 7 stitches on row every time a row is worked from wrong side – adjust to begin alternately on 1st and 3rd row in pattern on next row from right side every time a new repetition of A.4 is started, so that lace pattern (decrease + yarn over) is worked the same in the different repetitions on row. When there has been worked short rows and 8-9-10-10-11-12 repetitions with A.4 in width (2 stitches remain before marker thread in the side), work pattern from wrong side over the remaining stitches on row. The short rows are now finished. Continue back and forth with pattern as before. When piece measures 6 cm = 2⅜" from cast-on edge and along marker thread in the side, begin decrease in the side on front pieces – read DECREASE TIP-2. Decrease like this approx. every 2 cm = ¾" 9 times in total (= 18 stitches decreased in total) = 209-230-251-258-286-314 stitches. When piece measures 24-24-25-25-25-25 cm = 9½"-9½"-9¾"-9¾"-9¾"-9¾" from cast-on edge (along marker thread in the side), bind off 3-4-5-5-6-7 stitches for armhole on each side of marker thread in the sides on next row from wrong side. There are now 83-88-93-100-112-124 stitches on back piece, and 57-63-69-69-75-81 stitches on each front piece. Put piece aside and work the sleeves. SLEEVES: Cast on 110-112-116-118-120-122 stitches on circular needle size 4 mm = US 6 with 1 strand BabyAlpaca Silk and 1 strand Kid-Silk (= 2 strands). Knit 1 round. Then work rib (= knit 1/purl 1) in the round for 4 cm = 1½". Knit 1 round while decreasing 14-14-16-16-16-16 stitches evenly - remember DECREASE TIP-1 = 96-98-100-102-104-106 stitches. Switch to circular needle size 5 mm = US 8. Work in stockinette stitch in the round. When sleeve measures 24-23-22-21-20-19 cm = 9½"-9"-8¾"-8¼"-8"-7½", bind off 6-8-10-10-12-14 stitches under sleeve = 90-90-90-92-92-92 stitches. Put piece aside and knit another sleeve the same way. YOKE: Slip sleeves on to same circular needle as body where armholes were bind off in each side= 377-394-411-422-446-470 stitches. Insert a marker thread in all transitions between sleeves and body. Continue back and forth with pattern as before on front pieces and back piece, and work in stockinette stitch over all stitches on sleeves. When piece measures 2-1-0-2-1-0 cm = ¾"-⅜"-0"-¾"-⅜"-0", begin decrease for RAGLAN – read explanation above. The decrease on front pieces, back piece and sleeves are uneven. Right and left front piece: Decrease 2 stitches on every other row 23-26-29-29-32-35 times in total (= 46-52-58-58-64-70 stitches decreased on each front piece). Back piece: Decrease 1 stitch on every other row 23-26-29-29-32-35 times in total (= total 46-52-58-58-64-70 stitches decreased on back piece). Sleeve: Decrease 1 stitch every other row 10-14-18-21-25-29 times in total, then decrease 2 stitches every other row 15-13-11-10-8-6 times (= 80-80-80-82-82-82 stitches decrease in total on each sleeve). When all decreases for raglan are done, 79-78-77-84-90-96 stitches remain on needle. Work next row from right side as follows: Work A.1 over the first 11 stitches, knit the next 10 stitches, knit the next 37-36-35-42-48-54 stitches and decrease at the same time 3-2-0-6-11-17 stitches evenly, knit the next 10 stitches, A.3 as before over the last 11 stitches = 76-76-77-78-79-79 stitches. Work next row from wrong side as follows: Work the first 11 stitches before slipping them on a stitch holder (= left band), bind off the next 54-54-55-56-57-57 stitches, work the last 11 stitches (= right band). RIGHT BAND: Now work band back and forth with knit over knit, purl over purl with 1 edge stitch in garter stitch in each side. When band measures 4 cm = 1½", work short rows as follows – begin from right side: ROW 1 (= right side): Work all stitches, turn. ROW 2: Work the first 7 stitches, turn, tighten yarn. ROW 3: Work back, turn ROW 4: Work all stitches, turn. Repeat row 1-4 1 more time (= 2 times in total). Continue with knit over knit and purl over purl until band measures 15-15-15½-15½-16-16 cm = 6"-6"-6⅛"-6⅛"-6¼"-6¼" along the longest side. Bind off stitches with knit over knit and purl over purl. LEFT BAND: Slip stitches from stitch holder back on needle and work band back and forth with knit over knit, purl over purl with 1 edge stitch in garter stitch in each side. When band measures 4 cm = 1½", work short rows as follows – begin from wrong side: ROW 1 (= wrong side): Work all stitches, turn. ROW 2: Work the first 7 stitches, turn, tighten yarn. ROW 3: Work back, turn ROW 4: Work all stitches, turn. Repeat row 1-4 1 more time (= 2 times in total). Continue with knit over knit and purl over purl until band measures 15-15-15½-15½-16-16 cm = 6"-6"-6⅛"-6⅛"-6¼"-6¼" along the longest side. Bind off stitches with knit over knit and purl over purl. ASSEMBLY: Sew the opening under the sleeves. Sew together mid back, and sew it on to neck at the back of neck. TIE AND STRAPS: Cast on 5 stitches on circular needle size 4 mm = US 6 with 1 strand BabyAlpaca Silk and 1 strand Kid-Silk (= 2 strands). Work in stockinette stitch back and forth over the 5 stitches. When tie measures approx. 180 to 250 cm = 71" to 99" – or desired length, bind off. Fasten strands in each end of the tie. Crochet a strap in each side along knit stitch in transition between front pieces and back piece with 1 strand of each quality (= 2 strands) with crochet hook size 3 mm = US C. Fasten strands with a slip stitch in the side approx. 5 cm = 2" below bind off for armholes, work chain stitches for approx. 4 cm = 1½". Fasten strand with 1 slip stitch approx. 4 cm = 1½" below where the strap started. Cut the yarn and fasten. Repeat in the other side. |
||||||||||||||||
Diagram explanations |
||||||||||||||||
|
||||||||||||||||

|
||||||||||||||||

|
||||||||||||||||
|
Have you made this or any other of our designs? Tag your pictures in social media with #dropsdesign so we can see them! Do you need help with this pattern?You'll find tutorial videos, a Comments/Questions area and more by visiting the pattern on garnstudio.com. © 1982-2024 DROPS Design A/S. We reserve all rights. This document, including all its sub-sections, has copyrights. Read more about what you can do with our patterns at the bottom of each pattern on our site. |
||||||||||||||||


With over 40 years in knitting and crochet design, DROPS Design offers one of the most extensive collections of free patterns on the internet - translated to 17 languages. As of today we count 304 catalogs and 11422 patterns - 11417 of which are translated into English (US/in).
We work hard to bring you the best knitting and crochet have to offer, inspiration and advice as well as great quality yarns at incredible prices! Would you like to use our patterns for other than personal use? You can read what you are allowed to do in the Copyright text at the bottom of all our patterns. Happy crafting!
Comments / Questions (25)
During cast on for the body it gives a number but then says “including 11 stitches”… does this mean that the extra stitches are already included in the original number or that we need to include 11 additional stitches? Thank you???
19.11.2023 - 08:00DROPS Design answered:
Dear Danie, these stitches are included in the number of stitches to cast on, this means you don't have to cast them off extra. Happy knitting!
20.11.2023 - 10:34Buongiorno. Non ho capito comunque. Si lavora sulle prime 11 e poi si fa un ferro accorciato. Poi si lavora sulle 11 + 7 maglie e di nuovo un ferro accorciato. Ma poi devo lavorare sempre su queste prime 11 e 11+7 fino ad aver fatto tutte le ripetizioni? Grazie
08.04.2023 - 19:25DROPS Design answered:
Buonasera Deborah, deve aggiungere una ripetizione di 7 maglie di A.2 ad ogni nuovo ferro accorciato fino ad aver lavorato le ripetizioni indicate. Buon lavoro!
11.04.2023 - 23:12Buongiorno. Non ho capito comunque. Si lavora sulle prime 11 e poi si fa un ferro accorciato. Poi si lavora sulle 11 + 7 maglie e di nuovo un ferro accorciato. Ma poi devo lavorare sempre su queste prime 11 e 11+7 fino ad aver fatto tutte le ripetizioni? Grazie
20.03.2023 - 10:03DROPS Design answered:
Buonasera Deborah, deve aggiungere una ripetizione di 7 maglie di A.2 ad ogni nuovo ferro accorciato fino ad aver lavorato le ripetizioni indicate. Buon lavoro!
11.04.2023 - 23:12Buongiorno. Non ho capito il passaggio dei ferri accorciati: ogni quanto li devo fare? Grazie
19.03.2023 - 14:03DROPS Design answered:
Buonasera Deborah, deve lavorare a ferri accorciati fino al numero di ripetizioni di A.2 indicato. Buon lavoro!
19.03.2023 - 19:05Guten Tag, ich verstehe beim Rumpfteil nicht wie das funktioniert: "einschließlich je 11 Maschen beidseitig für die vorderen Blenden) mit 1 Faden BabyAlpaca Silk und 1 Faden Kid-Silk (= 2 Fäden)". Könnten Sie mir das bitte etwas genauer erklären wie man das macht, ich stricke noch nicht so lange. Vielen Dank im Voraus!
15.02.2021 - 12:57DROPS Design answered:
Liebe Frau Reuhl, es bedeudet, daß die 11 Blenden-Maschen auf beiden Seiten sind in den angegebenen Maschenanzahl inbegriffen, so brauchen Sie nicht diese 22 Maschen extra anzuschlagen. Hoffentlich kann es Ihnen weiter helfen. Viel Spaß beim stricken!
15.02.2021 - 15:16Er det hul mønster på ryggen også ?
20.07.2020 - 06:33DROPS Design answered:
Hej Molly, Du strikker A.4 over ryggen ifølge opskriften. God fornøjelse!
28.07.2020 - 15:59Could you please provide with more details about the crocheted straps: Is that along side lines? Does it start 5 cm bellow armholes and lasts 4 cm down? etc.
25.06.2020 - 09:43DROPS Design answered:
Dear Oksana, the crocheted straps start approx. 5 cm below the cast off stitches for armholes and 4 cm down (fasten the chains with 1 slip stitch in the stitch in the side). Happy knitting!
25.06.2020 - 16:56Bonjour j'ai presque terminé ce modèle en taille S. Les quantités de laine requises ne sont pas suffisantes. Il me reste 10 rangs à faire les bordures et la ceinture . J'ai du recommander une pelote de baby alpaca silk.
18.06.2020 - 17:14DROPS Design answered:
Bonjour Mme Broux, avez-vous bien conservé la même tension que dans le modèle, en largeur et en hauteur autrement dit 17 m x 22 rangs = 10 x 10 cm? Si le nombre de rangs en hauteur est différent, la quantité nécessaire peut en être affectée. Merci. Bon tricot!
19.06.2020 - 08:03Bonjour j'ai tricoté les rangs raccourcis du devant droit, puis le 1er rang A4 du dos j'en suis aux rangs raccourcis du devant gauche et je ne comprends pas : si je tricote le premier rang A4 puis les rangs raccourcis au deuxième puis quatrième....etc motif A4 j'ai deux rangs 1 + rang env l'un au dessus de l'autre Faut-il au premier rang du devant gauche alterner rang 1 et rang 3 à chaque motif?
31.05.2020 - 12:41DROPS Design answered:
Bonjour Mme Broux, les rangs ajourés des diagrammes se tricotent toujours sur l'endroit, vous allez tricoter les rangs raccourcis du devant gauche en commençant sur l'envers, puis continuer de la même façon que pour le devant droit, en tricotant toujours plus de mailles. Bon tricot!
02.06.2020 - 10:00Så fin!!!
12.05.2020 - 14:06