
Popular categories
Looking for a yarn?


|
|||||||||||||||||||
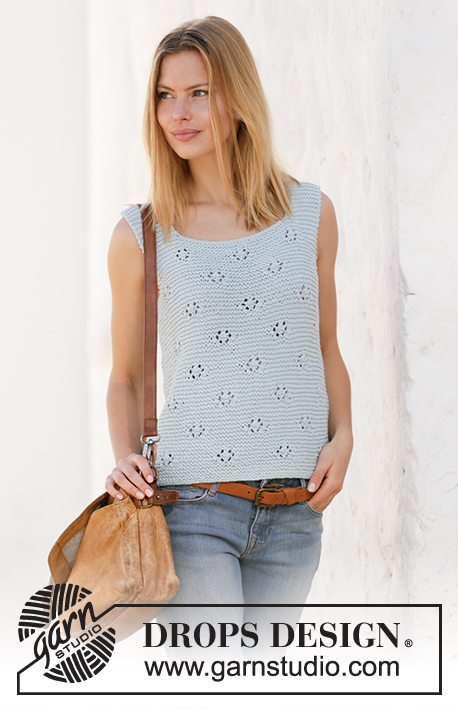
Lilly Pond |
|||||||||||||||||||
 |
 |
||||||||||||||||||
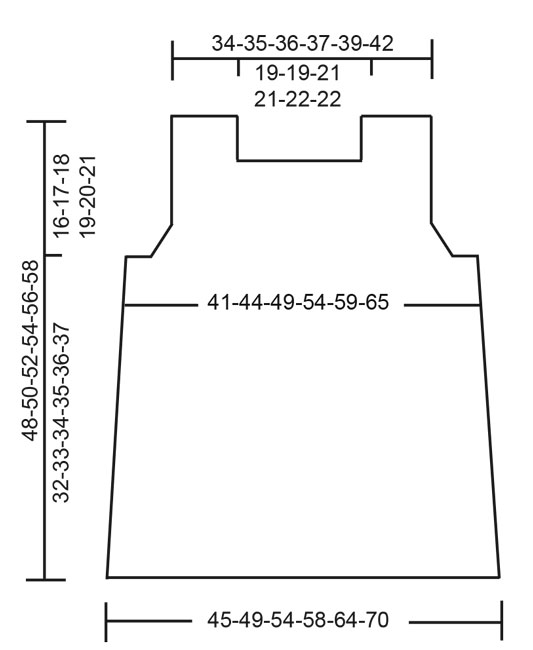
Knitted top in DROPS Paris. Piece is knitted in garter stitch and lace pattern. Size: S - XXXL
DROPS 211-9 |
|||||||||||||||||||
|
---------------------------------------------------------- EXPLANATION FOR THE PATTERN: ---------------------------------------------------------- GARTER STITCH (back and forth): Knit all rows. 1 ridge vertically = knit 2 rows. PATTERN: See diagram A.1. Diagrams show all rows in pattern seen from the right side. DECREASE TIP-1 (applies to sides of body): Decrease as follows inside 1 edge stitch in garter stitch at the beginning of row: Knit 2 together. Decrease as follows inside 1 edge stitch in garter stitch at the end of row: Work until 3 stitches remain on needle, slip 1 stitch knitwise, knit 1, pass slipped stitch over. DECREASE TIP-2 (applies to armhole): All decreases are done from the right side! Decrease as follows at the beginning of row from right side (= left armhole): Work 2 stitches in garter stitch, knit 2 together (= 1 stitch decreased). Decrease as follows at the end of row from right side (= right armhole): Work until 4 stitches remain on needle, knit 2 together (= 1 stitch decreased), work the last 2 stitches on needle. DECREASE TIP-3 (applies to neck): All decreases are done from the right side! Decrease as follows towards the neck: Work until 4 stitches remain, knit 2 together (= 1 stitch decreased), work the last 2 stitches before the neck. Decrease as follows from the neck: Work 2 stitches in garter stitch, knit 2 together (= 1 stitch decreased). ---------------------------------------------------------- START THE PIECE HERE: ---------------------------------------------------------- TOP - SHORT OVERVIEW OF THE PIECE: Work piece back and forth on circular needle. Front piece and back piece are worked separately and sewn together at the end. FRONT PIECE: Cast on 79-85-93-101-111-121 stitches on circular needle size 4.5 mm with Paris. Work 2 ridges in GARTER STITCH - read explanation above, over all stitches on row. Then work pattern as follows: Work 12-15-11-15-12-17 stitches in garter stitch, A.1 (= 16 stitches) over the next 48-48-64-64-80-80 stitches (= 3-3-4-4-5-5 repetitions in width), work the first 7 stitches in A.1, 12-15-11-15-12-17 stitches in garter stitch. When piece measures 4-5-6-4-5-6 cm, begin decrease in each side – read DECREASE TIP-1. Decrease like this approx. every 8-8-8-9-9-9 cm 4 times in total = 71-77-85-93-103-113 stitches. REMEMBER THE KNITTING TENSION! When A.1 has been worked vertically, repeat diagrams vertically. When piece measures 32-33-34-35-36-37 cm, cast off 4-5-6-8-10-12 stitches at the beginning of the next 2 rows for armholes. Then decrease 1 stitch inside 2 stitches in garter stitch in each side - read DECREASE TIP-2 (applies to armhole). Decrease like this on every row from right side 3-4-6-7-8-9 times in total = 57-59-61-63-67-71 stitches. At the same time work as many repetitions with lace pattern (A.1) as there is room for in width. When all decreases for armholes are done, continue with lace pattern as before over the middle 55 stitches in all sizes. Work the remaining stitches in each side (i.e. 1-2-3-4-6-8 stitches in each side) in garter stitch. When piece measures 40-42-43-45-46-48 cm - adjust to work at least 2 ridges vertically after the last lace pattern worked, and next row should be worked from right side as follows: Work the first 13-14-14-15-16-18 stitches, cast off the next 31-31-33-33-35-35 stitches for neck and work the remaining 13-14-14-15-16-18 stitches. Now finish each shoulder separately. Continue back and forth in garter stitch and on first row from right side decrease 1 stitch for neck by knitting 2 stitches together inside 2 stitches in garter stitch towards/from the neck – read DECREASE TIP-3 = 12-13-13-14-15-17 stitches for shoulder. When piece measures 8-8-9-9-10-10 cm from where stitches were cast off for neck, cast off. Piece measures approx. 48-50-52-54-56-58 cm from shoulder and down. Work the other shoulder the same way. BACK PIECE: Cast on and work pattern the same way as on front piece, AT THE SAME TIME when piece measures 32-33-34-35-36-37 cm, decrease for armholes the same way as on front piece (= 57-39-61-63-67-71 stitches on row when decrease for armholes is done). When piece measures 36-38-39-41-42-44 cm - adjust to work at least 2 ridges vertically after the last lace pattern worked, and next row should be worked from right side. On first row from right side, work a vent in the back of neck as follows: Knit the first 27-28-29-30-32-34 stitches (= right back piece), cast off the next 3 stitches for vent, knit the next 27-28-29-30-32-34 stitches (= left back piece). Continue in garter stitch as follows: Turn and knit back and forth over stitch for left back piece. When piece measures 6 cm from where 3 stitches were cast off for vent, work first row from right side as follows: Cast off the first 14-14-15-15-16-16 stitches for neck, work the remaining 13-14-14-15-16-18 stitches for shoulder. Continue back and forth in garter stitch but on next row from right side decrease 1 stitch for neck by knitting 2 stitches together inside 2 stitches in garter stitch from the neck – remember DECREASE TIP-3 = 12-13-13-14-15-17 stitches for shoulder. When piece measures 6-6-7-7-8-8 cm from where stitches were cast off for neck, cast off. Piece measures approx. 48-50-52-54-56-58 cm from shoulder and down. Then work over the 27-28-29-30-32-34 stitches for right shoulder. Work in garter stitch back and forth until piece measures 5 cm from where 3 stitches were cast off for vent - adjust so that next row is worked from right side. Work over the 27-28-29-30-32-34 stitches, cast on 5 new stitches on needle, turn, cast off the 5 stitches (= loop – to assemble later), work back over the 27-28-29-30-32-34 stitches. Turn and work the first 13-14-14-15-16-18 stitches, cast off the next 14-14-15-15-16-16 stitches. Cut the yarn and leave approx. 20 cm yarn to assemble loop with. Then work back and forth over the 13-14-14-15-16-18 stitches for shoulder, and on first row from right side decrease 1 stitch towards the neck – remember DECREASE TIP = 12-13-13-14-15-17 stitches. When piece measures 6-6-7-7-8-8 cm from where stitches were cast off for neck, cast off. Piece measures approx. 48-50-52-54-56-58 cm from shoulder and down. Fasten end of the 5 stitches cast on and cast off (= loop) to the outermost stitches towards the vent to thread around the button. Fasten button in opposite side on vent. ASSEMBLY: Sew shoulder seams inside cast-off edge. Sew side seams from armhole and down. |
|||||||||||||||||||
Diagram explanations |
|||||||||||||||||||
|
|||||||||||||||||||

|
|||||||||||||||||||
|
|||||||||||||||||||
|
Have you made this or any other of our designs? Tag your pictures in social media with #dropsdesign so we can see them! Do you need help with this pattern?You'll find tutorial videos, a Comments/Questions area and more by visiting the pattern on garnstudio.com. © 1982-2024 DROPS Design A/S. We reserve all rights. This document, including all its sub-sections, has copyrights. Read more about what you can do with our patterns at the bottom of each pattern on our site. |
|||||||||||||||||||


With over 40 years in knitting and crochet design, DROPS Design offers one of the most extensive collections of free patterns on the internet - translated to 17 languages. As of today we count 304 catalogues and 11422 patterns - 11422 of which are translated into English (UK/cm).
We work hard to bring you the best knitting and crochet have to offer, inspiration and advice as well as great quality yarns at incredible prices! Would you like to use our patterns for other than personal use? You can read what you are allowed to do in the Copyright text at the bottom of all our patterns. Happy crafting!
Comments / Questions (14)
Inoltre, c'è per caso un video dove si vede come si fa l'occhiello?
21.02.2024 - 16:32DROPS Design answered:
Buonasera Alessia, purtroppo non ci sono video che spiegano l'occhiello deve avviare 5 maglie e poi intrecciarle. Buon lavoro!
25.02.2024 - 21:57Buongiorno, Non mi è chiara una cosa: quando lavoro il dietro del top, devo sempre intrecciare le maglie per lo scalfo come sul davanti, o fare soltanto le diminuzioni? Grazie mille!
21.02.2024 - 16:19DROPS Design answered:
Buonasera Alessia, deve intrecciare le maglie come sul davanti. Buon lavoro!
25.02.2024 - 21:54Bij het begin voorpand: moet je nou eerst 12 steken in ribbelsteek doen en dan A1 of 12 plus 7 dus 19 en dan beginnen met A1? Dit bij maat S groeten sjanie
28.06.2022 - 19:41DROPS Design answered:
Dag Sjanie,
Je breit inderdaad eerst 12 teken in ribbelsteek en daarna begin je met A.1. Je breit A.1 over de volgende 48 steken en tot slot brei je op het eind nog eens 12 steken in ribbelsteek. Dit herhaal je in de hoogte, dus op elke naald aan elke kant 12 steken in ribbelsteek naast A.1
03.07.2022 - 13:25J'ai trouvé une petite erreur dans les explications. dos: diminuer pour les emmanchures comme pour le devant (= 57-39-61-63-67-71 mailles si on suit la suite logique des mailles ça devrait être 57-59-61-63-67-71 et non 57-39 etc. MErci pour vos beaux patrons
03.06.2021 - 20:04DROPS Design answered:
Bonjour Mme Dumas, il fallait effectivement lire 59 et non 39, cette faute de frappe a été corrigée de suite, merci pour votre retour, bonne continuation!
04.06.2021 - 07:18God og nem opskrift
31.07.2020 - 20:27Buonasera non riesco a stampare il modello Mi potete aiutare? Grazie
01.05.2020 - 15:48DROPS Design answered:
Buongiorno Cristina, ci può dare qualche informazione in più sulla difficoltà nella stampa? nelle pagine dei modelli c'è l'icona per la stampa: può stampare il modello o salvarlo in .pdf. Buon lavoro!
05.05.2020 - 10:50Posso avere il pattern? È un modello molto bello
18.04.2020 - 16:07Deseando el patrón
08.04.2020 - 13:15En fin modell, den skulle jag vilja sticka!
01.04.2020 - 10:17Let og luftig sommer top, vil gerne strikke den.
10.03.2020 - 12:34