
Popular categories
Looking for a yarn?


|
|
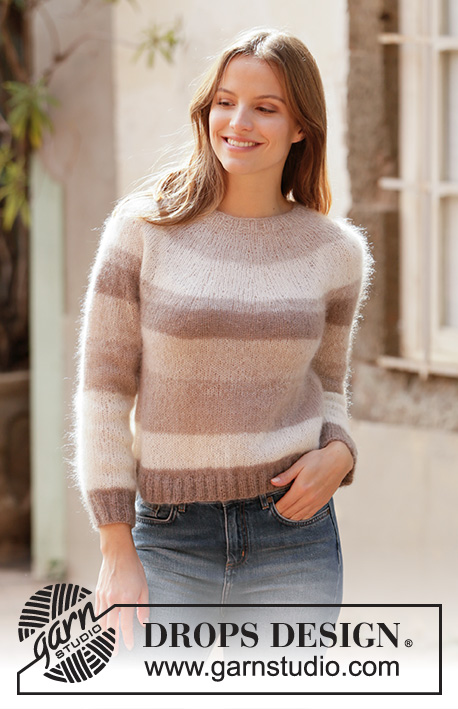
Sahara Rose Sweater |
|
 |
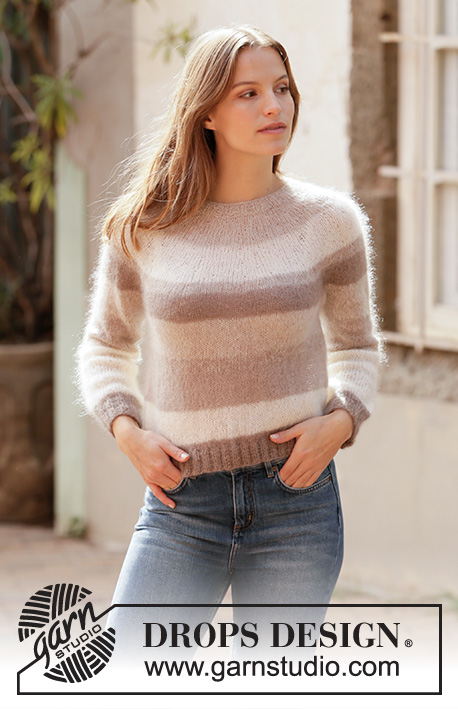 |
Knitted jumper in 2 strands DROPS Kid-Silk. The piece is worked top down with stripes and round yoke. Sizes S - XXXL.
DROPS 213-32 |
|
|
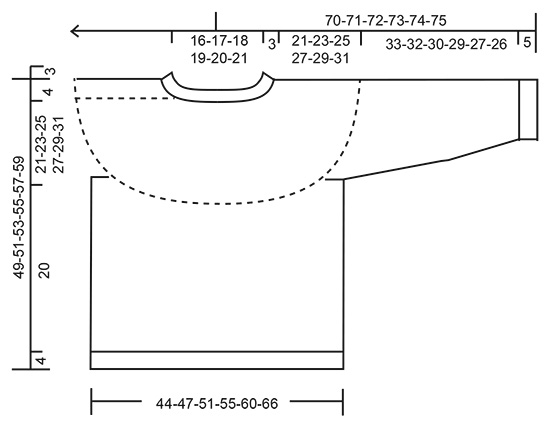
------------------------------------------------------- EXPLANATIONS FOR THE PATTERN: ------------------------------------------------------- STRIPES: NOTE: Stripes start on the yoke (after the rib). STRIPE 1: 5-5-5-5-6-6 cm with 1 strand light beige + 1 strand off white (+ 3 cm of rib = a total of 8-8-8-8-9-9 cm). STRIPE 2: 7-8-8-8-8-8 cm with 2 strands off white. STRIPE 3: 2-2-2-2-2-2 cm (i.e. 4 rows) with 1 strand off white + 1 strand beige. STRIPE 4: 5-5-5-6-6-7 cm with 2 strands beige. STRIPE 5: 7-8-8-8-8-8 cm with 1 strand light beige + 1 strand off white. STRIPE 6: 2-2-2-2-2-2 cm (i.e. 4 rows) with 1 strand beige + 1 strand off white. STRIPE 7: 7-7-8-8-8-8 cm with 2 strands light beige. STRIPE 8: 5-5-5-6-6-7 cm with 2 strands off white. STRIPE 9: Work with 2 strands beige to finished length (approx. 5-5-6-6-7-7 cm). STRIPES SLEEVE: Continue with stripes in the same way as on the body until stripe 7 has been completed in height. Then work with 2 strands off white until the sleeve measures 32-31-29-28-26-25 cm. Finally work with 2 strands beige to finished length. INCREASE/DECREASE TIP (evenly spaced): To work out how to increase/decrease evenly, count the total number of stitches on needle (e.g. 80 stitches) and divide by the number of increases/decreases to be made (e.g. 2) = 40. In this example, increase by making 1 yarn over after each 40th stitch. On the next round work the yarn overs twisted to avoid holes. When decreasing, knit together each 39th and 40th stitch. INCREASE TIP (for yoke): Increase alternately before and after the marker thread; i.e. first increase before all marker threads on the round, then increase after all marker threads, then increase before all marker threads and so-on. Increase before the marker thread as follows: Work until there is 1 stitch left before the marker thread and make 1 yarn over, knit 1, marker thread sits here. Increase after the marker thread as follows: Knit 2, make 1 yarn over. On the next round knit the yarn overs twisted to avoid holes. Then work the new stitches in stocking stitch. DECREASE TIP (for sleeves): Decrease 1 stitch on each side of the marker thread as follows: Work until there are 3 stitches left before the marker thread, knit 2 together, knit 2 (marker thread sits between these 2 stitches), slip 1 stitch as if to knit, knit 1 and pass the slipped stitch over the knitted stitch. CASTING-OFF TIP: To avoid the cast-off edge being tight you can cast off with a larger size needle. If the edge is still tight, make 1 yarn over after approx. each 4th stitch at the same time as casting off and the yarn overs are cast off as normal stitches. ------------------------------------------------------- START THE PIECE HERE: ------------------------------------------------------- JUMPER – SHORT OVERVIEW OF THE PIECE: The neck and yoke are worked in the round with circular needle, top down from mid back. The yoke is divided for body and sleeves and the body continued in the round with circular needle. The sleeves are worked in the round with short circular needle/double pointed needles, top down. NECK: Cast on 80-84-88-92-96-100 stitches with circular needle size 4 mm and 1 strand off-white + 1 strand light beige (= 2 strands). Knit 1 round. Then work rib (= knit 2 / purl 2) in the round for 3 cm. Knit 1 round where the number of stitches is adjusted to 78-84-90-96-102-108 stitches – read INCREASE/DECREASE TIP (i.e., in size S decrease 2 stitches, in size M the stitch-number stays the same and in sizes L, XL, XXL and XXXL increase 2-4-6-8 stitches). Insert a marker at the beginning of the round (= mid back). THE PIECE IS NOW MEASURED FROM HERE. YOKE: Change to circular needle size 5 mm. The first round on the yoke is worked as follows: * Knit 3, insert a marker thread here, knit 3 *, work from *-* to the end of the round = 13-14-15-16-17-18 marker threads in the piece. Allow the threads to follow your work onwards; they will be used when increasing on the yoke. Work stocking stitch and STRIPES – read description above. AT THE SAME TIME, on the first round, increase at each of the marker threads – read INCREASE TIP. Increase like this every 2nd round 3-3-6-5-4-3 times and every 4th-4th-6th-6th-6th-6th round 9-9-6-7-8-9 times = 234-252-270-288-306-324 stitches. REMEMBER THE KNITTING TENSION! When all the increases are finished knit 1 round where you increase 0-2-6-6-12-14 stitches evenly spaced = 234-254-276-294-318-338 stitches. Continue with stocking stitch until the piece measures 21-23-25-27-29-31 cm from the marker. The next round is worked as follows: Work the first 33-36-39-42-46-50 stitches (= half back piece), place the next 51-55-59-63-67-68 stitches on a thread and cast on 8-8-8-10-10-12 stitches on the needle (= in side under the sleeve), work the next 66-72-79-84-92-101 stitches (= front piece), place the next 51-55-59-63-67-68 stitches on a thread and cast on 8-8-8-10-10-12 stitches on the needle (= in side under the sleeve), work the last 33-36-40-42-46-51 stitches (= half back piece). Body and sleeves are finished separately. THE PIECE IS NOW MEASURED FROM HERE. BODY: = 148-160-174-188-204-226 stitches. Continue in the round with stocking stitch and stripes. When the piece measures 20 cm, knit 1 round where you increase 28-32-34-40-40-46 stitches = 176-192-208-228-244-272 stitches. Change to circular needle size 4 mm and work rib (= knit 2 / purl 2) for 4 cm. Cast off with knit over knit and purl over purl – read CASTING-OFF TIP. The jumper measures approx. 49-51-53-55-57-59 cm from the shoulder down. SLEEVE: Place the 51-55-59-63-67-68 stitches from the thread on the one side of the piece on short circular needle/double pointed needles size 5 mm and knit up 1 stitch in each of the 8-8-8-10-10-12 stitches cast on under the sleeve = 59-63-67-73-77-80 stitches. Insert a marker thread in the middle of the 8-8-8-10-10-12 stitches under the sleeve (= 4-4-4-5-5-6 new stitches on each side of the marker thread). Allow the thread to follow your work onwards; it will be used when decreasing under the sleeve. Work stocking stitch and STRIPES SLEEVE. When the sleeve measures 4-4-4-4-4-3 cm from the division begin to decrease – read DECREASE TIP. Decrease like this every 6½-4-3-2½-2-2 cm a total of 5-7-8-10-11-12 times = 49-49-51-53-55-56 stitches. Continue working until the sleeve measures 33-32-30-29-27-26 cm from the division. Knit 1 round where you decrease 9-9-7-5-7-8 stitches evenly spaced = 40-40-44-48-48-48 stitches. Change to double pointed needles size 4 mm and work rib (= knit 2 / purl 2) for 5 cm. Cast off with knit over knit and purl over purl – remember CASTING-OFF TIP. Work the other sleeve in the same way. |
|
|
|
|
Have you made this or any other of our designs? Tag your pictures in social media with #dropsdesign so we can see them! Do you need help with this pattern?You'll find tutorial videos, a Comments/Questions area and more by visiting the pattern on garnstudio.com. © 1982-2024 DROPS Design A/S. We reserve all rights. This document, including all its sub-sections, has copyrights. Read more about what you can do with our patterns at the bottom of each pattern on our site. |
|


With over 40 years in knitting and crochet design, DROPS Design offers one of the most extensive collections of free patterns on the internet - translated to 17 languages. As of today we count 304 catalogues and 11422 patterns - 11422 of which are translated into English (UK/cm).
We work hard to bring you the best knitting and crochet have to offer, inspiration and advice as well as great quality yarns at incredible prices! Would you like to use our patterns for other than personal use? You can read what you are allowed to do in the Copyright text at the bottom of all our patterns. Happy crafting!
Comments / Questions (37)
Hola!, esta vez mi consulta es sobre las disminuciones en las mangas. Para talle S, cuando dice "cuando la manga mida 4cm desde la división, comenzar las disminuciones cada 6½ cm un total de 5 veces = 49 puntos". La pregunta es, por cada vez de esas 5, se disminuyen 2 puntos?, de modo tal que en 5 veces x2 son 10 puntos totales, para obtener los 49?. La disminución se hace antes y después del marcador?. Agradezco la orientación. Saludos!
01.10.2023 - 04:03DROPS Design answered:
Hola Marina, la forma de disminuir está indicado en TIP PARA LAS DISMINUCIONES (para las mangas). Se disminuye a ambos lados del marcapuntos, tal y como se indica en el TIP. Por lo tanto se disminuyen 10 puntos y obtienes 49 puntos al final.
09.10.2023 - 00:32Hola, quería aclarar una duda. En las indicaciones del cuerpo, dice que , cuando la labor mida 20cm, trabajar una vuelta en jersey y al mismo tiempo aumentar en talla S, 28 puntos y luego trabajar el elástico. Pata qué se hace ese aumento? La idea es en la vuelta previa al comenzar el elástico se realiza ese aumento de puntos? Gracias!
22.09.2023 - 21:55DROPS Design answered:
Hola Marina, se trabajan aumentos antes de comenzar el elástico porque la textura del patrón elástico tiende a encoger o contraer la labor. Por lo tanto, para contrarrestarlo, aumentamos algunos puntos antes de comenzar el elástico.
24.09.2023 - 22:40Jakie będzie zużycie włóczki w jednym kolorze? Pozdrawiam. Kinga
14.09.2023 - 08:50Hola!, quizá ya lo preguntaron, pero en el canesú, cuando dice que luego de los aumentos, contar desde el marcapuntos 21 cm, esos 21 se cuentan a partir del ultimo aumento o tiene que medir 21 desde el escote?. Perdón por si la consulta es muy obvia, pero es mi primer prenda en circular. Gracias!
13.09.2023 - 03:43DROPS Design answered:
Hola Marina, la labor tiene que medir 21cm desde el marcapuntos en el escote.
17.09.2023 - 23:10Jag undrar hur mycket garn det går åt att sticka denna tröja storlek medium utan ränder?
19.08.2023 - 17:32DROPS Design answered:
Hei Marianne. Siden vi ikke har strikket denne uten striper, har vi ikke den nøyaktige garnmengden. Vil tippe +/- 175 gram. mvh DROPS Design
21.08.2023 - 11:45Hi. Re this instruction for yoke increases: “Increase like this every 2nd round 3-3-6-5-4-3 times and every 4th-4th-6th-6th-6th-6th round 9-9-6-7-8-9 times”. Question: Are the increases “in every 4th or 6th round” done ‘after’ completing the increases in every 2nd round, or are they done at the same time?
01.08.2023 - 19:23DROPS Design answered:
Hi Lynn, You first do the increases every 2nd round then the increases every 4/6th round afterwards. Happy knitting!
02.08.2023 - 06:47Hi! I have a question about the gauge swatch. Should I knit this in the round like the sweater? Thank you!
17.01.2023 - 15:43DROPS Design answered:
Dear Marjolein, if your tension knitted in the round is different as when you knit back and forth, then you might have to work your swatch in the round. Happy knitting!
17.01.2023 - 17:28Merci de votre réponse qui reprend les explications mais ne m'ont pas permis de mieux comprendre, mais j'ai trouvé de l'aide ailleurs, désolée car c'est le 6em modèle que je fais et j'apprécie vos modèles, merci
14.11.2022 - 17:44Pour les augmentations empiècement avant le marqueur au rg 2 4 6 8 10 12 et après le marqueur au rang 5 11 17 23 29 et 37 pour la taille L , je ne suis pas sûre d'avoir bien compris Merci pour votre réponse
12.11.2022 - 19:20DROPS Design answered:
Bonjour Mme Galerand, les augmentations doivent être faites alternativement avant/après les fils marqueur - cf AUGMENTATIONS (empiècement):; autrement dit, la 1ère fois, augmentez avant tous les fils marqueurs, la fois suivante augmentez après tous les fils marqueurs et ainsi de suite, vous augmentez ainsi 6 fois tous les 2 tours (1 fois avant, 1 fois après)x 3; puis 6 fois tous les 6 tours (1 fois avant, 1 fois après)x3. Bon tricot!
14.11.2022 - 09:36Hej i udtagningerne på bærestykket får vi for mange masker, efter de 9 rækker med udtagelser str m Hav en skøn dag
16.08.2022 - 08:08DROPS Design answered:
Hei Michelle. Usikker på hva du mener med for mange masker etter 9. omgang. Du skal da ha 210 masker, hva har du? I str. M starter du med 84 masker og etter 12 omganger (når alle økningene er ferdig) skal du har 252 masker iflg oppskriften. 84+14 (1. øk) = 98 + 14 (2.øk) =112 + 14 (3.øk) = 126 + 14 (4. øk) =140 +14 (5.øk) = 154 + 14 (6.øk)= 168 + 14 (7. øk) = 182 + 14 (8.øk) =196 + 14 (9.øk) = 210 + 14 (10.øk) = 224 + 14 (11. øk)=238 + 14 (12. øk) = 252. mvh DROPS Design
22.08.2022 - 09:21