DROPS Bomull-Lin
DROPS Bomull-Lin
53% Cotton, 47% Linen
from 3.45 $ /50g
Get the yarn to make this pattern from 31.05$.

The yarn cost is calculated from the pattern’s smallest size and the yarn’s cheapest product type. Looking for an even better price? You might find it on the DROPS Deals!

DROPS SS24

Free Flow

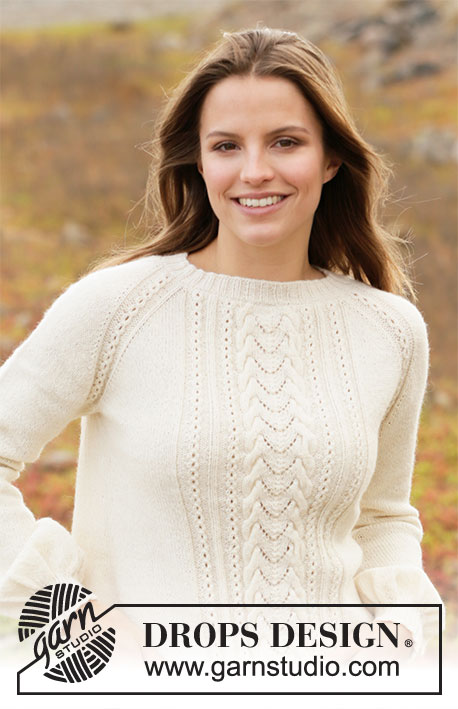
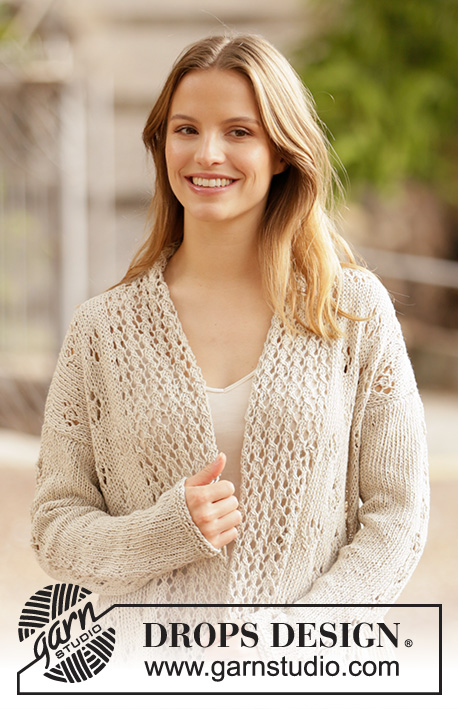
Knitted long jacket with shawl collar in DROPS Bomull-Lin or DROPS Paris. Piece is knitted with lace pattern. Size XS–XXL.

DROPS 213-18
DROPS design: Pattern l-155
Yarn group C or A + A
----------------------------------------------------------

SIZE:
XS - S - M - L - XL – XXL

Finished measurements:
Chest measurements: 92-104-108-118-124-132 cm = 36¼"-41"-42½"-46½"-48¾"-52"
Full length: 60-62-64-66-68-70 cm = 23⅝"-24⅜"-25¼"-26"-26¾"-27½"

All measurements in charts are in cm.

MATERIALS:
DROPS BOMULL-LIN from Garnstudio (belongs to yarn group C)
450-500-550-650-700-750 color 03, light beige

Or use:
DROPS PARIS from Garnstudio (belongs to yarn group C)
550-600-650-700-750-850 g color 26, beige

KNITTING GAUGE:
16 stitches in width and 20 rows vertically in stockinette stitch = 10 x 10 cm = 4" x 4".

NEEDLES:
DROPS DOUBLE POINTED NEEDLES SIZE 5.5 mm = US 9
DROPS CIRCULAR NEEDLE SIZE 5.5 mm = US 9: Length 40 and 80 cm = 16" and 32" for stockinette stitch/ pattern.
DROPS DOUBLE POINTED NEEDLES SIZE 5 mm = US 8
DROPS CIRCULAR NEEDLE SIZE 5 mm = US 8: Length 80 cm = 32" for edges in garter stitch.
Needle size is only a suggestion! If you have too many stitches on 10 cm = 4" switch to a larger needle size. If you have too few stitches on 10 cm = 4" switch to a smaller needle size.

-------------------------------------------------------

Alternative Yarn – See how to change yarns here
Yarn Groups A to F – Use the same pattern and change the yarn here
Yarn usage using an alternative yarn – Use our yarn converter here

-------------------------------------------------------

DROPS Bomull-Lin
DROPS Bomull-Lin
53% Cotton, 47% Linen
from 3.45 $ /50g
Get the yarn to make this pattern from 31.05$.

The yarn cost is calculated from the pattern’s smallest size and the yarn’s cheapest product type. Looking for an even better price? You might find it on the DROPS Deals!

Pattern instructions

NOTE: This pattern is written in American English. All measurements in charts are in cm. For conversion from inches to cm - click here. There are different terms for crocheting in American and British English. If this pattern includes crochet, click for "crochet terms" here. For this pattern in British English, please click here.
----------------------------------------------------------

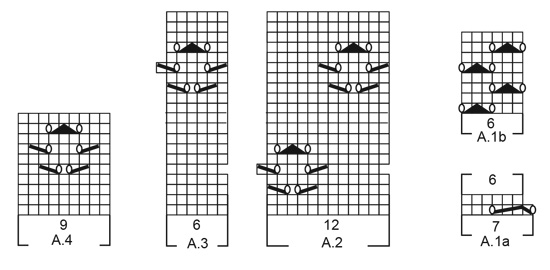
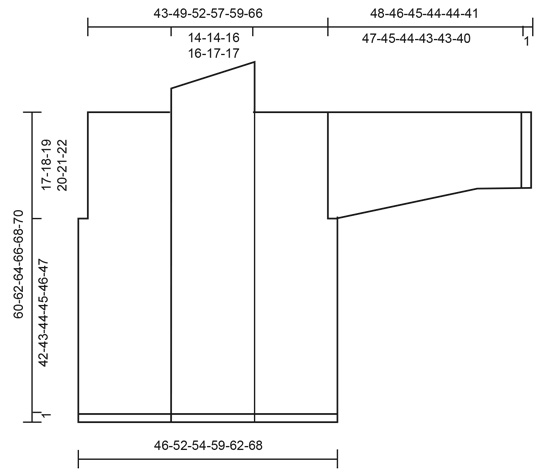
EXPLANATION FOR THE PATTERN:

----------------------------------------------------------

GARTER STITCH (worked in the round):
1 ridge vertically = 2 rounds, i.e. knit 1 round and purl 1 round.

GARTER STITCH (back and forth):
Knit all rows.
1 ridge vertically = knit 2 rows.

PATTERN:
See diagram A.1 to A.4 (diagram A.4 applies to sleeves). Diagrams show all rows in pattern seen from the right side.

INCREASE TIP (applies to sleeves):
Work until 2 stitches remain before marker thread, 1 yarn over, knit 4 (marker thread is in the middle of these stitches), 1 yarn over. On next round knit yarn overs twisted to avoid holes. Then work the new stitches in stockinette stitch.

----------------------------------------------------------

START THE PIECE HERE:

----------------------------------------------------------

JACKET - SHORT OVERVIEW OF THE PIECE:
Work body back and forth on circular needle up to armhole. Then bind off stitches for armholes in each side, and work front pieces and back piece back and forth separately. Work sleeves in the round on double pointed needles/a short circular needle.

BODY:
Cast on 169-189-195-225-231-251 stitches (including 1 edge stitch in each side towards mid front) on circular needle size 5 mm = US 8 with Bomull-Lin or Paris. Work 2 ridges in GARTER STITCH - read explanation above. Switch to circular needle size 5.5 mm = US 9. Work next row in the different sizes as follows:

Size XS, L, XL:
Work 1 edge stitch in garter stitch, A.1a over the next 21-28-28 stitches (= 3-4-4 repetitions of 7 stitches), knit 4-3-2, A.2 over the next 12-24-24 stitches (= 1-2-2 repetitions of 12 stitches), A.3 over the next 6-6-6 stitches (= 1 repetition of 6 stitches), knit 4-3-5, insert a marker thread here (= in the side), knit 3-2-4, A.2 over the next 60-84-84 stitches (= 5-7-7 repetitions), A.3 over the next 6-6-6 stitches (= 1 repetition), knit 4-3-5, insert a marker thread here (= in the side), knit 3-2-4, A.2 over the next 12-24-24 stitches (= 1-2-2 repetitions), A.3 over the next 6-6-6 stitches (= 1 repetition of 6 stitches), knit 5-4-3, A.1a over the next 21-28-28 stitches (= 3-4-4 repetitions), 1 edge stitch in garter stitch.

Size S, M, XXL:
Work 1 edge stitch in garter stitch, A.1a over the next 21-21-28 stitches (= 3-3-4 repetitions of 7 stitches), knit 4-3-2, A.2 over the next 24-24-36 stitches (= 2-2-3 repetitions of 12 stitches), knit 3-5-4, insert a marker thread here (= the side), knit 2-4-3, A.2 over the next 72-72-96 stitches (= 6-6-8 repetitions), A.3 over the next 6-6-6 stitches (= 1 repetition of 6 stitches), knit 3-5-4, insert a marker thread here (= in the side), knit 2-4-3, A.2 over the next 24-24-36 stitches (= 2-2-3 repetitions), knit 5-4-3, A.1a over the next 21-21-28 stitches (= 3-3-4 repetitions), 1 edge stitch in garter stitch.

All sizes:
When first row has been worked, 1 stitch has been decreased in every repetition A.1a on row (= 6-6-6-8-8-8 stitches decreased in total) = 163-183-189-217-223-243 stitches. Work 1 row from wrong side. Now work A.1b over every repetition A.1a and work pattern as before over the remaining stitches on row.
NOTE! On 5th row in A.2 work 1 more knit stitch before the first stitch in diagram (applies first time diagram is worked after band stitches on right front piece and after marker thread in the sides). On 15th row in A.3 work 1 knit stitch less after the last stitch in diagram (applies before marker thread in the sides and before band stitches on left front piece. REMEMBER THE KNITTING GAUGE!
When piece measures 43-44-45-46-47-48 cm = 17"-17¼"-17¾"-18"-18½"-19" - adjust so that next row is worked from wrong side, bind off 2 stitch in each side, i.e. 1 stitch on each side of marker thread in each side. Then finish front pieces and back piece separately.

BACK PIECE:
= 71-81-85-93-97-107 stitches. Work first row as follows from right side: 1 edge stitch in garter stitch, knit 2-1-3-1-3-2, work pattern as before over the next 66-78-78-90-90-102 stitches, knit 1-0-2-0-2-1, 1 edge stitch in garter stitch. Continue back and forth like this.
When piece measures 55-57-59-61-63-65 cm = 21⅝"-22½"-23¼"-24"-24¾"-25½", do not begin any more lace patterns vertically (this way the neck isn’t bind off in the middle of working a lace pattern).When last lace pattern has been worked, continue with stockinette stitch and 1 edge stitch in garter stitch in each side.
When piece measures 58-60-62-64-66-68 cm = 22¾"-23⅝"-24⅜"-25¼"-26"-26¾", bind off the middle 21-21-23-23-25-25 stitches for neck, and finish each shoulder separately. On next row from the neck, bind off 1 stitch = 24-29-30-34-35-41 stitches. When piece measures 60-62-64-66-68-70 cm = 23⅝"-24⅜"-25¼"-26"-26¾"-27½", bind off all stitches. Work the other shoulder the same way.

RIGHT FRONT PIECE:
= 44-49-50-60-61-66 stitches. Work first row from right side as follows: 1 edge stitch in garter stitch, work A.1b over the next 18-18-18-24-24-24 stitches, knit 4-4-3-3-2-2, work pattern as before over the next 18-24-24-30-30-36 stitches, knit 2-1-3-1-3-2, 1 edge stitch in garter stitch. Continue back and forth like this. When piece measures 60-62-64-66-68-70 cm = 23⅝"-24⅜"-25¼"-26"-26¾"-27½" – adjust so that next row is worked from wrong side, bind off the first 24-29-30-34-35-40 stitches for shoulder, then work over the last 20-20-20-26-26-26 stitches as before. Continue with lace pattern and 1 edge stitch in garter stitch in each side until band measures 7-7-7-7-8-8 cm = 2¾"-2¾"-2¾"-2¾"-3⅛"-3⅛" from shoulder. At the beginning of the next 3-3-3-4-4-4 rows from wrong side, bind off the first 5 stitches = 5-5-5-6-6-6 stitches remain. Loosely bind off the last stitches on next row from wrong side

LEFT FRONT PIECE:
= 44-49-50-60-61-66 stitches. Work first row from right side as follows: 1 edge stitch in garter stitch, knit 1-0-2-0-2-1, pattern as before over the next 18-24-24-30-30-36 stitches, knit 5-5-4-4-3-3, A.1b over the next 18-18-18-24-24-24 stitches, 1 edge stitch in garter stitch. Continue back and forth like this. When piece measures 60-62-64-66-68-70 cm = 23⅝"-24⅜"-25¼"-26"-26¾"-27½" – adjust so that next row is worked from right side, bind off the first 24-29-30-34-35-40 stitches for shoulder, then work over the last 20-20-20-26-26-26 stitches as before. Continue with lace pattern and 1 edge stitch in garter stitch in each side until band measures 7-7-7-7-8-8 cm = 2¾"-2¾"-2¾"-2¾"-3⅛"-3⅛" from shoulder. At the beginning of the next 3-3-3-4-4-4 rows from right side, bind off the first 5 stitches = 5-5-5-6-6-6 stitches remain. Loosely bind off the last stitches on next row from right side

SLEEVES:
Cast on 35-35-37-39-41-41 stitches on double pointed needles size 5 mm = US 8 with Bomull-Lin or Paris. Work 2 ridges. Switch to double pointed needles size 5.5 mm = US 9. Insert a marker thread at beginning of round (= mid under sleeve). Work pattern as follows: Knit 13-13-14-15-16-16, A.4 (= 9 stitches) knit 13-13-14-15-16-16. Work pattern in the round as follows. When piece measures 8-8-8-9-9-9 cm = 3⅛"-3⅛"-3⅛"-3½"-3½"-3½", increase 2 stitches under sleeve - read INCREASE TIP! Increase like this approx. every 4-3½-3-2½-2½-2 cm = 1½"-1¼"-1⅛"-⅞"-⅞"-¾" 10-11-12-13-13-15 times in total = 55-57-61-65-67-71 stitches. When sleeve measures 43-41-40-39-39-36 cm = 17"-16⅛"-15¾"-15¼"-15¼"-14¼", do not begin any more lace patterns vertically (this way the sleeve isn’t bind off in the middle of working a lace pattern). Continue in the round in stockinette stitch. When sleeve measures 48-46-45-44-44-41 cm = 19"-18"-17¾"-17¼"-17¼"-16⅛", bind off all stitches. Work the other sleeve the same way.

ASSEMBLY:
Sew shoulder seams with grafting/kitchener stitches inside bind-off edge. Sew sleeves in body inside 1 edge stitch in garter stitch on body and inside bind-off edge on sleeve. Sew the collar together mid back and sew it to the neck. Fasten off.
Bomull-Lin will be more even and look better after it has been washed. When the garment is finished, soak it, stretch it to correct measurements - see chart, and leave it to dry flat.

This pattern has been corrected.

Updated online: 09.09.2022
BODY, Size XS, L, XL: ...A.1a over the next 21-28-28 stitches (= 3-3-4-4 repetitions), 1 edge stitch in garter stitch.

Diagram

All measurements in charts are in cm.

symbols = knit from the right side, purl from the wrong side
symbols = between 2 stitches make 1 yarn over, on next row (wrong side) purl yarn over to make hole. When working pattern on sleeve, knit yarn overs on next round to make holes.
symbols = knit 2 together
symbols = slip 1 stitch knitwise, knit 1, pass slipped stitch over stitch worked
symbols = slip 1 stitch knitwise, knit 2 stitches together, pass slipped stitch over stitches worked together
symbols = slip 1 stitch knitwise, knit 3 stitches together, pass slipped stitch over stitches worked together
diagram
diagram

Each of our patterns has specific tutorial videos to help you.

Do you have a question? See a list of frequently asked questions (FAQ)

Knitting tension is what determines the final measurements of your work, and is usually measured per 10 x 10 cm. It is provided like so: number of stitches in width x number of rows in height - eg: 19 stitches x 26 rows = 10 x 10 cm.

The knitting tension is very individual; some people knit/crochet loosely while others work tightly. You adjust the knitting tension with the needle size, which is why the suggested needle size only serve as a guide! You need to adjust this (up or down) to ensure that YOUR knitting tension matches the knitting tension provided in the pattern. If you work with a different knitting tension than provided you will have a different yarn consumption, and your work will have different measurements than what the pattern suggests.

The knitting tension also determines which yarns can replace each other. As long as you achieve the same knitting tension you can replace one yarn with another.

See DROPS lesson: How to measure your tension/gauge

See DROPS video: How to make a gauge tension swatch

The required amount of yarn is provided in grams, eg: 450 g. To calculate how many balls you’ll need you first need to know how many grams are in 1 ball (25g, 50g or 100g). This information is available if you click on the individual yarn quality on our pages. Divide the amount required with the amount of each ball. For example, if each ball is 50g (the most common amount), the calculation will be as follows: 450 / 50 = 9 balls.

The important thing when changing from one yarn to another is that the knitting/crochet tension remains the same. This is so that the measurements of the finished piece will be the same as on the sketch provided. It is easier to achieve the same knitting tension using yarns from the same yarn group. It is also possible to work with multiple strands of a thinner yarn to achieve the knitting tension of a thicker one. Please try our yarn converter. We recommend you to always work a test swatch.

Please NOTE: when changing yarn the garment might have a different look and feel to the garment in the photo, due to individual properties and qualities of each yarn.

See DROPS lesson: Can I use a different yarn than the one mentioned in the pattern?

All our yarns are categorised into yarn groups (from A to F) according to thickness and knitting tension – group A contains the thinnest yarns and group F the thickest. This makes it easier for you to find alternative yarns to our patterns, should you wish to switch yarn. All yarns within the same group have a similar knitting tension and can easily replace each other. However, different yarn qualities have different structures and properties which will give the finished work a unique look and feel.

Click here for an overview of the yarns in each yarn group

At the top of all our patterns you’ll find a link to our yarn converter, which is a helpful tool should you wish to use a different yarn than suggested. By filling in the yarn quality you wish to replace, the amount (in your size) and number of strands, the converter will present good alternative yarns with the same knitting tension. Additionally it will tell you how much you’ll require in the new qualities and whether you’ll need to work with multiple strands. Most skeins are 50g (some are 25g or 100g).

If the pattern is worked with multiple colours, every colour will have to be converted separately. Similarly, if the pattern is worked with several strands of different yarns (for example 1 strand Alpaca and 1 strand Kid-Silk) you will have to find alternatives for each, individually.

Click here to see our yarn converter

Since different yarns have different qualities and textures we have chosen to keep the original yarn in our patterns. However, you can easily find options among our available qualities by using our yarn converter, or simply pick a yarn from the same yarn group.

It is possible that some retailers still have discontinued yarns in stock, or that someone has a few skeins at home that they would like to find patterns for.

The yarn converter will provide both alternative yarn as well as required amount in the new quality.

If you think it's hard to decide what size to make, it can be a good idea to measure a garment you own already and like the size of. Then you can pick the size by comparing those measures with the ones available in the pattern's size chart.

You'll find the size chart at the bottom of the pattern.

See DROPS lesson: How to read size chart

The needle size provided in the pattern serves only as a guide, the important thing is to follow the knitting tension. And since knitting tension is very individual, you will have to adjust the needle size to ensure that YOUR tension is the same as in the pattern – maybe you’ll have to adjust 1, or even 2 needle sizes, up or down to achieve the correct tension. For this, we recommend that you work test swatches.

Should you work with a different knitting tension than the one provided, the measurements of the finished garment might deviate from the measurement sketch.

See DROPS lesson: How to measure your tension/gauge

See DROPS video: How to make a gauge tension swatch

Working a garment top-down provides more flexibility and room for personal adjustment. For example it is easier to try the garment on while working, as well as making adjustments to length of yoke and shoulder caps.

The instructions are carefully explaining every step, in the correct order. Diagrams are adjusted to the knitting direction and are worked as usual.

The diagram depicts all rows/rounds, and every stitch seen from the right side. It is read from bottom to top, from right to left. 1 square = 1 stitch.

When working back and forth, every other row is worked from the right side and every other row is worked from the wrong side. When working from the wrong side, the diagram will have to be worked reversed: from left to right, knit stitches are purled, purl stitches are knit etc.

When working in the round every round is worked from the right side and the diagram are worked from right to left on all rounds.

See DROPS lesson: How to read knitting diagrams

The diagram depicts all rows/rounds, and every stitch seen from the right side. It is worked from bottom to top, from right to left.

When working back and forth every other row is worked from the right side: from right to left and every other row is worked from the wrong side: from left to right.

When working in the round, every row in the diagram are worked from the right side, from right to left.

When working a circular diagram you start in the middle and work your way outwards, counter clockwise, row by row.

The rows usually start with a given number of chain stitches (equivalent to the height of the following stitch), this will either be depicted in the diagram or explained in the pattern.

See DROPS lesson: How to read crochet diagrams

Instructions for working several diagrams after each other on the same row/round, will often be written like so: “work A.1, A.2, A.3 a total of 0-0-2-3-4 times". This means you work A.1 once, then A.2 is worked once, and A.3 is repeated (in width) the number of times provided for your size – in this case like so: S = 0 times, M = 0 times, L=2 times, XL= 3 times and XXL = 4 times.

The diagrams are worked as usual: begin with the first row in A.1, then work the first row in A.2 etc.

See DROPS lesson: How to read knitting diagrams

See DROPS lesson: How to read crochet diagrams

The total width of the garment (from wrist-to-wrist) will be larger in the larger sizes, despite the actual sleeves being shorter. The larger sizes have longer sleeve caps and wider shoulders, so there will be a good fit in all sizes.

The measurement sketch/schematic drawing provides information regarding the full length of the garment. If it’s a jumper or a jacket the length is measured from the highest point on the shoulder (usually closest to the neckline), and straight down to the bottom of the garment. It is NOT measured from the tip of shoulder. Similarly, the length of yoke is measured from the highest point on the shoulder and down to where yoke is split into body and sleeves.

See DROPS lesson: How to read a schematic drawing

Diagrams are often repeated on the round or in height. 1 repeat is the diagram the way it appears in the pattern. If it says to work 5 repeats of A.1 in the round, then you work A.1 a total of 5 times after/next to each other in the round. If it says to work 2 repeats of A.1 vertically/in height you work the entire diagram once, then begin again at the start and work the entire diagram one more time.

Chain stitches are slightly narrower than other stitches and to avoid working the cast-on edge too tight, we simply chain more stitches to begin with. The stitch count will be adjusted on the following row to fit the pattern and measurement sketch.

The rib edge is more elastic and will contract slightly compared to, for example, stocking stitch. By increasing before the rib edge, you avoid a visible difference in width between the rib edge and the rest of the body.

It’s very easy to cast off too tightly, and by making yarn overs while casting off (and simultaneously casting these off) you avoid a too tight cast off edge.

See DROPS video: How to bind off with yarn overs (yo)

To achieve an even increase (or decrease) you can increase on, for example: every 3rd and 4th row alternately, like so: work 2 rows and increase on the 3rd row, work 3 rows and increase on the 4th. Repeat this until the increase is complete.

See DROPS lesson: Increase or decrease 1 st on every 3rd and 4th row alternately

Should you prefer to work in the round instead of back and forth, you may of course adjust the pattern. You’ll need to add steeks mid-front (usually 5 stitches), and follow the instructions. When you would normally turn and work from the wrong side, simply work across the steek and continue in the round. At the end you’ll cut the piece open, pick up stitches to work bands, and cover the cut edges.

See DROPS video: How to knit steeks and cut open

Should you prefer to work back and forth instead of in the round, you may of course adjust the pattern so you work the pieces separately and then assemble them at the end. Divide the stitches for the body in 2, add 1 edge stitch in each side (for sewing) and work the front and back pieces separately.

See DROPS lesson: Can I adapt a pattern for circular needles into straight needles?

Pattern repeats can vary slightly in the different sizes, in order to get the correct proportions. If you’re not working the exact same size as the garment in the photo, yours might deviate slightly. This has been carefully developed and adjusted so that the complete impression of the garment is the same in all sizes.

Make sure to follow instructions and diagrams for your size!

If you have found a pattern you like which is available in women’s size it’s not very difficult to convert it to men’s size. The biggest difference will be the length of sleeves and body. Start working on the women size that you think would fit across the chest. The additional length will be worked right before you cast off for the armhole/sleeve cap. If the pattern is worked top-down you can add the length right after the armhole or before the first decrease on sleeve.

Regarding additional yarn amount, this will depend on how much length you add, but it is better with a skein too many than too few.

All yarns will have excess fibres (from production) that might come off as lint or shedding. Brushed yarns (ie hairier yarns) have more of these loose, excess fibres, causing more shedding.

Shedding also depends on what is worn under or over the garment, and whether this pulls at the yarn fibres. It’s therefore not possible to guarantee that there will be no shedding

Below are some tips on how to get the best result when working with hairier yarns:

1. When the garment is finished (before you wash it) shake it vigorously so the looser hairs come off. NOTE: do NOT use a lint roller, brush or any method that pulls at the yarn.

2. Place the garment in a plastic bag and put it in your freezer - the temperature will cause the fibres to become less attached to each other, and excess fibres will come off easier.

3. Leave in the freezer for a few hours before taking it out and shaking it again.

4. Wash the garment according to the instructions on the yarn label.

Pilling is a natural process that happens to even the most exclusive of fibers. It's a natural sign of wear and tear that is hard to avoid, and that is most visible in high friction areas of your garment like a sweater's arms and cuffs.

You can make your garment look as new by removing the pilling, using a fabric comb or a pill/lint remover.

Still can't find the answer you need? Then scroll down and leave your question so one of our experts can try to help you. This will be done normally within 5 to 10 working days.
In the meantime, you can read the questions and answers that others have left to this pattern or join the DROPS Workshop on Facebook to get help from fellow knitters/crocheters!

You might also like...

Post a comment to pattern DROPS 213-18

We would love to hear what you have to say about this pattern!

If you want to leave a question, please make sure you select the correct category in the form below, to speed up the answering process. Required fields are marked *.

Comments / Questions (64)

country flag Maria wrote:

For the S,M XXL sizes there is only one A.3 pattern to work per row. Is this correct? I noticed A.3 is worked twice in each row for the XS,L, XL sizes which looks to me right as it keeps the symmetry. Looking forward for your answer .

09.05.2020 - 19:27

DROPS Design answered:

Dear Maria, you don't work the same diagrams in all sizes because of there are less stitches worked in A.2 in sizes XS, L and XL you finish the pattern with A.3 and in the other size you work A.2 over more stitches. Happy knitting!

11.05.2020 - 11:06

country flag Maria wrote:

Hello, is A.1a only worked in the first row? And for the rest of the rows is always A.1b? Thank you

09.05.2020 - 15:25

DROPS Design answered:

Dear Maria, A.1a is only 2 rows (1 row with decrease + 1 row from WS = there are 6 sts in A.1a), then you will work A1b over the stitches on 6 sts of A.1a. Happy knitting!

11.05.2020 - 09:26

country flag Maria wrote:

Hello, for the sleeves you say cast on 35 stitches and work on the round, double pointed or circular needles. I don't understand how I can work with only 35 stitches even with small circular needles ( 40 cm). Thank you

09.05.2020 - 12:47

DROPS Design answered:

Hi Maria, You use double pointed needles until you have increased enough stitches to be able to use the short circular needle. Happy knitting!

11.05.2020 - 07:18

country flag Myriam wrote:

Bonjour on a 183 maille taille m. Mais quand on a tricoter a1a 2fois 21mailles. 2 fois a1b 24 mailles. A2 72 et 24mailles. A3 plus les mailles endroit entre je finit pas le diagramme. Merci de votre explication.

25.04.2020 - 18:32

DROPS Design answered:

Bonjour Myriam, essayez de mettre des marqueurs entre chaque partie en jersey et chaque diagramme, cela vous aidera à mieux repérer les mailles et comment les tricoter. Bon tricot!

27.04.2020 - 08:47

country flag Myriam wrote:

Bonjour on a 183 mailles mais quand on tricoté a1a 2fois a1b 2fois a2 72 mailles et 24 mailles a3 plus les mailles endroit entre j arrive pas à finir le diagramme. Merci de m expliquer

25.04.2020 - 18:28

DROPS Design answered:

Bonjour Myriam, en taille M, vous tricotez vos 183 m ainsi: 1 maille lisière au point mousse, 3 fois A.1b (= au-dessus des 18 mailles restantes après A.1a), continuez en jersey et A.2, A.3, A.4 comme avant (= 3 m endroit, 2 x A.2, 5 m end (marqueur), 4 m end, 6 x A.2, 1 x A.3, 5 m end, (marqueur), 4 m end, 2 fois A.2), 4 m end) et terminez par 3 fois A.1b (= au-dessus des 18 mailles restantes après A.1a) et 1 m lis au point mousse. Bon tricot!

27.04.2020 - 08:46

country flag Christelle wrote:

Bonjour au 3 ème rang on tricoter a1b au lieu de a2 est ce sur 24 mailles comme au 1er rang ou sur 12 mailles ? Merci de votre reponse

23.04.2020 - 23:43

DROPS Design answered:

Bonjour Christelle, quand A.1a a été tricoté (= 2 rangs), on tricote A.1b au-dessus des mailles des A.1b (= 4 motifs au total de chaque côté si vous avez 24 mailles). Les autres mailles se tricotent comme avant (continuez A.2 comme avant). Bon tricot!

24.04.2020 - 09:33

country flag Claudia Mesquita wrote:

What is group C (or A)?

22.04.2020 - 23:15

DROPS Design answered:

Hi Claudia, The different yarns are grouped together (Group A, B, C....), to make it easier for users to choose a different yarn from the one specified if they wish. Happy crafting!

23.04.2020 - 07:44

country flag STURM wrote:

Je souhaite le tricoter en alpaca + kild silk, savez vous quel quantité dois-je prendre de chaque pour une taille L ? je n'y arrive pas avec le convertisseur. Merci pour votre aide

22.04.2020 - 16:51

DROPS Design answered:

Bonjour Mme Sturm, vous trouverez ici des informations sur les alternatives qui vous permettront de calculer les quantités nécessaires. Bon tricot!

23.04.2020 - 09:31

country flag STURM wrote:

Bonjour, dans votre explication du point A1-a vous notez glisser 1 maille à l'endroit, 3 mailles ensemble à l'endroit, passer la maille glissée par-dessus les 2 mailles tricotées ensemble mais si nous tricotons 3 mailles ensemble, il faudrait faire passer la maille glissée par dessus les 3 mailles tricotées ensemble (et non les deux comme vous l'indiquez). Est-ce une erreur ou n'ai pas tout compris ? Un grand merci pour votre retour

21.04.2020 - 13:32

DROPS Design answered:

Bonjour Mme Sturm, le "2" a été supprimé, il n'avait pas lieu d'être, dans A1a, vous faites: 1 jeté, glissez 1 maille à l'endroit, tricotez 3 mailles ensemble à l'endroit, passez la maille glissée par-dessus les mailles tricotées ensemble, 1 jeté et 3 mailles endroit (= il reste 6 mailles dans chaque A.1a). Merci pour votre retour. Bon tricot!

21.04.2020 - 14:33

country flag Mira wrote:

Kunt u svp aangeven wanneer patroon verwacht kan worden?

18.04.2020 - 15:08

DROPS Design answered:

Dag Mira,

Het patroon staat inmiddels online! Veel plezier!

28.04.2020 - 20:42