DROPS BabyAlpaca Silk
70% Alpaca, 30% Silk
Discontinued
find alternatives
DROPS SS24

Calm Shores

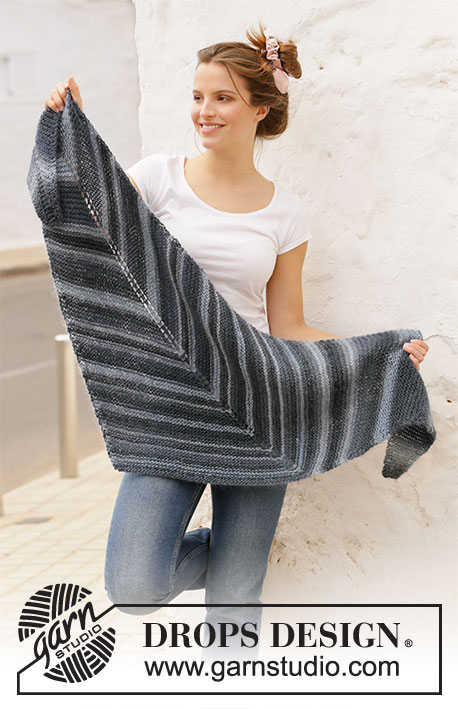
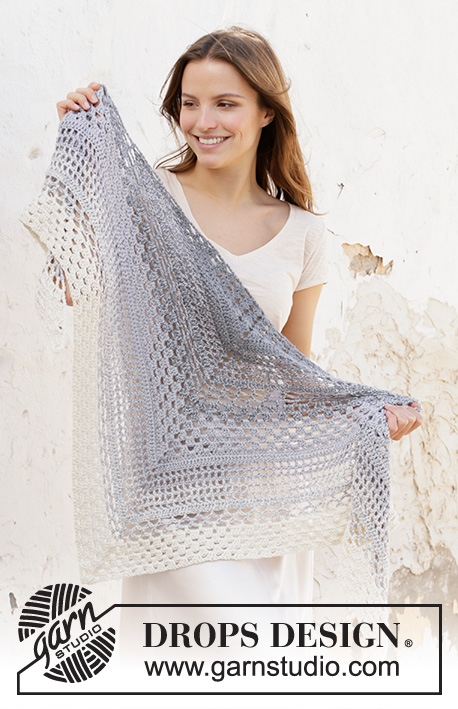
Crocheted shawl in 2 strands DROPS BabyAlpaca Silk. The piece is worked with lace pattern and stripes.

DROPS 211-21
DROPS Design: Pattern no bs-158
Yarn group A + A or C
-------------------------------------------------------

SIZE:
Length: Measured down the middle = approx. 67 cm.
Width: Measured along the top = approx. 156 cm.

MATERIALS:
DROPS BABYALPACA SILK from Garnstudio (belongs to yarn group A)
150 g color 0100, off white
150 g color 8108, light grey
50 g color 8465, medium grey

CROCHET GAUGE:
14 double crochets in width and 8.5 rows in height with 2 strands = 10 x 10 cm = 4" x 4".

CROCHET HOOK:
DROPS CROCHET HOOK SIZE 5 MM = US H/8.
Hook size is only a guide. If you get too many stitches on 10 cm = 4", change to a larger hook size. If you get too few stitches on 10 cm = 4", change to a smaller hook size.

-------------------------------------------------------

Alternative Yarn – See how to change yarns here
Yarn Groups A to F – Use the same pattern and change the yarn here
Yarn usage using an alternative yarn – Use our yarn converter here

-------------------------------------------------------

DROPS BabyAlpaca Silk
70% Alpaca, 30% Silk
Discontinued
find alternatives

Pattern instructions

NOTE: This pattern is written in American English. All measurements in charts are in cm. For conversion from inches to cm - click here. There are different terms for crocheting in American and British English. If this pattern includes crochet, click for "crochet terms" here. For this pattern in British English, please click here.
-------------------------------------------------------

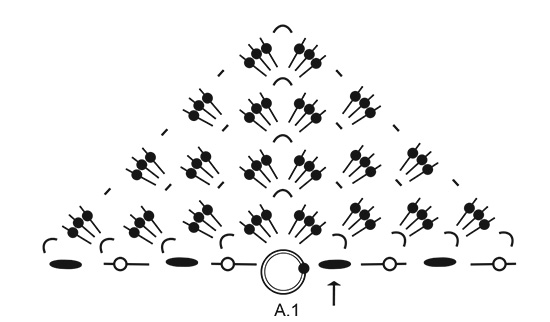
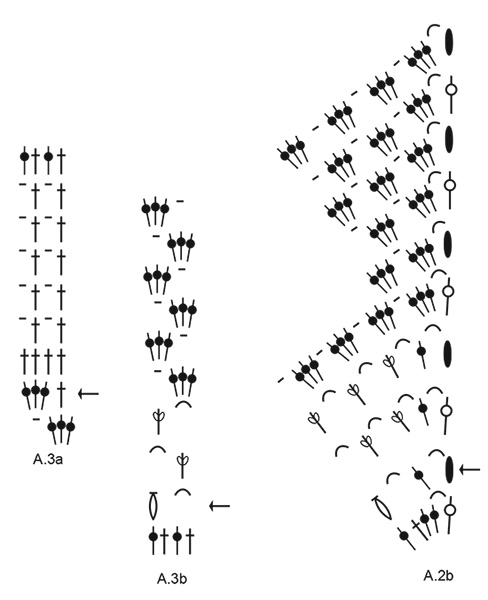
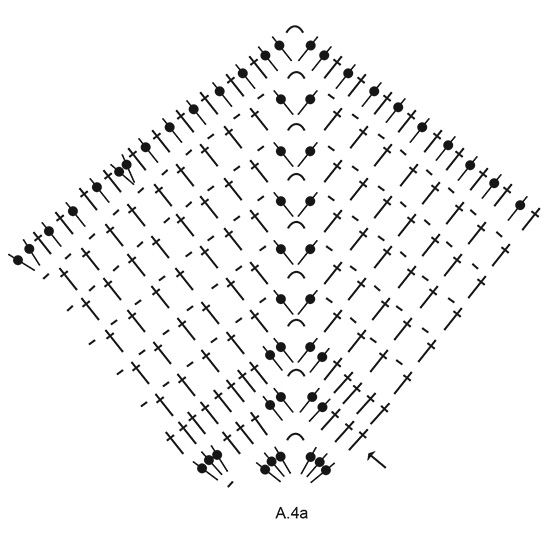
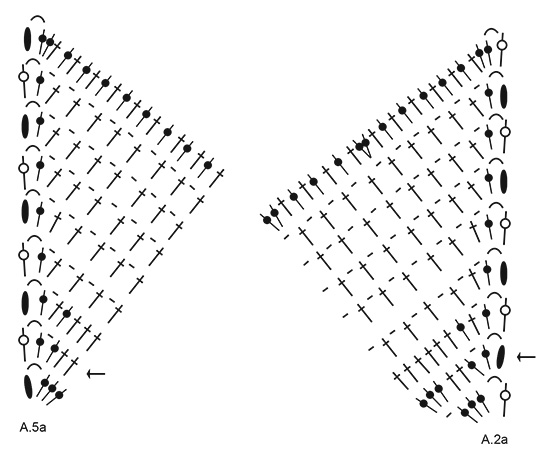
EXPLANATIONS FOR THE PATTERN:

-------------------------------------------------------

PATTERN:
See diagrams A.1 to A.5.

CHAIN STITCH:
If you work outermost on the hook the chain stitch will often be too tight; 1 chain stitch should be as long as 1 half double crochet/double crochet/treble crochet is wide.

STRIPES:
NOTE: The stripes are measured in the crochet direction between the increase on the one side and the increase in the middle of the shawl. Whether or not you have finished a pattern in height, a new stripe is worked with measurements as follows:
STRIPE 1: 12 cm = 4¾" with 2 strands medium grey.
STRIPE 2: 11 cm = 4⅜" with 1 strand medium grey and 1 strand light grey.
STRIPE 3: 9 cm = 3½" with 2 strands light grey.
STRIPE 4: 8 cm = 3⅛" with 1 strand light grey and 1 strand off-white.
STRIPE 5: Work with 2 strands off-white to finished length (= approx. 7 cm = 2¾").

-------------------------------------------------------

START THE PIECE HERE:

-------------------------------------------------------

SHAWL – SHORT OVERVIEW OF THE PIECE:
The shawl is worked back and forth with lace pattern and stripes.

SHAWL:
Work 5 chain stitches with hook size 5 mm = US H/8 and 2 strands medium grey; form them into a ring with 1 slip stitch in the first chain stitch – read CHAIN STITCH.
Work STRIPES – read description above, and pattern A.1 back and forth. When A.1 has been completed in height, repeat the last 2 rows in height 1 more time = 6 rows; there are a total of 12 double-crochet groups on the last row. REMEMBER THE CROCHET GAUGE!
Now work pattern as follows: A.2a (= increase in side), A.3a a total of 4 times in width, A.4a (= increase in middle), A.3a a total of 4 times in width, A.5a (= increase in side). Continue back and forth until A.2a to A.5a have been completed in height. There are now 59 double crochets on each side of the increase mid-front (the outermost treble crochet/4 chain stitches at the beginning of the row are not counted).
Now work pattern as follows: A.2b (= increase in side), A.3b a total of 13 times in width, A.4b (= increase in middle), A.3b a total of 13 times in width, A.5b (= increase in side).
When the diagrams have been completed in height, repeat the pattern from the row with the arrow in A.2a, A.3a, A.4a and A.5a in the same way as earlier (work as many repeats of A.3a as there is room for between the diagrams with increases). Then continue the pattern from the row with the arrow in A.2b, A.3b, A.4b, A.5b in the same way as earlier (work as many repeats of A.3b as there is room for between the diagrams with increases).
Continue the patterns in this way until the stripes have been completed and the piece measures approx. 47 cm = 18½" in the crochet direction (= approx. 67 cm = 26⅜" along the increase in the middle) – or to desired length.
Cut and fasten the strands.

Diagram

symbols = start here – this chain-stitch ring is described in the text. Continue with symbol over point on circle and work towards left
symbols = start on this row. Previous row already worked
symbols = 4 chain stitches
symbols = 1 treble crochet around chain-space
symbols = 1 chain stitch - if you work outermost on the hook the chain stitch will often be too tight; 1 chain stitch should be as long as 1 half double crochet /double crochet/treble crochet is wide
symbols = 4 chain stitches - if you work outermost on the hook the chain stitch will often be too tight; 1 chain stitch should be as long as 1 half double crochet /double crochet/treble crochet is wide.
symbols = 1 double crochet around chain-space
symbols = 1 double crochet in stitch
symbols = 1 half-double crochet around chain-space
symbols = 1 half-double crochet in stitch
diagram
diagram
diagram
diagram
diagram
Do you have a question? See a list of frequently asked questions (FAQ)

Knitting tension is what determines the final measurements of your work, and is usually measured per 10 x 10 cm. It is provided like so: number of stitches in width x number of rows in height - eg: 19 stitches x 26 rows = 10 x 10 cm.

The knitting tension is very individual; some people knit/crochet loosely while others work tightly. You adjust the knitting tension with the needle size, which is why the suggested needle size only serve as a guide! You need to adjust this (up or down) to ensure that YOUR knitting tension matches the knitting tension provided in the pattern. If you work with a different knitting tension than provided you will have a different yarn consumption, and your work will have different measurements than what the pattern suggests.

The knitting tension also determines which yarns can replace each other. As long as you achieve the same knitting tension you can replace one yarn with another.

See DROPS lesson: How to measure your tension/gauge

See DROPS video: How to make a gauge tension swatch

The required amount of yarn is provided in grams, eg: 450 g. To calculate how many balls you’ll need you first need to know how many grams are in 1 ball (25g, 50g or 100g). This information is available if you click on the individual yarn quality on our pages. Divide the amount required with the amount of each ball. For example, if each ball is 50g (the most common amount), the calculation will be as follows: 450 / 50 = 9 balls.

The important thing when changing from one yarn to another is that the knitting/crochet tension remains the same. This is so that the measurements of the finished piece will be the same as on the sketch provided. It is easier to achieve the same knitting tension using yarns from the same yarn group. It is also possible to work with multiple strands of a thinner yarn to achieve the knitting tension of a thicker one. Please try our yarn converter. We recommend you to always work a test swatch.

Please NOTE: when changing yarn the garment might have a different look and feel to the garment in the photo, due to individual properties and qualities of each yarn.

See DROPS lesson: Can I use a different yarn than the one mentioned in the pattern?

All our yarns are categorised into yarn groups (from A to F) according to thickness and knitting tension – group A contains the thinnest yarns and group F the thickest. This makes it easier for you to find alternative yarns to our patterns, should you wish to switch yarn. All yarns within the same group have a similar knitting tension and can easily replace each other. However, different yarn qualities have different structures and properties which will give the finished work a unique look and feel.

Click here for an overview of the yarns in each yarn group

At the top of all our patterns you’ll find a link to our yarn converter, which is a helpful tool should you wish to use a different yarn than suggested. By filling in the yarn quality you wish to replace, the amount (in your size) and number of strands, the converter will present good alternative yarns with the same knitting tension. Additionally it will tell you how much you’ll require in the new qualities and whether you’ll need to work with multiple strands. Most skeins are 50g (some are 25g or 100g).

If the pattern is worked with multiple colours, every colour will have to be converted separately. Similarly, if the pattern is worked with several strands of different yarns (for example 1 strand Alpaca and 1 strand Kid-Silk) you will have to find alternatives for each, individually.

Click here to see our yarn converter

Since different yarns have different qualities and textures we have chosen to keep the original yarn in our patterns. However, you can easily find options among our available qualities by using our yarn converter, or simply pick a yarn from the same yarn group.

It is possible that some retailers still have discontinued yarns in stock, or that someone has a few skeins at home that they would like to find patterns for.

The yarn converter will provide both alternative yarn as well as required amount in the new quality.

If you think it's hard to decide what size to make, it can be a good idea to measure a garment you own already and like the size of. Then you can pick the size by comparing those measures with the ones available in the pattern's size chart.

You'll find the size chart at the bottom of the pattern.

See DROPS lesson: How to read size chart

The needle size provided in the pattern serves only as a guide, the important thing is to follow the knitting tension. And since knitting tension is very individual, you will have to adjust the needle size to ensure that YOUR tension is the same as in the pattern – maybe you’ll have to adjust 1, or even 2 needle sizes, up or down to achieve the correct tension. For this, we recommend that you work test swatches.

Should you work with a different knitting tension than the one provided, the measurements of the finished garment might deviate from the measurement sketch.

See DROPS lesson: How to measure your tension/gauge

See DROPS video: How to make a gauge tension swatch

Working a garment top-down provides more flexibility and room for personal adjustment. For example it is easier to try the garment on while working, as well as making adjustments to length of yoke and shoulder caps.

The instructions are carefully explaining every step, in the correct order. Diagrams are adjusted to the knitting direction and are worked as usual.

The diagram depicts all rows/rounds, and every stitch seen from the right side. It is read from bottom to top, from right to left. 1 square = 1 stitch.

When working back and forth, every other row is worked from the right side and every other row is worked from the wrong side. When working from the wrong side, the diagram will have to be worked reversed: from left to right, knit stitches are purled, purl stitches are knit etc.

When working in the round every round is worked from the right side and the diagram are worked from right to left on all rounds.

See DROPS lesson: How to read knitting diagrams

The diagram depicts all rows/rounds, and every stitch seen from the right side. It is worked from bottom to top, from right to left.

When working back and forth every other row is worked from the right side: from right to left and every other row is worked from the wrong side: from left to right.

When working in the round, every row in the diagram are worked from the right side, from right to left.

When working a circular diagram you start in the middle and work your way outwards, counter clockwise, row by row.

The rows usually start with a given number of chain stitches (equivalent to the height of the following stitch), this will either be depicted in the diagram or explained in the pattern.

See DROPS lesson: How to read crochet diagrams

Instructions for working several diagrams after each other on the same row/round, will often be written like so: “work A.1, A.2, A.3 a total of 0-0-2-3-4 times". This means you work A.1 once, then A.2 is worked once, and A.3 is repeated (in width) the number of times provided for your size – in this case like so: S = 0 times, M = 0 times, L=2 times, XL= 3 times and XXL = 4 times.

The diagrams are worked as usual: begin with the first row in A.1, then work the first row in A.2 etc.

See DROPS lesson: How to read knitting diagrams

See DROPS lesson: How to read crochet diagrams

The total width of the garment (from wrist-to-wrist) will be larger in the larger sizes, despite the actual sleeves being shorter. The larger sizes have longer sleeve caps and wider shoulders, so there will be a good fit in all sizes.

The measurement sketch/schematic drawing provides information regarding the full length of the garment. If it’s a jumper or a jacket the length is measured from the highest point on the shoulder (usually closest to the neckline), and straight down to the bottom of the garment. It is NOT measured from the tip of shoulder. Similarly, the length of yoke is measured from the highest point on the shoulder and down to where yoke is split into body and sleeves.

See DROPS lesson: How to read a schematic drawing

Diagrams are often repeated on the round or in height. 1 repeat is the diagram the way it appears in the pattern. If it says to work 5 repeats of A.1 in the round, then you work A.1 a total of 5 times after/next to each other in the round. If it says to work 2 repeats of A.1 vertically/in height you work the entire diagram once, then begin again at the start and work the entire diagram one more time.

Chain stitches are slightly narrower than other stitches and to avoid working the cast-on edge too tight, we simply chain more stitches to begin with. The stitch count will be adjusted on the following row to fit the pattern and measurement sketch.

The rib edge is more elastic and will contract slightly compared to, for example, stocking stitch. By increasing before the rib edge, you avoid a visible difference in width between the rib edge and the rest of the body.

It’s very easy to cast off too tightly, and by making yarn overs while casting off (and simultaneously casting these off) you avoid a too tight cast off edge.

See DROPS video: How to bind off with yarn overs (yo)

To achieve an even increase (or decrease) you can increase on, for example: every 3rd and 4th row alternately, like so: work 2 rows and increase on the 3rd row, work 3 rows and increase on the 4th. Repeat this until the increase is complete.

See DROPS lesson: Increase or decrease 1 st on every 3rd and 4th row alternately

Should you prefer to work in the round instead of back and forth, you may of course adjust the pattern. You’ll need to add steeks mid-front (usually 5 stitches), and follow the instructions. When you would normally turn and work from the wrong side, simply work across the steek and continue in the round. At the end you’ll cut the piece open, pick up stitches to work bands, and cover the cut edges.

See DROPS video: How to knit steeks and cut open

Should you prefer to work back and forth instead of in the round, you may of course adjust the pattern so you work the pieces separately and then assemble them at the end. Divide the stitches for the body in 2, add 1 edge stitch in each side (for sewing) and work the front and back pieces separately.

See DROPS lesson: Can I adapt a pattern for circular needles into straight needles?

Pattern repeats can vary slightly in the different sizes, in order to get the correct proportions. If you’re not working the exact same size as the garment in the photo, yours might deviate slightly. This has been carefully developed and adjusted so that the complete impression of the garment is the same in all sizes.

Make sure to follow instructions and diagrams for your size!

If you have found a pattern you like which is available in women’s size it’s not very difficult to convert it to men’s size. The biggest difference will be the length of sleeves and body. Start working on the women size that you think would fit across the chest. The additional length will be worked right before you cast off for the armhole/sleeve cap. If the pattern is worked top-down you can add the length right after the armhole or before the first decrease on sleeve.

Regarding additional yarn amount, this will depend on how much length you add, but it is better with a skein too many than too few.

All yarns will have excess fibres (from production) that might come off as lint or shedding. Brushed yarns (ie hairier yarns) have more of these loose, excess fibres, causing more shedding.

Shedding also depends on what is worn under or over the garment, and whether this pulls at the yarn fibres. It’s therefore not possible to guarantee that there will be no shedding

Below are some tips on how to get the best result when working with hairier yarns:

1. When the garment is finished (before you wash it) shake it vigorously so the looser hairs come off. NOTE: do NOT use a lint roller, brush or any method that pulls at the yarn.

2. Place the garment in a plastic bag and put it in your freezer - the temperature will cause the fibres to become less attached to each other, and excess fibres will come off easier.

3. Leave in the freezer for a few hours before taking it out and shaking it again.

4. Wash the garment according to the instructions on the yarn label.

Pilling is a natural process that happens to even the most exclusive of fibers. It's a natural sign of wear and tear that is hard to avoid, and that is most visible in high friction areas of your garment like a sweater's arms and cuffs.

You can make your garment look as new by removing the pilling, using a fabric comb or a pill/lint remover.

Still can't find the answer you need? Then scroll down and leave your question so one of our experts can try to help you. This will be done normally within 5 to 10 working days.
In the meantime, you can read the questions and answers that others have left to this pattern or join the DROPS Workshop on Facebook to get help from fellow knitters/crocheters!

You might also like...

Post a comment to pattern DROPS 211-21

We would love to hear what you have to say about this pattern!

If you want to leave a question, please make sure you select the correct category in the form below, to speed up the answering process. Required fields are marked *.

Comments / Questions (17)

country flag Malin wrote:

Hej Jag håller precis på med sista varvet av A.2a-A.3a-A.4a-A.3a-A.5a. Ska jag öka fler gånger på detta varvet än de ökningar som är markerade? Eller hur får jag fram 59 stolpar? Är det längs ena sidan eller från ökning höger till ökning vänster? Väldigt svårt att förstå detta. Ska jag repetera A.2a ännu en gång med ökningen?

11.04.2024 - 17:23

DROPS Design answered:

Hei Malin. Når A.1 er ferdig heklet har du 36 staver (stolpar) / 12 stavgrupper og nå skal A.2a, A.3a, A.4a, A.3a, A:5a hekles. Når dun har heklet diagrammene 1 gang i høyden har du: A.2a (= 24 staver) + A.3a ((x4)= 16 staver) +A.4a 19 staver før midt foran + 24 staver etter midt foran) +A.3a ((x4) = 16 staver) + A.5a(=19 staver) ferdig i høyden skal du ha 118 staver på raden. Skrevet med tall: 24+16+19 = 59 masker før midt foran OG 24+16+19 = 59 masker etter midt foran. mvh DROPS Design

15.04.2024 - 13:01

country flag Christine SANCHEZ BARBER wrote:

Bonjour, existe-t-il des explications écrites ou vidéo, car j'ai un problème de compréhension des schémas seuls. Avec tous mes remerciements. Cordialement.

17.09.2022 - 18:23

DROPS Design answered:

Bonjour Mme Sanchez-Barber, nous n'avons que des diagrammes pour ce modèle, peut-être que cette leçon peut vous aider, sinon n'hésitez pas à nous indiquer à quel niveau vous coincez. Bon crochet!

19.09.2022 - 09:47

country flag Karolina wrote:

Hello I would like to ask you if you would mind if the pattern was written out by me using the international signs used in crochet patterns? Obviously no changes have been made, it is just an easier to read version. On a crochet group on FB that I belong to, we would like to crochet Calm Shores together however the graphic scheme and description is quite complicated in places. Using more accessible graphic signs, would allow a larger audience to crochet your shawl. Thank you in advance

18.08.2022 - 22:53

country flag Gudrun Ebeling wrote:

Hallo.ich versuche die häkelschrift zu Modell 211-21 zu lesen und komm nicht klar.bei A.1 ist der luftmaschenkreis und soll von da an nach links gehäkelt werden. Aber fängt denn das Tuch nicht an der Spitze an? Also mit 4luftmaschen im Kreis in den ich drei stäbchen 4luftmaschenen ,1Stäbchen häkele.Dann wenden.Also von unten nach oben lesen?

08.03.2022 - 15:35

DROPS Design answered:

Liebe Frau Ebeling, beginnen Sie mit der Luftmaschenring, dann (siehe Pfeil und lesen Sie rechts nach links), 4 Luftmaschen und dann: 4 Luftmaschen, 3 Stb, 4 Lufmtaschen, 3 Stb, 4 Luftmaschen, 1 Doppelstäbchen um Ring; bei der 2. Reihe lesen Sie links nach rechts, und so weiterhäkeln. Viel Spaß beim häkeln!

08.03.2022 - 22:13

country flag ZP wrote:

I love so many of your designs, but your instructions are so confusing. If your designers could provide complete written instruction as well as their nicely drawn charts it would probably make a lot of people happy. I would be happy to pay for the,.

04.02.2022 - 00:05

country flag Karen wrote:

Thank you for the link to instructions, but after reading them, I am even more confused than before. I haven't the faintest clue how this new crochet language works. I have given up on this. Please put warnings on the front page of your crochet patterns so people don't waste money on yarn they can't use.

13.10.2021 - 00:17

country flag Karen wrote:

This is a lovely pattern and was looking forward to making the shawl. I thought it would be reasonably straightforward and I bought the yarn. Very disappointed now as I am completely baffled by the pattern drawings. I am an experienced crocheter, but the pattern drawing makes as much sense to me as a technical drawing to build a rocket. Is there perhaps a case for having written crochet instructions in Drops patterns, so those not literate in these patterns could also make the garments?

12.10.2021 - 00:11

DROPS Design answered:

Dear Karen, there are only diagrams to this pattern, but this lesson should be able to help you to understand how to work/follow the diagrams. Hope this can help, happy crocheting!

12.10.2021 - 08:56

country flag Lola wrote:

Buenas tardes, ¿Cómo puedo descargar el patron?

04.10.2021 - 16:40

DROPS Design answered:

Hola Lola, en la pagina del patron tienes una opcion IMPRIMIR el patron. Buen trabajo!

04.10.2021 - 16:49

country flag Christine Tremblay wrote:

Dans le modèle DROPS211-21, on parle de rayures. Est ce que vous entendez par ce terme le changement de couleur? Le châle se tricote t-il en une fois ou plusieurs morceaux de diagrammes à joindre à la fin. Je ne comprends pas comment continuer de A.1 à A.2a et suis-je encore dans la rayure 1? J’espère vraiment que vous pourrez m’aider. Merci

25.09.2020 - 17:08

DROPS Design answered:

Bonjour Mme Tremblay, les rayures s'entendent en changement de couleur - cf RAYURES au début des explications. Ce châle se tricote en une seule partie, de bas en haut, on va crocheter les diagrammes comme indiqué (plus d'infos sur les diagrammes ici) et augmenter de chaque côté et au milieu pour obtenir le triangle à la taille souhaitée. Bon crochet!

28.09.2020 - 07:47

country flag Christina wrote:

Danke für die Info, das heißt, die Reihen enden mit 4 Luftmaschen und einem Doppelstäbchen und beginnen mit 4 Luftmaschen und dann nochmal 4 Luftmaschen für den Bogen?

27.08.2020 - 16:27

DROPS Design answered:

Liebe Christina, alle Reihen beginnen mit 4 Luftmaschen (1. Reihe beginnt am Pfeil in A.1 = 4 Luftmaschen = 3. Symbol bei der Beschreibung) und enden mit 1 Doppelstäbchen (= siehe letzte Symbol bei der 1. Reihe in A.1 = 4. Symbol), z. B. 1. Reihe in A.1 häkeln Sie so: 4 Luftmaschen (= 1. Doppelstb), 4 Luftmaschen (= 1. Luftmaschenbogen), 3 Stb + 4 Lfm + 3 Stb um den Luftmaschenring, 4 Lfm, 1 Doppelstb um den Luftmaschenrign, wenden, 2. Reihe: 4 Lfm (= 1. Doppelstb), 4 Lfm, 3Stb um Luftmaschenring.... und enden Sie mit 1 Doppelstb in die 4. Luftmaschen am Anfang der vorrigen Reihe. Viel Spaß beim häkeln!

28.08.2020 - 08:00