
Popular categories
Looking for a yarn?


|
||||||||||||||||||||||||||||
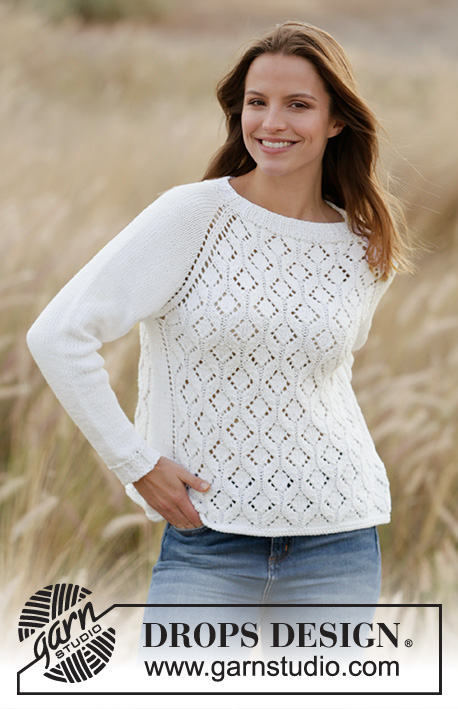
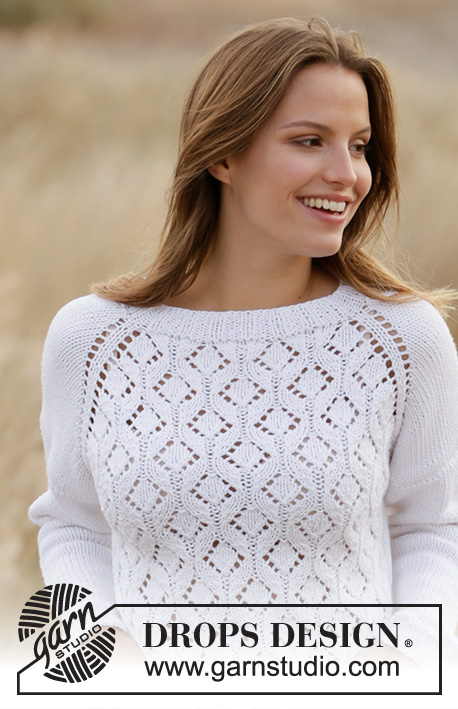
Dripping Diamonds |
||||||||||||||||||||||||||||
 |
 |
|||||||||||||||||||||||||||
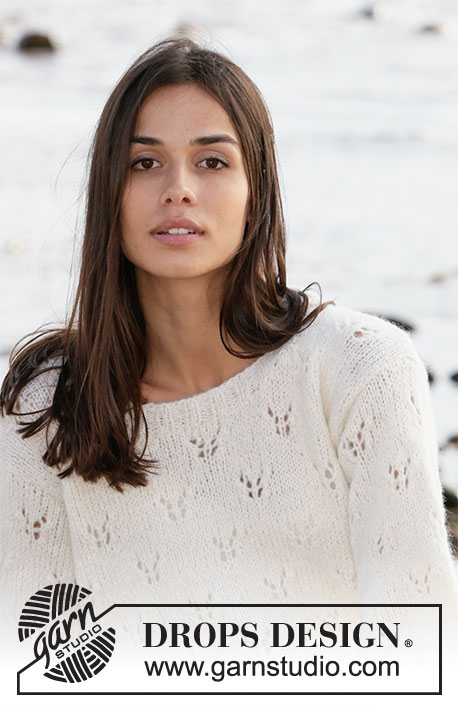
Knitted jumper with raglan in DROPS Big Merino. Piece is knitted top down with lace pattern. Size: S - XXXL
DROPS 210-13 |
||||||||||||||||||||||||||||
|
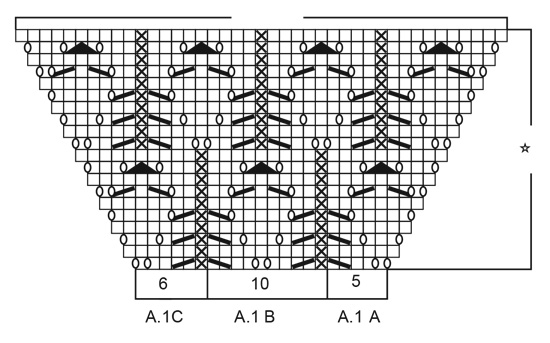
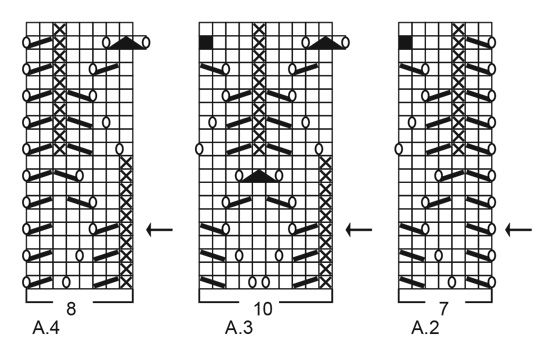
---------------------------------------------------------- EXPLANATION FOR THE PATTERN: ---------------------------------------------------------- GARTER STITCH (worked in the round): 1 ridge = 2 rounds. Knit 1 round and purl 1 round. PATTERN: See diagrams A.1 to A.4. Diagrams show all rows in pattern seen from the right side. INCREASE TIP-1 (evenly): To calculate how to increase evenly, use the total number of stitches on row (e.g. 78 stitches) and divide stitches by number of increases to be done (e.g. 8) = 9.75. In this example increase by making 1 yarn over after approx. every 10th stitch. On next round knit yarn overs twisted to avoid holes. INCREASE TIP-2 (applies to sides of body): All increases are done from the right side. Work until 2 stitches remain before marker thread, 1 yarn over, knit 4 (marker thread is in the middle of these stitches), 1 yarn over. On next round knit yarn overs twisted to avoid holes. Then work the new stitches in stocking stitch. DECREASE TIP (applies to sleeves): Decrease 1 stitch on each side of marker thread as follows: Work until 3 stitches remain before marker thread and knit 2 together, knit 2 (marker thread is between these stitches), slip 1 stitch knitwise, knit 1, pass slipped stitch over stitch worked. ---------------------------------------------------------- START THE PIECE HERE: ---------------------------------------------------------- JUMPER - SHORT OVERVIEW OF THE PIECE: Neck edge, yoke and body are worked in the round on circular needle. Begin round in transition between left shoulder and back piece. Work sleeves in the round on double pointed needles/a short circular needle, top down. NECK EDGE: Cast on 80-80-80-88-88-88 stitches on circular needle size 4.5 mm with Big Merino. Knit 1 round, then work rib knit 2/purl 2. When piece measures 3 cm, work 1 ridge in GARTER STITCH over all stitches – read explanation above. Knit 1 round while increasing 6-6-6-18-18-18 stitches evenly - read INCREASE TIP-1 = 86-86-86-106-106-106 stitches. Switch to circular needle size 5 mm. YOKE: Work as follows: A.1 A (= 5 stitches), A.1 B over the next 20-20-20-30-30-30 stitches ( = 2-2-2-3-3-3 repetitions of 10 stitches), A.1 C (= 6 stitches), 2 stitches in stocking stitch (= raglan line), make 1 yarn over, 8 stitches in stocking stitch (= sleeve), make 1 yarn over, 2 stitches in stocking stitch (= raglan line), A.1 A, A.1 B over the next 20-20-20-30-30-30 stitches, A.1 C, 2 stitches in stocking stitch (= raglan line), make 1 yarn over, 8 stitches in stocking stitch (= sleeve), make 1 yarn over, 2 stitches in stocking stitch (= raglan line) = 8 stitches increased. There are now 94-94-94-114-114-114 stitches on needle. Continue pattern like this. On front and back piece increase in each side as shown in A.1, on sleeves increase with yarn overs on each side of stitches on sleeve (raglan line = always 2 stitches). Increase like this every other round. On next round knit the yarn overs to make holes. Work the increased stitches in stocking stitch on the sleeves. On front and back piece work the increased stitches in pattern as shown in A.1. REMEMBER THE KNITTING TENSION! When A.1 has been worked 1 time vertically, there are 166-166-166-186-186-186 stitches on needle. Continue pattern the same way upwards, i.e. pattern is repeated as shown in A.1. Every time 20 row have been vertically, there is room for 2 repetitions more of A.1B in width on back piece/front piece. When increase has been done 22-22-27-27-27-32 times in total on each side of A.1, there are 262-262-302-322-322-362 stitches on row, and piece measures approx. 24-24-28-28-28-33 cm from neck edge. Work next round as follows: Work 75-75-85-95-95-105 stitches as before (= back piece), slip the next 56-56-66-66-66-76 stitches on 1 stitch holder for sleeve, cast on 6-8-8-8-12-14 new stitches on needle (= in the side under sleeve), work the next 75-75-85-95-95-105 stitches as before (= front piece), slip the next 56-56-66-66-66-76 stitches on 1 stitch holder for sleeve, cast on 6-8-8-8-12-14 new stitches on needle (in the side under sleeve). Finish body and sleeves separately. NOW MEASURE THE PIECE FROM HERE! BODY: = 162-166-186-206-214-238 stitches. Insert 1 marker thread in each side, in the middle of the 6-8-8-8-12-14 stitches that were cast on under each sleeve. Move the marker threads upwards when working; they should be used for increase later. Work first round as follows, begin 3-4-4-4-6-7 stitches after marker thread (begin on round marked with arrow in each diagram): A.2 (= 7 stitches), work A.3 over the next 60-60-70-80-80-90 stitches (= 6-6-7-8-8-9 repetitions of 10 stitches), A.4 (= 8 stitches), work 6-8-8-8-12-14 stitches in stocking stitch (marker thread is in the middle of these 6-8-8-8-12-14 stitches), A.2 (= 7 stitches), work A.3 over the next 60-60-70-80-80-90 stitches (= 6-6-7-8-8-9 repetition of 10 stitches), A.4 (= 8 stitches), work 6-8-8-8-12-14 stitches in stocking stitch (marker thread is in the middle of these 6-8-8-8-12-14 stitches), Continue pattern like this, repeat A.2, A.3 and A.4 vertically. When piece measures 5 cm from division, increase 1 stitch on each side of both marker threads - read INCREASE TIP-2 = 4 stitches increased. Increase like this every 7 cm 4 times in total = 178-182-202-222-230-254 stitches. Work until piece measures approx. 29-31-29-31-33-31 cm from division. Switch to circular needle size 4.5 mm. Work 2 ridges. Switch back to circular needle size 5 mm. Cast off. Jumper measures approx. 58-60-62-64-66-68 cm from shoulder and down. SLEEVE: Slip the 56-56-66-66-66-76 stitches from stitch holder in one side of piece on a short circular needle/double pointed needles size 5 mm and pick in addition up 1 stitch in each of the 6-8-8-8-12-14 stitches cast on under sleeve = 62-64-74-74-78-90 stitches. Insert 1 marker thread in the middle of the 6-8-8-8-12-14 stitches under sleeve - move the marker thread upwards when working, it is used for decrease later. Begin round at the marker thread and work stocking stitch in the round. When piece measures 3 cm from division, decrease 2 stitches mid under sleeve - read DECREASE TIP. Decrease like this every 2½-2½-2-1½-1½-1 cm 12-12-16-16-17-22 times in total = 38-40-42-42-44-46 stitches. Continue until piece measures approx. 32-33-30-28-29-26 cm from division (shorter measurements in larger sizes because of longer yoke). Switch to double pointed needles size 4.5 mm. Knit 1 round while adjusting number of stitches to 40-40-44-44-44-48. Purl 1 round. Work rib in the round with knit 2/purl 2 for 4 cm. Cast off by knitting but make sure that the cast-off edge is not too tight. Sleeve measures approx. 36-37-34-32-33-30 cm from division. Work the other sleeve the same way. |
||||||||||||||||||||||||||||
Diagram explanations |
||||||||||||||||||||||||||||
|
||||||||||||||||||||||||||||
|
||||||||||||||||||||||||||||
|
||||||||||||||||||||||||||||

|
||||||||||||||||||||||||||||
|
Have you made this or any other of our designs? Tag your pictures in social media with #dropsdesign so we can see them! Do you need help with this pattern?You'll find tutorial videos, a Comments/Questions area and more by visiting the pattern on garnstudio.com. © 1982-2024 DROPS Design A/S. We reserve all rights. This document, including all its sub-sections, has copyrights. Read more about what you can do with our patterns at the bottom of each pattern on our site. |
||||||||||||||||||||||||||||


With over 40 years in knitting and crochet design, DROPS Design offers one of the most extensive collections of free patterns on the internet - translated to 17 languages. As of today we count 304 catalogues and 11422 patterns - 11422 of which are translated into English (UK/cm).
We work hard to bring you the best knitting and crochet have to offer, inspiration and advice as well as great quality yarns at incredible prices! Would you like to use our patterns for other than personal use? You can read what you are allowed to do in the Copyright text at the bottom of all our patterns. Happy crafting!
Comments / Questions (20)
Guten Tag, ich bin am Anfang des Pullovers und habe an der Halsblende gleichmäßig verteilt Maschen zugenommen. In der nächsten Runde muss ich u.a. zwei Maschen rechts zusammen stricken. Können Sie mir sagen wie man das macht, wenn eine der beiden Maschen nur ein Umschlag ist? Bei meinem bisherigen Versuch ist ein Loch entstanden, das da sicher nicht sein soll. Vielen Dank und viele Grüße Sabine
05.05.2023 - 15:47DROPS Design answered:
Liebe Sabine, so stricken Sie A.1A bei der 1. Runde: Umschlag, 1 M rechts, Umschlag, 2 M rechts, 1 M abheben, 1 M rechts, die abgehobene Masche über die gestrickte Masche ziehen; A.1B: 1 M links, 2 M re zs, 2 M re, Umschlag, 1 M re, Umschlag, 2 M re, 1 M abheben, 1 M rechts, die abgehobene Masche über die gestrickte Masche ziehen, A.1C: 1 M li, 2 M re zs, 2 M re, Umschlag, 1 M re, Umschlag. Bei der nächsten Runde stricken Sie alle Umschläge rechts, es sollen Löcher entstehen. Viel Spaß beim stricken!
05.05.2023 - 17:06Bonjour, j ai deux questions : la première on augmente bien de 8mailles (4 par manches) tous les 2 rangs ? La deuxième est sur le fait de faire 2 fois A1b après on doit faire A1a et a1c 1 fois du coup ?
19.09.2022 - 12:29DROPS Design answered:
Bonjour Melanie, on augmente 8 mailles par tour: 1 maille de chaque côté des 2 mailles du raglan tricotées en jersey à la transition du dos/devant et des manches. Quand on a tricoté 20 rangs (et augmenté comme dans les diagrammes A et C), on a augmenté 10 mailles dans A et dans C = soit 1 motif de B en plus de chaque côté; tricotez A.1A au-dessus des 5 premières m de A.1A précédent et les 10 m suivantes en B, puis les 10 premières m du C précédent en B et les 6 dernières mailles en C. Bon tricot!
20.09.2022 - 09:37Siempre me respondieron las consultas, no se que pasa que con esta no tengo novedades. Me gustaría poder avanzar con el tejido, sigo esperando la respuesta a mi pregunta. Gracias!!!
22.07.2022 - 01:24Hola! Estoy tejiendo este patrón en talla XL. La indicación dice que al terminar 20 vueltas de A1 debería tener 186 puntos, pero sumando los aumentos de las mangas yo tengo 230 puntos. Los aumentos de las mangas van en todas las vueltas? Por otro lado, no me queda claro como comenzar la segunda repetición, ya que en lo que sería A1.A y A1. C ahora hay más puntos, no se como distribuírlos.
21.07.2022 - 01:21DROPS Design answered:
Hola Diana, A.1A y A.1C se trabajan siempre en los extremos. Después de cada 20 filas trabajas 2 repeticiones más de A.1B entre A.1A y A.1C. Los aumentos para el cuerpo están en A.1A y A.1C. Los aumentos de la manga son aparte y se trabajan cada 2ª fila. Después de la 1ª fila con aumentos tienes 114 pts. En la siguiente fila no aumentas. En cada fila con aumentos (que es cada 2ª fila, es decir, una sí y en la siguiente no) aumentas 8 pts. En las 18 filas de A.1 restantes, aumentas 8 pts en cada fila y aumentas en filas alternas/ cada 2ª fila, así que has aumentado 72 pts más. En total, deberías tener 186 pts, incluyendo todo tipo de aumentos.
24.07.2022 - 19:13Buenos días! Estoy tejiendo este patrón en talla XL. La indicación dice que al terminar 20 vueltas de A1 debería tener 186 puntos, pero sumando los aumentos de las mangas yo tengo 230 puntos. Por otro lado, no me queda claro como comenzar la segunda repetición, ya que en lo que sería A1.A y A1. C ahora hay más puntos, no se como distribuírlos.
20.07.2022 - 15:28DROPS Design answered:
Hola Diana, puedes ver la respuesta arriba.
24.07.2022 - 19:14Hallo! Nach welchen Schema wird das Vorder bzw. Rückenteil gestrickt? Bitte um Rückmeldung. Danke! Lg Andrea Rademacher
08.11.2021 - 17:20DROPS Design answered:
Liebe Frau Rademacher, meinen Sie Rumpfteil nach der Verteilung am Ende der Passe? Die werden mit A.2, A.3 und A.4 gestrickt mit jeweils glatt rechte Maschen an den Seiten. Viel Spaß beim stricken!
09.11.2021 - 12:47Dzień dobry, mam problem z liczbą oczek dla rozmiaru M w Karczku - po zsumowaniu wszystkich oczek wychodzi mi 90 - a w opisie podano 94 oczka. Dodatkowo napisano, że "dodano 8 oczek", a przecież są tylko 4 narzuty. Proszę o pomoc w zrozumieniu tego opisu..
08.11.2021 - 07:36DROPS Design answered:
Witaj Alicjo, przed rozpoczęciem karczku w rozmiarze M masz 86 oczek. W 1-szym okrążeniu karczku wykonujesz 4 narzuty i dodatkowo będziesz miała 4 dodane oczka w schematach A.1A i A.1C. W sumie po przerobieniu 1-szego okrążenia karczku jest 94 oczka. Powodzenia i miłej pracy!
08.11.2021 - 07:57Bonjour Madame, Je vous serais reconnaissante de bien vouloir m'indiquer si je peux réaliser ce modèle avec Drops belle uni colour, ayant fait une erreur inexplicable lors de ma commande ; cela m'éviterait de retourner mes pelotes. Je vous remercie. Cordialement. Mme Marcheron
04.08.2021 - 22:48DROPS Design answered:
Bonjour Mme Marcheron, ce pull se tricote en DROPS Big Merino, qui appartient au groupe C de nos fils alors que Belle appartient au groupe B et ne peut donc pas être utilisé ici, l'échantillon serait différent, vous trouverez ici tous les modèles de pulls femme en laine/fil du groupe B où vous pourrez utiliser Belle, vous trouverez peut-être un autre modèle qui vous conviendra? Utilisez le convertisseur pour obtenir la quantité nécessaire en Belle si besoin. Bon tricot!
05.08.2021 - 09:06Bonjour Madame, Dans empiècement, tricoter A.1A =5mailles, A.1B au dessus des 20 mailles suivantes. Au dessus ? Je ne comprends pas comment faire au dessus. Je vous remercie d'avance de me renseigner avant que j'effectue ma commande Cordialement Martine
13.05.2021 - 14:25DROPS Design answered:
Bonjour Mme Marcheron. cela veut dire que vous devez tricoter 20 mailles suivantes ainsi: 2 x diagramme A.1B (1 rapport compte 10 mailles). Bon tricot!
13.05.2021 - 15:41Hi, I am half-way through knitting this jumper (I am enjoying it very much!), but it's for a present so needs to be finished soon. Unfortunately, your site is having some technical problems displaying the images. Is there any way you can send me a pdf version? Many thanks
16.03.2021 - 11:34DROPS Design answered:
Dear Tamara, unfortunately we cannot send out these PDF's so, please be patient. We are working hard to restore the pictures as soon as we can. Thank you for your understanding and patience.
16.03.2021 - 12:45