DROPS Brushed Alpaca Silk
77% Alpaca, 23% Silk
from 3.10 € /25g
Get the yarn to make this pattern from 18.60€.

The yarn cost is calculated from the pattern’s smallest size and the yarn’s cheapest product type. Looking for an even better price? You might find it on the DROPS Deals!

DROPS SS24

Sahara Sunrise

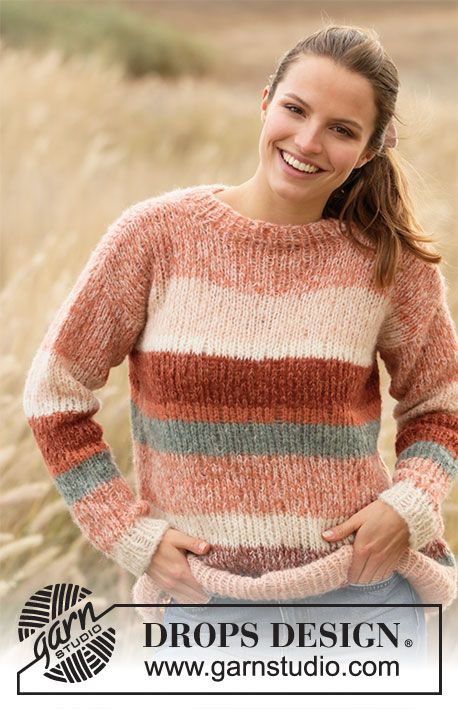
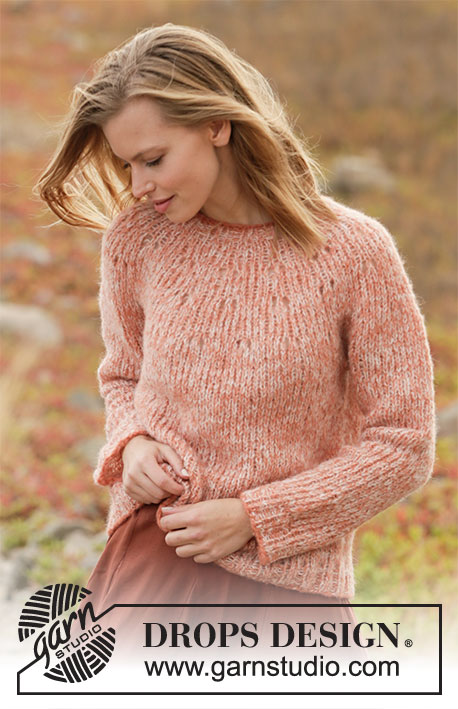
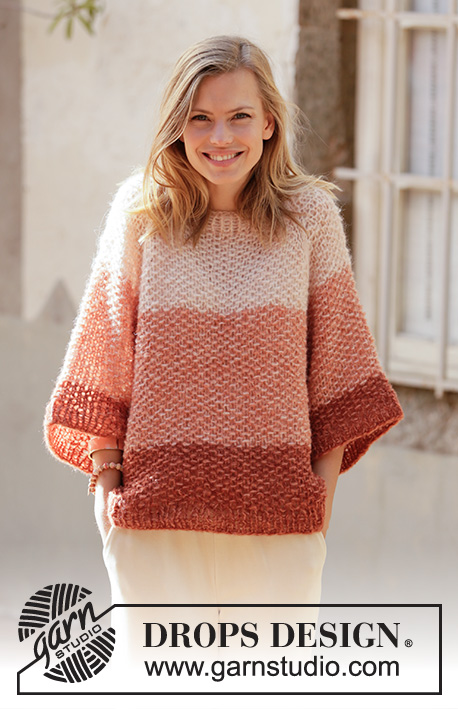
Knitted jumper with raglan in 2 strands DROPS Brushed Alpaca Silk. Piece knitted top down with moss stitch. Size XS – XXXL.

DROPS 212-36
DROPS design: Pattern as-132
Yarn group C + C or E
----------------------------------------------------------

SIZE:
XS - S - M - L - XL - XXL

MATERIALS:
DROPS BRUSHED ALPACA SILK from Garnstudio (belongs to yarn group C)
25-25-25-25-25-25 g colour 01, off white
50-50-50-75-75-75 g colour 20, pink sand
50-50-75-75-75-75 g colour 22, pale rust
25-25-25-25-25-25 g colour 24, rust

KNITTING TENSION:
11 stitches in width and 15 rows vertically in moss stitch (A.1) with 2 strands = 10 x 10 cm.

NEEDLES:
DROPS CIRCULAR NEEDLE SIZE 10 mm : Length 80 cm for moss stitch.
DROPS DOUBLE POINTED NEEDLES SIZE 10 mm for moss stitch.
DROPS CIRCULAR NEEDLE SIZE 8 mm : Length 40 and 80 cm for rib.
Needle size is only a suggestion! If you have too many stitches on 10 cm switch to larger needles. If you have too few stitches on 10 cm switch to smaller needles.

-------------------------------------------------------

Alternative Yarn – See how to change yarns here
Yarn Groups A to F – Use the same pattern and change the yarn here
Yarn usage using an alternative yarn – Use our yarn converter here

-------------------------------------------------------

DROPS Brushed Alpaca Silk
77% Alpaca, 23% Silk
from 3.10 € /25g
Get the yarn to make this pattern from 18.60€.

The yarn cost is calculated from the pattern’s smallest size and the yarn’s cheapest product type. Looking for an even better price? You might find it on the DROPS Deals!

Pattern instructions

NOTE: This pattern is written in British English. All measurements in charts are in cm. For conversion from cm to inches - click here. There are different terms for crocheting in British and American English. If this pattern includes crochet, click for "crochet terms" here. For this pattern in American English, please click here.
----------------------------------------------------------

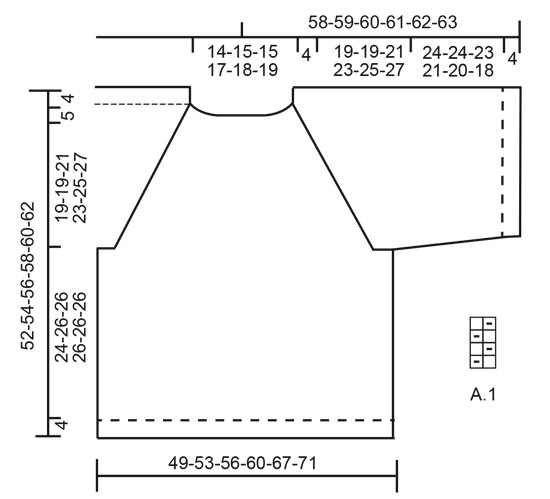
EXPLANATION FOR THE PATTERN:

----------------------------------------------------------

PATTERN: 
See diagram A.1.

INCREASE TIP (evenly):
To calculate how to increase evenly, use the total number of stitches on row (e.g. 42 stitches) and divide stitches by number of increases to be done (e.g. 6) = 7. 
In this example increase by making 1 yarn over after every 7th stitch. On next round work yarn overs twisted to avoid holes.

STRIPES YOKE AND BODY:
Measure first stripe from marker, i.e. after rib in neck.
Work 14-15-16-16-17-17 cm with 1 strand off white and pink sand (= 2 strands)
Work 18-19-20-21-22-23 cm with 1 strand pink sand and 1 strand light rust (= 2 strands).
Then work with 1 strand pale rust and 1 strand rust (= 2 strands) until finished measurements.

STRIPES SLEEVE:
Continue with 2nd stripe, i.e. 1 strand pink sand + light rust (= 2 strands) until stripe measures 18-19-20-21-22-23 cm including that worked on yoke.
Then work with 1 strand pale rust and 1 strand rust (= 2 strands) until finished measurements.

RAGLAN:
Increase 1 stitch on each side of marker thread as follows: Work until 1 stitch remains before marker thread, 1 yarn over, knit 2 (marker thread is in the middle of these stitches), 1 yarn over. Repeat at each of the remaining marker threads (= 8 stitches increased on round).
On next round work yarn overs twisted to avoid holes. Then work the new stitches in moss stitch (A.1). 

KNITTING TIP:
To make a more even transition between round decrease 1 stitch on round to make number of stitches uneven (divisible by 2 + 1). Then work moss stitch (A.1) in the round in a spiral. When increasing stitches before rib, increase 1 stitch more than stated in pattern to make number of stitches even (divisible by 2).

DECREASE TIP (applies to sleeves): 
Decrease 2 stitches on each side of marker thread under sleeve as follows: Work until 3 stitches remain before marker thread, knit 3 together (= 2 stitches decreased), marker thread is here, work next stitch in A.1 as before, knit 3 together.

CAST-OFF TIP:
To avoid a tight cast-off edge you may use a larger needle. If this also is too tight, make 1 yarn over after approx. every 4th stitch and cast off these as regular stitches.

----------------------------------------------------------

START THE PIECE HERE:

----------------------------------------------------------

JUMPER - SHORT OVERVIEW OF THE PIECE:
Neck edge and yoke are worked in the round on circular needle, top down. Now divide yoke for body and sleeves. Work body in the round on circular needle. Work sleeves in the round on double pointed needles/a short circular needle.

NECK EDGE:
Cast on 42-44-44-48-50-52 stitches on circular needle size 8 mm with 1 strand off white and 1 strand pink sand (= 2 strands). Knit 1 round. Now work rib (= knit 1/purl 1) for 4 cm. When rib is done, knit 1 round while at the same time increasing 6-4-8-4-6-4 stitches evenly - read INCREASE TIP (evenly)= = 48-48-52-52-56-56 stitches. Knit 1 round (knit yarn overs twisted). Switch to circular needle size 10 mm. Insert 1 marker after rib, measure yoke from this marker!

YOKE:
Now work STRIPES YOKE AND BODY – read explanation above, and pattern as follows: Insert a marker thread here (= in transition between left sleeve and back piece), knit 1, 1 yarn over, A.1 over the next 13-13-15-15-17-17 stitches, 1 yarn over, knit 1, insert a marker thread here (= in transition between back piece and right sleeve), knit 1, 1 yarn over, A.1 over the next 7 stitches in all sizes, 1 yarn over, knit 1 insert a marker thread here (= in transition between right sleeve and front piece), knit 1, 1 yarn over, A.1 over the next 13-13-15-15-17-17 stitches, 1 yarn over, knit 1, insert a marker thread here (= in transition between front piece and left sleeve), knit 1, 1 yarn over, A.1 over the next 7 stitches in all sizes, 1 yarn over, knit 1.
1 stitch has been increased on each side of the marker threads for RAGLAN - read explanation above. REMEMBER THE KNITTING TENSION! Continue in the round like this and increase every other round 12-14-14-16-18-20 times in total = 144-160-164-180-200-216 stitches.
Continue with pattern and stripes without increasing until piece measures 19-19-21-23-25-27 cm from marker.
Now divide piece for body and sleeves. Work next round as follows: Work pattern as before over the first 39-43-45-49-55-59 stitches (= back piece), slip the next 33-37-37-41-45-49 stitches on a stitch holder (= sleeve), cast on 5 new stitches on needle (= in the side under sleeve), work the next 39-43-45-49-55-59 stitches (= front piece), slip the next 33-37-37-41-45-49 stitches on a stitch holder (= sleeve), cast on 5 new stitches (in the side under sleeve).
Then finish body and sleeves separately. NOW MEASURE PIECE FROM HERE!

BODY:
= 88-96-100-108-120-128 stitches. Insert 1 marker thread in one side, before the middle stitch cast on in the side under sleeve. Move the marker thread upwards when working. It shows beginning of round and where to change colours in stripes. Continue with stripes and work A.1 in the round over all stitches on round - make sure that pattern fits as before over stitches from yoke - read KNITTING TIP.
When piece measures 24-26-26-26-26-26 cm from division, knit 1 round while increasing 18-20-20-22-24-26 stitches evenly = 106-116-120-130-144-154 stitches.
Switch to circular needle size 8 mm. Work rib (knit 1/purl 1) in the round for 4 cm.
Cast off with knit over knit and purl over purl - read CAST-OFF TIP. Jumper measures approx. 52-54-56-58-60-62 cm from shoulder and down.

SLEEVES:
Slip the 33-37-37-41-45-49 stitches from stitch holder in one side of piece back on a short circular needle size 10 mm and pick in addition up 1 stitch in each of the 5 stitches cast on under sleeves = 38-42-42-46-50-54 stitches. Insert a marker thread before the middle of the 5 new stitches cast on under sleeve. Move marker thread upwards when working. Use marker later when decreasing stitches under sleeve.
Work STRIPES SLEEVE - see explanation above, and work moss stitch (A.1) in the round - make sure that moss stitch fits as before over stitches from yoke. When piece measures 4 cm, decrease 2 stitch on each side of the middle stitch under sleeve (= stitch after marker thread) - read DECREASE TIP = 34-38-38-42-46-50 stitches. Continue to work in the round in moss stitch (A.1) - remember KNITTING TIP.
Continue like this until piece measures 24-24-23-21-20-18 cm (shorter measurements in the larger sizes because of longer yoke). Knit 1 round while increasing 6-8-8-8-10-10 stitches evenly = 40-46-46-50-56-60 stitches. Switch to circular needle size 8 mm. Work rib (knit 1/purl 1) in the round for 4 cm. Cast off with knit over knit and purl over purl - read CAST-OFF TIP. Sleeve measures approx. 28-28-27-25-24-22 cm. Work the other sleeve the same way.

This pattern has been corrected.

Updated online: 12.05.2020
RAGLAN: ...On next round work yarn overs twisted to avoid holes. Then work the new stitches in moss stitch (A.1).

Diagram

symbols = knit
symbols = purl
diagram

Each of our patterns has specific tutorial videos to help you.

Do you have a question? See a list of frequently asked questions (FAQ)

Knitting tension is what determines the final measurements of your work, and is usually measured per 10 x 10 cm. It is provided like so: number of stitches in width x number of rows in height - eg: 19 stitches x 26 rows = 10 x 10 cm.

The knitting tension is very individual; some people knit/crochet loosely while others work tightly. You adjust the knitting tension with the needle size, which is why the suggested needle size is only meant as a guide! You need to adjust this (up or down) to ensure that YOUR knitting tension matches the knitting tension provided in the pattern. If you work with a different knitting tension than provided you will have a different yarn consumption, and your work will have different measurements than what the pattern suggests.

The knitting tension also determines which yarns can replace each other. As long as you achieve the same knitting tension you can replace one yarn with another.

See DROPS lesson: How to measure your tension/gauge

See DROPS video: How to make a gauge tension swatch

The required amount of yarn is provided in grams, eg: 450 g. To calculate how many balls you’ll need you first need to know how many grams are in 1 ball (25g, 50g or 100g). This information is available if you click on the individual yarn quality on our pages. Divide the amount required with the amount of each ball. For example, if each ball is 50g (the most common amount), the calculation will be as follows: 450 / 50 = 9 balls.

The important thing when changing from one yarn to another is that the knitting/crochet tension remains the same. This is so that the measurements of the finished piece will be the same as on the sketch provided. It is easier to achieve the same knitting tension using yarns from the same yarn group. It is also possible to work with multiple strands of a thinner yarn to achieve the knitting tension of a thicker one. Please try our yarn converter. We recommend you to always work a test swatch.

Please NOTE: when changing yarn the garment might have a different look and feel to the garment in the photo, due to individual properties and qualities of each yarn.

See DROPS lesson: Can I use a different yarn than the one mentioned in the pattern?

All our yarns are categorised into yarn groups (from A to F) according to thickness and knitting tension – group A contains the thinnest yarns and group F the thickest. This makes it easier for you to find alternative yarns to our patterns, should you wish to switch yarn. All yarns within the same group have a similar knitting tension and can easily replace each other. However, different yarn qualities have different structures and properties which will give the finished work a unique look and feel.

Click here for an overview of the yarns in each yarn group

At the top of all our patterns you’ll find a link to our yarn calculator, which is a helpful tool should you wish to use a different yarn than suggested. By filling in the yarn quality you wish to replace, the amount (in your size) and number of strands, the calculator will present good alternative yarns with the same knitting tension. Additionally it will tell you how much you’ll require in the new qualities and whether you’ll need to work with multiple strands. Most skeins are 50g (some are 25g or 100g).

If the pattern is worked with multiple colours, every colour will have to be calculated separately. Similarly, if the pattern is worked with several strands of different yarns (for example 1 strand Alpaca and 1 strand Kid-Silk) you will have to find alternatives for each, individually.

Click here to see our yarn calculator

Since different yarns have different qualities and textures we have chosen to keep the original yarn in our patterns. However, you can easily find options among our available qualities by using our yarn calculator, or simply pick a yarn from the same yarn group.

It is possible that some retailers still have discontinued yarns in stock, or that someone has a few skeins at home that they would like to find patterns for.

The yarn calculator will provide both alternative yarn as well as required amount in the new quality.

If you think it's hard to decide what size to make, it can be a good idea to measure a garment you own already and like the size of. Then you can pick the size by comparing those measures with the ones available in the pattern's size chart.

You'll find the size chart at the bottom of the pattern.

See DROPS lesson: How to read size chart

The needle size provided in the pattern serves only as a guide, the important thing is to follow the knitting tension. And since knitting tension is very individual, you will have to adjust the needle size to ensure that YOUR tension is the same as in the pattern – maybe you’ll have to adjust 1, or even 2 needle sizes, up or down to achieve the correct tension. For this, we recommend that you work test swatches.

Should you work with a different knitting tension than the one provided, the measurements of the finished garment might deviate from the measurement sketch.

See DROPS lesson: How to measure your tension/gauge

See DROPS video: How to make a tension/gauge swatch

Working a garment top-down provides more flexibility and room for personal adjustment. For example it is easier to try the garment on while working, as well as making adjustments to length of yoke and shoulder caps.

The instructions are carefully explaining every step, in the correct order. Diagrams are adjusted to the knitting direction and are worked as usual.

The diagram depicts all rows/rounds, and every stitch seen from the right side. It is read from bottom to top, from right to left. 1 square = 1 stitch.

When working back and forth, every other row is worked from the right side and every other row is worked from the wrong side. When working from the wrong side, the diagram will have to be worked reversed: from left to right, knit stitches are purled, purl stitches are knit etc.

When working in the round every round is worked from the right side and the diagram are worked from right to left on all rounds.

See DROPS lesson: How to read knitting diagrams

The diagram depicts all rows/rounds, and every stitch seen from the right side. It is worked from bottom to top, from right to left.

When working back and forth every other row is worked from the right side: from right to left and every other row is worked from the wrong side: from left to right.

When working in the round, every row in the diagram are worked from the right side, from right to left.

When working a circular diagram you start in the middle and work your way outwards, counter clockwise, row by row.

The rows usually start with a given number of chain stitches (equivalent to the height of the following stitch), this will either be depicted in the diagram or explained in the pattern.

See DROPS lesson: How to read crochet diagrams

Instructions for working several diagrams after each other on the same row/round, will often be written like so: “work A.1, A.2, A.3 a total of 0-0-2-3-4 times". This means you work A.1 once, then A.2 is worked once, and A.3 is repeated (in width) the number of times provided for your size – in this case like so: S = 0 times, M = 0 times, L=2 times, XL= 3 times and XXL = 4 times.

The diagrams are worked as usual: begin with the first row in A.1, then work the first row in A.2 etc.

See DROPS lesson: How to read knitting diagrams

See DROPS lesson: How to read crochet diagrams

The total width of the garment (from wrist-to-wrist) will be larger in the larger sizes, despite the actual sleeves being shorter. The larger sizes have longer sleeve caps and wider shoulders, so there will be a good fit in all sizes.

The measurement sketch/schematic drawing provides information regarding the full length of the garment. If it’s a jumper or a jacket the length is measured from the highest point on the shoulder closest to the neckline, and straight down to the bottom of the garment. It is NOT measured from the tip of shoulder. Similarly, the length of yoke is measured from the highest point on the shoulder and down to where yoke is split into body and sleeves.

On a jacket measures are never taken along bands, unless specifically stated. Always measure inside band stitches when measuring the length.

See DROPS lesson: How to read a schematic drawing

Diagrams are often repeated on the round or in height. 1 repeat is the diagram the way it appears in the pattern. If it says to work 5 repeats of A.1 in the round, then you work A.1 a total of 5 times after/next to each other in the round. If it says to work 2 repeats of A.1 vertically/in height you work the entire diagram once, then begin again at the start and work the entire diagram one more time.

Chain stitches are slightly narrower than other stitches and to avoid working the cast-on edge too tight, we simply chain more stitches to begin with. The stitch count will be adjusted on the following row to fit the pattern and measurement sketch.

The rib edge is more elastic and will contract slightly compared to, for example, stocking stitch. By increasing before the rib edge, you avoid a visible difference in width between the rib edge and the rest of the body.

It’s very easy to cast off too tightly, and by making yarn overs while casting off (and simultaneously casting these off) you avoid a too tight cast off edge.

See DROPS video: How to bind off with yarn overs (yo)

To achieve an even increase (or decrease) you can increase on, for example: every 3rd and 4th row alternately, like so: work 2 rows and increase on the 3rd row, work 3 rows and increase on the 4th. Repeat this until the increase is complete.

See DROPS lesson: Increase or decrease 1 st on every 3rd and 4th row alternately

Should you prefer to work in the round instead of back and forth, you may of course adjust the pattern. You’ll need to add steeks mid-front (usually 5 stitches), and follow the instructions. When you would normally turn and work from the wrong side, simply work across the steek and continue in the round. At the end you’ll cut the piece open, pick up stitches to work bands, and cover the cut edges.

See DROPS video: How to knit steeks and cut open

Should you prefer to work back and forth instead of in the round, you may of course adjust the pattern so you work the pieces separately and then assemble them at the end. Divide the stitches for the body in 2, add 1 edge stitch in each side (for sewing) and work the front and back pieces separately.

See DROPS lesson: Can I adapt a pattern for circular needles into straight needles?

Pattern repeats can vary slightly in the different sizes, in order to get the correct proportions. If you’re not working the exact same size as the garment in the photo, yours might deviate slightly. This has been carefully developed and adjusted so that the complete impression of the garment is the same in all sizes.

Make sure to follow instructions and diagrams for your size!

If you have found a pattern you like which is available in women’s size it’s not very difficult to convert it to men’s size. The biggest difference will be the length of sleeves and body. Start working on the women size that you think would fit across the chest. The additional length will be worked right before you cast off for the armhole/sleeve cap. If the pattern is worked top-down you can add the length right after the armhole or before the first decrease on sleeve.

Regarding additional yarn amount, this will depend on how much length you add, but it is better with a skein too many than too few.

All yarns will have excess fibres (from production) that might come off as lint or shedding. Brushed yarns (ie hairier yarns) have more of these loose, excess fibres, causing more shedding.

Shedding also depends on what is worn under or over the garment, and whether this pulls at the yarn fibres. It’s therefore not possible to guarantee that there will be no shedding

Below are some tips on how to get the best result when working with hairier yarns:

1. When the garment is finished (before you wash it) shake it vigorously so the looser hairs come off. NOTE: do NOT use a lint roller, brush or any method that pulls at the yarn.

2. Place the garment in a plastic bag and put it in your freezer - the temperature will cause the fibres to become less attached to each other, and excess fibres will come off easier.

3. Leave in the freezer for a few hours before taking it out and shaking it again.

4. Wash the garment according to the instructions on the yarn label.

Pilling is a natural process that happens to even the most exclusive of fibers. It's a natural sign of wear and tear that is hard to avoid, and that is most visible in high friction areas of your garment like a sweater's arms and cuffs.

You can make your garment look as new by removing the pilling, using a fabric comb or a pill/lint remover.

Still can't find the answer you need? Then scroll down and leave your question so one of our experts can try to help you. This will be done normally within 5 to 10 working days.
In the meantime, you can read the questions and answers that others have left to this pattern or join the DROPS Workshop on Facebook to get help from fellow knitters/crocheters!

You might also like...

Sahara Sunrise

Maria, Poland

212-36 Sahara Sunrise

Jennifer, Germany

Post a comment to pattern DROPS 212-36

We would love to hear what you have to say about this pattern!

If you want to leave a question, please make sure you select the correct category in the form below, to speed up the answering process. Required fields are marked *.

Comments / Questions (35)

country flag Grace wrote:

For the reglan, in every other non-increasing row, should I purl the 2 knits next to the marker to make it moss pattern?

09.02.2023 - 16:09

DROPS Design answered:

Dear Grace, work the increased stitches in moss stitch, but continue knitting the 2 sts on each raglan line (these will be knitted all the way). Happy knitting!

09.02.2023 - 16:44

country flag Vera Van Veenendaal wrote:

Waarom breien jullie altijd van boven naar beneden en niet andersom en altijd met rondbreinaalden ik kan daar niet mee overweg

04.03.2022 - 13:56

country flag Vera Van Veenendaal wrote:

Waarom word het patroon van boven naar beneden gebreid en niet andersom en waarom worden de patronen altijd op rondbreinaalden gebreid ik kan daar niet mee overweg

04.03.2022 - 13:50

DROPS Design answered:

Dag Vera,

Veel van de patronen zijn inderdaad van boven naar beneden en in de rondte. Dit is van oorsprong de Noorse methode van breien. Het kan een voordeel zijn om van boven naar beneden te breien omdat je dan gaandeweg tijdens het breien, het kledingstuk kunt passen en daardoor precies aan kunt passen op de juiste lengte. Sommige patronen kunnen trouwen aangepast worden om op rechte naalden te breien. Hier vind je een uitleg daarover.

07.03.2022 - 12:35

country flag Gillian wrote:

I want to knit this in a size M for a friend but only 175g of wool doesn't seem like a lot for 2 strands pattern. Are the quantities right? I'd love to order the wool and get started. Thanks.

15.02.2022 - 12:07

DROPS Design answered:

Dear Gillian, please note that DROPS Brushed Alpaca Silk is 25 g a ball - so if you need 175 g in size M, this means you need a total of 7 balls - read more in the shade card (and remember to check your tension). Happy knitting!

15.02.2022 - 13:52

country flag Jette Olsen wrote:

Jeg har strikket denne trøje i det anbefalede garn. Jeg har håndvasket den i næsten koldt vand og lagt den til tørre på en håndklæde ovenpå et tørrestativ. Da den var tør var den lidt trist og flad og se på. Den nederste kant var meget uregelmæssig. Hvordan skal jeg undgå det? Er det ok at lade den tørre halvt og så hænge den op på en oppustelig bøjle eller har I andre forslag? jeg ser frem til at få et godt råd for trøjen er ret flot.

14.10.2021 - 12:14

DROPS Design answered:

Hei Jette. Hvilket håndklæde tørket du genseren på? Unngå å tørke plagget på underlag som suger til seg fuktighet, som for eksempel frottéhåndklær. Plagget kan miste sin naturlige elastisitet og virke litt flat. Etter at genseren er tørket, ris lett i plagget, slik at fibrene i garnet vil "våkne". Evnt la den halvtørke på et håndklæde på et tørkestativ og deretter fjerne håndklæde og la den tørke ferdig på tørkestativ. mvh DROPS Design

18.10.2021 - 09:55

country flag Arianna wrote:

Buongiorno, ho un dubbio per il SUGGERIMENTO PER LE DIMINUZIONI (applicato alle maniche). Devo diminuire 4 maglie: 2 prima del segnapunti e 2 dopo. Quindi dovrei lavorare 3 maglie insieme a dritto, trovo il segnapunti, lavoro la maglia successiva in A1 e poi di nuovo 3 maglie insieme a dritto? Grazie.

24.08.2021 - 14:59

DROPS Design answered:

Buonasera Arianna, si è corretto, deve procedere in questo modo. Buon lavoro!

24.08.2021 - 21:09

country flag Evy wrote:

Hoi! Welke maat draagt het model? Zou leuk zijn als dit bij de breipatronen vermeld staat. Ondanks juiste stekenverhouding valt de trui toch veel strakker uit dan gedacht. Had ik dit geweten had ik 2 maten groter genomen dan mijn gebruikelijke.

16.06.2021 - 19:39

DROPS Design answered:

Dag Evy,

Het model draagt maat S.

Aan de hand van de maattekening onderaan het patroon kun je zien hoe groot het kledingstuk wordt in elke maat.

23.06.2021 - 20:14

country flag Flavia wrote:

Quando lavoro lo sprone,sul lato destro mi viene bene ma sul sinistro viene troppo lenta la lavorazione... Sto sbagliando qualcosa? Io lavoro i gettati prima e dopo le due maglie dritte, e al giro successivo lavoro a maglia diritta ritorta questi gettati, c'è qualcosa di sbagliato? Grazie

02.05.2021 - 11:39

DROPS Design answered:

Buongiorno Flavia, può essere un problema di tensione, provi a controllare di lavorare in modo regolare da ambedue le parti. Buon lavoro!

02.05.2021 - 20:23

country flag CABANES Catherine wrote:

Bonjour, sur le modèle 212-36 pouvez-vous me dire comment placer les fils marqueurs, et surtout à combien de mailles d'intervalles les placer (c'est-à-dire tous les combiens de mailles placer un fil marqueur???) Je reste à votre disposition pour toutes informations complémentaires, Bien cordialement Mme CABANES Catherine

17.02.2021 - 18:00

DROPS Design answered:

Bonjour Mme Cabanes, placez vos fils marqueurs en fonction de la taille ainsi, en tricotant le 1er rang en même temps: fil marqueur, 1 m end, 1 jeté, 13-13-15-15-17-17 m en A.1, 1 jeté, 1 m end, fil marqueur, 1 m end, 1 jeté, 7 m A.1, 1 jeté, 1 m end, fil marqueur, 1 m end, 1 jeté, 13-13-15-15-17-17 m A.1, 1 jeté, 1 m end, fil marqueur, 1 m end, 1 jeté, 7 m A.1, 1 jeté, 1 m end. Vous avez augmenté en même temps 1 maille de chaque côté des 2 mailles endroit avec un fil marqueur entre elles. Bon tricot!

18.02.2021 - 09:03

country flag Janice Hansen wrote:

Hej Er i gang med denne sweater, men opdager at diagram A1 perlestrik mangler i opskriften. Kan jeg finde det et andet sted? Mvh. Janice

03.02.2021 - 16:50

DROPS Design answered:

Hej Janice, diagrammet finder du nederst i opskriften til højre for måleskitsen. God fornøjelse!

04.02.2021 - 14:35