DROPS Brushed Alpaca Silk
77% Alpaca, 23% Silk
from 3.10 € /25g
Get the yarn to make this pattern from 15.50€.

The yarn cost is calculated from the pattern’s smallest size and the yarn’s cheapest product type. Looking for an even better price? You might find it on the DROPS Deals!

DROPS SS24

City Streets Sweater

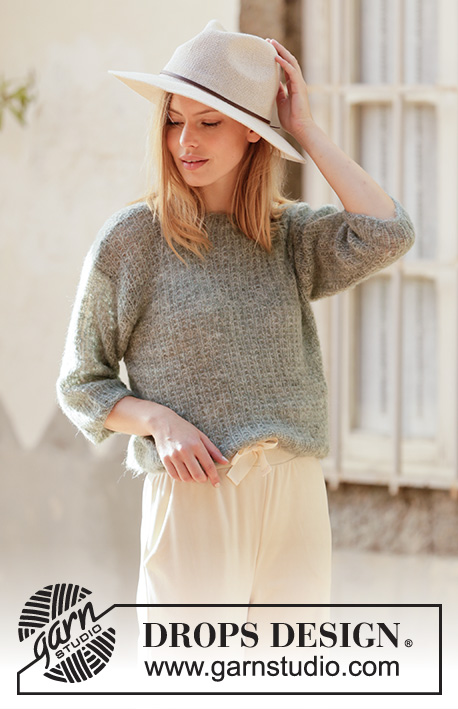
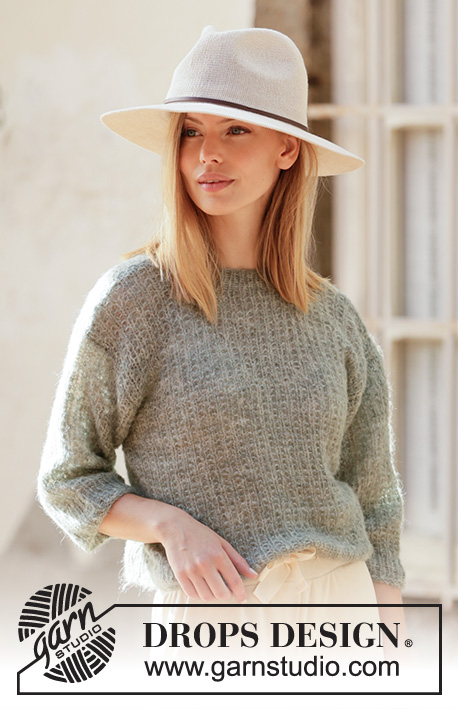
Knitted jumper in DROPS Brushed Alpaca Silk. The piece is worked with textured pattern and short ¾ sleeves. Sizes XS - XXL.

DROPS 210-17
DROPS Design: Pattern no as-134
Yarn group C or A + A
-------------------------------------------------------

SIZES:
XS - S - M - L - XL - XXL

MATERIALS:
DROPS BRUSHED ALPACA SILK from Garnstudio (belongs to yarn group C)
125-125-150-150-175-175 g colour 21, sage green

KNITTING TENSION:
17 stitches in width and 22 rows in height with textured pattern = 10 x 10 cm.

NEEDLES:
DROPS DOUBLE POINTED NEEDLES SIZE 5 MM.
DROPS CIRCULAR NEEDLE SIZE 5 MM: Length 40 cm and 80 cm for textured pattern.
DROPS DOUBLE POINTED NEEDLES SIZE 4 MM.
DROPS CIRCULAR NEEDLE SIZE 4 MM: Length 40 cm and 60 cm or 80 cm for rib.
Needle size is only a guide. If you get too many stitches on 10 cm, change to a larger needle size. If you get too few stitches on 10 cm, change to a smaller needle size.

-------------------------------------------------------

Alternative Yarn – See how to change yarns here
Yarn Groups A to F – Use the same pattern and change the yarn here
Yarn usage using an alternative yarn – Use our yarn converter here

-------------------------------------------------------

DROPS Brushed Alpaca Silk
77% Alpaca, 23% Silk
from 3.10 € /25g
Get the yarn to make this pattern from 15.50€.

The yarn cost is calculated from the pattern’s smallest size and the yarn’s cheapest product type. Looking for an even better price? You might find it on the DROPS Deals!

Pattern instructions

-------------------------------------------------------

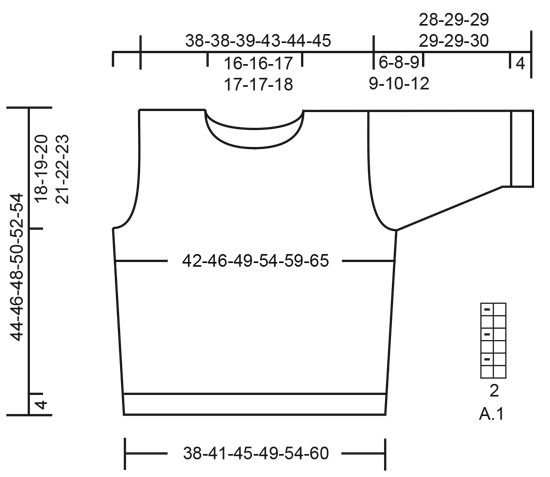
EXPLANATIONS FOR THE PATTERN:

-------------------------------------------------------

PATTERN:
See diagram A.1. The diagram shows all rows in the pattern seen from the right side.

INCREASE TIP (for sides of body and mid under sleeves):
Work as far as the stitch with the marker, make 1 yarn over, work the stitch with the marker in garter stitch as before, 1 yarn over (= 2 stitches increased at marker).
On the next round work the yarn overs twisted to avoid holes. The new stitches are worked into A.1 as you go. 


-------------------------------------------------------

START THE PIECE HERE:

-------------------------------------------------------

JUMPER – SHORT OVERVIEW OF THE PIECE:
The body is worked in the round with circular needle bottom up, as far as the armholes. Stiches are cast off for the armholes and the front and back pieces are finished back and forth, separately. The sleeves are worked in the round with double pointed needles/short circular needle bottom up, as far as the beginning of the sleeve cap. The sleeve cap is worked back and forth with circular needle. The piece is sewn together at the shoulders and the sleeves are sewn in. The neck is worked in rib to finish.

BODY:
Cast on 128-140-152-168-184-204 stitches with circular needle size 4 mm and Brushed Alpaca Silk. Knit 1 round then work rib in the round (= knit 1/ purl 1) for 4 cm. When the rib is finished change to circular needle size 5 mm.
Insert 1 marker in the 64th-70th-76th-84th-92nd-102nd stitch on the round and 1 marker in the last stitch on the round – both markers sit in purled stitches. Allow them to follow you work onwards, they will be used when increasing in the sides of the body.

Then work A.1 in the round. REMEMBER THE KNITTING TENSION!
When the piece measures 5 cm, increase 1 stitch on each side of both markers – read INCREASE TIP (= 4 stitches increased). Increase like this every 5-5-6-6-6-7 cm a total of 4 times on each side = 144-156-168-184-200-220 stitches.
Continue without further increases until the piece measures 26-27-28-29-30-31 cm.
Now cast off for the armholes on the next round as follows: Cast off 3 stitches for the armhole, work 65-71-77-85-93-103 stitches as before (= back piece), cast off 7 stitches for the armhole (stitch with marker in the middle of these 7 stitches), work 65-71-77-85-93-103 stitches as before (= front piece) and cast off the remaining 4 stitches for the armhole. Cut the strand. Finish the front and back pieces separately as described below.

BACK PIECE:
= 65-71-77-85-93-103 stitches. Continue A.1 back and forth and cast off for the armholes at the beginning of each row on both sides as follows: Cast off 3 stitches 0-0-0-0-1-1 times, 2 stitches 0-1-2-2-2-4 times and 1 stitch 0-1-1-2-2-2 times = 65-65-67-73-75-77 stitches left.
When the piece measures 41-43-45-47-49-51 cm cast off the middle 23-23-25-25-25-27 stitches for the neck and each shoulder is finished separately.
Continue A.1 and cast off 2 stitches on the next row from the neck = 19-19-19-22-23-23 stitches left on the shoulder. Work until there is 1 row left before the piece measures 44-46-48-50-52-54 cm. Knit 1 row from the wrong side. Then loosely cast off with knit from the right side. Work the other shoulder in the same way.

FRONT PIECE:
= 65-71-77-85-93-103 stitches. Continue A.1 back and forth and cast off for the armholes at the beginning of each row on both sides as follows: Cast off 3 stitches 0-0-0-0-1-1 time, 2 stitches 0-1-2-2-2-4 times and 1 stitch 0-1-1-2-2-2 times = 65-65-67-73-75-77 stitches left.
Continue working until the piece measures 38-39-40-42-43-44 cm. Now place the middle 15 stitches on 1 thread for the neck and each shoulder is finished separately.
Continue A.1 and cast off for the neck at the beginning of each row from the neck as follows: Cast off 2 stitches 2 times and 1 stitch 2-2-3-3-3-4 times = 19-19-19-22-23-23 stitches left on the shoulder. Work until there is 1 row left before the piece measures 44-46-48-50-52-54 cm. Knit 1 row from the wrong side. Then loosely cast off with knit from the right side. Work the other shoulder in the same way.

SLEEVE:
Cast on 42-46-46-50-52-54 stitches with double pointed needles size 4 mm and Brushed Alpaca Silk. Knit 1 round then work rib in the round (= knit 1/ purl 1) for 4 cm. Change to double pointed needles size 5 mm and insert a marker in the last stitch on the round (= 1 purled stitch). Work A.1 in the round with knit over knit and garter stitch over purl. When the piece measures 6-6-6-6-8-8 cm, increase 1 stitch on each side of the stitch with the marker – read INCREASE TIP. Increase like this every 2½-2½-1½-1½-1-1 cm a total of 6-6-8-8-10-10 times = 54-58-62-66-72-74 stitches. Continue working until the sleeve measures 22-21-20-20-19-18 cm but finish the round when there are still 3 stitches left before the stitch with the marker. NOTE: Shorter measurements in larger sizes due to broader shoulders and longer sleeve cap.
On the next round cast off the first 7 stitches, then continue with pattern as before to the end of the round.
Now work the sleeve cap back and forth with circular needle as follows: Continue A.1 as before and cast off for the sleeve cap at the beginning of each row on both sides as follows: Cast off 2 stitches 2-3-3-3-3-3 times on each side and 1 stitch 1-2-2-2-2-4 times on each side. Then cast off 2 stitches on each side until the sleeve measures 27-28-28-28-28-29 cm. Cast off 3 stitches 1 time on each side and then cast off the remaining stitches. The sleeve measures approx. 28-29-29-29-29-30 cm from the top down. Work the other sleeve in the same way.

ASSEMBLY:
Sew the shoulder seams inside the cast-off edge. Sew in the sleeves inside the 1 edge stitch.

NECK:
Start from the right side on the one shoulder and knit up approx. 64 to 78 stitches around the neck (including the stitches from the threads in front) with circular needle size 4 mm and Brushed Alpaca Silk.
Work rib in the round (= knit 1 / purl 1) and match the rib with knit over knit and purl over garter stitch over the stitches on the thread mid front.
Work until the neck measures 3½ to 4 cm. Cast off with knit over knit, purl over purl and garter stitch over garter stitch.

Diagram

symbols = knit from right side, purl from wrong side
symbols = purl from right side, knit from wrong side
diagram

Each of our patterns has specific tutorial videos to help you.

Do you have a question? See a list of frequently asked questions (FAQ)

Knitting tension is what determines the final measurements of your work, and is usually measured per 10 x 10 cm. It is provided like so: number of stitches in width x number of rows in height - eg: 19 stitches x 26 rows = 10 x 10 cm.

The knitting tension is very individual; some people knit/crochet loosely while others work tightly. You adjust the knitting tension with the needle size, which is why the suggested needle size is only meant as a guide! You need to adjust this (up or down) to ensure that YOUR knitting tension matches the knitting tension provided in the pattern. If you work with a different knitting tension than provided you will have a different yarn consumption, and your work will have different measurements than what the pattern suggests.

The knitting tension also determines which yarns can replace each other. As long as you achieve the same knitting tension you can replace one yarn with another.

See DROPS lesson: How to measure your tension/gauge

See DROPS video: How to make a gauge tension swatch

The required amount of yarn is provided in grams, eg: 450 g. To calculate how many balls you’ll need you first need to know how many grams are in 1 ball (25g, 50g or 100g). This information is available if you click on the individual yarn quality on our pages. Divide the amount required with the amount of each ball. For example, if each ball is 50g (the most common amount), the calculation will be as follows: 450 / 50 = 9 balls.

The important thing when changing from one yarn to another is that the knitting/crochet tension remains the same. This is so that the measurements of the finished piece will be the same as on the sketch provided. It is easier to achieve the same knitting tension using yarns from the same yarn group. It is also possible to work with multiple strands of a thinner yarn to achieve the knitting tension of a thicker one. Please try our yarn converter. We recommend you to always work a test swatch.

Please NOTE: when changing yarn the garment might have a different look and feel to the garment in the photo, due to individual properties and qualities of each yarn.

See DROPS lesson: Can I use a different yarn than the one mentioned in the pattern?

All our yarns are categorised into yarn groups (from A to F) according to thickness and knitting tension – group A contains the thinnest yarns and group F the thickest. This makes it easier for you to find alternative yarns to our patterns, should you wish to switch yarn. All yarns within the same group have a similar knitting tension and can easily replace each other. However, different yarn qualities have different structures and properties which will give the finished work a unique look and feel.

Click here for an overview of the yarns in each yarn group

At the top of all our patterns you’ll find a link to our yarn calculator, which is a helpful tool should you wish to use a different yarn than suggested. By filling in the yarn quality you wish to replace, the amount (in your size) and number of strands, the calculator will present good alternative yarns with the same knitting tension. Additionally it will tell you how much you’ll require in the new qualities and whether you’ll need to work with multiple strands. Most skeins are 50g (some are 25g or 100g).

If the pattern is worked with multiple colours, every colour will have to be calculated separately. Similarly, if the pattern is worked with several strands of different yarns (for example 1 strand Alpaca and 1 strand Kid-Silk) you will have to find alternatives for each, individually.

Click here to see our yarn calculator

Since different yarns have different qualities and textures we have chosen to keep the original yarn in our patterns. However, you can easily find options among our available qualities by using our yarn calculator, or simply pick a yarn from the same yarn group.

It is possible that some retailers still have discontinued yarns in stock, or that someone has a few skeins at home that they would like to find patterns for.

The yarn calculator will provide both alternative yarn as well as required amount in the new quality.

If you think it's hard to decide what size to make, it can be a good idea to measure a garment you own already and like the size of. Then you can pick the size by comparing those measures with the ones available in the pattern's size chart.

You'll find the size chart at the bottom of the pattern.

See DROPS lesson: How to read size chart

The needle size provided in the pattern serves only as a guide, the important thing is to follow the knitting tension. And since knitting tension is very individual, you will have to adjust the needle size to ensure that YOUR tension is the same as in the pattern – maybe you’ll have to adjust 1, or even 2 needle sizes, up or down to achieve the correct tension. For this, we recommend that you work test swatches.

Should you work with a different knitting tension than the one provided, the measurements of the finished garment might deviate from the measurement sketch.

See DROPS lesson: How to measure your tension/gauge

See DROPS video: How to make a tension/gauge swatch

Working a garment top-down provides more flexibility and room for personal adjustment. For example it is easier to try the garment on while working, as well as making adjustments to length of yoke and shoulder caps.

The instructions are carefully explaining every step, in the correct order. Diagrams are adjusted to the knitting direction and are worked as usual.

The diagram depicts all rows/rounds, and every stitch seen from the right side. It is read from bottom to top, from right to left. 1 square = 1 stitch.

When working back and forth, every other row is worked from the right side and every other row is worked from the wrong side. When working from the wrong side, the diagram will have to be worked reversed: from left to right, knit stitches are purled, purl stitches are knit etc.

When working in the round every round is worked from the right side and the diagram are worked from right to left on all rounds.

See DROPS lesson: How to read knitting diagrams

The diagram depicts all rows/rounds, and every stitch seen from the right side. It is worked from bottom to top, from right to left.

When working back and forth every other row is worked from the right side: from right to left and every other row is worked from the wrong side: from left to right.

When working in the round, every row in the diagram are worked from the right side, from right to left.

When working a circular diagram you start in the middle and work your way outwards, counter clockwise, row by row.

The rows usually start with a given number of chain stitches (equivalent to the height of the following stitch), this will either be depicted in the diagram or explained in the pattern.

See DROPS lesson: How to read crochet diagrams

Instructions for working several diagrams after each other on the same row/round, will often be written like so: “work A.1, A.2, A.3 a total of 0-0-2-3-4 times". This means you work A.1 once, then A.2 is worked once, and A.3 is repeated (in width) the number of times provided for your size – in this case like so: S = 0 times, M = 0 times, L=2 times, XL= 3 times and XXL = 4 times.

The diagrams are worked as usual: begin with the first row in A.1, then work the first row in A.2 etc.

See DROPS lesson: How to read knitting diagrams

See DROPS lesson: How to read crochet diagrams

The total width of the garment (from wrist-to-wrist) will be larger in the larger sizes, despite the actual sleeves being shorter. The larger sizes have longer sleeve caps and wider shoulders, so there will be a good fit in all sizes.

The measurement sketch/schematic drawing provides information regarding the full length of the garment. If it’s a jumper or a jacket the length is measured from the highest point on the shoulder closest to the neckline, and straight down to the bottom of the garment. It is NOT measured from the tip of shoulder. Similarly, the length of yoke is measured from the highest point on the shoulder and down to where yoke is split into body and sleeves.

On a jacket measures are never taken along bands, unless specifically stated. Always measure inside band stitches when measuring the length.

See DROPS lesson: How to read a schematic drawing

Diagrams are often repeated on the round or in height. 1 repeat is the diagram the way it appears in the pattern. If it says to work 5 repeats of A.1 in the round, then you work A.1 a total of 5 times after/next to each other in the round. If it says to work 2 repeats of A.1 vertically/in height you work the entire diagram once, then begin again at the start and work the entire diagram one more time.

Chain stitches are slightly narrower than other stitches and to avoid working the cast-on edge too tight, we simply chain more stitches to begin with. The stitch count will be adjusted on the following row to fit the pattern and measurement sketch.

The rib edge is more elastic and will contract slightly compared to, for example, stocking stitch. By increasing before the rib edge, you avoid a visible difference in width between the rib edge and the rest of the body.

It’s very easy to cast off too tightly, and by making yarn overs while casting off (and simultaneously casting these off) you avoid a too tight cast off edge.

See DROPS video: How to bind off with yarn overs (yo)

To achieve an even increase (or decrease) you can increase on, for example: every 3rd and 4th row alternately, like so: work 2 rows and increase on the 3rd row, work 3 rows and increase on the 4th. Repeat this until the increase is complete.

See DROPS lesson: Increase or decrease 1 st on every 3rd and 4th row alternately

Should you prefer to work in the round instead of back and forth, you may of course adjust the pattern. You’ll need to add steeks mid-front (usually 5 stitches), and follow the instructions. When you would normally turn and work from the wrong side, simply work across the steek and continue in the round. At the end you’ll cut the piece open, pick up stitches to work bands, and cover the cut edges.

See DROPS video: How to knit steeks and cut open

Should you prefer to work back and forth instead of in the round, you may of course adjust the pattern so you work the pieces separately and then assemble them at the end. Divide the stitches for the body in 2, add 1 edge stitch in each side (for sewing) and work the front and back pieces separately.

See DROPS lesson: Can I adapt a pattern for circular needles into straight needles?

Pattern repeats can vary slightly in the different sizes, in order to get the correct proportions. If you’re not working the exact same size as the garment in the photo, yours might deviate slightly. This has been carefully developed and adjusted so that the complete impression of the garment is the same in all sizes.

Make sure to follow instructions and diagrams for your size!

If you have found a pattern you like which is available in women’s size it’s not very difficult to convert it to men’s size. The biggest difference will be the length of sleeves and body. Start working on the women size that you think would fit across the chest. The additional length will be worked right before you cast off for the armhole/sleeve cap. If the pattern is worked top-down you can add the length right after the armhole or before the first decrease on sleeve.

Regarding additional yarn amount, this will depend on how much length you add, but it is better with a skein too many than too few.

All yarns will have excess fibres (from production) that might come off as lint or shedding. Brushed yarns (ie hairier yarns) have more of these loose, excess fibres, causing more shedding.

Shedding also depends on what is worn under or over the garment, and whether this pulls at the yarn fibres. It’s therefore not possible to guarantee that there will be no shedding

Below are some tips on how to get the best result when working with hairier yarns:

1. When the garment is finished (before you wash it) shake it vigorously so the looser hairs come off. NOTE: do NOT use a lint roller, brush or any method that pulls at the yarn.

2. Place the garment in a plastic bag and put it in your freezer - the temperature will cause the fibres to become less attached to each other, and excess fibres will come off easier.

3. Leave in the freezer for a few hours before taking it out and shaking it again.

4. Wash the garment according to the instructions on the yarn label.

Pilling is a natural process that happens to even the most exclusive of fibers. It's a natural sign of wear and tear that is hard to avoid, and that is most visible in high friction areas of your garment like a sweater's arms and cuffs.

You can make your garment look as new by removing the pilling, using a fabric comb or a pill/lint remover.

Still can't find the answer you need? Then scroll down and leave your question so one of our experts can try to help you. This will be done normally within 5 to 10 working days.
In the meantime, you can read the questions and answers that others have left to this pattern or join the DROPS Workshop on Facebook to get help from fellow knitters/crocheters!

You might also like...

City Streets Sweater

Vanessa, United Kingdom

City Streets sweater

Isabelle Binette, France

City Streets Sweater

Morgane, United Kingdom

Post a comment to pattern DROPS 210-17

We would love to hear what you have to say about this pattern!

If you want to leave a question, please make sure you select the correct category in the form below, to speed up the answering process. Required fields are marked *.

Comments / Questions (27)

country flag Elisabet Ohlsson wrote:

Ska man borsta tröjan för att Brushed Alpacka silk ska bli jämnt luddig över hela tröjan?

18.01.2024 - 19:11

DROPS Design answered:

Hej Elisabeth, nej garnet er børstet og resultatet bliver jämnt luddigt över hela tröjan :)

19.01.2024 - 10:53

country flag Isabelle Calleau wrote:

Bonjour, concernant l'aisance du modèle je ne vois pas d'indication sur le patron ? D'après la photo je pense qu'il y a une aisance positive mais de combien ? merci

11.01.2024 - 10:54

DROPS Design answered:

Bonjour Mme Calleau, nous n'utilisons pas ce concept, à chacune de trouver l'aisance qu'elle souhaite. Ainsi pour trouver votre taille, choisissez un pull similaire que vous avez et dont vous aimez la forme et comparez ces mesures à celles du schéma. Retrouvez plus d'infos sur les tailles ici. Bon tricot!

11.01.2024 - 15:38

country flag Martina wrote:

Hallo! Wo kann ich das Diagramm zum Muster sehen? Ich sehe nur die Erklärungen dazu? Viele Grüße, Martina

28.10.2022 - 09:00

DROPS Design answered:

Liebe Martina, das Diagram finden Sie neben der Maßskizze unter der Ärmel - A.1 wird über 2 Maschen x 6 Reihen gezeichnet. Viel Spaß beim stricken!

28.10.2022 - 10:59

country flag Mitzi Russell wrote:

For the sleeves, it says “work A1 in the round with knit over knit and garter stitch over purl”. Does it mean knit one round and purl the next , etc.

01.05.2022 - 20:40

DROPS Design answered:

Hi Mitzi, A.1 is shown at the bottom of the pattern. The first round is knit, the second knit 1, purl, 1, repeat. The instructions are in connection with matching this pattern to the yoke (so you get a neat follow-on). Happy knitting!

02.05.2022 - 08:32

country flag Mitzi Russell wrote:

Re Back piece - Continue A1 back and forth and cast off for the armholes at beginning of each row on both sides as follows. Does back and forth mean working as a single point needle, right side and wrong side, rather than as a circular needle?

11.03.2022 - 21:32

DROPS Design answered:

Dear Mrs Russel, correct, back and forth means that you work now back and front piece separately, working alternately from right side and from wrong side, you can use a straight needle or a circular needle. Happy knitting!

14.03.2022 - 10:04

country flag Harmonie ROUQUETTE wrote:

Bonjour le devant et le dos sont en cotes 1/1 ? Je ne comprends pas le diagramme Merci de me renseigner

07.01.2022 - 16:21

country flag Diana wrote:

Nella versione in lingua inglese, la parte a coste del modello riporta 1 m a diritto e 1 m a rovescio. La versione in italiano riporta invece 1 m diritto e 2 m a rovescio.

27.10.2021 - 00:03

DROPS Design answered:

Buonasera Diana, abbiamo corretto il testo. Grazie per la segnalazione. Buon lavoro!

29.10.2021 - 21:19

country flag Mariann Borregaard wrote:

Vi I være søde og rare at sende mig diagrammet til mønster nr. 210-17? Det mangler i opskriften.

21.08.2021 - 09:12

DROPS Design answered:

Hej Mariann. Du hittar diagrammet till höger om måleskitsen. Mvh DROPS Design

24.08.2021 - 09:51

country flag Ann-Karina wrote:

Hejsa, mange tak for forklaring det var præcis det jeg mente, og tak for super hurtigt svar !

19.04.2021 - 20:27

country flag Ann-Karina wrote:

Hej igen jeg er med på at der strikkes både rundt og frem og tilbage. Spørgsmålet er hvordan strikkes diagrammet når man strikker rundt. Hvordan strikker man fra vrangen når man stikker rundt? Strikker man ikke fra forsiden når man strikker rundt?

19.04.2021 - 11:55

DROPS Design answered:

Hei Ann-Karina. Usikker på om jeg skjønner spørsmålet ditt riktig, men når du strikker rundt etter diagrammet strikker du fra retten, strikk 1 omgang med bare rettmasker (glattstrikk), neste omgang strikker du (fremdeles fra retten) 1 rett , 1 vrang (dette gjentas hele omgang rundt og disse 2 omgangene gjentas i høyden). Man strikker ikke fra vrangen når man strikker rundt. mvh DROPS design

19.04.2021 - 12:15