
Popular categories
Looking for a yarn?


|
||||||||||
Enchanted Evening |
||||||||||
 |
 |
|||||||||
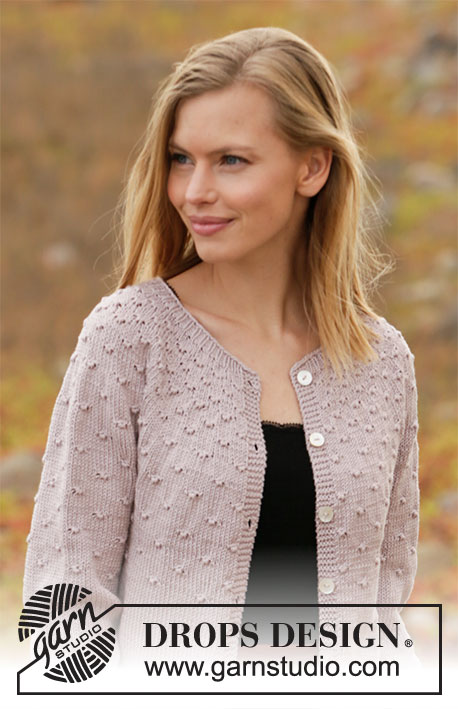
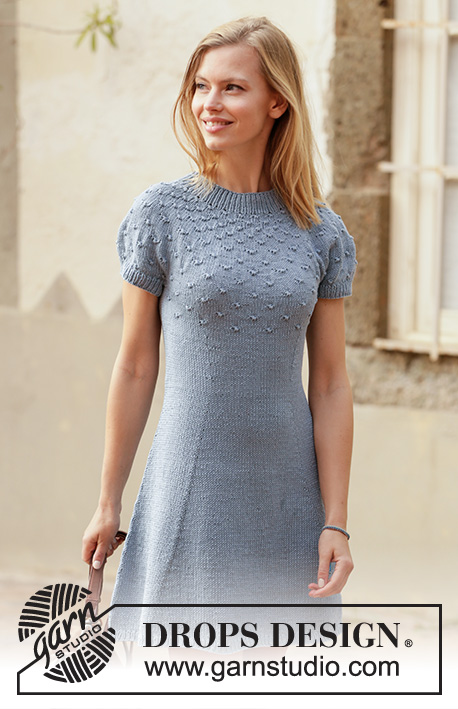
Knitted dress in DROPS Muskat. Piece is knitted top down with round yoke, knot pattern and short sleeves. Size: S - XXXL
DROPS 211-1 |
||||||||||
|
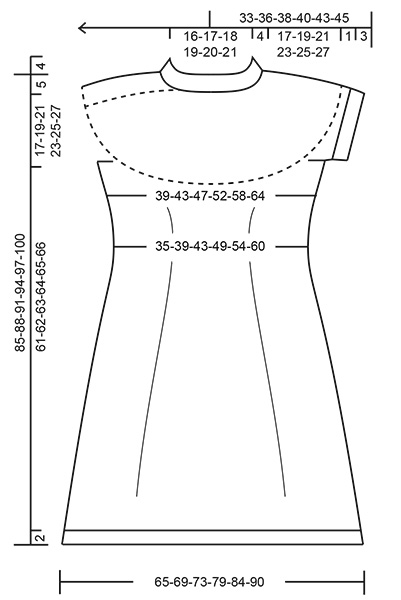
---------------------------------------------------------- EXPLANATION FOR THE PATTERN: ---------------------------------------------------------- PATTERN: See diagrams A.1 and A.2. Choose diagram for your size (applies to A.1). INCREASE/DECREASE TIP (evenly): To calculate how to increase/decrease evenly use the total number of stitches on row (e.g. 120 stitches) , and divide stitches by number of increases/decreases to be done (e.g. 18) = 6.7. In this example increase by making 1 yarn over after alternately approx. every 6th and 7th stitch. On next round knit yarn overs twisted to avoid holes. If decreasing knit in this example alternately approx. every 5th and 6th stitch and every 6th and 7th stitch together. INCREASE TIP-1 (applies to waist on body): Increase 1 stitch after 1st and 3rd marker thread and before 2nd and 4th marker thread as explained below. INCREASE AS FOLLOWS AFTER MARKER THREAD: Knit 1 stitch in loop around first stitch on left needle (i.e. In stitch from previous round). INCREASE AS FOLLOWS BEFORE MARKER THREAD: Work until marker thread, then knit 1 stitch around outermost stitch on right needle (i.e. in stitch from previous round). INCREASE TIP-2 (applies to sides of body): Increase the same way before and after marker as explained in INCREASE TIP-1, but increase alternately before and after marker. I.e. increase only 1 time in each side every 1½ cm = ½" and this happen alternately before and after marker (not on each side). DECREASE TIP (applies to waist of body): The first decreases will be at the same time as working pattern. Adjust to decrease on a round without knots, and note that there will be fewer stitches in stockinette stitch between 2 knots after a decrease. Decrease 1 stitch after 1st and 3rd marker thread and before 2nd and 4th marker thread as explained below. DECREASE AS FOLLOWS AFTER MARKER THREAD: Slip 1 stitch knitwise, knit 1, pass slipped stitch over stitch worked DECREASE AS FOLLOWS BEFORE MARKER THREAD: Work until 2 stitches remain before marker thread, knit 2 together. BIND-OFF TIP: To avoid a tight bind-off edge you may use a larger needle size. If this also is too tight, work a 1 yarn over after approx. every 8th stitch while binding off (bind off yarn overs as regular stitches). ---------------------------------------------------------- START THE PIECE HERE: ---------------------------------------------------------- DRESS - SHORT OVERVIEW OF THE PIECE: Work neck edge and yoke in the round on circular needle from mid back, top down. Divide yoke for body and sleeve edges. Body is worked in the round on circular needle, top down. Work sleeve edges in the round on double pointed needles, top down. NECK EDGE: Cast on 120-124-130-134-138-140 stitches on a short circular needle size 3 mm = US 2,5 with Muskat. Knit 1 round. Then work rib in the round (= knit 1/purl 1) for 4 cm = 1½". Knit 1 round while increasing 18-26-32-16-22-35 stitches evenly - read INCREASE/DECREASE TIP = 138-150-162-150-160-175 stitches. Knit 1 round where yarn overs are knitted twisted. Insert 1 marker in the middle of round (= mid front). Measure yoke from this marker! Then work yoke as explained below. YOKE: Switch to circular needle size 4 mm = US 6 and work A.1 in the round (= 23-25-27-30-32-35 repetitions of 6-6-6-5-5-5 stitches). Continue pattern like this , and increase as shown in A.1. REMEMBER THE KNITTING GAUGE! When A.1 has been worked, there are 230-250-270-300-320-350 stitches on needle. Then work A.2 in the round (= 23-25-27-30-32-35 repetitions of 10 stitches). Continue pattern like this and increase as shown in A.2. After last increase in A.2 there are 276-300-324-360-384-420 stitches on needle. Work until piece measures 17-19-21-23-25-27 cm = 6¾"-7½"-8¼"-9"-9¾"-10⅝" from marker at the neck - NOTE: Work A.2 as far as you can until correct measurements and in some sizes A.x must be repeated vertically until correct measurements (pattern should continue on body). Now divide yoke for body and sleeves, i.e. work next round as follows from mid back: Work 38-42-45-51-56-62 stitches as before (= ½ back piece), slip the next 62-66-72-78-80-86 stitches on 1 stitch holder for sleeve edge, cast on 6-6-8-8-10-10 new stitches on row (= in the side under sleeve), work 76-84-90-102-112-124 stitches as before (= front piece), slip the next 62-66-72-78-80-86 stitches on 1 stitch holder for sleeve edge, cast on 6-6-8-8-10-10 new stitches on row (= in the side under sleeve) and work the remaining 38-42-45-51-56-62 stitches as before (= ½ back piece). Cut the yarn. Finish body and sleeve edges separately. NOW MEASURE PIECE FROM HERE! BODY: = 164-180-196-220-244-268 stitches. Insert 1 marker in each side on body, in the middle of the 6-6-8-8-10-10 stitches cast on under each sleeve. Insert in addition 4 marker threads in the piece as follows: Count 21-24-27-32-37-42 stitches from marker in one side of piece, insert 1st marker thread before next marker, count 40-42-44-46-48-50 stitches, insert 2nd marker thread before next stitch, count 42-48-54-64-74-84 stitches (maker in the side is in the middle of these stitches), insert 3rd marker thread before next stitch, count 40-42-44-46-48-50 stitches, insert 4th marker thread before next stitch. 21-24-27-32-37-42 stitches remain on round after last marker thread. Move the marker threads upwards when working; they should be used for decrease and increase later. Now continue A.x while AT THE SAME TIME decreasing in the sides on body as explained below: Begin round at marker in one side of piece and work A.x in the round, but make sure to continue on correct row in diagram according to where piece was divided, and make sure to place knots correctly over knots on yoke. Work 6-6-8-8-10-10 stitches cast on under each sleeve in stockinette stitch. When piece measures 6 cm = 2⅜" from division in all sizes, finish A.x, but finish after 1 round with knots. Continue to work stockinette stitch in the round over all stitches. AT THE SAME TIME when piece measures approx. 3 cm = 1⅛" from division in all sizes, decrease 1 stitch after 1st and 3rd marker thread and before 2nd and 4th marker thread – read DECREASE TIP (= 4 stitches decreased). Decrease like this every 2½ cm = ⅞" 4 times in total vertically = 148-164-180-204-228-252 stitches. When piece measures 16 cm = 6¼" from division in all sizes, increase 1 stitch after 1st and 3rd marker thread and before 2nd and 4th marker thread – read INCREASE TIP-1. Increase in addition 1 stitch at marker in each side - read INCREASE TIP-2 (= 6 stitches increased in total on round). Increase like this every 2 cm = ¾" 21 times vertically in all sizes = 274-290-306-330-354-378 stitches. Work without increases until piece measures approx. 61-62-63-64-65-66 cm = 24"-24⅜"-24¾"-25½"-26" from division (approx. 2 cm = ¾" remain until finished measurements, try the dress on and work to desired length). Knit 1 round while increasing 20-22-24-26-26-28 stitches evenly = 294-312-330-356-380-406 stitches (increase a little to avoid the rib to be worked from contracting the edge). Switch to circular needle size 3 mm = US 2,5. Work rib in the round = knit 1/purl 1 for 2 cm = ¾". Bind off with knit over knit and purl over purl - read BIND-OFF TIP. Dress measures approx. 85-88-91-94-97-100 cm = 33½"-34⅝"-35¾"-37"-38½"-39⅜" from shoulder and down. SLEEVE EDGE: Slip the 62-66-72-78-80-86 stitches from stitch holder in one side of piece on double pointed needles size 4 mm = US 6 and pick in addition up 1 stitch in each of the 6-6-8-8-10-10 new stitches cast on under sleeve = 68-72-80-86-90-96 stitches. Begin round in the middle of the 6-6-8-8-10-10 stitches that were cast on under sleeve and work 3 rounds in stockinette stitch. AT THE SAME TIME on last round decrease 4-4-4-4-2-2 stitches evenly - remember INCREASE/DECREASE TIP = 64-68-76-82-88-94 stitches. Switch to double pointed needles size 3 mm = US 2,5. Work rib in the round = knit 1/purl 1 for 3 cm = 1⅛". Bind off with knit over knit and purl over purl - remember BIND-OFF TIP! Sleeve edge measures approx. 4 cm = 1½" from division. Work the other sleeve edge the same way. |
||||||||||
Diagram explanations |
||||||||||
|
||||||||||

|
||||||||||
|
||||||||||
|
Have you made this or any other of our designs? Tag your pictures in social media with #dropsdesign so we can see them! Do you need help with this pattern?You'll find tutorial videos, a Comments/Questions area and more by visiting the pattern on garnstudio.com. © 1982-2024 DROPS Design A/S. We reserve all rights. This document, including all its sub-sections, has copyrights. Read more about what you can do with our patterns at the bottom of each pattern on our site. |
||||||||||


With over 40 years in knitting and crochet design, DROPS Design offers one of the most extensive collections of free patterns on the internet - translated to 17 languages. As of today we count 304 catalogs and 11422 patterns - 11417 of which are translated into English (US/in).
We work hard to bring you the best knitting and crochet have to offer, inspiration and advice as well as great quality yarns at incredible prices! Would you like to use our patterns for other than personal use? You can read what you are allowed to do in the Copyright text at the bottom of all our patterns. Happy crafting!
Comments / Questions (62)
The chart instructions It says “work A1 chart in the round 27 repetitions of 6 stitches. The bottom of chart starts with 6 inches and after about 8 boxes high x 6 stitches there is a increase so next section has 8 boxes in the row . Fir the next 8 or so rows of boxes going up and then increases to 10. My question is do I follow the whole chart with increases for the 27 times or just the 6 stitches section ? Wish I could put a picture . The pattern is Drops Enchanted evening dress .
10.11.2021 - 00:25DROPS Design answered:
Dear Debby, you repeat the pattern "unit" or pattern repeat 27 times, beginning with the 6 stitch, then repeat the 8 stitch repeat, etc. so your piece will be increased evenly. Happy Stitching!
10.11.2021 - 06:09Czy mogę prosić o pomoc przy zmniejszeniu wzoru do rozmiaru Xs? Powinnam zacząć od nabrania 114 oczek? A potem wykonać wzór A.1 22 razy?
22.05.2021 - 16:01DROPS Design answered:
Witaj Emilio, niestety nie jesteśmy w stanie dopasować każdego z naszych wzorów do indywidualnych potrzeb. Zalecam kontakt ze sklepem, w którym kupiłaś włóczkę, gdzie uzyskasz fachową pomoc. Pozdrawiamy!
23.05.2021 - 21:50What is A.x?
31.01.2021 - 23:21DROPS Design answered:
Dear Mariel, A.x consists on the last 12 rows in A.2 - see on the right side of diagram. Happy knitting!
01.02.2021 - 10:03After almost giving up on how to do the increase, I figured out that the increase technique for this pattern could be the "Make 1 Below". Can you confirm that this is how to do the increase AFTER the marker here? Could you please also tell me how to do it BEFORE the marker thread?
20.01.2021 - 16:43DROPS Design answered:
Dear Adriana, you can also increase with "make 1 below" if you wish, make just sure you are working the tread as desired (leaning to the right or to the left as shown in this video. Happy knitting!
21.01.2021 - 07:29After almost giving up on how to do the increase, I figured out that the increase technique for this pattern could be the "Make 1 Below". Can you confirm that this is how to do the increase AFTER the marker here? Could you please also tell me how to do it BEFORE the marker thread?
20.01.2021 - 16:42I'm afraid I don't get the increase instructions. Is your video "How to knit in stitch below and how to increase 4 or 2 stitches" relevant to increasing 1 stitch too? Or is it something totally different from the increase instruction here? Also, can you describe how to increase BEFORE MARKER THREAD? I don't understand how to "knit 1 stitch around outermost stitch on right needle (i.e. in stitch from previous round)". I wish there was a video instruction...
20.01.2021 - 16:17DROPS Design answered:
Dear Adriana, this video shows how to increase by working the thread around the stitch on right needle (first in the video) and on left needle (2nd increase in the video). Happy knitting!
21.01.2021 - 07:25INCREASE AS FOLLOWS BEFORE MARKER THREAD: Work until marker thread, then knit 1 stitch around outermost stitch on right needle (i.e. in stitch from previous round). What does the above instruction mean?
03.11.2020 - 19:14DROPS Design answered:
Dear Jk, when you decrease for the waist at the skirt part of the dress, you have to decrease either before or after the marker threads, when decreasing before the marker thread, work until 2 stitches remain before the marker thread, then decrease working: slip 1 as if to knit, knit 1, psso (see video), slip marker = you have decrease 1 stitch before the marker thread. Happy knitting!
04.11.2020 - 09:02How many balls of yarn is needed for thus dress in small size?
09.10.2020 - 06:41DROPS Design answered:
Hi Jk. You nedd 13 skeins of yarn for size S. Happy knitting!
09.10.2020 - 07:46Hej Jeg er ved at blive vanvittig over at mit Drops Muskat garn snor sig om hinanden. Forstås det ? Det er tråden jeg stikker med der snor sig om sig selv. Så jeg skal hele tiden lade strikketøjet hænge nedad i tråden og lade det dreje rundt så det snor sig op. Spørgsmål kan man gøre noget ved garnet så det undgås? Vh Ulla
18.05.2020 - 09:11DROPS Design answered:
Hei Ulla. Det er jo kjedelig, men prøv å starte med tråden inn nøstet, eller du kan du nøste opp til en ball, og så strikke fra denne nøsteballen, evnt nøste nøste en gang til. Håper det kan være til hjelp. God Fornøyelse!
25.05.2020 - 10:57Jeg tror Astrid har rett. Diagram A.1, 10. rad må være feil. Det må være én maske glattstrikk. I tillegg kan ikke rapporten starte med en økning. Den må avslutte med en, for at mønsteret skal bli riktig med tidligere knuter.
25.04.2020 - 10:07DROPS Design answered:
Hej Sofia, ja det stemmer og diagrammerne er nu rettet :)
29.04.2020 - 08:29