
Popular categories
Looking for a yarn?


|
|||||||||||||||||||
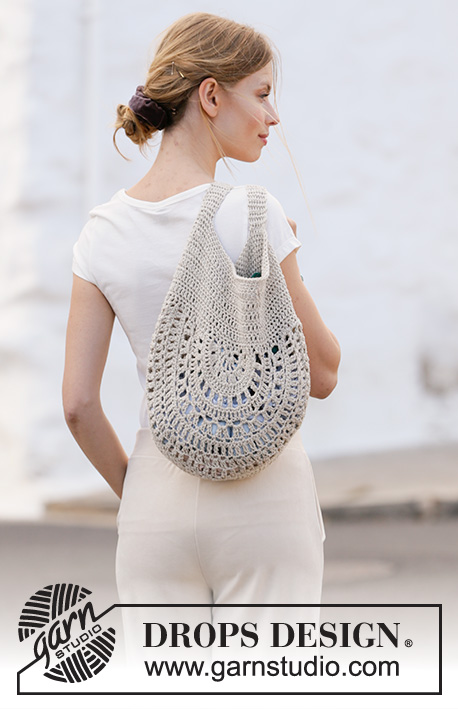
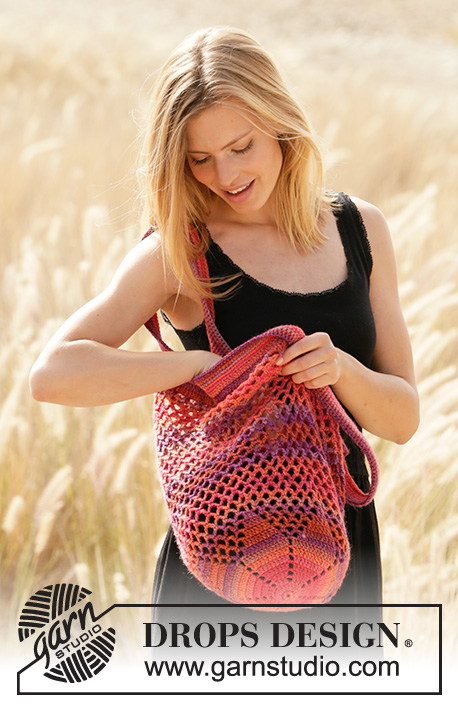
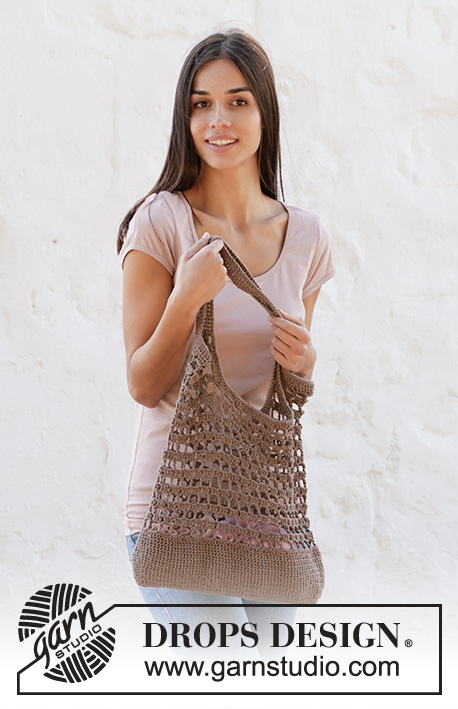
Eco Tote |
|||||||||||||||||||
 |
 |
||||||||||||||||||
Crocheted bag with lace pattern and treble crochet groups in DROPS Bomull-Lin or DROPS Paris.
DROPS 211-28 |
|||||||||||||||||||
|
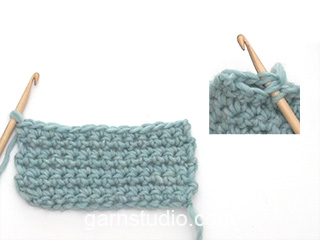
---------------------------------------------------------- EXPLANATION FOR THE PATTERN: ---------------------------------------------------------- CHAIN STITCH: If you work at the end of crochet hook the chain stitch will often be too tight 1 chain stitch should be just as long as 1 double crochet/treble crochet is wide. CROCHET INFORMATION: At beginning of every round with double crochet work 1 chain stitch, this chain stitch does not replace 1st double crochet. Finish round with 1 slip stitch in first double crochet on round At beginning of every round with treble crochets work 3 chain stitches, these 3 chain stitches do not replace 1st treble crochet on round. Finish round with 1 slip stitch in 3rd chain stitch at beginning of round. PATTERN: See diagrams A.1 to A.5. INCREASE TIP-1: Increase 1 treble crochet by working 2 treble crochets in one stitch. Increase 1 treble crochet before and after marker thread in each side (= 4 stitches increased on round). INCREASE TIP-2: To calculate how to increase evenly, use the total number of stitches on row (e.g. 130 stitches) and divide stitches by number of increases to be done (e.g. 14) = 9.3. In this example increase by working 2 treble crochets in approx. every 9th stitch. 3 TREBLE CROCHETS INTO 1 TREBLE CROCHET: Work 1 treble crochet in first stitch but wait with last yarn over and pull through (= 2 loops on hook), work 1 treble crochet more the same way in each of the next 2 stitches, but pull last yarn over through all 4 loops on hook (= 1 stitch). ---------------------------------------------------------- START THE PIECE HERE: ---------------------------------------------------------- BAG - SHORT OVERVIEW OF THE PIECE: Work in the round bottom up. Then work the bottom together. BAG: Work 114 chain stitches on hook size 4.5 mm with Bomull-Lin or Paris and form a ring with 1 slip stitch in first chain stitch worked on round - read CHAIN STITCH. ROUND 1: Work 1 double crochet in every stitch - read CROCHET INFORMATION, = 114 double crochets on round. Insert a marker thread at the beginning of round and a marker thread after 57 double crochets (= 57 double crochets between marker threads). ROUNDS 2-5: Work 1 treble crochet in every double crochet, AT THE SAME TIME on every round increase 1 treble crochet on each side of both marker threads - read INCREASE TIP-1 = 130 treble crochets. REMEMBER THE CROCHET TENSION! Then work with 1 treble crochet in every treble crochet until piece measures 9 cm from cast-on edge. Work next round as follows: Work 1 treble crochet in every treble crochet and increase 14 treble crochets evenly on round - read INCREASE TIP-2 = 144 treble crochets. Now work pattern as follows: Work A.1 (shows how round begins and ends), A.2 36 repetitions in total on round. When diagrams have been worked vertically, repeat the last 2 rounds until piece measures approx. 32 cm - adjust to finish after a round that is last round in A.2. Cut the yarn. Now work back and forth in each side of bag follows: Fasten strand with 1 slip stitch in treble crochet before the last 4 chain spaces on round and work pattern from right side as follows: A.3, A.4 over the next 7 chain spaces, A.5 over the next chain space + treble crochet after chain space. Continue back and forth like this until A.3 to A.5 have been worked vertically. Cut and fasten the yarn. Fasten strand with 1 slip stitch in treble crochet after the 10th chain space, counted from after A.5 worked in one side of piece. Work pattern as follows: A.3, A.4 over the next 7 chain spaces, A.5 over the next chain space + treble crochet after chain space. There should now be 10 chain spaces between A.5 and A.3 in the middle of bag between sides worked. Continue back and forth like this until A.3 to A.5 have been worked vertically. Cut and fasten the yarn. CROCHET TOGETHER AT THE BOTTOM: Turn the piece so that right side is against right side and work bottom together at the bottom along the first chain stitch row worked. Work through both layers, begin from marker thread at the beginning of round and work 1 double crochet in every chain stitch. Cut and fasten the yarn. STRAPS: Turn piece again to work from right side. ROUND 1: Fast yarn with 1 slip stitch in one side, in the middle treble crochet (= 4 chain spaces on each side). Work 3 chain stitches (= 1 treble crochet) - remember CROCHET INFORMATION, work 4 treble crochets around each of the next 4 chain spaces, work 72 chain stitches (make sure that chain stitches are not worked too tight, chain stitch row should measure 45 cm), skip the 10 chain spaces in the middle of bag between the sides, work 4 treble crochets around each of the 8 chain spaces along one side, work 72 chain stitches (make sure that chain stitches are not too tight, chain stitch row should measure 45 cm), skip 10 chain spaces in the middle of bag between the sides, work 4 treble crochets around each of the last 4 chain spaces on round. There are no 32 treble crochets in each side and 72 chain stitches for strap in each side = 208 stitches. ROUND 2: Work * 1 treble crochet in every treble crochet until 2 treble crochets before first chain stitch, work 3 TREBLE CROCHETS INTO 1 TREBLE CROCHET - read explanation above, work 1 treble crochet in each of the next 70 chain stitches (i.e. until 1 chain stitch remains before next treble crochet), work 3 treble crochets into 1 treble crochet, work 1 treble crochet in each of the next 14 treble crochets *, work from *-* 1 more time on round = 200 treble crochets on round: ROUND 3: Work 1 double crochet in every stitch. Cut and fasten the yarn. Now work on the inside of strap around chain stitch row, edges and the 10 chain spaces as follows: Work one side as follows: ROUND 1: Begin with 1 slip stitch in the first chain stitch on the inside of one of the straps, work 1 treble crochet in each of the 72 chain stitches - remember CROCHET INFORMATION, work 3 treble crochets around each of the next 3 rows (= along the side on A.3/A.5, work 2 treble crochets around next row, work 3 TREBLE CROCHETS INTO 1 TREBLE CROCHET the same way as earlier, but now work 1 treble crochet in the last row and 2 treble crochets around the first of the 10 chain spaces. Continue with 2 more treble crochet around this chain space, and work 4 treble crochets around each of the next 8 chain spaces, work 2 treble crochets around the 10th chain space, work 3 TREBLE CROCHETS INTO 1 TREBLE CROCHET the same way as earlier, but work 2 treble crochets around the last chain space and 1 treble crochet around the next row, work 2 more treble crochets around this row, work 3 treble crochets around each of the next 3 rows. ROUND 2: Work 1 double crochet in every stitch. Cut and fasten the yarn. Work the same way around the other opening for strap. |
|||||||||||||||||||
Diagram explanations |
|||||||||||||||||||
|
|||||||||||||||||||

|
|||||||||||||||||||
|
Have you made this or any other of our designs? Tag your pictures in social media with #dropsdesign so we can see them! Do you need help with this pattern?You'll find tutorial videos, a Comments/Questions area and more by visiting the pattern on garnstudio.com. © 1982-2024 DROPS Design A/S. We reserve all rights. This document, including all its sub-sections, has copyrights. Read more about what you can do with our patterns at the bottom of each pattern on our site. |
|||||||||||||||||||


With over 40 years in knitting and crochet design, DROPS Design offers one of the most extensive collections of free patterns on the internet - translated to 17 languages. As of today we count 304 catalogues and 11422 patterns - 11422 of which are translated into English (UK/cm).
We work hard to bring you the best knitting and crochet have to offer, inspiration and advice as well as great quality yarns at incredible prices! Would you like to use our patterns for other than personal use? You can read what you are allowed to do in the Copyright text at the bottom of all our patterns. Happy crafting!
Comments / Questions (21)
Buenas tardes,de casualidad hay un tuturial dónde paso a paso indiquen como hacer el bolso, gracias soy principiante y no entiendo los diagramas
05.11.2023 - 22:49DROPS Design answered:
Hola Mayra, puedes encontrar todos los videos que te pueden ayudar a realizar la labor después de las instrucciones escritas. Para poder comprender nuestros diagramas puedes leer la siguiente lección: https://www.garnstudio.com/lesson.php?id=69&cid=23.
12.11.2023 - 21:10Buenas tardes, podría detallar me como se lee el patrón A3, serían 3 cadenas de inicio un punto alto cadena y punto alto sobre el primer arco. A4, 4 puntos cadena y punto alto sobre el arco 3 puntos altos sobre el arco siguiente y repito contando 7 arcos de la vuelta anterior. A5? Muchas gracias y saludos desde Córdoba, argentina.
05.09.2023 - 20:21DROPS Design answered:
Hola Cintia, A.3-A.4-A.5 se trabaja como sigue: 3 cadenetas, *3 puntos altos en el arco de la fila anterior, 1 cadeneta,* repetir de * a * toda la fila hasta que quede 1 arco, 3 puntos altos en el arco, 1 punto alto en el punto alto de la fila anterior.
10.09.2023 - 20:06Bonjour! D’abord merci pour vos beaux modèles. J’ai un problème au moment de passer à A3: il faut joindre une bride avant les 4 derniers arceaux de quel tour? du nouveau tour ou du précédent? Ce n’est pas très clair… Merci!
22.08.2023 - 13:03DROPS Design answered:
Bonjour Emma, le diagramme A.3 montre comment commencer les rangs: crochetez A.3 dans la bride avant les 4 derniers arceaux du tour précédent (de A.2), puis répétez A.4 et terminez par A.5 dans l'arceau suivant + dans la bride après cet arceau, et sur l'envers, commencez par A.5, répétez A.4 et terminez par A.3. Vous crochetez ainsi les côtés du sac, qui sont un peu surélevés par rapport au reste du sac que vous venez de faire = vous aurez 4 rangs en plus en hauteur de chaque côté. Bon crochet!
22.08.2023 - 14:17Merci beaucoup de votre réponse. J'avais fini par me débrouiller en comparant le diagramme A1 A2 et votre mannequin, et mon travail correspond à vos explications. Au moment d'aborder maintenant le haut du sac, je craignais d'avoir de nouvelles difficultés, mais je vois que vous avez donné les explications correspondantes à une autre crocheteuse. Cela devrait donc répondre à mes questions. Merci encore de votre aide.
31.07.2023 - 21:04Bonjour. Cela me rassure de constater que de nombreuses crocheteuses sont aussi perdues que moi. Pourriez-vous me donner en français les explications du diagramme A2, pour les 1er, 2e et 3e tours, en supposant que ces tours se répètent alternativement, jusqu'à la hauteur souhaitée ? Je pense avoir réalisé le 1er rang correctement, et suppose qu'il faut ensuite travailler le 2e rang en quinconce, mais le résultat n'est pas satisfaisant. Merci d'avance de m'aider.
23.07.2023 - 11:12DROPS Design answered:
Bonjour Mme Long, au 2ème tour de A.2, crochetez: *4 mailles en l'air, sautez 3 brides, 1 bride dans la bride suivante*, répétez de *-*. Au 3ème tour de A.2, crochetez *3 brides dans l'arceau de 4 mailles en l'air, 1 maille en l'air*, répétez de *-*. Répétez les tours 2 et 3. Bon crochet!
27.07.2023 - 12:00Hej och Tack för svar på min fråga- Men. Sista varvet på väskdelen är ju A2, dvs fyra lm och en stolpe som upprepas varvet ut och slutar med en smygmaska i föregående varvs tre lm. Så långt är allt väl. I A3 ska man börja med tre lm, i A4 fyra lm och 4 stolpar, en lm och A5, fyra lm tre stolpar plus en stolpe i maskan. Varf inns de sju luftmaskorna annat än i början på varvet? Hur många gånger upprepas A3-A5 innan man virkar tillbaka? Vänligen Katarina
01.02.2023 - 11:27DROPS Design answered:
Hej Katarina, jo det er bare i början på varvet du får 7 lm :)
03.02.2023 - 11:27Hej!\r\nNågra frågor gällande utförandet av diagrammet A3–A5. Vad betyder det att virka A3-A4 över de sju luftmaskbågarna som finns var? Hur många ggr ska A4 och A5 upprepas på varvet – dvs sidan för att det sedan ska finnas 10 luftmaskbågar i mitten? Och var kom de ifrån?\r\n Det hade varit bra med bilder på på arbetet i olika stadier – det är ju en fin modell!\r\nvänligen Katarina
30.01.2023 - 22:50DROPS Design answered:
Hej Katarina, A.3 over første lm-bue, så A.4 i de næste 7 lm-buer og sidst A.5 i næste lm-bue :)
31.01.2023 - 12:04Mi sbaglio o la spiegazione dell’interno dei manici al 1° giro appare non simmetrica? Inoltre perché invece di scrivere “ lavorare 4 maglie alte intorno al primo dei 10 archi” , scrivete “ lavorare 2 maglie alte intorno al primo dei 10 archi di catenelle, lavorare altre 2 maglie alte intorno allo stesso arco”?!? È molto. CONFUSING! Grazie Paola
04.12.2022 - 22:40DROPS Design answered:
Buonasera Paola, al momento non sono riportate correzioni per questo modello. Buon lavoro!
28.12.2022 - 19:36Je suis bloquée, pour la suite du dernier tour A2. Après avoir couper le fil. Je ne comprend pas. Je dois travailler que sur 7 arceaux A3, A4..... Je fais A3, puis A4, puis A5 en aller retour sur 7 arceaux ???
06.04.2022 - 19:09DROPS Design answered:
Bonjour Mme Marcelle, vous crochetez d'abord A.3 (début du rang sur l'endroit) dans la bride avant les 4 derniers arceaux du tour, puis vous répétez 7 fois A.4 (= au-dessus des 7 arceaux suivants), puis A.5 dans l'arceau + la bride suivante (fin de rang sur l'endroit), tournez, et crochetez: A.5 (début de rang sur l'envers), répétez 7 fois A.4 et terminez par A.3. Coupez le fil après ces 4 rangs A.3-A.5. Répétez de l'autre côté du sac. Bon crochet!
07.04.2022 - 09:37Hallo Drops Team! Komme leider auch nicht ganz klar mit der Anleitung.. Es widerspricht sich die Häkelinformation mit dem Video.Im Video wird beschrieben das die 3 Luftmaschen am Reihenanfang als erstes Stäbchen zählt, in der Häkelinformation steht sie ersetzt nicht das 1.Stäbchen in der Runde. Verstehe ich leider nicht ganz.\r\nVielen Dank und viele Grüße aus Dresden
07.03.2022 - 13:38DROPS Design answered:
Liebe Susanne, hier sind ja 2 unterschiedliche Techniken benutzt, im Video werden die 3 Lm das 1. Stäbchen ersetzen, hier werden die 3 Lm extra gehäkelt. Viel Spaß beim häkeln!
08.03.2022 - 11:28