DROPS Sky
DROPS Sky
74% Alpaca, 18% Polyamide, 8% Wool
from 5.10 £ /50g
Get the yarn to make this pattern from 25.50£.

The yarn cost is calculated from the pattern’s smallest size and the yarn’s cheapest product type. Looking for an even better price? You might find it on the DROPS Deals!

DROPS SS24

Hey June

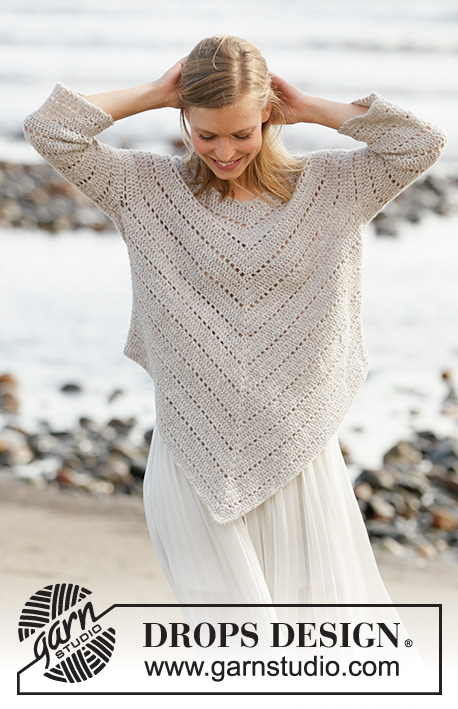
Crocheted poncho jumper with raglan in DROPS Sky. Piece is crocheted top down at an angle, A-shape and lace pattern. Size XS–XXL.

DROPS 213-35
DROPS design: Pattern sk-085
Yarn group B
----------------------------------------------------------

SIZE:
XS - S - M - L - XL - XXL

MATERIALS:
DROPS SKY from Garnstudio (belongs to yarn group B)
250-250-300-300-350-400 g colour 03, light beige

CROCHET TENSION:
16 treble crochets in width and 8 rows vertically = 10 x 10 cm.

CROCHET HOOK:
DROPS CROCHET HOOK SIZE 4.5 mm.
Hook size is only a suggestion! If you have too many stitches on 10 cm switch to larger hook. If you have too few stitches on 10 cm switch to smaller hook.

-------------------------------------------------------

Alternative Yarn – See how to change yarns here
Yarn Groups A to F – Use the same pattern and change the yarn here
Yarn usage using an alternative yarn – Use our yarn converter here

-------------------------------------------------------

DROPS Sky
DROPS Sky
74% Alpaca, 18% Polyamide, 8% Wool
from 5.10 £ /50g
Get the yarn to make this pattern from 25.50£.

The yarn cost is calculated from the pattern’s smallest size and the yarn’s cheapest product type. Looking for an even better price? You might find it on the DROPS Deals!

Pattern instructions

NOTE: This pattern is written in British English. All measurements in charts are in cm. For conversion from cm to inches - click here. There are different terms for crocheting in British and American English. If this pattern includes crochet, click for "crochet terms" here. For this pattern in American English, please click here.
----------------------------------------------------------

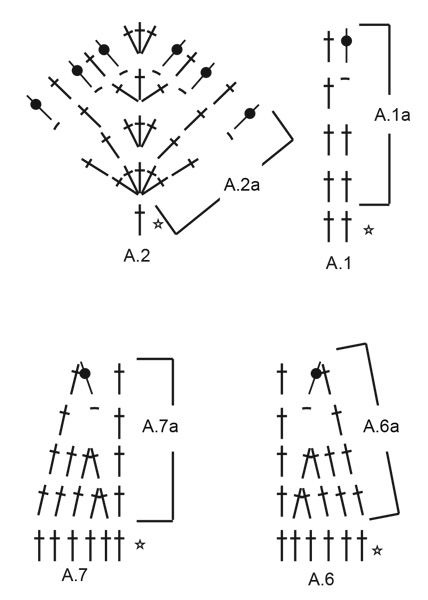
EXPLANATION FOR THE PATTERN:

----------------------------------------------------------

CHAIN STITCH:
If you work at the end of crochet hook the chain stitch will often be too tight 1 chain stitch should be just as long as 1 treble crochet is wide.

PATTERN: 
See diagrams A.1 to A.7.

CROCHET INFORMATION:
At beginning of every round with treble crochet replace first treble crochet with 3 chain stitches.
Finish round with 1 slip stitch in 3rd chain stitch at beginning of round.
Round beginning with 1 chain stitch in the diagrams, begins with 3 chain stitches (these will replace last treble crochet on round).
Finish round with 1 slip stitch in 3rd chain stitch at beginning of round.
On every round with double crochets replace first double crochet with 1 chain stitch.
Finish round with 1 slip stitch in first chain stitch at beginning of round.

INCREASE TIP:
Work 2 treble crochets in same stitches (= 1 treble crochet increased).

----------------------------------------------------------

START THE PIECE HERE:

----------------------------------------------------------

JUMPER - SHORT OVERVIEW OF THE PIECE:
Work in the round top down. First work a yoke. Then divide the piece into body and sleeves and continue in the round separately. Finish with an edge around the neckline.

YOKE:
Work 96-96-104-104-112-112 chain stitches - read CHAIN STITCHES, on hook size 4.5 mm with Sky and form a ring with 1 slip stitch in first chain stitch. Work 1 treble crochet in every chain stitch and increase 16-16-12-16-16-24 treble crochets evenly – read CROCHET INFORMATION and INCREASE TIP = 112-112-116-120-128-136 treble crochets.

WORK PATTERN A.1 TO A.5 AS FOLLOWS:
Round begins in transition between left sleeve and back piece.
Work * A.1a (= 2 treble crochets) over 22-22-23-24-26-28 treble crochets, A.2a (= 1 treble crochet = mid back/mid front), A.3a (= 2 treble crochets) over 22-22-23-24-26-28 treble crochets (= back piece/front piece), A.4a (= 1 treble crochet), A.3a over 8 treble crochets, A.5a (= 2 treble crochets = sleeve) *, work from *-* 2 times in total.
REMEMBER THE CROCHET TENSION!
On 4th round increase (in addition to diagrams) 0-2-2-4-4-6 treble crochets evenly on each front piece/back piece on each side of middle stitch (i.e. 0-4-4-8-8-12 stitches increased in total on each front piece/back piece) and 0-2-2-2-2-4 treble crochets evenly on each sleeve (= 0-12-12-20-20-32 stitches increased evenly and 40 stitches increased in A.2a/A.4a/A.5a) = 152-164-168-180-188-208 stitches.
Repeat pattern vertically.
I.e. work A.2a over the middle treble crochet from previous repetition.
Every time it is repeated there are 6 treble crochets more on each side of middle stitch, which are worked in pattern A.1a/A.3a.
Work A.4a over the first treble crochet from previous repetition, work the remaining 4 stitches in pattern A.3a.
Work A.5a over the last 2 treble crochets from previous repetition, work the remaining stitches in pattern A.3a.
I.e. increase 8 stitches in total on each sleeve and 12 stitches on front piece/back piece for every repetition of pattern vertically (= 40 stitches increased in total).
On 8th round (i.e. last round of 2nd repetitions) increase (in addition to diagrams) 0-2-2-4-4-6 treble crochets evenly on each front piece/back piece on each side of middle stitch (i.e. 0-4-4-8-8-12 stitches increased in total on each front piece/back piece) and 0-2-2-2-2-4 treble crochets evenly on each sleeve (= 0-12-12-20-20-32 stitches increased evenly and 40 stitches increased in A.2a/A.4a/A.5a) = 192-216-220-240-248-280 stitches.
Then repeat pattern vertically.
When 15-15-17-19-21-21 rounds have been worked in total, work 1 more round as before but increase 1 stitch on each sleeve = 274-298-322-362-390-422 stitches.
Piece measures approx. 20-20-23-25-28-28 cm.
Insert 4 markers in piece without working as follows:
Insert 1 marker at the beginning of round, insert 1 marker after 93-101-109-125-135-147 treble crochets (= back piece), insert 1 marker after 44-48-52-56-60-64 treble crochets (= right sleeve), insert 1 marker after 93-101-109-125-135-147 treble crochets (= front piece), the remaining stitch on round (= 44-48-52-56-60-64 treble crochets) are left sleeve.
These markers mark where yoke is divided later.
If the crochet tension is not correct vertically continue to work as explained below until piece measures 20-20-23-25-28-28 cm but the increase will continue and the body will be a bit wider. Work as follows if needed:
Continue with A.2a over middle stitch(es) (depending on which round you are working) on front piece/back piece and A.1a/A.3a over the remaining stitches.
When piece measures 20-20-23-25-28-28 cm, divide piece for body and sleeves as follows:
Work as before over stitches on back piece until marker thread, work 8 chain stitches, skip stitches between the 2 marker threads (= sleeve), work as before over stitches on front piece until next marker thread, work 8 chain stitches, skip the last stitches between marker threads (= sleeve).

BODY:
Insert 1 marker thread in the middle of the 8 stitches under each sleeve. Move the marker threads upwards, decrease on each side of these.
Continue pattern as before, i.e. increase mid front and mid back while decreasing stitches under each sleeve by working diagram A.6a and A.7a as follows:
Work until stitches in A.6a remain before marker thread (this is according to where pattern was casted off for body/sleeves), work A.6a, work A.7a.
Work like this on each side of every marker thread. Decrease stitches in A.6a and A.7a and increase stitches in A.2a mid front/mid back.
When 1 repetition / 4 rows have been worked vertically, 16 stitches have been decreased and 24 stitches have been increased, i.e. increase 8 stitches per repetition.
Continue pattern like this until piece measures 24 cm from where piece was divided, adjust to finish with 2 rounds with only treble crochets - or work to desired measurements.

SLEEVES:
Fasten strand with 1 slip stitch in 4th chain stitch under sleeve, work 1 treble crochet in each of the 4 chain stitches under sleeve, work pattern as before over the 44-48-52-56-60-64 stitches skipped for sleeve and finish with 1 treble crochet in each of the last 4 chain stitches under sleeve = 52-56-60-64-68-72 treble crochets.
Work until A.3a measures 32-33-31-30-27-28 cm from division (or desired length– NOTE!: Shorter measurements in the larger sizes because of wider neck and longer yoke) - adjust after 2 round with only treble crochets.
Then work 1 edge around the sleeve as follows:
Work * 1 double crochet, 3 chain stitches, skip approx. 1 cm *, work from *-* around the entire sleeve, adjust to finish with 3 chain stitches and 1 slip stitch in first double crochet. Cut and fasten the yarn. Work the other sleeve the same way.

NECK EDGE:
Crochet an edge around the neck as follows: Begin mid on top of shoulder, fasten strand with 1 slip stitch in 1st stitch. Work * 1 double crochet in next stitch, 3 chain stitches, skip approx. 1 cm *, work from *-* around the neck like this, adjust to finish round with 3 chain stitches and 1 slip stitch in first double crochet. Make sure edge is not too tight at the neck, skip fewer stitches if needed. Fasten off.

Diagram

symbols = treble crochet in stitch
symbols = treble crochet around stitch
symbols = chain stitch
symbols = work 2 treble crochets together as follows: Work 1 treble crochet in next treble crochet, but wait with last pull through, work 1 treble crochet in next treble crochet, but on last pull through pull yarn through all loops on hook (= 1 treble crochet decreased)
symbols = work 2 treble crochets together as follows: Work 1 treble crochet around next chain stitch, but wait with last pull through, work 1 treble crochet in next treble crochet, but on last pull through pull yarn through all loops on hook (= 1 treble crochet decreased).
symbols = work 2 treble crochets together as follows: Work 1 treble crochet in next treble crochet, but wait with last pull through, work 1 treble crochet in next chain stitch, but on last pull through pull yarn through all loops on hook (= 1 treble crochet decreased)
symbols = this round has been worked already; it only shows how next round should be worked in stitches
diagram
diagram
diagram
Do you have a question? See a list of frequently asked questions (FAQ)

Knitting tension is what determines the final measurements of your work, and is usually measured per 10 x 10 cm. It is provided like so: number of stitches in width x number of rows in height - eg: 19 stitches x 26 rows = 10 x 10 cm.

The knitting tension is very individual; some people knit/crochet loosely while others work tightly. You adjust the knitting tension with the needle size, which is why the suggested needle size is only meant as a guide! You need to adjust this (up or down) to ensure that YOUR knitting tension matches the knitting tension provided in the pattern. If you work with a different knitting tension than provided you will have a different yarn consumption, and your work will have different measurements than what the pattern suggests.

The knitting tension also determines which yarns can replace each other. As long as you achieve the same knitting tension you can replace one yarn with another.

See DROPS lesson: How to measure your tension/gauge

See DROPS video: How to make a gauge tension swatch

The required amount of yarn is provided in grams, eg: 450 g. To calculate how many balls you’ll need you first need to know how many grams are in 1 ball (25g, 50g or 100g). This information is available if you click on the individual yarn quality on our pages. Divide the amount required with the amount of each ball. For example, if each ball is 50g (the most common amount), the calculation will be as follows: 450 / 50 = 9 balls.

The important thing when changing from one yarn to another is that the knitting/crochet tension remains the same. This is so that the measurements of the finished piece will be the same as on the sketch provided. It is easier to achieve the same knitting tension using yarns from the same yarn group. It is also possible to work with multiple strands of a thinner yarn to achieve the knitting tension of a thicker one. Please try our yarn converter. We recommend you to always work a test swatch.

Please NOTE: when changing yarn the garment might have a different look and feel to the garment in the photo, due to individual properties and qualities of each yarn.

See DROPS lesson: Can I use a different yarn than the one mentioned in the pattern?

All our yarns are categorised into yarn groups (from A to F) according to thickness and knitting tension – group A contains the thinnest yarns and group F the thickest. This makes it easier for you to find alternative yarns to our patterns, should you wish to switch yarn. All yarns within the same group have a similar knitting tension and can easily replace each other. However, different yarn qualities have different structures and properties which will give the finished work a unique look and feel.

Click here for an overview of the yarns in each yarn group

At the top of all our patterns you’ll find a link to our yarn calculator, which is a helpful tool should you wish to use a different yarn than suggested. By filling in the yarn quality you wish to replace, the amount (in your size) and number of strands, the calculator will present good alternative yarns with the same knitting tension. Additionally it will tell you how much you’ll require in the new qualities and whether you’ll need to work with multiple strands. Most skeins are 50g (some are 25g or 100g).

If the pattern is worked with multiple colours, every colour will have to be calculated separately. Similarly, if the pattern is worked with several strands of different yarns (for example 1 strand Alpaca and 1 strand Kid-Silk) you will have to find alternatives for each, individually.

Click here to see our yarn calculator

Since different yarns have different qualities and textures we have chosen to keep the original yarn in our patterns. However, you can easily find options among our available qualities by using our yarn calculator, or simply pick a yarn from the same yarn group.

It is possible that some retailers still have discontinued yarns in stock, or that someone has a few skeins at home that they would like to find patterns for.

The yarn calculator will provide both alternative yarn as well as required amount in the new quality.

If you think it's hard to decide what size to make, it can be a good idea to measure a garment you own already and like the size of. Then you can pick the size by comparing those measures with the ones available in the pattern's size chart.

You'll find the size chart at the bottom of the pattern.

See DROPS lesson: How to read size chart

The needle size provided in the pattern serves only as a guide, the important thing is to follow the knitting tension. And since knitting tension is very individual, you will have to adjust the needle size to ensure that YOUR tension is the same as in the pattern – maybe you’ll have to adjust 1, or even 2 needle sizes, up or down to achieve the correct tension. For this, we recommend that you work test swatches.

Should you work with a different knitting tension than the one provided, the measurements of the finished garment might deviate from the measurement sketch.

See DROPS lesson: How to measure your tension/gauge

See DROPS video: How to make a tension/gauge swatch

Working a garment top-down provides more flexibility and room for personal adjustment. For example it is easier to try the garment on while working, as well as making adjustments to length of yoke and shoulder caps.

The instructions are carefully explaining every step, in the correct order. Diagrams are adjusted to the knitting direction and are worked as usual.

The diagram depicts all rows/rounds, and every stitch seen from the right side. It is read from bottom to top, from right to left. 1 square = 1 stitch.

When working back and forth, every other row is worked from the right side and every other row is worked from the wrong side. When working from the wrong side, the diagram will have to be worked reversed: from left to right, knit stitches are purled, purl stitches are knit etc.

When working in the round every round is worked from the right side and the diagram are worked from right to left on all rounds.

See DROPS lesson: How to read knitting diagrams

The diagram depicts all rows/rounds, and every stitch seen from the right side. It is worked from bottom to top, from right to left.

When working back and forth every other row is worked from the right side: from right to left and every other row is worked from the wrong side: from left to right.

When working in the round, every row in the diagram are worked from the right side, from right to left.

When working a circular diagram you start in the middle and work your way outwards, counter clockwise, row by row.

The rows usually start with a given number of chain stitches (equivalent to the height of the following stitch), this will either be depicted in the diagram or explained in the pattern.

See DROPS lesson: How to read crochet diagrams

Instructions for working several diagrams after each other on the same row/round, will often be written like so: “work A.1, A.2, A.3 a total of 0-0-2-3-4 times". This means you work A.1 once, then A.2 is worked once, and A.3 is repeated (in width) the number of times provided for your size – in this case like so: S = 0 times, M = 0 times, L=2 times, XL= 3 times and XXL = 4 times.

The diagrams are worked as usual: begin with the first row in A.1, then work the first row in A.2 etc.

See DROPS lesson: How to read knitting diagrams

See DROPS lesson: How to read crochet diagrams

The total width of the garment (from wrist-to-wrist) will be larger in the larger sizes, despite the actual sleeves being shorter. The larger sizes have longer sleeve caps and wider shoulders, so there will be a good fit in all sizes.

The measurement sketch/schematic drawing provides information regarding the full length of the garment. If it’s a jumper or a jacket the length is measured from the highest point on the shoulder closest to the neckline, and straight down to the bottom of the garment. It is NOT measured from the tip of shoulder. Similarly, the length of yoke is measured from the highest point on the shoulder and down to where yoke is split into body and sleeves.

On a jacket measures are never taken along bands, unless specifically stated. Always measure inside band stitches when measuring the length.

See DROPS lesson: How to read a schematic drawing

Diagrams are often repeated on the round or in height. 1 repeat is the diagram the way it appears in the pattern. If it says to work 5 repeats of A.1 in the round, then you work A.1 a total of 5 times after/next to each other in the round. If it says to work 2 repeats of A.1 vertically/in height you work the entire diagram once, then begin again at the start and work the entire diagram one more time.

Chain stitches are slightly narrower than other stitches and to avoid working the cast-on edge too tight, we simply chain more stitches to begin with. The stitch count will be adjusted on the following row to fit the pattern and measurement sketch.

The rib edge is more elastic and will contract slightly compared to, for example, stocking stitch. By increasing before the rib edge, you avoid a visible difference in width between the rib edge and the rest of the body.

It’s very easy to cast off too tightly, and by making yarn overs while casting off (and simultaneously casting these off) you avoid a too tight cast off edge.

See DROPS video: How to bind off with yarn overs (yo)

To achieve an even increase (or decrease) you can increase on, for example: every 3rd and 4th row alternately, like so: work 2 rows and increase on the 3rd row, work 3 rows and increase on the 4th. Repeat this until the increase is complete.

See DROPS lesson: Increase or decrease 1 st on every 3rd and 4th row alternately

Should you prefer to work in the round instead of back and forth, you may of course adjust the pattern. You’ll need to add steeks mid-front (usually 5 stitches), and follow the instructions. When you would normally turn and work from the wrong side, simply work across the steek and continue in the round. At the end you’ll cut the piece open, pick up stitches to work bands, and cover the cut edges.

See DROPS video: How to knit steeks and cut open

Should you prefer to work back and forth instead of in the round, you may of course adjust the pattern so you work the pieces separately and then assemble them at the end. Divide the stitches for the body in 2, add 1 edge stitch in each side (for sewing) and work the front and back pieces separately.

See DROPS lesson: Can I adapt a pattern for circular needles into straight needles?

Pattern repeats can vary slightly in the different sizes, in order to get the correct proportions. If you’re not working the exact same size as the garment in the photo, yours might deviate slightly. This has been carefully developed and adjusted so that the complete impression of the garment is the same in all sizes.

Make sure to follow instructions and diagrams for your size!

If you have found a pattern you like which is available in women’s size it’s not very difficult to convert it to men’s size. The biggest difference will be the length of sleeves and body. Start working on the women size that you think would fit across the chest. The additional length will be worked right before you cast off for the armhole/sleeve cap. If the pattern is worked top-down you can add the length right after the armhole or before the first decrease on sleeve.

Regarding additional yarn amount, this will depend on how much length you add, but it is better with a skein too many than too few.

All yarns will have excess fibres (from production) that might come off as lint or shedding. Brushed yarns (ie hairier yarns) have more of these loose, excess fibres, causing more shedding.

Shedding also depends on what is worn under or over the garment, and whether this pulls at the yarn fibres. It’s therefore not possible to guarantee that there will be no shedding

Below are some tips on how to get the best result when working with hairier yarns:

1. When the garment is finished (before you wash it) shake it vigorously so the looser hairs come off. NOTE: do NOT use a lint roller, brush or any method that pulls at the yarn.

2. Place the garment in a plastic bag and put it in your freezer - the temperature will cause the fibres to become less attached to each other, and excess fibres will come off easier.

3. Leave in the freezer for a few hours before taking it out and shaking it again.

4. Wash the garment according to the instructions on the yarn label.

Pilling is a natural process that happens to even the most exclusive of fibers. It's a natural sign of wear and tear that is hard to avoid, and that is most visible in high friction areas of your garment like a sweater's arms and cuffs.

You can make your garment look as new by removing the pilling, using a fabric comb or a pill/lint remover.

Still can't find the answer you need? Then scroll down and leave your question so one of our experts can try to help you. This will be done normally within 5 to 10 working days.
In the meantime, you can read the questions and answers that others have left to this pattern or join the DROPS Workshop on Facebook to get help from fellow knitters/crocheters!

You might also like...

Post a comment to pattern DROPS 213-35

We would love to hear what you have to say about this pattern!

If you want to leave a question, please make sure you select the correct category in the form below, to speed up the answering process. Required fields are marked *.

Comments / Questions (61)

country flag Dawn B wrote:

This has to be the most confusing pattern I have ever tried to use. I'm an experienced crocheter and this is just gobbledegook. I appreciate its free but its terrible. I would've given up making it if it hadn't been a requested item. Ended up, having to re write it. Can't recommend.

09.06.2022 - 13:35

country flag Nonnalorenza wrote:

Salve! Sto eseguendo questo modello nella taglia XL. Parto da 112 catenelle e alla fine dopo gli aumenti ho 128 maglie alte. Fin qui tutto bene. Inizio a seguire i diagrammi e quindi ad ogni giro aumento 60 maglie, quindi avrò 188 m, poi 248 m e così via. Al 16° giro ho 368 m. Come faccio al 21° giro ad avere 390 m??? Cosa non ho capito? Grazie

02.05.2022 - 15:45

DROPS Design answered:

Buonasera Nonnalorenza, oltre agli aumenti del diagramma ci sono anche gli aumenti indicati ad esempio sul 4° e 8° giro. Buon lavoro!

07.05.2022 - 17:15

country flag Satu wrote:

Jag ser på bilden att det finns hålmaskor virkade. Vart finns denna beskrivning? Hur får man till dessa små hål?

11.04.2022 - 11:55

DROPS Design answered:

Hei Satu. Når du hekler etter diagrammene og da hekler omgangen med luftmasker, vil disse luftmaskene skape hullmønstret. Du gjentar diagrammene i høyden og da skapes det hullmønster på hver 4. omgang. mvh DROPS Design

19.04.2022 - 09:57

country flag Gina wrote:

Scusi, come mai al primo giro al diagramma A2a dice di lavorare una maglia alta quando sul grafico indica 5 maglie alte? grazie

03.02.2022 - 11:45

DROPS Design answered:

Buonasera Gina, vanno lavorate 5 m.a in 1 m.a. Buon lavoro!

05.02.2022 - 20:48

country flag Bettina wrote:

Ich arbeite für Größe XL für Passe. Muss ich ab Runde 4 insgesamt 40 Maschen zusätzlich zu den Zunahmen durch das Muster zunehmen oder zählen die zugenommenen Mädchen von A2,4 und 5 mit?

04.12.2021 - 18:32

DROPS Design answered:

Liebe Bettina, diese Zunahmen werden zusätlich zun den Zunahmen in Diagram gehäkelt. Viel Spaß beim häkeln!

06.12.2021 - 07:56

country flag Judith wrote:

Drops crochet pattern Hey June 213-35, I have reached where the piece is split for the sleeves. I have worked the row where the sleeve sets are skipped with a chain of 8 sets. Do I continue with the next row working trebles across the chain of 8 sts (sleeve), or is it now worked with the front/back and back/front pieces worked separately

17.09.2021 - 22:45

DROPS Design answered:

Dear Judith, yes, continue the pattern under the sleeves (on the 8 stitches you made), and from here the pieces (body and the two sleeves) are knitted separately. Happy Stitching!

19.09.2021 - 00:37

country flag Susan wrote:

I am making the XS size and have a problem with the number of stitches I need to increase. I think the pattern is saying to increase 16 on the first round (after the foundation chain), then 12 in the next round (increasing 8 in A2, 2 in A4 and 2 in A5), followed by 8 in the next round (4 in A2, 2 in A4 and 2 in A5). I am 20 stitches short - the pattern says I should have 152 stitches and I only have 132. Where have I gone wrong? Thanks for any help you can give.

02.06.2021 - 16:04

DROPS Design answered:

Dear Susan, at the end of row 2 of the diagrams you have 132 stitches (= 11 sts in A.2, 4 sts in A.4a, 5 sts in A.5a) - then at the end of row 3 of the diagram you will have 152 sts (= 13 sts in A.2, 5 sts in A.4a, 6 sts in A.5a). Hope this will help. Happy crocheting!

02.06.2021 - 16:24

country flag Antonella wrote:

Cosa si intende lavorare 1 altro giro come prima dopo aver lavorato 19 giri? Bisogna eseguire due giri identici senza seguire i diagrammi? Grazie

22.05.2021 - 22:04

DROPS Design answered:

Buonasera Antonella, deve lavorare un altro giro con i motivi in cui aumentare 1 maglia su ogni spalla. Buon lavoro!

22.05.2021 - 22:52

country flag Jeanette wrote:

Hej Jag är på fram-och bakstycke. När jag gjort hela A6 och a7 en gång vad ska jag göra då? Det verkar konstigt att börja om, dvs att börja minska igen. Jag har ju inte så många maskor som det ska vara från varv 1. Varifrån är delningen? Dvs därifrån man ska mäta 24 cm.

15.04.2021 - 19:43

DROPS Design answered:

Hej Jeanette, du kan se på måleskitsen hvorfra du skal måle de 24 cm. När 1 rapport / 4 varv har virkats på höjden har det minskats 16 maskor och ökats 24 maskor, dvs det ökas 8 maskor per repetition.

28.04.2021 - 15:32

country flag Ginette Himbeault wrote:

Bonjour, je fais la taille M. merci de m'aider.

31.03.2021 - 23:33

DROPS Design answered:

Bonjour Ginette, tour 4: vous travaillez selon les diagrammes, les mailles sont augmentees en A.2a, A.4a et A.5a> cela veut dire que vous augmentez les mailles a chaque raglan et au milieu dos et milieu devant. A la fin du 4eme tour vous devriez avoir 156 mailles. Le meme tour vous augmenez aussi 4 brides à intervalles réguliers sur les mailles du devant et 4 sur le dos (sur les mailles de A.1a et A.3a) et 2 brides à intervalles réguliers sur chaque manche (4 mailles augmentees) > 4+4+2+2=12 mailles supplementaires. Au total 168 mailles.

01.04.2021 - 14:06