DROPS Delight
DROPS Delight
75% Wool, 25% Polyamide
Discontinued
find alternatives
DROPS Alpaca
DROPS Alpaca
100% Alpaca
from 3.65 € /50g
DROPS SS24

Nature Awakes

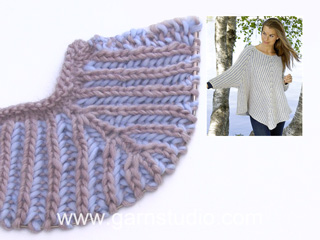
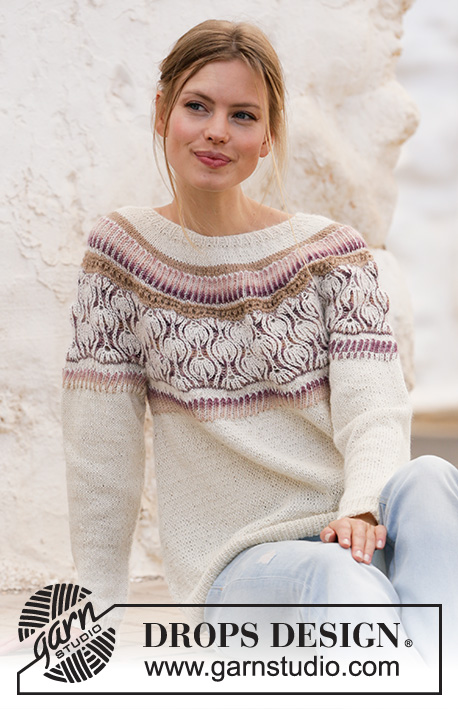
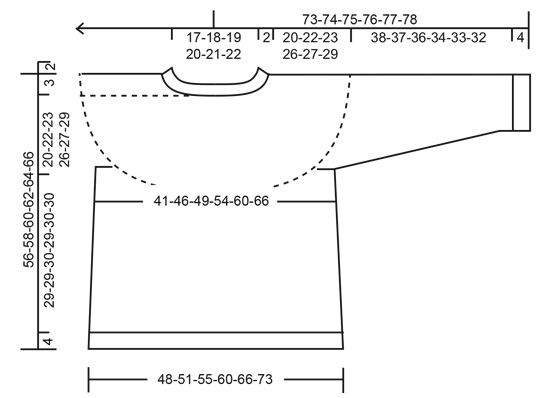
Knitted jumper with round yoke in DROPS Alpaca and DROPS Delight. The piece is worked top down with 2-coloured English rib, stripes and lace pattern. Sizes S - XXXL.

DROPS 213-5
DROPS Design: Pattern no de-213
Yarn group A
-------------------------------------------------------

SIZES:
S - M - L - XL - XXL - XXXL

MATERIALS:
DROPS ALPACA from Garnstudio (belongs to yarn group A)
250-300-300-350-400-400 g colour 100, off white
50-50-50-50-50-50 g colour 302, camel
And use:
DROPS DELIGHT from Garnstudio (belongs to yarn group A)
100-100-100-100-150-150 g colour 20, blueberry pie

KNITTING TENSION:
24 stitches in width and 32 rows in height with stocking stitch = 10 x 10 cm.
23 stitches in width and 48 rows in height with English rib = 10 x 10 cm.

NEEDLES:
DROPS DOUBLE POINTED NEEDLES SIZE 3 MM.
DROPS CIRCULAR NEEDLE SIZE 3 MM: Length 40 cm and 80 cm for stocking stitch.
DROPS DOUBLE POINTED NEEDLES SIZE 2.5 MM.
DROPS CIRCULAR NEEDLE SIZE 2.5 MM: Length 40 cm and 80 cm for English rib and neck.
Needle size is only a guide. If you get too many stitches on 10 cm, change to a larger needle size. If you get too few stitches on 10 cm, change to a smaller needle size.

-------------------------------------------------------

Alternative Yarn – See how to change yarns here
Yarn Groups A to F – Use the same pattern and change the yarn here
Yarn usage using an alternative yarn – Use our yarn converter here

-------------------------------------------------------

DROPS Delight
DROPS Delight
75% Wool, 25% Polyamide
Discontinued
find alternatives
DROPS Alpaca
DROPS Alpaca
100% Alpaca
from 3.65 € /50g

Pattern instructions

-------------------------------------------------------

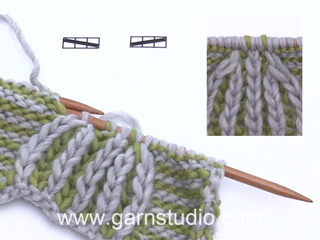
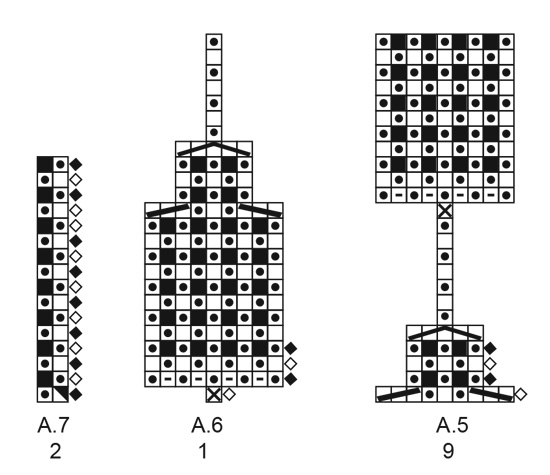
EXPLANATIONS FOR THE PATTERN:

-------------------------------------------------------

RIDGE/GARTER STITCH (worked in the round):
1 ridge in height = 2 rounds; Knit 1 round and purl 1 round.

PATTERN: 
See diagrams A.1 to A.7.
A.2 is the lace pattern.
A.1 and A.3 to A.7 are English rib using off-white and blueberry pie.

INCREASE TIP-1 (evenly spaced):
To work out how to increase evenly, count the total number of stitches on the needle (e.g. 123 stitches) and divide by the number of increases to be made (e.g. 42) = 2.9. 
In this example, increase by making 1 yarn over after approx. each 3rd stitch. On the next round work the yarn overs twisted to avoid holes.

INCREASE TIP-2 (for sides of body):
Work until there are 2 stitches left before the marker thread, make 1 yarn over, knit 4 (marker thread sits between these 4 stitches) make 1 yarn over.
On the next round work the yarn overs twisted to avoid holes. Then work the new stitches in stocking stitch

2-COLOURED ENGLISH RIB:
Work in stripes.
The unfilled and filled squares (outside the diagrams) show which colour to use on the round.

DECREASE TIP (for sleeves): 
Decrease 1 stitch on each side of the marker thread as follows: Work until there are 3 stitches left before the marker thread, knit 2 together, knit 2 (marker thread sits between these 2 stitches), slip 1 stitch as if to knit, knit 1 and pass the slipped stitch over the knitted stitch.

CASTING-OFF TIP:
To avoid the cast-off edge being tight you can cast off with a larger size needle. If the edge is still tight, make 1 yarn over after approx. each 4th stitch at the same time as casting off and the yarn overs are cast off as normal stitches.

------------------------------------------------------

START THE PIECE HERE:

-------------------------------------------------------

JUMPER – SHORT OVERVIEW OF THE PIECE:
The neck and yoke are worked in the round with circular needle, top down from mid back. The yoke is divided for body and sleeves and the body continued in the round with circular needle. The sleeves are worked in the round with double pointed needles, top down.

NECK:
Cast on 117-123-129-132-141-144 stitches with circular needle size 2.5 mm and off-white.
Knit 1 round, then work rib in the round (= knit 1 / purl 2).
When the piece measures 2 cm, knit 1 round and increase 40-42-44-46-46-52 stitches evenly spaced – read INCREASE TIP-1 = 157-165-173-178-187-196 stitches.
Change to circular needle size 3 mm.
Insert 1 marker at the beginning of the round, mid back; the yoke will be measured from here!

YOKE:
Work stocking stitch in the round until the piece measures 2-3-3-3-4-4 cm from the marker
Change to camel.
Knit 3 rounds.
Knit 1 round and increase 41-43-45-46-47-52 stitches evenly spaced = 198-208-218-224-234-248 stitches.
Purl 1 round.
Change to off-white.
Knit 1 round.

ENGLISH RIB:
Change to circular needle size 2.5 mm.
Continue with pattern and blueberry pie and off-white as follows – read 2-COLOURED ENGLISH RIB:
Work A.1 (= 2 stitches) over all stitches.
Repeat A.1a in height until the piece measures 7-8-9-9-10-10 cm from the marker (i.e. approx. 4-4-5-5-5-5 cm English rib), adjust so you finish with a round off-white.
Change to circular needle size 3 mm and continue with off-white as follows:

LACE PATTERN:
Knit 2 rounds (the yarn overs from the English rib are knitted together with their respective stitches on the first round).
Change to camel.
Work 1 RIDGE – read description above and increase 22-24-28-34-38-44 stitches evenly on the first round = 220-232-246-258-272-292 stitches.
On the next round work as follows:
Work A.2 (= 2 stitches) over all stitches.
Change to off-white.
Knit 1 round and increase 52-56-58-62-64-76 stitches evenly spaced = 272-288-304-320-336-368 stitches.

ENGLISH RIB:
Change to blueberry pie.
Knit 1 round. Change to circular needle size 2.5 mm.
Work A.3 over all stitches.
When A.3 has been worked 1 time in height continue with pattern as follows:
Work * A.4 (= 3 stitches), A.5 (= 9 stitches), A.4 over 3 stitches, A.6 (= 1 stitch) *, work from *-* a total of 17-18-19-20-21-23 times in width.
Repeat A.4 to A.6 until the piece measures approx. 20-21-22-25-26-28 cm; adjust so you finish after a whole or half repeat in height.
Change to circular needle size 3 mm.
Knit 1 round with blueberry pie and increase 47-67-70-80-88-92 stitches evenly spaced (the yarn overs from the English rib are knitted together with their stitches) = 319-355-374-400-424-460 stitches.
Change to off-white.
Knit 1 round and increase 0-0-15-29-45-45 stitches evenly spaced = 319-355-389-429-469-505 stitches.
Work stocking stitch until the piece measures 20-22-23-26-27-29 cm from the marker.
Now divide the piece for body and sleeves:
Work 46-52-55-61-68-75 stitches (= half back piece), place the next 68-74-84-92-98-102 stitches on a thread for sleeve and cast on 8 stitches under the sleeve, work 91-103-111-123-137-151 stitches (= front piece), place the next 68-74-84-92-98-102 stitches on a thread for sleeve and cast on 8 stitches under the sleeve and finish by working 46-52-55-61-68-75 stitches (= half back piece).

BODY:
= 199-223-237-261-289-317 stitches. Knit 1 round and decrease 17-21-21-23-25-27 stitches evenly spaced = 182-202-216-238-264-290 stitches.
Knit 1 round.

ENGLISH RIB:
Change to circular needle size 2.5 mm.
Work A.1. Repeat A.1a in height until the English rib measures approx. 3 cm.
Change to circular needle size 3 mm.

REST OF BODY:
Now finish the piece using off-white and stocking stitch.
On the next round increase 17-21-21-23-25-27 stitches evenly spaced (the yarn overs from the English rib are knitted together with their respective stitches) = 199-223-237-261-289-317 stitches.
Insert 1 marker thread 50-56-59-65-72-79 stitches in from each end of the round (= in sides of body). There are 99-111-119-131-145-159 stitches between the markers on the front piece; allow the threads to follow your work onwards, they will be used when increasing in the sides.
When the piece measures 2 cm from the English rib, increase 1 stitch on each side of both marker threads – read INCREASE TIP-2 (= 4 stitches increased).
Increase like this every 2½ cm a total of 8-6-7-7-7-8 times = 231-247-265-289-317-349 stitches.
When the piece measures 29-29-30-29-30-30 cm from the division increase 57-59-59-59-58-59 stitches evenly spaced = 288-306-324-348-375-408 stitches.
Change to circular needle size 2.5 mm and work rib (= knit 1/ purl 2) for 4 cm, then cast off with knit – read CASTING-OFF TIP!

SLEEVES:
Place the 68-74-84-92-98-102 stitches from the thread on the one side of the piece on double pointed needles size 3 mm and knit up 1 stitch in each of the 8 stitches cast on under the sleeve = 76-82-92-100-106-110 stitches. Insert a marker thread in the middle of the 8 stitches under the sleeve. Allow the thread to follow your work onwards; it will be used when decreasing under the sleeve. Knit 2 rounds with off-white.
On the next round decrease 8 stitches evenly spaced = 68-74-84-92-98-102 stitches. Then work pattern as follows:

ENGLISH RIB:
Change to double pointed needles size 2.5 mm.
Continue pattern with blueberry pie and off white as follows:
Work A.7 (= 2 stitches) in the round over all stitches.
On the first 12 rounds use blueberry pie for the knitted stitches, on the last 4 rounds use off-white – see markers in diagram A.7.

REST OF SLEEVE:
Change to double pointed needles size 3 mm.
Finish the sleeve with off-white. Work stocking stitch (the yarn overs from the English rib are knitted together with their respective stitches on the first round).
On the first round increase 8 stitches evenly spaced = 76-82-92-100-106-110 stitches.
On the next round decrease 1 stitch on each side of the marker thread – read DECREASE TIP (= 2 stitches decreased).
Decrease like this every 2½-2-1½-1-1-1 cm a total of 12-14-17-20-22-23 times = 52-54-58-60-62-64 stitches.
When the piece measures 38-37-36-34-33-32 cm from the division increase 11-12-11-12-10-11 stitches evenly spaced = 63-66-69-72-72-75 stitches. Change to double pointed needles size 2.5 mm and work rib (= knit 1/ purl 2) for 4 cm, then cast off with knit. Work the other sleeve in the same way.

This pattern has been corrected.

Updated online: 16.04.2020
Correction: diagram A.3 has been edited.

Diagram

symbols = knit
symbols = between 2 stitches make 1 yarn over
symbols = knit 2 together
symbols = round worked with off-white
symbols = round worked with blueberry pie
symbols = make 1 yarn over, slip 1 stitch as if to purl
symbols = knit yarn over and stitch together
symbols = purl yarn over and stitch together
symbols = work 9 stitches in the knitted stitch and yarn over as follows: Knit together the yarn over and stitch together but do not slip them from the needle, * make 1 yarn over the right needle and knit together the yarn over and stitch without slipping them from the needle *, work from *-* a total of 4 times, now slip the yarn over and knitted stitch off the left needle = 9 stitches
symbols = slip 1 stitch and the yarn over onto the right needle as if to knit, knit 2 stitches and 1 yarn over together, pass the slipped stitch over the knitted together stitches (i.e. 2 stitches decreased)
symbols = knit 3 stitches and 2 yarn overs together (i.e. 2 stitches decreased)
symbols = knit 5 stitches and 3 yarn overs together as follows (= a total of 8 stitches): Slip the first 3 stitches and 2 yarn overs onto the right needle as if to knit together, knit the next 2 stitches and 1 yarn over together, pass the 5 slipped stitches (including yarn overs) from the right needle over the knitted together stitches (i.e. 4 stitches decreased)
symbols = purl
diagram
diagram
diagram

Each of our patterns has specific tutorial videos to help you.

Do you have a question? See a list of frequently asked questions (FAQ)

Knitting tension is what determines the final measurements of your work, and is usually measured per 10 x 10 cm. It is provided like so: number of stitches in width x number of rows in height - eg: 19 stitches x 26 rows = 10 x 10 cm.

The knitting tension is very individual; some people knit/crochet loosely while others work tightly. You adjust the knitting tension with the needle size, which is why the suggested needle size is only meant as a guide! You need to adjust this (up or down) to ensure that YOUR knitting tension matches the knitting tension provided in the pattern. If you work with a different knitting tension than provided you will have a different yarn consumption, and your work will have different measurements than what the pattern suggests.

The knitting tension also determines which yarns can replace each other. As long as you achieve the same knitting tension you can replace one yarn with another.

See DROPS lesson: How to measure your tension/gauge

See DROPS video: How to make a gauge tension swatch

The required amount of yarn is provided in grams, eg: 450 g. To calculate how many balls you’ll need you first need to know how many grams are in 1 ball (25g, 50g or 100g). This information is available if you click on the individual yarn quality on our pages. Divide the amount required with the amount of each ball. For example, if each ball is 50g (the most common amount), the calculation will be as follows: 450 / 50 = 9 balls.

The important thing when changing from one yarn to another is that the knitting/crochet tension remains the same. This is so that the measurements of the finished piece will be the same as on the sketch provided. It is easier to achieve the same knitting tension using yarns from the same yarn group. It is also possible to work with multiple strands of a thinner yarn to achieve the knitting tension of a thicker one. Please try our yarn converter. We recommend you to always work a test swatch.

Please NOTE: when changing yarn the garment might have a different look and feel to the garment in the photo, due to individual properties and qualities of each yarn.

See DROPS lesson: Can I use a different yarn than the one mentioned in the pattern?

All our yarns are categorised into yarn groups (from A to F) according to thickness and knitting tension – group A contains the thinnest yarns and group F the thickest. This makes it easier for you to find alternative yarns to our patterns, should you wish to switch yarn. All yarns within the same group have a similar knitting tension and can easily replace each other. However, different yarn qualities have different structures and properties which will give the finished work a unique look and feel.

Click here for an overview of the yarns in each yarn group

At the top of all our patterns you’ll find a link to our yarn calculator, which is a helpful tool should you wish to use a different yarn than suggested. By filling in the yarn quality you wish to replace, the amount (in your size) and number of strands, the calculator will present good alternative yarns with the same knitting tension. Additionally it will tell you how much you’ll require in the new qualities and whether you’ll need to work with multiple strands. Most skeins are 50g (some are 25g or 100g).

If the pattern is worked with multiple colours, every colour will have to be calculated separately. Similarly, if the pattern is worked with several strands of different yarns (for example 1 strand Alpaca and 1 strand Kid-Silk) you will have to find alternatives for each, individually.

Click here to see our yarn calculator

Since different yarns have different qualities and textures we have chosen to keep the original yarn in our patterns. However, you can easily find options among our available qualities by using our yarn calculator, or simply pick a yarn from the same yarn group.

It is possible that some retailers still have discontinued yarns in stock, or that someone has a few skeins at home that they would like to find patterns for.

The yarn calculator will provide both alternative yarn as well as required amount in the new quality.

If you think it's hard to decide what size to make, it can be a good idea to measure a garment you own already and like the size of. Then you can pick the size by comparing those measures with the ones available in the pattern's size chart.

You'll find the size chart at the bottom of the pattern.

See DROPS lesson: How to read size chart

The needle size provided in the pattern serves only as a guide, the important thing is to follow the knitting tension. And since knitting tension is very individual, you will have to adjust the needle size to ensure that YOUR tension is the same as in the pattern – maybe you’ll have to adjust 1, or even 2 needle sizes, up or down to achieve the correct tension. For this, we recommend that you work test swatches.

Should you work with a different knitting tension than the one provided, the measurements of the finished garment might deviate from the measurement sketch.

See DROPS lesson: How to measure your tension/gauge

See DROPS video: How to make a tension/gauge swatch

Working a garment top-down provides more flexibility and room for personal adjustment. For example it is easier to try the garment on while working, as well as making adjustments to length of yoke and shoulder caps.

The instructions are carefully explaining every step, in the correct order. Diagrams are adjusted to the knitting direction and are worked as usual.

The diagram depicts all rows/rounds, and every stitch seen from the right side. It is read from bottom to top, from right to left. 1 square = 1 stitch.

When working back and forth, every other row is worked from the right side and every other row is worked from the wrong side. When working from the wrong side, the diagram will have to be worked reversed: from left to right, knit stitches are purled, purl stitches are knit etc.

When working in the round every round is worked from the right side and the diagram are worked from right to left on all rounds.

See DROPS lesson: How to read knitting diagrams

The diagram depicts all rows/rounds, and every stitch seen from the right side. It is worked from bottom to top, from right to left.

When working back and forth every other row is worked from the right side: from right to left and every other row is worked from the wrong side: from left to right.

When working in the round, every row in the diagram are worked from the right side, from right to left.

When working a circular diagram you start in the middle and work your way outwards, counter clockwise, row by row.

The rows usually start with a given number of chain stitches (equivalent to the height of the following stitch), this will either be depicted in the diagram or explained in the pattern.

See DROPS lesson: How to read crochet diagrams

Instructions for working several diagrams after each other on the same row/round, will often be written like so: “work A.1, A.2, A.3 a total of 0-0-2-3-4 times". This means you work A.1 once, then A.2 is worked once, and A.3 is repeated (in width) the number of times provided for your size – in this case like so: S = 0 times, M = 0 times, L=2 times, XL= 3 times and XXL = 4 times.

The diagrams are worked as usual: begin with the first row in A.1, then work the first row in A.2 etc.

See DROPS lesson: How to read knitting diagrams

See DROPS lesson: How to read crochet diagrams

The total width of the garment (from wrist-to-wrist) will be larger in the larger sizes, despite the actual sleeves being shorter. The larger sizes have longer sleeve caps and wider shoulders, so there will be a good fit in all sizes.

The measurement sketch/schematic drawing provides information regarding the full length of the garment. If it’s a jumper or a jacket the length is measured from the highest point on the shoulder closest to the neckline, and straight down to the bottom of the garment. It is NOT measured from the tip of shoulder. Similarly, the length of yoke is measured from the highest point on the shoulder and down to where yoke is split into body and sleeves.

On a jacket measures are never taken along bands, unless specifically stated. Always measure inside band stitches when measuring the length.

See DROPS lesson: How to read a schematic drawing

Diagrams are often repeated on the round or in height. 1 repeat is the diagram the way it appears in the pattern. If it says to work 5 repeats of A.1 in the round, then you work A.1 a total of 5 times after/next to each other in the round. If it says to work 2 repeats of A.1 vertically/in height you work the entire diagram once, then begin again at the start and work the entire diagram one more time.

Chain stitches are slightly narrower than other stitches and to avoid working the cast-on edge too tight, we simply chain more stitches to begin with. The stitch count will be adjusted on the following row to fit the pattern and measurement sketch.

The rib edge is more elastic and will contract slightly compared to, for example, stocking stitch. By increasing before the rib edge, you avoid a visible difference in width between the rib edge and the rest of the body.

It’s very easy to cast off too tightly, and by making yarn overs while casting off (and simultaneously casting these off) you avoid a too tight cast off edge.

See DROPS video: How to bind off with yarn overs (yo)

To achieve an even increase (or decrease) you can increase on, for example: every 3rd and 4th row alternately, like so: work 2 rows and increase on the 3rd row, work 3 rows and increase on the 4th. Repeat this until the increase is complete.

See DROPS lesson: Increase or decrease 1 st on every 3rd and 4th row alternately

Should you prefer to work in the round instead of back and forth, you may of course adjust the pattern. You’ll need to add steeks mid-front (usually 5 stitches), and follow the instructions. When you would normally turn and work from the wrong side, simply work across the steek and continue in the round. At the end you’ll cut the piece open, pick up stitches to work bands, and cover the cut edges.

See DROPS video: How to knit steeks and cut open

Should you prefer to work back and forth instead of in the round, you may of course adjust the pattern so you work the pieces separately and then assemble them at the end. Divide the stitches for the body in 2, add 1 edge stitch in each side (for sewing) and work the front and back pieces separately.

See DROPS lesson: Can I adapt a pattern for circular needles into straight needles?

Pattern repeats can vary slightly in the different sizes, in order to get the correct proportions. If you’re not working the exact same size as the garment in the photo, yours might deviate slightly. This has been carefully developed and adjusted so that the complete impression of the garment is the same in all sizes.

Make sure to follow instructions and diagrams for your size!

If you have found a pattern you like which is available in women’s size it’s not very difficult to convert it to men’s size. The biggest difference will be the length of sleeves and body. Start working on the women size that you think would fit across the chest. The additional length will be worked right before you cast off for the armhole/sleeve cap. If the pattern is worked top-down you can add the length right after the armhole or before the first decrease on sleeve.

Regarding additional yarn amount, this will depend on how much length you add, but it is better with a skein too many than too few.

All yarns will have excess fibres (from production) that might come off as lint or shedding. Brushed yarns (ie hairier yarns) have more of these loose, excess fibres, causing more shedding.

Shedding also depends on what is worn under or over the garment, and whether this pulls at the yarn fibres. It’s therefore not possible to guarantee that there will be no shedding

Below are some tips on how to get the best result when working with hairier yarns:

1. When the garment is finished (before you wash it) shake it vigorously so the looser hairs come off. NOTE: do NOT use a lint roller, brush or any method that pulls at the yarn.

2. Place the garment in a plastic bag and put it in your freezer - the temperature will cause the fibres to become less attached to each other, and excess fibres will come off easier.

3. Leave in the freezer for a few hours before taking it out and shaking it again.

4. Wash the garment according to the instructions on the yarn label.

Pilling is a natural process that happens to even the most exclusive of fibers. It's a natural sign of wear and tear that is hard to avoid, and that is most visible in high friction areas of your garment like a sweater's arms and cuffs.

You can make your garment look as new by removing the pilling, using a fabric comb or a pill/lint remover.

Still can't find the answer you need? Then scroll down and leave your question so one of our experts can try to help you. This will be done normally within 5 to 10 working days.
In the meantime, you can read the questions and answers that others have left to this pattern or join the DROPS Workshop on Facebook to get help from fellow knitters/crocheters!

You might also like...

Nature Awakes

Kamila, Poland

Nature Awakes

Kamila, Poland

Post a comment to pattern DROPS 213-5

We would love to hear what you have to say about this pattern!

If you want to leave a question, please make sure you select the correct category in the form below, to speed up the answering process. Required fields are marked *.

Comments / Questions (54)

country flag Deb wrote:

Love this! Can't wait to see the pattern

23.01.2020 - 14:46

country flag Jana wrote:

Magical !!! Knitted brioche, very interestingly designed. I firmly believe, I hope that it will be translated into the Czech language, the saddle will be quite demanding for accuracy ....

22.01.2020 - 18:58

country flag Petra wrote:

Nádherný model, pevně věřím, že uspěje. Modlím se, aby byl přeložen do českého jazyka. Je tam poměrně složitý vzor, něžná krása.....

22.01.2020 - 18:41

country flag Tove Irene Lyngstad wrote:

Kjempefin modell. Gleder meg til å strikke denne !

21.01.2020 - 23:43

country flag Ruiz wrote:

Il est magnifique j’espère qu’il fera partie de la nouvelle collection.

19.01.2020 - 10:08

country flag Juana wrote:

Me encanta este es mio

18.01.2020 - 11:26

country flag Ina wrote:

Wouw, das ist Mal ein tolles Muster

15.01.2020 - 22:02

country flag Grethe Højgaard Strand wrote:

Så smuk. Den vil jeg gerne strikke.

15.01.2020 - 13:07

country flag Claudia wrote:

Stupendo!me ne sono innamorata.....

12.01.2020 - 23:35

country flag Alexandra wrote:

Tres beau design et couleur j'adore

09.01.2020 - 16:57