DROPS Air
DROPS Air
65% Alpaca, 28% Polyamide, 7% Wool
from 4.80 £ /50g
Get the yarn to make this pattern from 19.20£.

The yarn cost is calculated from the pattern’s smallest size and the yarn’s cheapest product type. Looking for an even better price? You might find it on the DROPS Deals!

DROPS SS24

Mountain Moraine

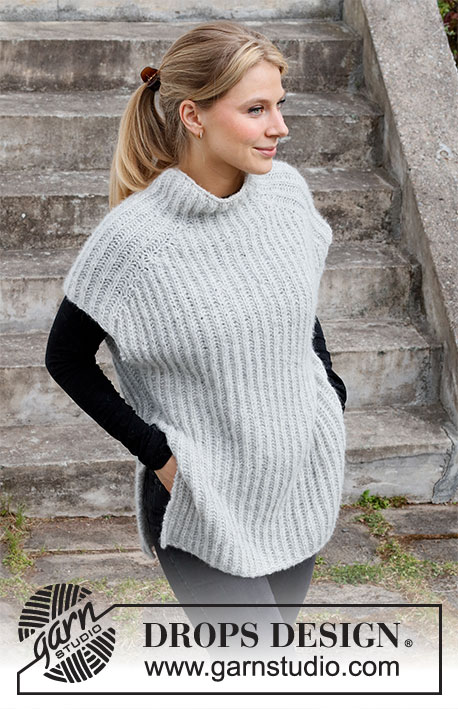
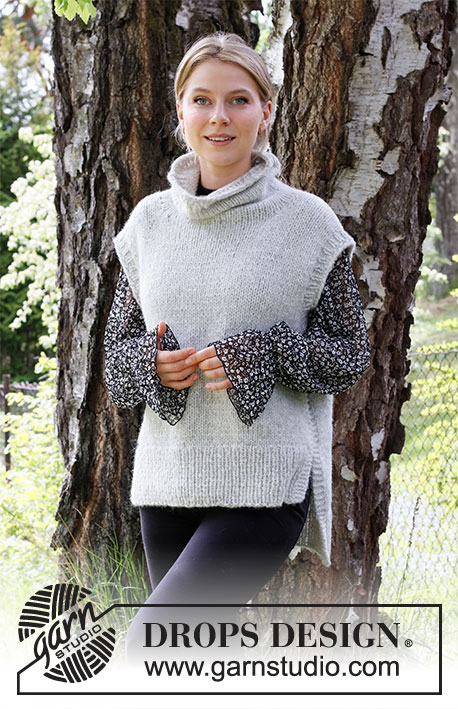
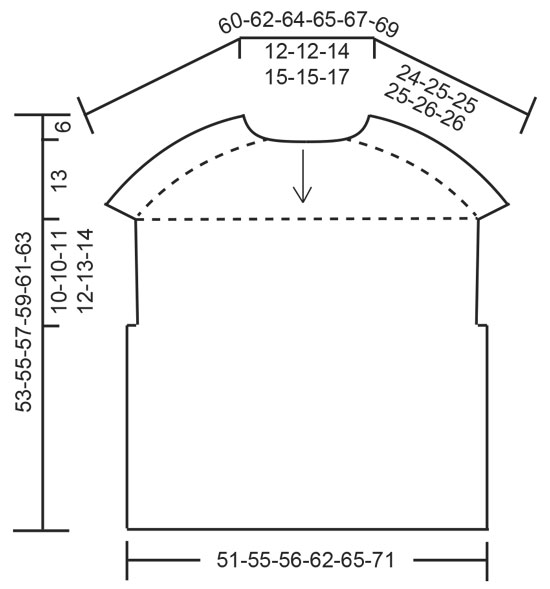
Knitted vest / slipover in DROPS Air. The piece is worked top down with English rib. Sizes XS - XXL.

DROPS 210-4
DROPS Design: Pattern no ai-259
Yarn group C or A + A
-------------------------------------------------------

SIZES:
XS - S - M - L - XL – XXL

MATERIALS:
DROPS AIR from Garnstudio (belongs to yarn group C)
200-200-250-250-300-300 g colour 03, pearl grey

KNITTING TENSION:
11 stitches in width and 32 rows in height with English rib = 10 x 10 cm.

NEEDLES:
DROPS CIRCULAR NEEDLE SIZE 7 MM: Length 40 cm and 80 cm for English rib.
DROPS CIRCULAR NEEDLE SIZE 6 MM: Length 40 cm for neck.
Needle size is only a guide. If you get too many stitches on 10 cm, change to a larger needle size. If you get too few stitches on 10 cm, change to a smaller needle size.

-------------------------------------------------------

Alternative Yarn – See how to change yarns here
Yarn Groups A to F – Use the same pattern and change the yarn here
Yarn usage using an alternative yarn – Use our yarn converter here

-------------------------------------------------------

DROPS Air
DROPS Air
65% Alpaca, 28% Polyamide, 7% Wool
from 4.80 £ /50g
Get the yarn to make this pattern from 19.20£.

The yarn cost is calculated from the pattern’s smallest size and the yarn’s cheapest product type. Looking for an even better price? You might find it on the DROPS Deals!

Pattern instructions

NOTE: This pattern is written in British English. All measurements in charts are in cm. For conversion from cm to inches - click here. There are different terms for crocheting in British and American English. If this pattern includes crochet, click for "crochet terms" here. For this pattern in American English, please click here.
-------------------------------------------------------

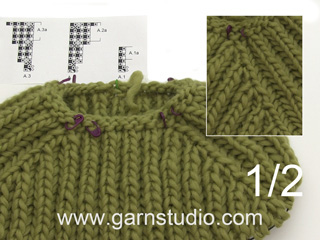
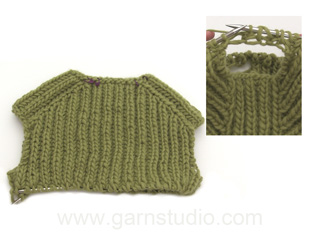
EXPLANATIONS FOR THE PATTERN:

-------------------------------------------------------

RIDGE/GARTER STITCH (worked back and forth):
Knit all rows.
1 ridge in height = Knit 2 rows.

PATTERN: 
See diagrams A.1 to A.4 (worked with English rib).

DECREASE TIP (evenly spaced):
To work out how to decrease evenly, count the total number of stitches on needle (e.g. 62 stitches) and divide by number of decreases to be made (e.g. 10) = 6.2. 
In this example decrease by purling each 5th and 6th stitch together.

-------------------------------------------------------

START THE PIECE HERE:

-------------------------------------------------------

VEST – SHORT OVERVIEW OF THE PIECE:
The neck and yoke are worked in the round with circular needle from mid back, top down. Stiches are increased for the shoulders before the piece is divided and the front and pieces worked separately as far as the bottom of the armholes. The pieces are rejoined and the body continued in the round.

NECK:
Cast on 62-62-66-70-70-74 stitches with circular needle size 6 mm and Air. Purl 1 round, purl 1 more round and decrease 10 stitches evenly spaced – read DECREASE TIP = 52-52-56-60-60-64 stitches.
Purl 1 round. Change to circular needle size 7 mm.

YOKE:
Work pattern as follows: A.1 (= 2 stitches) over the first 6-6-6-8-8-8 stitches (= half back piece), A.2 (= 2 stitches), A.1 over 12 stitches, A.3 (= 2 stitches = shoulder), A.1 over 10-10-12-14-14-16 stitches (= front piece), A.2 over 2 stitches, A.1 over 12 stitches, A.3 over 2 stitches (= shoulder) and A.1 over the last 4-4-6-6-6-8 stitches (= half back piece). REMEMBER THE KNITTING TENSION!
When A.1 has been completed 1 time in height, repeat A.1a onwards.
When A.2 and A.3 have been completed 1 time in height, repeat A.2a and A.3a onwards; i.e. continue to increase every 6th round, the increased stitches are worked in English rib.
When A.2a and A.3a have been worked a total of 8-9-9-10-11-12 times in height there are 132-140-144-156-164-176 stitches on the needle. Work A.1a over all stitches until the piece measures 24-25-25-25-26-26 cm at the longest point (i.e. measured along the shoulder); adjust so the next round is purled.
Now divide the piece for front and back pieces and the shoulder stitches are cast off as follows:
Work 26-28-28-32-34-36 stitches in English rib, 1 stitch in GARTER STITCH – read description above (= half back piece), cast off the next 13 stitches (yarn overs are cast off as separate stitches), 1 stitch in garter stitch, work 51-55-57-63-67-73 stitches in English rib, 1 stitch in garter stitch (= front piece), cast off the next 13 stitches (yarn overs are cast off as separate stitches), work 1 stitch in garter stitch and English rib over the last 25-27-29-31-33-37 stitches.
Cut the strand.
Now continue the armholes and back piece, working back and forth.
Allow the other stitches to remain on the needle.

BACK PIECE:
= 53-57-59-65-69-75 stitches.
Work as follows from the right side: 1 stitch in garter stitch, A.4 (= 2 stitches) until there is 1 stitch left (i.e. the English rib pattern starts and ends with 1 purled English rib stitch) and finish with 1 stitch in garter stitch.
Continue this pattern back and forth for 10-10-11-12-13-14 cm, measured along the garter stitch; make sure the last row is from the wrong side. Allow the stitches to remain on the needle and work the front piece.

FRONT PIECE:
Work the 53-57-59-65-69-75 stitches on the front piece in the same way as the back piece.

BODY:
Work A.1a over the front piece (i.e. the garter stitches on each side become knitted English rib stitches), cast on 3 stitches, work A.1a over the back piece and cast on 3 stitches at the end of the row = 112-120-124-136-144-156 stitches.
Now work A.1a in the round over all the stitches. On the first round work the 3 cast-on stitches under each sleeve without yarn overs.
When the piece measures 47-49-51-53-55-57 cm (measured from the neck) cast off with knit; yarn overs are cast off as separate stitches (to avoid the cast-off edge being tight).

Diagram

symbols = knit
symbols = work from right side
symbols = work from wrong side
symbols = make 1 yarn over, slip 1 stitch onto the right needle as if to purl
symbols = knit yarn over and stitch together
symbols = purl yarn over and stitch together
symbols = work 3 stitches in knitted stitch and yarn over as follows: knit the yarn over and knitted stitch together but do not slip them from the needle, make 1 yarn over right needle and knit the yarn over and stitch together 1 more time, slip the knitted stitch and yarn over that was knitted in off the left needle = 3 stitches
symbols = purl
symbols = knitting direction
diagram
diagram

Each of our patterns has specific tutorial videos to help you.

Do you have a question? See a list of frequently asked questions (FAQ)

Knitting tension is what determines the final measurements of your work, and is usually measured per 10 x 10 cm. It is provided like so: number of stitches in width x number of rows in height - eg: 19 stitches x 26 rows = 10 x 10 cm.

The knitting tension is very individual; some people knit/crochet loosely while others work tightly. You adjust the knitting tension with the needle size, which is why the suggested needle size is only meant as a guide! You need to adjust this (up or down) to ensure that YOUR knitting tension matches the knitting tension provided in the pattern. If you work with a different knitting tension than provided you will have a different yarn consumption, and your work will have different measurements than what the pattern suggests.

The knitting tension also determines which yarns can replace each other. As long as you achieve the same knitting tension you can replace one yarn with another.

See DROPS lesson: How to measure your tension/gauge

See DROPS video: How to make a gauge tension swatch

The required amount of yarn is provided in grams, eg: 450 g. To calculate how many balls you’ll need you first need to know how many grams are in 1 ball (25g, 50g or 100g). This information is available if you click on the individual yarn quality on our pages. Divide the amount required with the amount of each ball. For example, if each ball is 50g (the most common amount), the calculation will be as follows: 450 / 50 = 9 balls.

The important thing when changing from one yarn to another is that the knitting/crochet tension remains the same. This is so that the measurements of the finished piece will be the same as on the sketch provided. It is easier to achieve the same knitting tension using yarns from the same yarn group. It is also possible to work with multiple strands of a thinner yarn to achieve the knitting tension of a thicker one. Please try our yarn converter. We recommend you to always work a test swatch.

Please NOTE: when changing yarn the garment might have a different look and feel to the garment in the photo, due to individual properties and qualities of each yarn.

See DROPS lesson: Can I use a different yarn than the one mentioned in the pattern?

All our yarns are categorised into yarn groups (from A to F) according to thickness and knitting tension – group A contains the thinnest yarns and group F the thickest. This makes it easier for you to find alternative yarns to our patterns, should you wish to switch yarn. All yarns within the same group have a similar knitting tension and can easily replace each other. However, different yarn qualities have different structures and properties which will give the finished work a unique look and feel.

Click here for an overview of the yarns in each yarn group

At the top of all our patterns you’ll find a link to our yarn calculator, which is a helpful tool should you wish to use a different yarn than suggested. By filling in the yarn quality you wish to replace, the amount (in your size) and number of strands, the calculator will present good alternative yarns with the same knitting tension. Additionally it will tell you how much you’ll require in the new qualities and whether you’ll need to work with multiple strands. Most skeins are 50g (some are 25g or 100g).

If the pattern is worked with multiple colours, every colour will have to be calculated separately. Similarly, if the pattern is worked with several strands of different yarns (for example 1 strand Alpaca and 1 strand Kid-Silk) you will have to find alternatives for each, individually.

Click here to see our yarn calculator

Since different yarns have different qualities and textures we have chosen to keep the original yarn in our patterns. However, you can easily find options among our available qualities by using our yarn calculator, or simply pick a yarn from the same yarn group.

It is possible that some retailers still have discontinued yarns in stock, or that someone has a few skeins at home that they would like to find patterns for.

The yarn calculator will provide both alternative yarn as well as required amount in the new quality.

If you think it's hard to decide what size to make, it can be a good idea to measure a garment you own already and like the size of. Then you can pick the size by comparing those measures with the ones available in the pattern's size chart.

You'll find the size chart at the bottom of the pattern.

See DROPS lesson: How to read size chart

The needle size provided in the pattern serves only as a guide, the important thing is to follow the knitting tension. And since knitting tension is very individual, you will have to adjust the needle size to ensure that YOUR tension is the same as in the pattern – maybe you’ll have to adjust 1, or even 2 needle sizes, up or down to achieve the correct tension. For this, we recommend that you work test swatches.

Should you work with a different knitting tension than the one provided, the measurements of the finished garment might deviate from the measurement sketch.

See DROPS lesson: How to measure your tension/gauge

See DROPS video: How to make a tension/gauge swatch

Working a garment top-down provides more flexibility and room for personal adjustment. For example it is easier to try the garment on while working, as well as making adjustments to length of yoke and shoulder caps.

The instructions are carefully explaining every step, in the correct order. Diagrams are adjusted to the knitting direction and are worked as usual.

The diagram depicts all rows/rounds, and every stitch seen from the right side. It is read from bottom to top, from right to left. 1 square = 1 stitch.

When working back and forth, every other row is worked from the right side and every other row is worked from the wrong side. When working from the wrong side, the diagram will have to be worked reversed: from left to right, knit stitches are purled, purl stitches are knit etc.

When working in the round every round is worked from the right side and the diagram are worked from right to left on all rounds.

See DROPS lesson: How to read knitting diagrams

The diagram depicts all rows/rounds, and every stitch seen from the right side. It is worked from bottom to top, from right to left.

When working back and forth every other row is worked from the right side: from right to left and every other row is worked from the wrong side: from left to right.

When working in the round, every row in the diagram are worked from the right side, from right to left.

When working a circular diagram you start in the middle and work your way outwards, counter clockwise, row by row.

The rows usually start with a given number of chain stitches (equivalent to the height of the following stitch), this will either be depicted in the diagram or explained in the pattern.

See DROPS lesson: How to read crochet diagrams

Instructions for working several diagrams after each other on the same row/round, will often be written like so: “work A.1, A.2, A.3 a total of 0-0-2-3-4 times". This means you work A.1 once, then A.2 is worked once, and A.3 is repeated (in width) the number of times provided for your size – in this case like so: S = 0 times, M = 0 times, L=2 times, XL= 3 times and XXL = 4 times.

The diagrams are worked as usual: begin with the first row in A.1, then work the first row in A.2 etc.

See DROPS lesson: How to read knitting diagrams

See DROPS lesson: How to read crochet diagrams

The total width of the garment (from wrist-to-wrist) will be larger in the larger sizes, despite the actual sleeves being shorter. The larger sizes have longer sleeve caps and wider shoulders, so there will be a good fit in all sizes.

The measurement sketch/schematic drawing provides information regarding the full length of the garment. If it’s a jumper or a jacket the length is measured from the highest point on the shoulder closest to the neckline, and straight down to the bottom of the garment. It is NOT measured from the tip of shoulder. Similarly, the length of yoke is measured from the highest point on the shoulder and down to where yoke is split into body and sleeves.

On a jacket measures are never taken along bands, unless specifically stated. Always measure inside band stitches when measuring the length.

See DROPS lesson: How to read a schematic drawing

Diagrams are often repeated on the round or in height. 1 repeat is the diagram the way it appears in the pattern. If it says to work 5 repeats of A.1 in the round, then you work A.1 a total of 5 times after/next to each other in the round. If it says to work 2 repeats of A.1 vertically/in height you work the entire diagram once, then begin again at the start and work the entire diagram one more time.

Chain stitches are slightly narrower than other stitches and to avoid working the cast-on edge too tight, we simply chain more stitches to begin with. The stitch count will be adjusted on the following row to fit the pattern and measurement sketch.

The rib edge is more elastic and will contract slightly compared to, for example, stocking stitch. By increasing before the rib edge, you avoid a visible difference in width between the rib edge and the rest of the body.

It’s very easy to cast off too tightly, and by making yarn overs while casting off (and simultaneously casting these off) you avoid a too tight cast off edge.

See DROPS video: How to bind off with yarn overs (yo)

To achieve an even increase (or decrease) you can increase on, for example: every 3rd and 4th row alternately, like so: work 2 rows and increase on the 3rd row, work 3 rows and increase on the 4th. Repeat this until the increase is complete.

See DROPS lesson: Increase or decrease 1 st on every 3rd and 4th row alternately

Should you prefer to work in the round instead of back and forth, you may of course adjust the pattern. You’ll need to add steeks mid-front (usually 5 stitches), and follow the instructions. When you would normally turn and work from the wrong side, simply work across the steek and continue in the round. At the end you’ll cut the piece open, pick up stitches to work bands, and cover the cut edges.

See DROPS video: How to knit steeks and cut open

Should you prefer to work back and forth instead of in the round, you may of course adjust the pattern so you work the pieces separately and then assemble them at the end. Divide the stitches for the body in 2, add 1 edge stitch in each side (for sewing) and work the front and back pieces separately.

See DROPS lesson: Can I adapt a pattern for circular needles into straight needles?

Pattern repeats can vary slightly in the different sizes, in order to get the correct proportions. If you’re not working the exact same size as the garment in the photo, yours might deviate slightly. This has been carefully developed and adjusted so that the complete impression of the garment is the same in all sizes.

Make sure to follow instructions and diagrams for your size!

If you have found a pattern you like which is available in women’s size it’s not very difficult to convert it to men’s size. The biggest difference will be the length of sleeves and body. Start working on the women size that you think would fit across the chest. The additional length will be worked right before you cast off for the armhole/sleeve cap. If the pattern is worked top-down you can add the length right after the armhole or before the first decrease on sleeve.

Regarding additional yarn amount, this will depend on how much length you add, but it is better with a skein too many than too few.

All yarns will have excess fibres (from production) that might come off as lint or shedding. Brushed yarns (ie hairier yarns) have more of these loose, excess fibres, causing more shedding.

Shedding also depends on what is worn under or over the garment, and whether this pulls at the yarn fibres. It’s therefore not possible to guarantee that there will be no shedding

Below are some tips on how to get the best result when working with hairier yarns:

1. When the garment is finished (before you wash it) shake it vigorously so the looser hairs come off. NOTE: do NOT use a lint roller, brush or any method that pulls at the yarn.

2. Place the garment in a plastic bag and put it in your freezer - the temperature will cause the fibres to become less attached to each other, and excess fibres will come off easier.

3. Leave in the freezer for a few hours before taking it out and shaking it again.

4. Wash the garment according to the instructions on the yarn label.

Pilling is a natural process that happens to even the most exclusive of fibers. It's a natural sign of wear and tear that is hard to avoid, and that is most visible in high friction areas of your garment like a sweater's arms and cuffs.

You can make your garment look as new by removing the pilling, using a fabric comb or a pill/lint remover.

Still can't find the answer you need? Then scroll down and leave your question so one of our experts can try to help you. This will be done normally within 5 to 10 working days.
In the meantime, you can read the questions and answers that others have left to this pattern or join the DROPS Workshop on Facebook to get help from fellow knitters/crocheters!

You might also like...

Post a comment to pattern DROPS 210-4

We would love to hear what you have to say about this pattern!

If you want to leave a question, please make sure you select the correct category in the form below, to speed up the answering process. Required fields are marked *.

Comments / Questions (160)

country flag Therese Iden wrote:

Hei! Jeg har begynt å strikke vesten Mountain Moraine og lurer på hva jeg skal gjøre når jeg når jeg har kommet til der A2a og A3a skal repeteres oppover. Økningen som skal gjøres på hver 6 pinn skal økningen gjøres flere ganger når det er økt så mange ganger at det er nok masker til å ta flere økningen på samme pinne?

11.01.2021 - 20:20

country flag Eva-Lisa Johnsson wrote:

Jag förstår fortfarande inte hur man fortsätter sticka efter att ha maskat av för ärmhålet.

07.01.2021 - 22:06

country flag Eva-Lisa Johnsson wrote:

Hej! Jag har maskat av axelmaskorna och ska börja på bakstycket. Är på mitten av stickningen då,ska jag sätta alla maskorna på en sticka och börja på nytt?

29.12.2020 - 12:32

DROPS Design answered:

Hej Eva-Lisa, jeg er ikke helt sikker på hvor du er? Er du kommet dertil hvor arbejdet måler 24-25-25-25-26-26 cm, så er du midt på bagstykket og følger bare opskriften i din størrelse (dvs strik 26 m patent 1 maske rille i størrelse S) = halve bagstykket osv :)

08.01.2021 - 10:18

country flag Gunilla Eriksson wrote:

Jag har valt ett annat garn Big Merino från samma garngrupp och behöver då 500 gram i stället för 250. Men hur ska jag tänka när det gäller antal maskor? Behöver jag gå upp i storlek eller stickor? Har rundstickor 6 och 7. Tacksam för svar snarast.

27.12.2020 - 12:57

DROPS Design answered:

Hej Gunilla. Se bara till att du får stickfastheten att stämma (11 maskor på bredden och 32 varv på höjden med patentstickning = 10 x 10 cm) och då kan du följa mönstret som det är och få samma mått som i måttskissen. Mvh DROPS Design

04.01.2021 - 13:53

country flag Christina wrote:

Hi, nun zu meiner Frage: Wenn man die Charts bis Runde 8 gestrickt hat, hat man gleichzeitig auch den Abschnitt A1a beendet. Macht man dann, in Runde 9 nur noch mit Abschnitt A2 und A3 weiter? Was passiert mit den Maschen dazwischen? Danke für die Aufklärung und ♥liche Grüße

26.12.2020 - 17:14

DROPS Design answered:

Liebe Christina, nach der 8. Reihe in A.1 (= wenn A.1a fertig in der Höhe ist), wierdeholen Sie die 4 Reihen in A.1a, gleichzeitig stricken Sie die anderen Diagramme wie zuvor, dh bei der 9. Runde stricken Sie die 1. Reihe in A.1a wieder und die 9. Reihe in A.2/A.3. Viel Spaß beim stricken!

04.01.2021 - 08:49

country flag Christina wrote:

Hi, also ich muß mal sagen, daß dieses eine wirklich schwer zu verstehende Anleitung ist. Da hat Anna aus Norwegen Recht.

26.12.2020 - 17:10

country flag Anna wrote:

Hei igjen! Når man har strikket A.1 - A.2 og A.3 , samt A.1a oppover 8 omganger (hvis man teller nedenifra) så gjenstår det to omganger på A.2 og A.3 (FØR man går over på A.2.a og A.3.a.) Er det disse to omgangene ( Nr.9 og nr. 10 med økning ) som man skal strikke ETTER at man er ferdig med A.1a og FØR man begynner på A.2a og A.3a ...? Omgang nr.9 og nr.10 hører jo til A.2 og A.3. Har dere som svarer strikket dette selv...?

15.12.2020 - 16:55

DROPS Design answered:

Hej Anna, nej, vi som svarer har ikke strikket alle tusindvis af opskrifter.. Ja som sagt strikker du A.2 og A.3 helt færdig (incl pind 9 og 10 ifølge diagrammet) Når du er helt færdig med A.2 og A.3 fortsætter du med A.2a og A.3a (som består af de sidste 6 pinde). Nu lukker vi tråden! God fornøjelse!

16.12.2020 - 08:17

country flag Anna wrote:

Leser dere ikke spørsmålet? ? Jeg har fulgt videoen helt til den stopper etter A.1a. I videoen strikkes A.1- A.2 og A.3 om hverandre 4 rader opp før hun går over på A.1a 4 rader. Dette stemmer også med forklaringen. Etter dette stopper videoen. I forklaringen som følger mønsteret, skal man så strikke A.2og A.3 «en gang i høyden.» Jeg spør igjen: HVOR SKAL MAN DA BEGYNNE? RAD nr.9 og 10 på A.2 og A.3? Går det an å få svar på dette?

10.12.2020 - 14:07

DROPS Design answered:

Hej Anna, Det er ikke for at vi ikke vil svare, men vi har lidt svært ved at forstå dit spørgsmål.... Vi prøver en gang til :) Når du har strikket A.2 og A.3 fortsætter du med A.2a og A.3a som i begge diagrammer kun er de sidste 6 pinde i diagrammerne (rad 9 og 10 indgår ikke i A.3a eller A.2a).

15.12.2020 - 15:05

country flag Anna wrote:

Hei. Jeg har fulgt videoen helt til den stopper etter A.1a. I videoen strikkes A.1- A.2 og A.3 om hverandre 4 rader opp før hun går over på A.1a 4 rader. Dette stemmer også med forklaringen. Etter dette stopper videoen. I forklaringen som følger mønsteret, skal man så strikke A.2og A.3 «en gang i høyden.» Hvor skal man da begynne? Rad nr.9 og 10 på A.2 og A.3? Går det an å få svar på dette? Har dere som svarer strikket dette mønsteret selv?

09.12.2020 - 21:28

DROPS Design answered:

Hei Anna, Du ferdigstrikker A.2 og A.3 i høyden samtidig som du strikker A.1a over A.1. Når A.2 og A.3 er strikket ferdig i høyden 1 gang, strikker du A.2a og A.3a videre (repeteres i høyden). God fornøyelse!

10.12.2020 - 07:35

country flag Anna wrote:

Hei. Jeg har fulgt videoen helt til den stopper etter A.1a. I videoen strikkes A.1- A.2 og A.3 om hverandre 4 rader opp før hun går over på A.1a 4 rader. Dette stemmer også med forklaringen. Etter dette stopper videoen. I forklaringen som følger mønsteret, skal man så strikke A.2og A.3 «en gang i høyden.» Hvor skal man da begynne? Rad nr.9 og 10 på A.2 og A.3? Går det an å få svar på dette? Har dere som svarer strikket dette mønsteret selv?

09.12.2020 - 13:59