
Popular categories
Looking for a yarn?


|
||||||||||||||||||||||
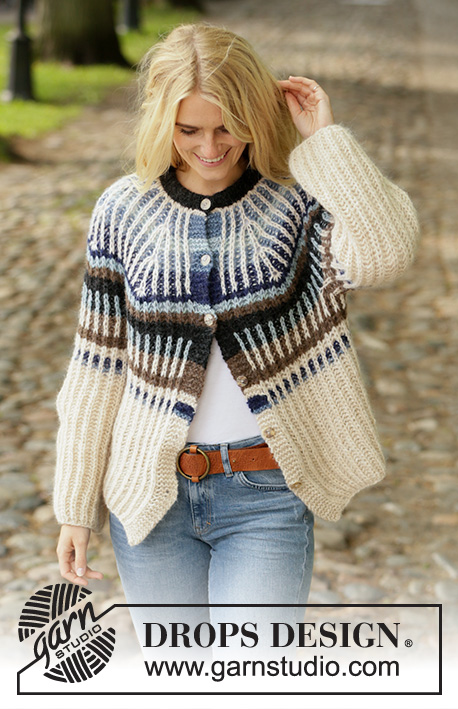
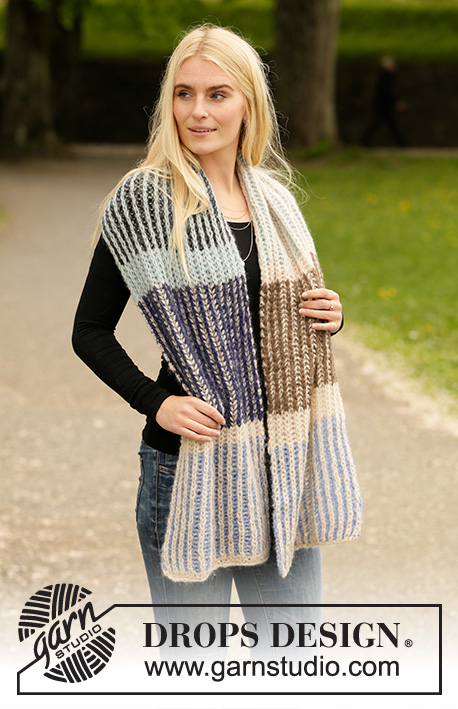
Urban Autumn |
||||||||||||||||||||||
 |
 |
|||||||||||||||||||||
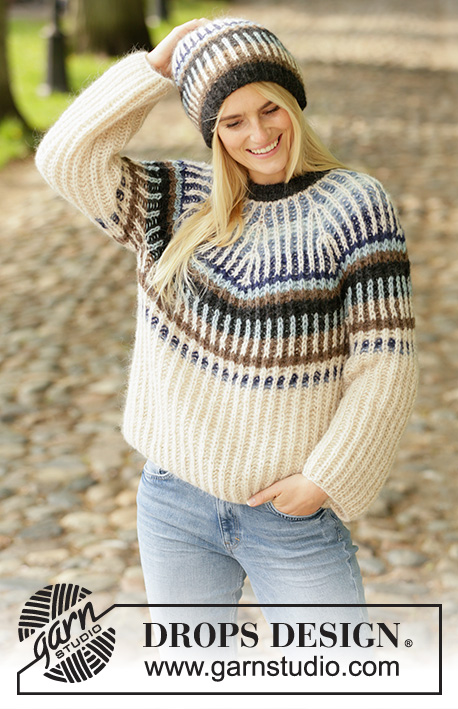
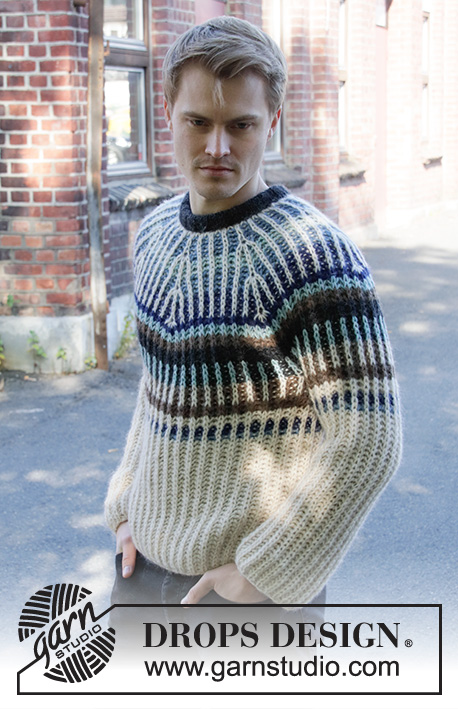
Knitted jumper for men in DROPS Air. The piece is worked top down with one-coloured English rib and 2-coloured English rib in stripes. Sizes S - XXXL.
DROPS 208-17 |
||||||||||||||||||||||
|
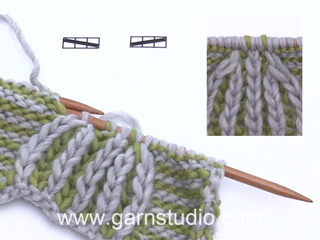
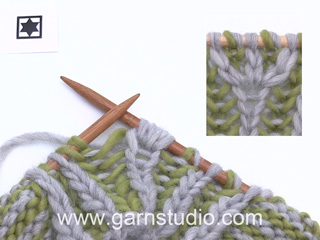
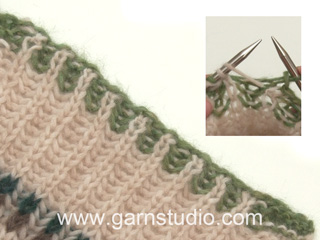
------------------------------------------------------- EXPLANATIONS FOR THE PATTERN: ------------------------------------------------------- DECREASE TIP-1 (evenly spaced): To work out how to decrease evenly, count the total number of stitches on needle (e.g. 76 stitches) and divide by number of decreases to be made (e.g. 20) = 3.8. In this example decrease by knitting together each 3rd and 4th stitch (approx.). PATTERN: See diagrams A.1 to A.3. Choose diagram for your size. KNITTING TIP (number of stitches): All stitch-counts given when working English rib exclude the yarn overs; the yarn overs belong to their respective knitted stitches and counted together as 1 stitch. STRIPES A.1: The arrows in A.1 show which colour to begin with; either the main colour (H) or the secondary colour (B). Work every other round with (H) and (B). A: wheat (H), denim blue (B). B: wheat (H), sea green (B). C: wheat (H), denim blue (B). D: wheat (H), navy blue (B). STRIPES A.2: The arrows in A.2 show which colour to begin with; either the main colour (H) or the secondary colour (B). With 2 colours, work every other round with (H) and (B). A: navy blue (H). B: sea green (H). C: brown (H). D: black (H). E: sea green (H), black (B). F: wheat (H), brown (B). G: brown (H). H: wheat (H). I: wheat (H), navy blue (B). J: wheat (H), denim blue (B). CASTING-OFF TIP: To avoid the cast-off edge being tight you can cast off with a ½ size larger needle. DECREASE TIP-2 (for sleeves; in sizes L, XXL and XXXL): Decrease alternately before and after the marker thread on a round with (H). Decrease 2 stitches at the end of the round as follows: Work until there are 4 stitches left before the marker thread, slip the first stitch and yarn-over onto the right needle as if to knit together, knit 2 together (i.e. 1 purled stitch + stitch and yarn over), pass the slipped stitch and yarn-over over the knitted together stitches, purl together the yarn over and stitch (= 2 stitches decreased). Decrease 2 stitches at the beginning of the round as follows: Slip the first stitch and yarn-over onto the right needle as if to knit together, purl 1, pass the slipped stitch and yarn-over over the purled stitch, slip the stitch back onto the left needle, pass the stitch and yarn-over over the stitch which was slipped back onto the left needle, finally slip the remaining stitch onto the right needle (= 2 stitches decreased) ------------------------------------------------------- START THE PIECE HERE: ------------------------------------------------------- JUMPER – SHORT OVERVIEW OF THE PIECE: The neck (with folded edge) is worked in the round with circular needle, top down. The yoke is worked in 2-coloured English rib and one-coloured English rib, top down from mid back. The yoke is divided for body and sleeves and the body continued in the round. The sleeves are worked in the round with short circular needle/double pointed needles, top down. NECK: Cast on 76-76-80-88-92-92 stitches with circular needle size 4 mm and black. Knit 1 round. Then work rib (= knit 2 / purl 2) for 7 cm (= including the folding edge). Change to wheat and knit 1 round where you decrease 20-20-16-32-28-20 stitches evenly spaced – read DECREASE TIP-1 = 56-56-64-56-64-72 stitches. Then work the yoke as described below. THE PIECE IS NOW MEASURED FROM HERE! YOKE: Change to circular needle size 8 mm and work the next round as follows: * Make 1 yarn over, slip 1 stitch onto the right needle as if to purl, purl 1 *, work from *-* to the end of the round. Read KNITTING TIP. Now work 2-coloured English rib and STRIPES A.1 – read description above, as follows: Work A.1 over all stitches (= 7-7-8-7-8-9 repeats of 8 stitches). REMEMBER THE KNITTING TENSION! When A.1 has been completed in height there are 140-140-160-168-192-216 stitches on the needle. The yoke measures approx. 12-12-12-16-16-16 cm measured from the bottom of the neck mid front. Then work A.2 over all stitches (= 70-70-80-84-96-108 repeats of 2 stitches) in STRIPES A.2 – read description above. Continue with this pattern. When the yoke measures 22-24-25-27-29-31 cm from the bottom of the neck mid front, work the next round as follows: Work the first 20-20-22-25-28-31 stitches as before (= half back piece), place the next 30-30-36-34-40-46 stitches on 1 thread for the sleeve, cast on 4-8-8-8-8-8 new stitches on the needle (= in side under the sleeve), work the next 40-40-44-50-56-62 stitches as before (= front piece), place the next 30-30-36-34-40-46 stitches on 1 thread for the sleeve, cast on 4-8-8-8-8-8 new stitches on the needle (= in side under the sleeve), work the remaining 20-20-22-25-28-31 stitches (= half back piece). Body and sleeves are finished separately. THE PIECE IS NOW MEASURED FROM HERE! BODY: = 88-96-104-116-128-140 stitches. Continue according to diagram A.2 as before – the 4-8-8-8-8-8 stitches under the sleeve are worked into the pattern; i.e. on the first round purl the stitches. Continue until A.2 has been completed in height. Then work one-coloured English rib as follows: Work A.3 over all stitches (= 44-48-52-58-64-70 repeats of 2 stitches) in wheat. Continue working until the piece worked 36-36-37-37-37-37 cm from the division (or to desired length; there is approx. 1 cm left to finished length) – adjust after a complete repeat in height. The next round is worked as follows: * Knit together the stitch and yarn over, purl 1, knit together the yarn over and stitch, 1 yarn over, slip 1 stitch onto the right needle as if to purl *, work from *-* to end of round. The next round is worked as follows: * Knit 1, purl 1, 1 yarn over, slip 1 stitch onto the right needle as if to purl, purl together the yarn over and stitch *, work from *-* to end of round. Cast off with knit over knit and purl over purl, yarn overs cast off as normal stitches. Make sure the cast-off edge is not tight – read CASTING-OFF TIP! SLEEVE: Place the 30-30-36-34-40-46 stitches from the thread on the one side of the piece on short circular needle size 8 mm and knit up 1 stitch in each of the 4-8-8-8-8-8 stitches cast on under the sleeve = 34-38-44-42-48-54 stitches. Insert a marker thread in the middle of the 4-8-8-8-8-8 stitches under the sleeve. Allow the thread to follow your work onwards; it will be used when decreasing under the sleeve. Continue according to diagram A.2 as before – the 4-8-8-8-8-8 stitches under the sleeve are worked into the pattern; i.e. on the first round purl the stitches. AT THE SAME TIME when the sleeve measures 6 cm, decrease 2 stitches mid under the sleeve (applies only to sizes L, XXL and XXXL) – read DECREASE TIP-2. Decrease like this every 2 cm a total of 0-0-2-0-2-3 times = 34-38-40-42-44-48 stitches. Complete A.2 in height. Then work one-coloured English rib as follows: Work A.3 (= 2 stitches) in wheat over all stitches. Continue like this until the sleeve measures 46-45-44-42-41-40 cm from the division (or to desired length; there is approx. 1 cm left to finished length – NOTE: Shorter measurements in larger sizes due to wider neck and longer yoke) – adjust after a complete repeat in height. The next round is worked as follows: * Knit together the yarn over and stitch, slip 1 stitch onto the right needle as if to purl *, work from *-* to end of round. The next round is worked as follows: * Knit 1, purl 1 *, work from *-* to end of round. Cast off with knit over knit and purl over purl – make sure the cast-off edge is not tight. Work the other sleeve in the same way. ASSEMBLY: Fold the cast-on edge to the wrong side and sew down with small neat stitches using black – make sure the seam is not tight and is not visible on the right side. |
||||||||||||||||||||||
Diagram explanations |
||||||||||||||||||||||
|
||||||||||||||||||||||

|
||||||||||||||||||||||

|
||||||||||||||||||||||

|
||||||||||||||||||||||
|
Have you made this or any other of our designs? Tag your pictures in social media with #dropsdesign so we can see them! Do you need help with this pattern?You'll find tutorial videos, a Comments/Questions area and more by visiting the pattern on garnstudio.com. © 1982-2024 DROPS Design A/S. We reserve all rights. This document, including all its sub-sections, has copyrights. Read more about what you can do with our patterns at the bottom of each pattern on our site. |
||||||||||||||||||||||


With over 40 years in knitting and crochet design, DROPS Design offers one of the most extensive collections of free patterns on the internet - translated to 17 languages. As of today we count 304 catalogues and 11422 patterns - 11422 of which are translated into English (UK/cm).
We work hard to bring you the best knitting and crochet have to offer, inspiration and advice as well as great quality yarns at incredible prices! Would you like to use our patterns for other than personal use? You can read what you are allowed to do in the Copyright text at the bottom of all our patterns. Happy crafting!
Comments / Questions (5)
Qué tal! Podrían ampliar la idea de borde de doblaje o indicarme dónde aprender eso para el cuello de esta prenda. Muchas gracias.
13.07.2021 - 00:58DROPS Design answered:
Hola Guillermo, puedes consultar el borde de doblaje en el siguiente vídeo: https://www.garnstudio.com/video.php?id=172&lang=es
15.07.2021 - 00:17Spørsmål: jeg har for mange masker når jeg skal dele opp til armer, rygg og forstykke- er masketallet i oppskriften korekt?
01.06.2021 - 18:26Hej. Jeg er igang med at strikke efter denne opskrift (XXXL), men frygter at der er nogle fejl. Jeg er nået til ærmer. Jeg ska samle 8 masker op = 54m. Så ska jeg tage 4m ind efter 6cm. = 50m Så står der jeg skal tage ind på samme måde efter 2cm 3 gange mere? Det bliver 12m mindre=38m MEN der står at der så ska være 48m efter indtagningerne? Kan i hjælpe?
02.02.2021 - 21:50DROPS Design answered:
Hei Mikkel. Du har 54 masker og etter 6 cm skal du felle 2 masker midt under ermet (ikke 4 masker som du skriver). Det felles 1 maske før og 1 maske etter merket midt under ermet, les evnt. FELLETIPS-2 i oppskriften. Fell slik på hver 2.cm totalt 3 ganger = 2 felt masker 3 ganger = 6 felte masker = 48 masker. God Fornøyelse!
08.02.2021 - 15:01Hello, I'd like to knit this sweater but I'm confused. I need to knit it with needle nr 8 and then 5 mm or needle 8 mm and then number 8? Thank you
12.11.2020 - 11:25DROPS Design answered:
Dear Silvia, you need needle size 4 mm (= for the ribbed edge on neck/collar) and needle size 8 mm - or size required to get the tension of 10 sts in width and 30 rows in English rib (brioche) = 10 x10 cm - read more about knitting tension here. Happy knitting!
12.11.2020 - 14:10Buongiorno, vorrei fare questo maglione per mio marito, mi viene solo un dubbio, i ferri sono misura 8 quindi 5 mm o 8 mm quindi misura 11?
12.11.2020 - 11:23DROPS Design answered:
Buongiorno Silva, i ferri utilizzati sono 4 mm per il bordo a coste sul collo e i ferri n° 8 mm. Controlli sempre che il suo campione corrisponda a quello indicato. In caso contrario, aggiusti il n° di ferri per ottenere il campione indicato. Buon lavoro!
13.11.2020 - 15:17