
Popular categories
Looking for a yarn?


|
|||||||||||||||||||
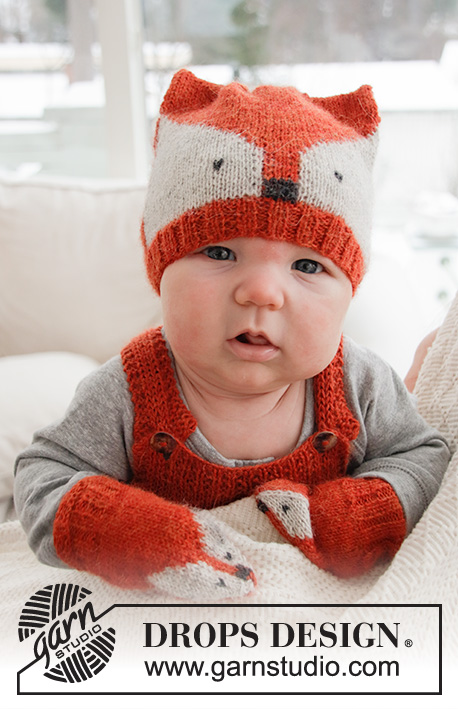
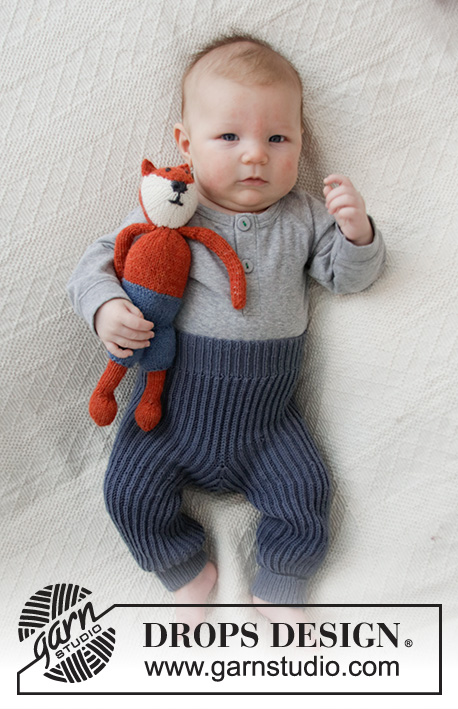
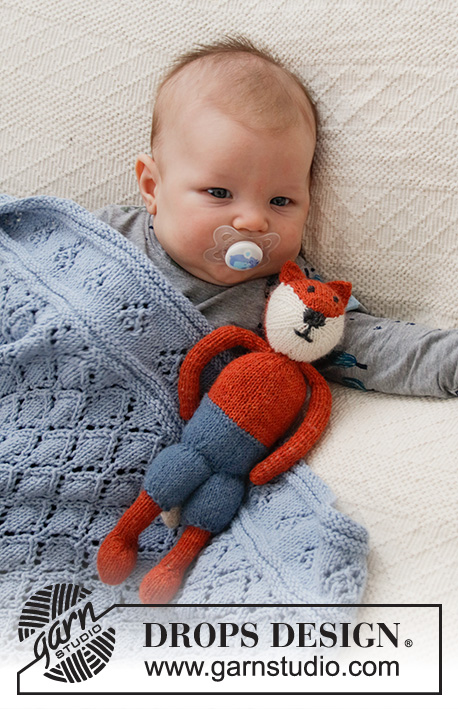
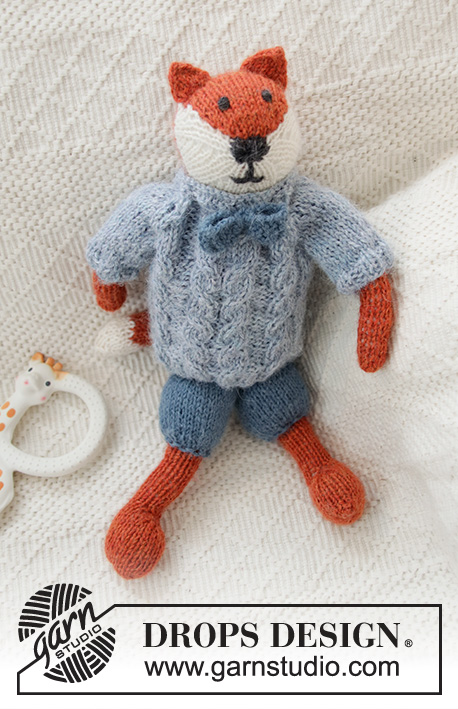
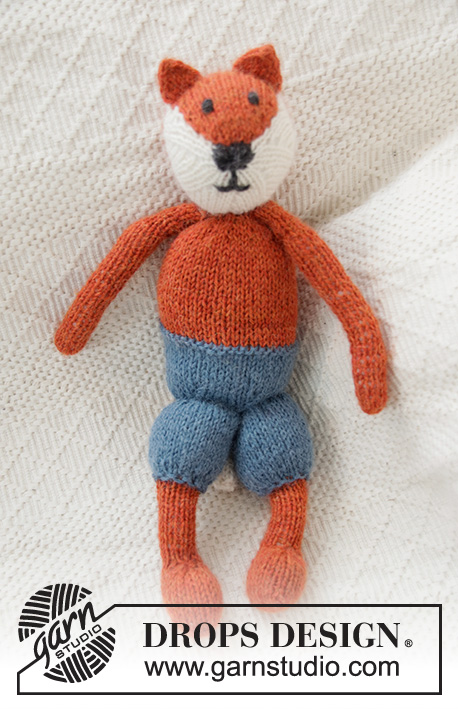
Mister Fox |
|||||||||||||||||||
 |
 |
||||||||||||||||||
Knitted fox with trousers, sweater and bow-tie in DROPS Alpaca.
DROPS Baby 36-11 |
|||||||||||||||||||
|
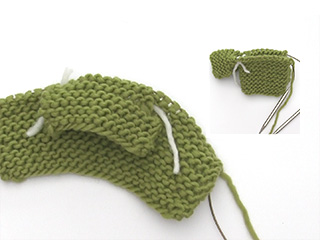
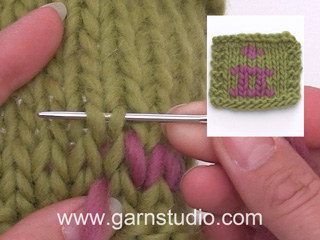
------------------------------------------------------- EXPLANATIONS FOR THE PATTERN: ------------------------------------------------------- MAGIC CIRCLE: To avoid a hole in the middle, use the following technique: Hold the strand-end with your left hand and make a loop around your left index finger (from left to right). Hold the loop between left thumb and index finger. Insert the needle through the loop, pick up the strand from the ball (i.e. lay the strand 1 time over the needle away from you), pull the strand through the loop, make 1 yarn over the needle (strand from back and towards you) and pull the yarn over through the stitch on the needle, * insert the needle through the loop, make 1 yarn over (strand from back and towards you), pull the yarn over through the loop, make 1 more yarn over (back and towards you) and pull the yarn over through the outermost stitch on the right needle (i.e. last stitch worked) *, repeat from *-* until there are 7 stitches on the row. Continue as described in the text – AT THE SAME TIME tighten the strand-end so the loop closes and the hole disappears. RIDGE/GARTER STITCH (worked back and forth): Knit all rows. 1 ridge in height = Knit 2 rows. PATTERN: See diagrams A.1 and A.2. RAGLAN: All decreases are worked from the right side! Work until there are 2 stitches left before the marker thread, knit 2 together (= 1 stitch decreases), marker thread here, slip 1 stitch as if to knit, knit 1 and pass the slipped stitch over (= 1 stitch decreased). When there are not enough stitches to work the cable, knit the cable stitches until all stitches are decreased. ------------------------------------------------------- START THE PIECE HERE: ------------------------------------------------------- FOX – SHORT OVERVIEW OF THE PIECE: The piece is worked with double pointed needles. The head is worked back and forth from the muzzle in two pieces with increasing, then sew both pieces together, the rest of the head is finished in the round to mid back. The ears are worked in the round and sewn onto the head. The body is worked in the round, top down. Arms, legs and tail are worked back and forth before being sewn onto the body. The sweater is worked to finish – the body is worked in the round and sleeves and yoke worked back and forth. The bow-tie is worked back and forth. HEAD: Make MAGIC CIRCLE with dark grey – read description above = 7 stitches on the needle. Divide the stitches between 3 double pointed needles size 3 mm = US 2,5 (work with the 4th needle) and work in the round as follows: ROUND 1: * Make 1 yarn over, knit 1 *, work from *-* to end of round = 14 stitches. Divide the piece in 2 and place 6 stitches on one needle for the rust section and 8 stitches on another needle for the off-white section. Now work back and forth over the 8 stitches with off-white as follows: NOTE: Yarn overs always worked twisted to avoid holes. ROW 1 (right side): 1 edge stitch in GARTER STITCH – read description above, * knit 1, make 1 yarn over *, work from *-* until there are 2 stitches left, knit 1 and 1 edge stitch in garter stitch = 13 stitches. ROW 2: Purl back with 1 edge stitch in garter stitch on each side. ROWS 3-4: Work stockinette stitch with 1 edge stitch in garter stitch on each side. ROW 5: Knit 3, * 1 yarn over, knit 2 *, work from *-* to end of row = 18 stitches. ROW 6: Purl back with 1 edge stitch in garter stitch on each side. ROW 7: Knit 3, * 1 yarn over, knit 3 *, work from *-* to end of row = 23 stitches. ROW 8: Purl back with 1 edge stitch in garter stitch on each side. ROW 9: Knit 3, * 1 yarn over, knit 4 *, work from *-* to end of row = 28 stitches. ROW 10: Purl back with 1 edge stitch in garter stitch on each side. ROW 11: 1 edge stitch in garter stitch, 1 yarn over, knit 2, * 1 yarn over, knit 5 *, work from *-* until there are 5 stitches left on the row, 1 yarn over, knit 4, 1 yarn over, 1 edge stitch in garter stitch = 35 stitches. ROW 12: Purl back with 1 edge stitch in garter stitch on each side. ROW 13: 1 edge stitch in garter stitch, 1 yarn over, knit 3, * 1 yarn over, knit 6 *, work from *-* until there is 1 stitch left on the row, 1 yarn over, 1 edge stitch in garter stitch = 42 stitches. ROW 14: Purl back with 1 edge stitch in garter stitch on each side. Place the stitches on 1 thread. Now work the 6 stitches with rust as follows: NOTE: Yarn overs always worked twisted to avoid holes. ROW 1: 1 edge stitch in garter stitch, 1 yarn over, knit until there is 1 stitch left, 1 yarn over, 1 edge stitch in garter stitch = 8 stitches. ROW 2: Purl with 1 edge stitch in garter stitch on each side. ROWS 3-6: Work as for rows 1-2 = 12 stitches. Continue back and forth with stockinette stitch and 1 edge stitch in garter stitch on each side until you have worked 14 rows with rust. Sew the off-white and rust sections together inside the 1 edge stitch in garter stitch using off-white. Make sure the stitches you sew into (i.e. the 4 edge stitches) are well fastened. They are no longer part of any stitch-counts. Now continue with rust as follows: Work the 10 rust-stitches and the 40 off-white-stitches are worked back onto the needle = 50 stitches. ROUND 1: * 1 yarn over, knit 4 *, work from *-* until there are 2 stitches left on the round, 1 yarn over and knit 2 = 63 stitches. ROUNDS 2-4: Knit (Yarn overs always knitted twisted to avoid holes). ROUND 5: * Knit 5, knit 2 together *, work from *-* to end of round (= 9 stitches decreased) = 54 stitches. ROUND 6: Knit. ROUND 7: * Knit 4, knit 2 together *, work from *-* to end of round (= 9 stitches decreased) = 45 stitches. ROUND 8: Knit. Continue decreasing like this every 2nd round (i.e. work 1 less stitch before knitting 2 together on each decrease-round = 9 stitches decreased on each round) until there are 9 stitches left on the needle. Cut the strand and pull it through the remaining stitches (without tightening). Embroider eyes, mouth and nose using dark grey, fill the head with wadding, tighten the stitches and fasten the strand (= mid-back of head). EARS: Cast on 16 stitches with rust and divide the stitches between 2 double pointed needles (work with the third needle). ROUNDS 1-2: Knit. ROUND 3: * Slip 1 stitch as if to knit, knit 1 and pass the slipped stitch over (= 1 stitch decreased), knit 4, knit 2 together (= 1 stitch decreased) *, work from *-* 1 more time = 12 stitches. ROUND 4: Knit. ROUND 5: * Slip 1 stitch as if to knit, knit 1 and pass the slipped stitch over (= 1 stitch decreased), knit 2, knit 2 together (= 1 stitch decreased) *, work from *-* 1 more time = 8 stitches. ROUND 6: Knit. ROUND 7: * Slip 1 stitch as if to knit, knit 1 and pass the slipped stitch over (= 1 stitch decreased), knit 2 together (= 1 stitch decreased) *, work from *-* 1 more time = 4 stitches. Knit the stitches together 2 and 2 = 2 stitches left. Cut the strand, pull it through the remaining stitches and fasten well. Sew the bottom together with a couple of stitches and fasten the ear to the head. Work 1 more ear and fasten to the head. BODY: Cast on 16 stitches with rust – divide the stitches between 4 double pointed needles (work with the 5th needle). ROUNDS 1-2: Knit. ROUND 3: * Knit 2, 1 yarn over *, work from *-* to end of round = 24 stitches. ROUND 4: Knit (Yarn overs always knitted twisted to avoid holes). ROUND 5: * Knit 2, 1 yarn over *, work from *-* to end of round = 36 stitches. ROUND 6: Knit. ROUND 7: * Knit 3, 1 yarn over *, work from *-* to end of round = 48 stitches. Continue in the round with stockinette stitch until the piece measures 5½ cm= 2⅛". Change to medium petrol and knit 1 round and purl 1 round. Then work 8 rounds with stockinette stitch and medium petrol. Continue decreasing as follows: ROUND 1: * Knit 6, knit 2 together *, work from *-* to end of round = 42 stitches. ROUND 2: Knit. ROUND 3: * Knit 5, knit 2 together *, work from *-* to end of round = 36 stitches. ROUND 4: Knit. Continue to decrease like this every 2nd round (i.e. on each decrease round work 1 less stitch before knitting 2 together = 6 stitches decreased on each decrease round) until there are 12 stitches left. Cut the strand and pull it through the remaining stitches (without tightening). Fill the body with wadding, tighten the strand and fasten well. Sew the head to the body– the medium petrol section should face down (= trousers). LEG: Cast on 18 stitches with double pointed needles size 3 mm = US 2,5 and rust. Work stockinette stitch back and forth with 1 edge stitch in garter stitch on each side for 3 cm = 1⅛". Then work as follows: ROW 1 (= right side): 1 edge stitch in garter stitch, knit 5, knit the next 6 stitches together 2 and 2, knit 5, 1 edge stitch in garter stitch = 15 stitches. ROW 2 (= wrong side): 1 edge stitch in garter stitch, purl 5, bind off the next 3 stitches, purl 5, 1 edge stitch in garter stitch = 6 stitches on each side. ROW 3 (= right side): Work the 6 first stitches and then the next 6 stitches on the needle (the 3 bind-off stitches are now a hole in the middle of the piece). Continue with stockinette stitch back and forth and 1 edge stitch in garter stitch on each side over the 12 stitches until the leg measures 8 cm = 3⅛". Change to medium petrol, knit 1 row from the right side and knit 1 row from the wrong side. Then work as follows: ROW 1 (= right side): * Knit 1, 1 yarn over *, work from *-* until there is 1 stitch left and knit 1 = 23 stitches. ROW 2 (= wrong side): Purl with 1 edge stitch in garter stitch on each side (yarn overs purled twisted to avoid holes). ROW 3: * Knit 2, 1 yarn over *, work from *-* until there is 1 stitch left, knit 1 = 34 stitches. Continue with stockinette stitch back and forth and 1 edge stitch in garter stitch on each side until the leg measures 11 cm = 4⅜", bind off. Sew together the opening mid-top of the foot. Sew the foot together underneath and continue up the back of the leg – sew inside the 1 edge stitch in garter stitch. Fill the leg with wadding. Tack a thread up and down through the bind-off edge at the top of the leg. Tighten so it is a bit baggy. Work 1 more leg in the same way. Sew both legs to the body. TAIL: Cast on 10 stitches with rust and double pointed needles size 3 mm = US 2,5. Work stockinette stitch with 1 edge stitch in garter stitch on each side. When you have worked 6 rows work the next row from the right side as follows: ROW 7: 1 edge stitch in garter stitch, * 1 yarn over, knit 2 *, work from *-* until there is 1 stitch left, 1 edge stitch in garter stitch = 14 stitches. ROW 8: Purl with 1 edge stitch in garter stitch on each side (yarn overs always purled twisted to avoid holes). ROW 9: 1 edge stitch in garter stitch, knit 1, * 1 yarn over, knit 3 *, work from *-* until there are 3 stitches left, 1 yarn over, knit 2, 1 edge stitch in garter stitch = 18 stitches. Continue back and forth until the tail measures 4½ cm = 1¾" – adjust so the next row is worked from the right side: Now work pattern back and forth as follows: 1 edge stitch in garter stitch, A.1 over the next 16 stitches, 1 edge stitch in garter stitch. When A.1 has been completed in height, continue with off-white as follows: 1 edge stitch in garter stitch, knit 4, * knit 2 together, insert a marker thread here, 1 yarn over, knit 2 *, work from *-* until there is 1 stitch left, 1 edge stitch in garter stitch. There are 3 marker threads in the piece and you have increased 3 stitches and decreased 3 stitches on the row = 18 stitches. Continue back and forth with stockinette stitch and 1 edge stitch in garter stitch on each side, AT THE SAME TIME on each row from the right side, knit together the 2 last stitches before each marker thread (= 3 stitches decreased) 3 times = 9 stitches left. Work 1 row back from the wrong side. Then work the last row as follows: Knit together all stitches 2 and 2 until there is 1 stitch left, knit 1 = 5 stitches. Cut the strand, leaving a strand-end to sew the tail together. Thread the strand through the remaining stitches and tighten, then sew the tail together inside the 1 edge stitch as far as the rust section, fill the tail with wadding and finish sewing the tail using rust. Fasten the tail to the middle of the medium petrol section at the back of the fox. ARM: Cast on 10 stitches with rust and double pointed needles size 3 mm = US 2,5. Work stockinette stitch back and forth with 1 edge stitch in garter stitch on each side until the arm measures 11½ cm = 4½". Cut the strand (leave enough strand-end to sew the sleeve with), pull the strand through the stitches (= at bottom of arm), tighten and then sew together inside the 1 edge stitch on each side. Fill the arm with wadding and fasten it to the top of the body by the neck (under the head). Work 1 more arm in the same way and fasten to the other side. SWEATER: The body is worked in the round with double pointed needles as far as the armholes. The sleeves are worked back and forth as far as the armholes, then placed on the same needle as the body, where stitches were bind off for the armholes. The yoke is worked back and forth from mid back, leaving an opening at the back of the sweater. BODY: Cast on 72 stitches with double pointed needles size 3 mm = US 2,5 and fog. Work rib (= knit 2 / purl 2) in the round. When you have worked 4 rounds of rib, knit 1 and insert a marker thread here (between 2 knitted stitches = in side of body; this is the beginning of the round). Work pattern as follows: * Knit 3, A.2 (= 30 stitches), knit 3 *, work from *-* 1 more time on the round. Continue like this in the round until the piece measures 8 cm = 3⅛" – adjust so you finish after round 1 in A.2. The next round is worked as follows: Bind off the first 2 stitches, work the next 32 stitches as before (= front piece), bind off the next 4 stitches, work the next 32 stitches as before (= back piece), bind off the last 2 stitches. Lay the piece to one side and work the sleeves. SLEEVE: Cast on 22 stitches with double pointed needles size 3 mm = US 2,5 and fog and leave a strand-end of approx. 15 cm = 6" to sew the sleeve seam with. Work rib as follows: 1 edge stitch in garter stitch, (knit 2 / purl 2) over the next 20 stitches, 1 edge stitch in garter stitch. Continue back and forth for 4 rows. Now work stockinette stitch back and forth with 1 edge stitch in garter stitch on each side. When the sleeve measures 5 cm = 2", bind off as follows: Bind off the first 3 stitches, work the next 16 stitches, bind off the last 3 stitches. Cut the strand and work the other sleeve in the same way. YOKE: Place the sleeves on the same needle as the body, where stitches were bind off for the armholes = 96 stitches. Place a marker thread in each transition between body and sleeves. Start the round mid back, i.e. between the middle 2 purled stitches in A.2. Then work back and forth as follows: Work pattern on the front and back pieces as before (with 1 edge stitch in garter stitch instead of purl over the first and last stitches = towards mid back), work stockinette stitch on the sleeves, AT THE SAME TIME decrease to RAGLAN – read description above, every 2nd row 4 times = 64 stitches. Now work as follows: ROW 1 (right side): * Work until there are 3 stitches left before the marker thread, knit 3 together (= 2 stitches decreased), marker thread here, slip 1 stitch as if to knit, knit 1 and pass the slipped stitch over (= 1 stitch decreased), knit until there are 2 stitches left before the marker thread, knit 2 together (= 1 stitch decreased), marker thread here, slip 1 stitch as if to knit, knit 2 together and pass the slipped stitch over the knitted together stitches (= 2 stitches decreased) *, work from *-* 1 more time= 52 stitches. ROW 2: Knit over knit, purl over purl from the wrong side. ROW 3: Work in the same way as row 1 (= 12 stitches decreased) = 40 stitches. ROW 4: Knit; at the end of the row cast on 15 stitches. ROW 5: Bind off the first 15 stitches with purl (from the right side), knit the next 40 stitches, cast on 15 stitches at the end of the row. ROW 6: Bind off the first 15 stitches with knit (from the wrong side), then bind off the remaining 40 stitches with knit (from the wrong side). Cut the strand. Sew the sleeve seams and fasten all strands. BOW-TIE: Cast on 5 stitches with double pointed needles size 3 mm = US 2,5 and medium petrol. Work garter stitch back and forth for 8 cm = 3⅛", bind off. Sew the short sides together in the outermost loop of the outermost stitch, forming a ring. Cut and fasten the strand. Take a new strand and wind it a couple of times around the bow-tie. Sew the bow-tie to the sweater. |
|||||||||||||||||||
Diagram explanations |
|||||||||||||||||||
|
|||||||||||||||||||

|
|||||||||||||||||||
|
Have you made this or any other of our designs? Tag your pictures in social media with #dropsdesign so we can see them! Do you need help with this pattern?You'll find tutorial videos, a Comments/Questions area and more by visiting the pattern on garnstudio.com. © 1982-2024 DROPS Design A/S. We reserve all rights. This document, including all its sub-sections, has copyrights. Read more about what you can do with our patterns at the bottom of each pattern on our site. |
|||||||||||||||||||


With over 40 years in knitting and crochet design, DROPS Design offers one of the most extensive collections of free patterns on the internet - translated to 17 languages. As of today we count 304 catalogs and 11422 patterns - 11417 of which are translated into English (US/in).
We work hard to bring you the best knitting and crochet have to offer, inspiration and advice as well as great quality yarns at incredible prices! Would you like to use our patterns for other than personal use? You can read what you are allowed to do in the Copyright text at the bottom of all our patterns. Happy crafting!
Comments / Questions (9)
Jeg trenger hjelp til hvordan det blir hull i arbeidet på benet. Litt rart forklart.
26.06.2023 - 22:49Miten puserossa voi ottaa kaikki silmukat samalle puikolle tehtäessä kaarroketta, kun etu-ja takakappaleet on kuitenkin neulottu suljettuna neuleena,
08.05.2021 - 15:35DROPS Design answered:
Hei, tämä onnistuu, koska kainaloiden kohdalta on päätetty silmukoita. Ensimmäiset kerrokset voivat kuitenkin olla hieman hankalia neuloa.
19.05.2021 - 17:31Hej! Se min fråga 9/4 och Drops svar 26/4. Min ursprungliga fråga gäller EFTER varv 14 när man sytt ihop. Då ska natur och orange del på huvudet stickas runt - men rent tekniskt blir det ju då inget fäste i färgbytet, eftersom det sker på samma ställe varje gång? Finns alternativ att sticka natur och orange fortsatt för sig själva och sedan sy ihop med kantmaska, liksom första delen efter nosen i grått?
27.04.2021 - 09:38Hej! När man sytt nosen och ska övergå i rundstickning resten av huvudet - hur får man gränsen mellan natur och orange att sitta ihop när man byter färg på garnet efter hälften, då blir det ju inte ihopstickat i gränsen? Finns ett rakt alternativ där man stickar vardera färg för sig och sedan syr ihop huvudet? MVH
09.04.2021 - 11:14DROPS Design answered:
Hei Rebecka. Man strikker dele hver for seg, bortsett fra 1. omgang /snuten i farge grå. Når du har strikket 1. omgang av snuten, deles arbeidet slik at du strikker 1 del i natur for seg selv og 1 del i orangemelert for seg selv. Så når 1.-14. pinne i natur er ferdigstrikket og 1.-14. pinne i orangemelert er ferdig skal disse delene sys sammen innenfor 1 kantmaske rille på hver del med natur. Pass på at maskene det blir sydd innenfor (dvs, de 4 kantmaskene) blir festet godt. mvh DROPS design
26.04.2021 - 10:45Hallo, wie bekommt man den Farbwechsel beim Stricken des Kopfes in Runden hin, also wie führt man den zweiten Faden mit? Vielen Dank für die Hilfe!
11.02.2021 - 20:57DROPS Design answered:
Liebe Frau Lademan, es wird nicht in Runden mit 2 Farben gestrickt: nach der 1. Runde stricken Sie mit natur über nur 8 Maschen (bis 14. Runde), dann stricken Sie die 6 Maschen mit orange über 14 Maschen, dann stricken Sie alle Maschen in der Runde - später nähen Sie beide Teile zusammen. Viel Spaß beim stricken!
12.02.2021 - 07:47Er der en fejl i snoningsdiagrammet og forklaringen? Jeg kan ikke få det til at passe. Maskerne skal vel ikke på snoningspinden foran i begge sider?
19.09.2020 - 22:36DROPS Design answered:
Hei Sigrid. Ja, her var det en feil i den danske oversettelsen. Skal være bak på det siste ikonet. Takk for at du gjorde oss oppmerksom på dette, vi vil ordne det med engang. mvh DROPS design
21.09.2020 - 13:40Please can you make a you tube video of this fox being made, to go along with the written pattern? Thanks
18.08.2020 - 22:16DROPS Design answered:
Dear Mrs Jones, we have added your wish on our todolist - a whole video for the entire fox might be way too long but we'll do our possible. Thank you!
20.08.2020 - 09:44Cast on 72 stitches with double-pointed needles size 3 mm and fog - what does fog mean the instructions? I am unfamiliar with this abbreviation. Thanks in advance. Beth
13.07.2020 - 09:29DROPS Design answered:
Dear Beth, "fog" is the colour DROPS Alpaca (= color Nr 9021) listed under Materials. Happy knitting!
13.07.2020 - 10:04Wie "fixiere" ich denn die krausen Randmaschen für die Schnauze? Ich verstehe nicht, wie die letzte Endmasche sich nicht auftrennen soll. Bitte bitte Hilfe!
27.06.2020 - 00:29DROPS Design answered:
Liebe Barbara, dieses Video zeigt, wie man eine unsichtbare Naht arbeitet, damit können Sie die beiden Teilen vom Kopf zusammennähen, damit die Randmaschen nicht mehr sichtbar sind. Viel Spaß beim stricken!
29.06.2020 - 07:39