DROPS Alaska
DROPS Alaska
100% Wool
from 1.90 £ /50g
Get the yarn to make this pattern from 7.60£.

The yarn cost is calculated from the pattern’s smallest size and the yarn’s cheapest product type. Looking for an even better price? You might find it on the DROPS Deals!

DROPS SS24

Good Morning Sunshine

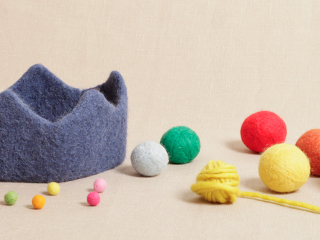
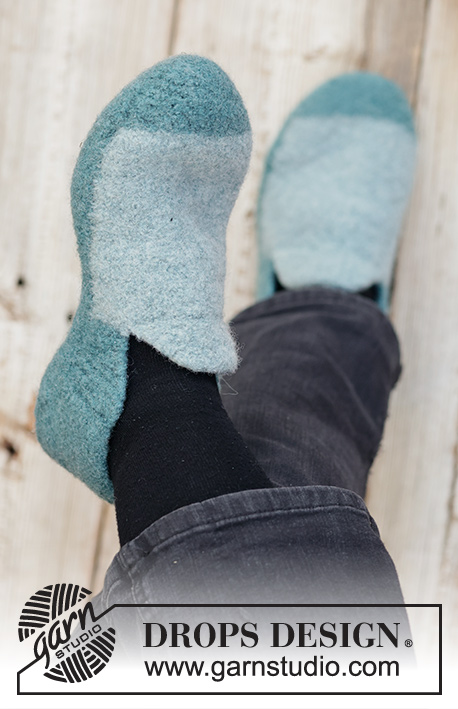
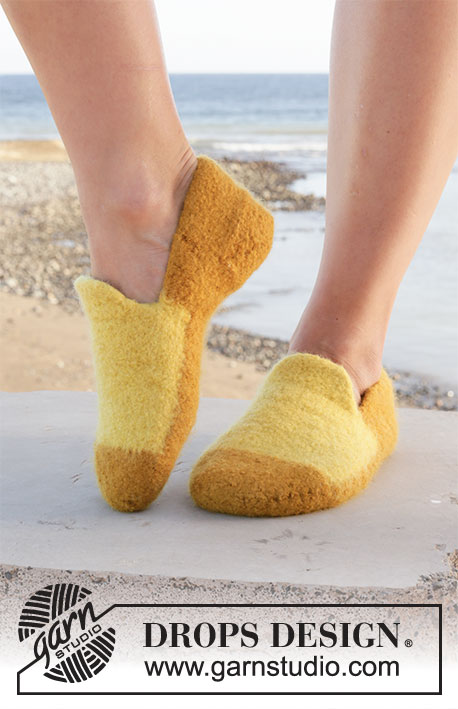
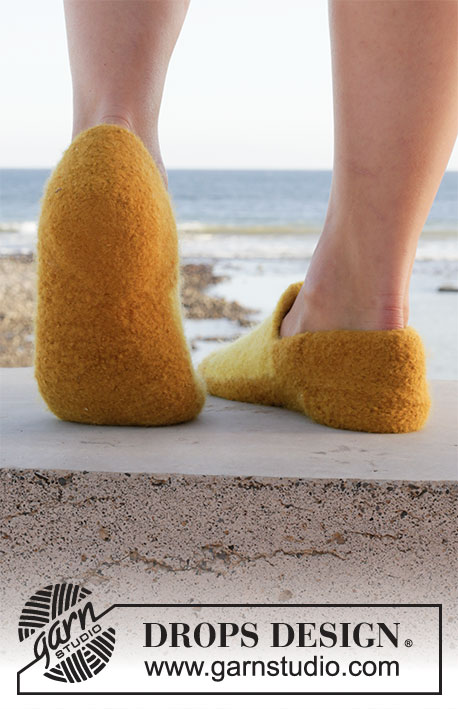
Felted slippers in DROPS Alaska. The piece is worked back and forth in one piece, which is then sewn together before felting. Sizes 35-46.

DROPS 209-17
DROPS Design: Pattern no x-446
Yarn group C
-------------------------------------------------------

SIZES:
Shoe size: 35/37 – 38/40 – 41/43 – 44/46
Foot length after felting: 22 – 24 – 27 – 30 cm
Foot length before felting: approx. 29½ -32½-37-40 cm

MATERIALS:
DROPS ALASKA from Garnstudio (belongs to yarn group C)
150-150-150-150 g colour 58, mustard
50-50-50-50 g colour 59, lemon

KNITTING TENSION:
Before felting: 16 stitches in width and 20 rows in height with stocking stitch = 10 x 10 cm.
After felting: approx. 20 stitches in width and 27 rows in height with stocking stitch = 10 x 10 cm.

NEEDLES:
DROPS NEEDLES SIZE 5.5 MM.
Needle size is only a guide. If you get too many stitches on 10 cm, change to a larger needle size. If you get too few stitches on 10 cm, change to a smaller needle size.

-------------------------------------------------------

Alternative Yarn – See how to change yarns here
Yarn Groups A to F – Use the same pattern and change the yarn here
Yarn usage using an alternative yarn – Use our yarn converter here

-------------------------------------------------------

DROPS Alaska
DROPS Alaska
100% Wool
from 1.90 £ /50g
Get the yarn to make this pattern from 7.60£.

The yarn cost is calculated from the pattern’s smallest size and the yarn’s cheapest product type. Looking for an even better price? You might find it on the DROPS Deals!

Pattern instructions

NOTE: This pattern is written in British English. All measurements in charts are in cm. For conversion from cm to inches - click here. There are different terms for crocheting in British and American English. If this pattern includes crochet, click for "crochet terms" here. For this pattern in American English, please click here.
-------------------------------------------------------

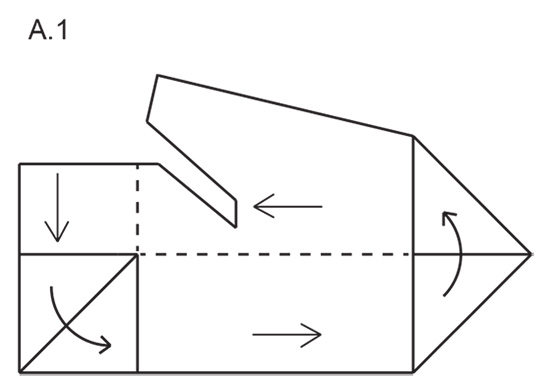
EXPLANATIONS FOR THE PATTERN:

-------------------------------------------------------

RIDGE/GARTER STITCH (worked back and forth):
Knit all rows.
1 ridge in height = Knit 2 rows.


-------------------------------------------------------

START THE PIECE HERE:

-------------------------------------------------------

SLIPPERS – SHORT OVERVIEW OF THE PIECE:
The piece is worked back and forth in one piece. When finished it is sewn together and felted in the washing machine.

SLIPPER:

BACK EDGE:
Cast on 23-25-26-28 stitches with needle size 5.5 mm and mustard. Work 9 RIDGES – read description above. REMEMBER THE KNITTING TENSION!

HEEL:
Now work short rows to make the heel; all rows are knitted (= garter stitch). Start from the right side and work as follows:
Knit until there is 1 stitch left on the row, turn and knit until there is 1 stitch left on the row. * Turn and knit until you have worked 1 stitch less than the previous row, turn and knit until you have worked 1 stitch less than the previous row *, work from *-* until there are 5-5-6-6 stitches left in the middle of the piece (you have turned 9-10-10-11 times on each side). Now knit 1 more stitch each time you turn until you have knitted all stitches again = 23-25-26-28 stitches. Insert a marker in the middle of the row to be used for measuring.

SOLE:
Work garter stitch and decrease 4 stitches evenly on the first row = 19-21-22-24 stitches. Work garter stitch until the piece measures a total of 18½-20-24-27 cm from the marker inserted on the heel.

TOE:
Now work short rows for the toe; all rows are knitted (= garter stitch). Work as follows from the right side: Knit until there is 1 stitch left on the row, turn and knit until there is 1 stitch left on the row. * Turn and knit until you have worked 1 stitch less than the previous row, turn and knit until you have worked 1 stitch less than the previous row *, work from *-* until there are 5-5-6-6 stitches left in the middle of the piece (you have turned 7-8-8-9 times on each side). Now knit 1 more stitch each time you turn until you have knitted all stitches again = 19-21-22-24 stitches. Insert a marker in the middle of the row to be used for measuring.

TOP:
Change to lemon. Work stocking stitch for 9-10-12-13 cm; on the next row from the right side increase 4 stitches evenly spaced (increase with yarn overs which are purled twisted on the next row) = 23-25-26-28 stitches. Continue with stocking stitch for a total of 13½-15-19-22 cm and the next row is worked from the right side. Now only work the first 5 stitches on the row; the remaining stitches are placed on a thread.
Change to mustard and work garter stitch (the first row is knitted from the right side) and increase 1 stitch inside the last stitch on each row from the right side a total of 5 times; the garter stitch should measure 5 cm from the division (do not stretch the piece). Cast off on the next row from the right side.
Place the outermost 5 stitches on the opposite side back on the needle (keep the remaining middle 13-15-16-18 stitches on the thread). Change to mustard and work garter stitch (the first row is knitted from the right side) and increase 1 stitch inside the first stitch on each row from the right side a total of 5 times; the garter stitch should measure 5 cm from the division (do not stretch the piece). Cast off on the next row from the wrong side.
Place the remaining 13-15-16-18 stitches from the thread back on the needle. Use lemon and work 6 ridges (the first row is worked from the right side) AT THE SAME TIME as you decrease as follows every 4th row: Knit the outermost 2 stitches on each side together. Repeat the decrease a total of 3 times = 7-9-10-12 stitches. Cast off on the next row from the right side.

ASSEMBLY:
The piece is sewn together from the wrong side. Fold the piece at the toe so the top lies over the sole. Start by sewing the 9 ridges from the back edge together with the 10 stitches cast off outermost on the top side. Then sew the top and sole together edge to edge as far as the toe. Repeat on the other side.

FELTING:
Place the slippers in the washing machine, using a detergent without enzymes or optical bleaches. Wash at 40 degrees with normal centrifuge and without pre-wash. After washing shape the slippers to the correct size while still wet. Later, wash as a normal wool garment.

AFTER FELTING:
If the piece is not felted enough and is too big: Wash the piece one more time in the washing machine while it is still wet add a terry towel that measures approx. 50 x 70 cm - NOTE: Do not use a short program.
If the piece has been felted too much and is too small: While the piece is still wet stretch it to the correct measurements, if the piece is dry, make sure to soak it first.
Remember: All subsequent washes are as a normal wool garment.

This pattern has been corrected.

Updated online: 03.04.2020
Correction: top: ...Use lemon and work 6 ridges (the first row is worked from the right side) AT THE SAME TIME as you decrease as follows every 4th row:

Diagram

symbols = knitting direction
symbols = shows where the slipper is sewn together
diagram
Do you have a question? See a list of frequently asked questions (FAQ)

Knitting tension is what determines the final measurements of your work, and is usually measured per 10 x 10 cm. It is provided like so: number of stitches in width x number of rows in height - eg: 19 stitches x 26 rows = 10 x 10 cm.

The knitting tension is very individual; some people knit/crochet loosely while others work tightly. You adjust the knitting tension with the needle size, which is why the suggested needle size is only meant as a guide! You need to adjust this (up or down) to ensure that YOUR knitting tension matches the knitting tension provided in the pattern. If you work with a different knitting tension than provided you will have a different yarn consumption, and your work will have different measurements than what the pattern suggests.

The knitting tension also determines which yarns can replace each other. As long as you achieve the same knitting tension you can replace one yarn with another.

See DROPS lesson: How to measure your tension/gauge

See DROPS video: How to make a gauge tension swatch

The required amount of yarn is provided in grams, eg: 450 g. To calculate how many balls you’ll need you first need to know how many grams are in 1 ball (25g, 50g or 100g). This information is available if you click on the individual yarn quality on our pages. Divide the amount required with the amount of each ball. For example, if each ball is 50g (the most common amount), the calculation will be as follows: 450 / 50 = 9 balls.

The important thing when changing from one yarn to another is that the knitting/crochet tension remains the same. This is so that the measurements of the finished piece will be the same as on the sketch provided. It is easier to achieve the same knitting tension using yarns from the same yarn group. It is also possible to work with multiple strands of a thinner yarn to achieve the knitting tension of a thicker one. Please try our yarn converter. We recommend you to always work a test swatch.

Please NOTE: when changing yarn the garment might have a different look and feel to the garment in the photo, due to individual properties and qualities of each yarn.

See DROPS lesson: Can I use a different yarn than the one mentioned in the pattern?

All our yarns are categorised into yarn groups (from A to F) according to thickness and knitting tension – group A contains the thinnest yarns and group F the thickest. This makes it easier for you to find alternative yarns to our patterns, should you wish to switch yarn. All yarns within the same group have a similar knitting tension and can easily replace each other. However, different yarn qualities have different structures and properties which will give the finished work a unique look and feel.

Click here for an overview of the yarns in each yarn group

At the top of all our patterns you’ll find a link to our yarn calculator, which is a helpful tool should you wish to use a different yarn than suggested. By filling in the yarn quality you wish to replace, the amount (in your size) and number of strands, the calculator will present good alternative yarns with the same knitting tension. Additionally it will tell you how much you’ll require in the new qualities and whether you’ll need to work with multiple strands. Most skeins are 50g (some are 25g or 100g).

If the pattern is worked with multiple colours, every colour will have to be calculated separately. Similarly, if the pattern is worked with several strands of different yarns (for example 1 strand Alpaca and 1 strand Kid-Silk) you will have to find alternatives for each, individually.

Click here to see our yarn calculator

Since different yarns have different qualities and textures we have chosen to keep the original yarn in our patterns. However, you can easily find options among our available qualities by using our yarn calculator, or simply pick a yarn from the same yarn group.

It is possible that some retailers still have discontinued yarns in stock, or that someone has a few skeins at home that they would like to find patterns for.

The yarn calculator will provide both alternative yarn as well as required amount in the new quality.

If you think it's hard to decide what size to make, it can be a good idea to measure a garment you own already and like the size of. Then you can pick the size by comparing those measures with the ones available in the pattern's size chart.

You'll find the size chart at the bottom of the pattern.

See DROPS lesson: How to read size chart

The needle size provided in the pattern serves only as a guide, the important thing is to follow the knitting tension. And since knitting tension is very individual, you will have to adjust the needle size to ensure that YOUR tension is the same as in the pattern – maybe you’ll have to adjust 1, or even 2 needle sizes, up or down to achieve the correct tension. For this, we recommend that you work test swatches.

Should you work with a different knitting tension than the one provided, the measurements of the finished garment might deviate from the measurement sketch.

See DROPS lesson: How to measure your tension/gauge

See DROPS video: How to make a tension/gauge swatch

Working a garment top-down provides more flexibility and room for personal adjustment. For example it is easier to try the garment on while working, as well as making adjustments to length of yoke and shoulder caps.

The instructions are carefully explaining every step, in the correct order. Diagrams are adjusted to the knitting direction and are worked as usual.

The diagram depicts all rows/rounds, and every stitch seen from the right side. It is read from bottom to top, from right to left. 1 square = 1 stitch.

When working back and forth, every other row is worked from the right side and every other row is worked from the wrong side. When working from the wrong side, the diagram will have to be worked reversed: from left to right, knit stitches are purled, purl stitches are knit etc.

When working in the round every round is worked from the right side and the diagram are worked from right to left on all rounds.

See DROPS lesson: How to read knitting diagrams

The diagram depicts all rows/rounds, and every stitch seen from the right side. It is worked from bottom to top, from right to left.

When working back and forth every other row is worked from the right side: from right to left and every other row is worked from the wrong side: from left to right.

When working in the round, every row in the diagram are worked from the right side, from right to left.

When working a circular diagram you start in the middle and work your way outwards, counter clockwise, row by row.

The rows usually start with a given number of chain stitches (equivalent to the height of the following stitch), this will either be depicted in the diagram or explained in the pattern.

See DROPS lesson: How to read crochet diagrams

Instructions for working several diagrams after each other on the same row/round, will often be written like so: “work A.1, A.2, A.3 a total of 0-0-2-3-4 times". This means you work A.1 once, then A.2 is worked once, and A.3 is repeated (in width) the number of times provided for your size – in this case like so: S = 0 times, M = 0 times, L=2 times, XL= 3 times and XXL = 4 times.

The diagrams are worked as usual: begin with the first row in A.1, then work the first row in A.2 etc.

See DROPS lesson: How to read knitting diagrams

See DROPS lesson: How to read crochet diagrams

The total width of the garment (from wrist-to-wrist) will be larger in the larger sizes, despite the actual sleeves being shorter. The larger sizes have longer sleeve caps and wider shoulders, so there will be a good fit in all sizes.

The measurement sketch/schematic drawing provides information regarding the full length of the garment. If it’s a jumper or a jacket the length is measured from the highest point on the shoulder closest to the neckline, and straight down to the bottom of the garment. It is NOT measured from the tip of shoulder. Similarly, the length of yoke is measured from the highest point on the shoulder and down to where yoke is split into body and sleeves.

On a jacket measures are never taken along bands, unless specifically stated. Always measure inside band stitches when measuring the length.

See DROPS lesson: How to read a schematic drawing

Diagrams are often repeated on the round or in height. 1 repeat is the diagram the way it appears in the pattern. If it says to work 5 repeats of A.1 in the round, then you work A.1 a total of 5 times after/next to each other in the round. If it says to work 2 repeats of A.1 vertically/in height you work the entire diagram once, then begin again at the start and work the entire diagram one more time.

Chain stitches are slightly narrower than other stitches and to avoid working the cast-on edge too tight, we simply chain more stitches to begin with. The stitch count will be adjusted on the following row to fit the pattern and measurement sketch.

The rib edge is more elastic and will contract slightly compared to, for example, stocking stitch. By increasing before the rib edge, you avoid a visible difference in width between the rib edge and the rest of the body.

It’s very easy to cast off too tightly, and by making yarn overs while casting off (and simultaneously casting these off) you avoid a too tight cast off edge.

See DROPS video: How to bind off with yarn overs (yo)

To achieve an even increase (or decrease) you can increase on, for example: every 3rd and 4th row alternately, like so: work 2 rows and increase on the 3rd row, work 3 rows and increase on the 4th. Repeat this until the increase is complete.

See DROPS lesson: Increase or decrease 1 st on every 3rd and 4th row alternately

Should you prefer to work in the round instead of back and forth, you may of course adjust the pattern. You’ll need to add steeks mid-front (usually 5 stitches), and follow the instructions. When you would normally turn and work from the wrong side, simply work across the steek and continue in the round. At the end you’ll cut the piece open, pick up stitches to work bands, and cover the cut edges.

See DROPS video: How to knit steeks and cut open

Should you prefer to work back and forth instead of in the round, you may of course adjust the pattern so you work the pieces separately and then assemble them at the end. Divide the stitches for the body in 2, add 1 edge stitch in each side (for sewing) and work the front and back pieces separately.

See DROPS lesson: Can I adapt a pattern for circular needles into straight needles?

Pattern repeats can vary slightly in the different sizes, in order to get the correct proportions. If you’re not working the exact same size as the garment in the photo, yours might deviate slightly. This has been carefully developed and adjusted so that the complete impression of the garment is the same in all sizes.

Make sure to follow instructions and diagrams for your size!

If you have found a pattern you like which is available in women’s size it’s not very difficult to convert it to men’s size. The biggest difference will be the length of sleeves and body. Start working on the women size that you think would fit across the chest. The additional length will be worked right before you cast off for the armhole/sleeve cap. If the pattern is worked top-down you can add the length right after the armhole or before the first decrease on sleeve.

Regarding additional yarn amount, this will depend on how much length you add, but it is better with a skein too many than too few.

All yarns will have excess fibres (from production) that might come off as lint or shedding. Brushed yarns (ie hairier yarns) have more of these loose, excess fibres, causing more shedding.

Shedding also depends on what is worn under or over the garment, and whether this pulls at the yarn fibres. It’s therefore not possible to guarantee that there will be no shedding

Below are some tips on how to get the best result when working with hairier yarns:

1. When the garment is finished (before you wash it) shake it vigorously so the looser hairs come off. NOTE: do NOT use a lint roller, brush or any method that pulls at the yarn.

2. Place the garment in a plastic bag and put it in your freezer - the temperature will cause the fibres to become less attached to each other, and excess fibres will come off easier.

3. Leave in the freezer for a few hours before taking it out and shaking it again.

4. Wash the garment according to the instructions on the yarn label.

Pilling is a natural process that happens to even the most exclusive of fibers. It's a natural sign of wear and tear that is hard to avoid, and that is most visible in high friction areas of your garment like a sweater's arms and cuffs.

You can make your garment look as new by removing the pilling, using a fabric comb or a pill/lint remover.

Still can't find the answer you need? Then scroll down and leave your question so one of our experts can try to help you. This will be done normally within 5 to 10 working days.
In the meantime, you can read the questions and answers that others have left to this pattern or join the DROPS Workshop on Facebook to get help from fellow knitters/crocheters!

You might also like...

Post a comment to pattern DROPS 209-17

We would love to hear what you have to say about this pattern!

If you want to leave a question, please make sure you select the correct category in the form below, to speed up the answering process. Required fields are marked *.

Comments / Questions (12)

country flag Anne wrote:

Hi I have finished the pattern, triple checked that I have followed the pattern correctly. I simply cannot match it up to sew it together. The back 9 garter ridges measure 7 cm and the corresponding piece only 5 cm , help please .\r\nThanks Anne

11.07.2023 - 11:27

DROPS Design answered:

Dear Anne, it's normal that the size of both parts is different. 9 garter stitch ridges should be 9 cm per the gauge of the pattern, so I guess your gauge is tighter than it should be. The seam between both pieces should be quite loose and you need to adjust both sides so that after felting it will have the correct shape. Happy knitting!

17.07.2023 - 10:40

country flag Meike Snow wrote:

Trying to print a few of the free patterns. When clicking on the print button there are 2 options, pattern and picture. When selecting pattern the only thing that populates is the advertisement page but no pattern. Where can I print the missing pattern pls? Thanks

12.08.2021 - 22:09

DROPS Design answered:

Dear Mrs Snow, in the small windows that opens with an advertisement, click on the top right onto Continue to print the pattern -> to launch printing. Happy knitting!

13.08.2021 - 07:31

country flag Vandenbunder wrote:

Hoe kunnen we de moeilijkheidsgraad zien, als beginnende breister is het niet duidelijk wat ik kan of niet kan

15.04.2020 - 16:14

DROPS Design answered:

Dag Vandenbunder,

We hebben bewust geen moeilijkheidsgradaties aangegeven per patroon, omdat het heel lastig is om in te schatten wat iemand moeilijk vindt. Dit hangt namelijk ook af van welke technieken je al geleerd hebt. Al onze patronen zijn voorzien van video's om je te helpen en je kunt ook vragen stellen, als je er niet uit komt. We hebben wel een algemene categorie met 'makkelijke patronen'. Deze sloffen zijn naar mijn mening geschikt voor een beginnende breister. Lees alles rustig door en bekijk de video's, dan is het voor iedereen mogelijk om te maken.

16.04.2020 - 11:50

country flag Susanne wrote:

Jag blir inte klok på hur jag ska sticka överdelen rättelsen stämmer inte överens med engelska och norska Vad gäller? Hur många varv och ska man minska eller öka

12.04.2020 - 18:46

country flag Nelly wrote:

In the final section it says: knit 5 ridges, then it follows with decrease three times every fourth row. That would require a minimum of 12 row, if I understand that correctly?

02.04.2020 - 21:02

DROPS Design answered:

Dear Nelly, you are right, pattern will be edited with 6 ridges. Happy knitting!

03.04.2020 - 08:22

country flag Christine Laverick wrote:

The end part of the pattern states decrease every 4 rows , 3 times whilst knitting 5 ridges. This is only 10 rows , not the 12 minimum required for these decreases. Have I misread the instructions?

20.03.2020 - 18:16

DROPS Design answered:

Dear Mrs Laverick, you are right, pattern will be edited to work 6 ridges, thanks for your feedback. Happy knitting!

03.04.2020 - 08:22

country flag Maarit Laine wrote:

Ihastuttavat - nämä ovat MUST-listalla.

06.02.2020 - 01:49

country flag Eva wrote:

Interessante, schöne Hausschuhe, die werde ich auf jeden Fall nachstricken

01.02.2020 - 20:34

country flag Irene wrote:

Dem vil jeg gerne strikke til mine børnebørn

11.01.2020 - 14:13

country flag BEAULIEUX C wrote:

Allure inhabituelle pour ces chaussons ravissants que je rêve d'enfiler...

25.12.2019 - 19:53