
Popular categories
Looking for a yarn?


|
||||||||||||||||||||||||||||||||||
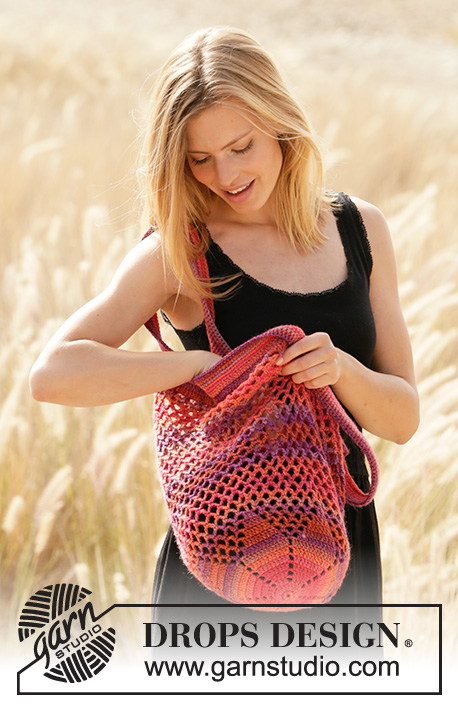
Sunset Shopper |
||||||||||||||||||||||||||||||||||
 |
 |
|||||||||||||||||||||||||||||||||
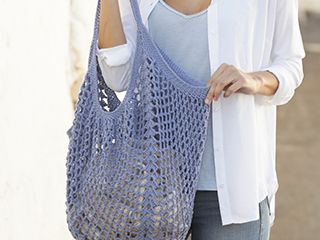
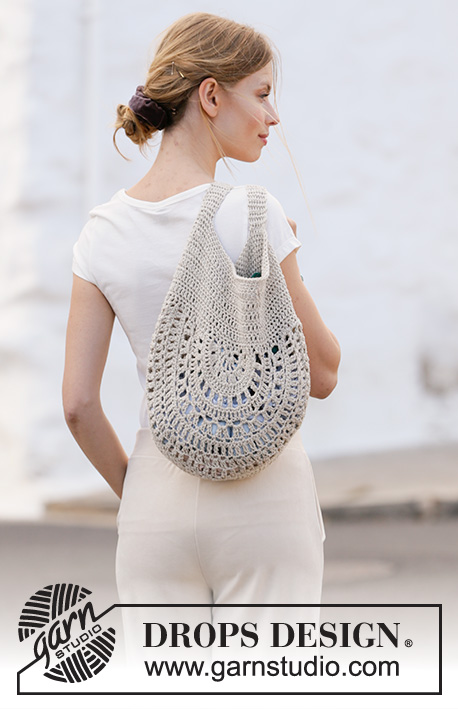
Crocheted bag in DROPS Big Delight. The piece is worked bottom up with star pattern on the bottom.
DROPS 211-27 |
||||||||||||||||||||||||||||||||||
|
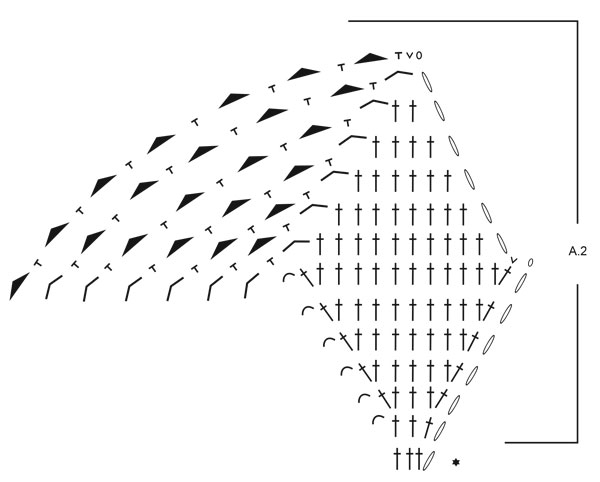
------------------------------------------------------- EXPLANATIONS FOR THE PATTERN: ------------------------------------------------------- PATTERN: See diagrams A.1 to A.3. CROCHET TIP (for chain stitch): 1 chain stitch should equal 1 double crochet in width. Make sure the loop you work for the chain stitch is pulled up the hook so it is not too tight. If the chain stitch is too tight the pattern will be tight in sections where there are a lot of chain stitches. CROCHET INFORMATION: At the beginning of each round of treble crochets work 3 chain stitches; these 3 chain stitches replace the first treble crochet, i.e. skip 1 treble crochet from the previous round, The round finishes with 1 slip stitch in the 3rd chain stitch at the beginning of the round. At the beginning of each round of double crochets work 1 chain stitch; this chain stitch replaces the first double crochet, i.e. skip the first stitch from the previous round. The round finishes with 1 slip stitch in the first chain stitch at the beginning of the round. ------------------------------------------------------- START THE PIECE HERE: ------------------------------------------------------- BAG – SHORT OVERVIEW OF THE PIECE: The piece is worked in the round, bottom up. BAG: Work 4 chain stitches with hook size 3.5 mm and Big Delight and form them into a ring with 1 slip stitch in the first chain stitch worked. Work A.1 in the round. When A.1 has been completed there are 3 chain stitches and 18 treble crochets on the round. The next round is worked as follows: Work A.2 one time (= first repeat also shows the beginning and end of the round), then work A.3 a total of 5 times = 6 leaves on the round. Continue this pattern. REMEMBER THE CROCHET TENSION! When A.2 and A.3 have been completed there are 42 chain-spaces on the round. Insert 1 marker in the last round. The piece will be measured from this marker. Continue working chain-spaces in the round without further increases as follows: Work slip stitches to the middle of the first chain-space, * work 5 chain stitches, 1 double crochet around the next chain-space *, work from *-* round and round without finishing each round. Work until the bag measures 38 cm from the marker and finish approx. above the start of the round at the bottom of the bag. Work slip stitches as far as the beginning of the next chain-space. Then work the edge with straps as described below. EDGE WITH STRAPS: ROUND 1: Work 3 chain stitches (equivalent to 1 treble crochet), 3 treble crochets around the same chain-space, then 4 treble crochets around each chain-space to end of round. Finish with 1 slip stitch in the 3rd chain stitch at the beginning of the round – read CROCHET INFORMATION = 168 treble crochets on the round. ROUND 2: Work 1 treble crochet in each treble crochet. ROUND 3: Work 1 treble crochet in each of the first 28 treble crochets, then 75 loose chain stitches – remember CROCHET TIP, skip the next 28 treble crochets, work 1 treble crochet in each of the next 56 treble crochets, 75 loose chain stitches, skip the next 28 treble crochets and work 1 treble crochet in each of the last 28 treble crochets. ROUND 4: Work 1 double crochet in each of the first 28 treble crochets, 1 double crochet in each of the 75 chain stitches, 1 double crochet in each of the next 56 treble crochets, 1 double crochet in each of the 75 chain stitches and 1 double crochet in each of the last 28 treble crochets. ROUNDS 5-8: Work 1 double crochet in each stitch. Cut and fasten the strand after the last round. To finish, work 1 round on the inside of the bag by starting in the middle of the 28 stitches at the bottom of the strap, work 1 double crochet in each of the 14 double crochets, 1 double crochet in each of the 75 stitches on the strap and 1 double crochet in each of the 14 stitches to the middle. Finish with 1 slip stitch in the first double crochet. Cut and fasten the strand. Repeat on the other strap. |
||||||||||||||||||||||||||||||||||
Diagram explanations |
||||||||||||||||||||||||||||||||||
|
||||||||||||||||||||||||||||||||||

|
||||||||||||||||||||||||||||||||||
|
||||||||||||||||||||||||||||||||||
|
Have you made this or any other of our designs? Tag your pictures in social media with #dropsdesign so we can see them! Do you need help with this pattern?You'll find tutorial videos, a Comments/Questions area and more by visiting the pattern on garnstudio.com. © 1982-2024 DROPS Design A/S. We reserve all rights. This document, including all its sub-sections, has copyrights. Read more about what you can do with our patterns at the bottom of each pattern on our site. |
||||||||||||||||||||||||||||||||||


With over 40 years in knitting and crochet design, DROPS Design offers one of the most extensive collections of free patterns on the internet - translated to 17 languages. As of today we count 304 catalogues and 11422 patterns - 11422 of which are translated into English (UK/cm).
We work hard to bring you the best knitting and crochet have to offer, inspiration and advice as well as great quality yarns at incredible prices! Would you like to use our patterns for other than personal use? You can read what you are allowed to do in the Copyright text at the bottom of all our patterns. Happy crafting!
Comments / Questions (16)
Jeg fatter ikke i det hele tatt hvordan jeg skal gjøre det i aller siste runde. På innsiden? Hvem hva hvor??? Hvordan?
18.09.2023 - 17:04DROPS Design answered:
Hei Renate. Jo, tenk deg at 1 hank ser ut som en oppned U og du har 28 masker i bunnen av U`en (som er oppned). Det er 168 masker rundt toppen av vesken og disse 28 maskene er en del av toppen. Nå skal du starte midt i U`en og hekle 1 fastmaske i hver av de 14 fastmaskene, hekle 1 fastmaske i hver av de 75 maskene på hanken (altså på innsiden av U`en) og hekle 1 fastmaske i hver av de 14 maskene til midten, avslutt med 1 kjedemaske i første fastmaske. Klipp og fest trådene. Gjenta på den andre hanken. mvh DROPS Design
26.09.2023 - 13:24Bedankt voor dit mooie patroon. Wat ik niet goed snap: eerst staat er dat de eerste drie lossen (begin van patroon) het eerste some vervangen, maar in A2 is dat niet zo, waardoor er in het eerste "setje" (van de zes) steeds een extra stokje zit, als het ware. Het lijkt me beter om dat eerste stokje dus te vervangen. Bedankt!
17.10.2022 - 20:41DROPS Design answered:
Dag Mirte,
Volgens mij kan je inderdaad het eerste stokje vervangen door 3 lossen. Eerlijk gezegd begrijp ik even niet de reden van dat extrastokje.
26.10.2022 - 09:28Quand vous dîtes : 'Crocheter des mailles coulées jusqu'au milieu du premier arceau', s'agit-il de crocheter une maille coulée dans chacune des mailles en l'air jusqu'au milieu du premier arceau? puis quand vous dîtes : '*5 mailles en l'air, 1 maille serrée autour de l'arceau suivant *, répéter de *-* tout le tour, et sans terminer chaque tour', on ne fait pas de maille coulée à la fin de chaque tour et on travaille donc en spirale, c'est bien ça? Merci de votre aide.
21.09.2022 - 12:31DROPS Design answered:
Bonjour Patricia, tout à fait, il faudra effectivement plusieurs mailles coulées pour arriver au milieu du 1er arceau. Effectivement, vous allez crocheter en spirale, autrement dit, mettez un marqueur/repère dans le 1er arceau si vous le souhaitez, sinon continuez simplement en rond à raison de 5 mailles en l'air + 1 maille serrée dans chaque arceau jusqu'à la hauteur indiquée. Bon crochet!
21.09.2022 - 17:11Hei ihr Lieben, Ich bin etwas ratlos bei der Anleitungsbeschreibung. Ich habe A1 sowieso A2 gehäkelt aber wie und wo fängt A3 an? Denn wenn ich es einfach an das Ende von A2 anschließe habe ich ca 20 Blätter statt 6…
10.02.2022 - 20:01DROPS Design answered:
Liebe Thilde, am Anfang beginnen Sie mit A.1 = nach A.1 sind es 18 Stäbchen. Jetzt häkeln Sie A.2 und A.3 in der Runde wie folgt: A.2 am Anfang der Runde (= nur 1 Mal) über die ersten 3 Stäbchen, dann wiederholen Sie A.3 5 Mal (= 5 Mal über je 3 Stäbchen = 15 Stäbchen). So haben Sie die 18 Stäbchen gehäkelt und 6 Blätter insgesamt in der Runde. Viel Spaß beim häkeln!
11.02.2022 - 09:14Goedendag, wat een leuk patroon. Ik vroeg mij af hoeveel rondes van lossenboogjes je haakt vanaf de markeerdraad tot je ongeveer 38 cm. hebt. Op de foto van de sunset shopper nr 26 tel ik er 22 of 23. Klopt dat? Ik vind het een beetje moeilijk meten want het zakt uit neem ik aan. Ik haak ook met naald 3,5. Alvast dank voor het antwoord.
08.07.2021 - 21:27DROPS Design answered:
Dag Monique,
Om te meten kun je het werk het beste plat neerleggen en zorgen dat de diameter van de onderkant klopt. De tas zal inderdaad uitzakken door het gebruik en het hangt natuurlijk ook af van het gewicht aan spullen wat je erin stopt.
20.07.2021 - 15:14Hallo, ich verstehe die letzte Reihe : abschließende Reihe an der Innenseite der Träger nicht. Wie soll ich denn da eine Reihe häkeln ? Gibt es dazu ein Video?
23.06.2021 - 11:27DROPS Design answered:
Liebe Jutta, diese Lektion zeigt, wie man eine andere Tasche häkelt, aber ab Bild 32 bis 35 (= letztes Bild) zeigt man, wie man diese Reihe an der Innenseite der Träger häkelt. Hoffentlich kann es Ihnen helfen. Viel Spaß beim häkeln!
23.06.2021 - 14:03Bonjour, j'ai du mal à comprendre le diagramme A2. Il est precisé dans "info crochet" que le rang débute par 3 mailles en l'air qui remplacent la première bride, mais A2 commence par 3 mailles en l'air puis on a 3 fois le symbole d'une bride (avant celui des 2 mailles en l'air), ce qui donne visuellement 4 brides pour le pétale formé par A2. Le pétale A2 doit être différente des 5 pétales A3? En vous remerciant par avance pour votre aide
02.06.2021 - 15:55DROPS Design answered:
Bonjour Jenny, cette "info crochet" ne s'applique qu'à la bordure, pas au diagramme, autrement dit lorsque l'on fait référence à cette astuce. Dans A.2, vous crochetez les 3 mailles en l'air du début du tour comme dans le diagramme, ces mailles en l'air ne vont pas remplacer la 1ère bride dans la 1ère moitié, puis, à partir du 7ème rang, elles remplaceront la 1ère bride (et on saute la bride du tour précédent, comme le montre le diagramme). A.2 se fait au début du tour, vous répétez ensuite A.3 et terminez le tour par 1 mc dans la 1ère m de A.2. Bon crochet!
02.06.2021 - 16:16What a lovely pattern! This is the first time I have crocheted a bag and I am so pleased with the results. I did 35 rounds from the marker to the band at the top. I made the straps wider by going round 4 times rather than once in the final step. Thank you for the great pattern and UK crochet terms!
07.08.2020 - 08:06I completed diagram A1 but in A2 can you tell me where I place the starting 3 chains and 2 trebles? Thanks.
21.07.2020 - 14:12DROPS Design answered:
Dear Ettie, work A.2 over A.1, ie the 3 chains are for the beg of the round (= 1st dc), and work then 1 dc (US-English) in each of the next 2 stitches (= 3 dc in A.2), 2 chain stitches, then work A.3 (= 1 dc in each of the next 3 dc, 2 ch) around. Happy crocheting!
29.07.2020 - 08:33Hallo, ich habe eine Frage zum Arbeiten von D 211-27. Die A1 ok, aber A2 bis Zeile 8 ok und dann verstehe ich es nicht mehr. Wann und wie wird A3 gearbeitet? Vielleicht können Sie mir es einfacher erläutern!!??? Viele Grüße von Christine
09.07.2020 - 16:20DROPS Design answered:
Liebe Christine, A.2 und A.3 werden gleichzeitig bei den selben Runden gehäkelt, dh A.2 beginngt die Runde, und dann häkeln Sie A.3 insgesamt 5 Mal bis zur Ende der Runde = so haben Sie insgesamt 6 Blätter (das erste Blatt = A.2, die 5 nächsten = die 5 Rapporte A.3). Viel Spaß beim häkeln!
09.07.2020 - 16:55