
Popular categories
Looking for a yarn?


|
|||||||||||||||||||
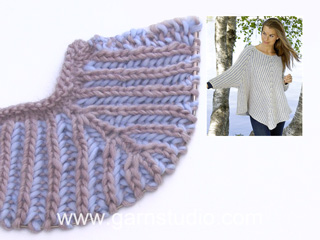
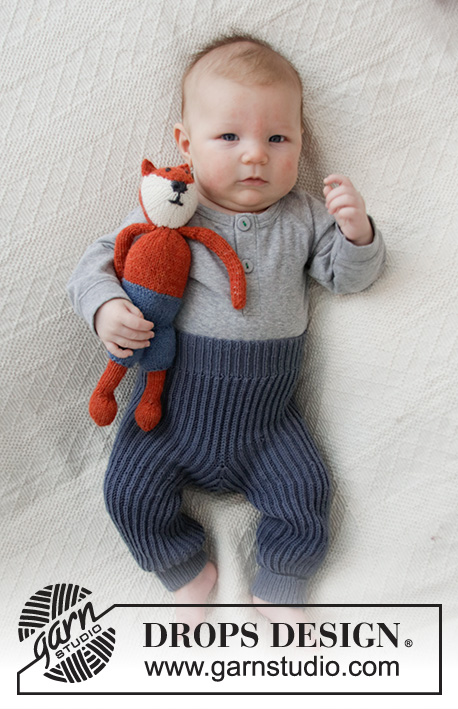
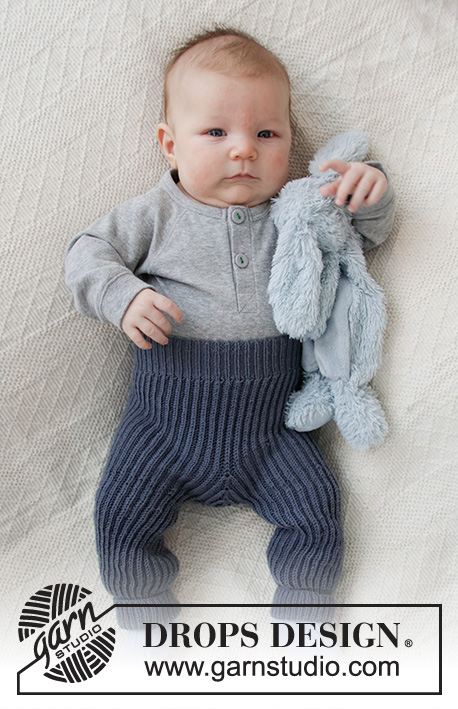
Early Nap Pants |
|||||||||||||||||||
 |
 |
||||||||||||||||||
Knitted trousers for babies in DROPS Baby Merino. The piece is worked top down with English ribs. Sizes: Premature – 4 years.
DROPS Baby 36-5 |
|||||||||||||||||||
|
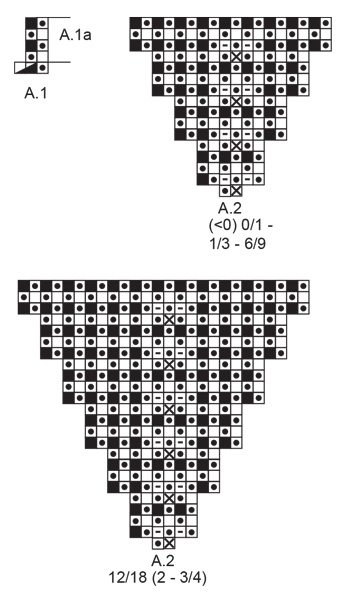
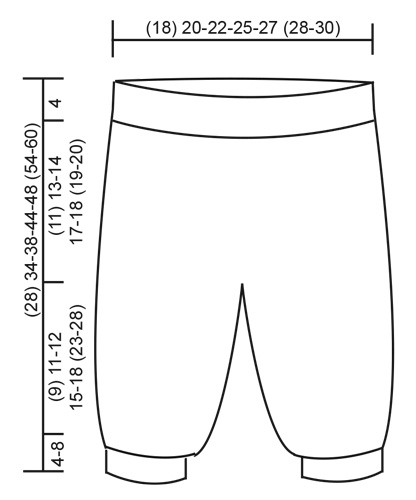
------------------------------------------------------- EXPLANATIONS FOR THE PATTERN: ------------------------------------------------------- PATTERN: See diagrams A.1 and A.2. Choose diagram for your size (applies to A.2). CASTING-OFF TIP: To avoid the cast-off edge being tight you can cast off with a larger size needle. If the edge is still tight, make 1 yarn over after approx. each 4th stitch at the same time as casting off and the yarn overs are cast off as normal stitches. ------------------------------------------------------- START THE PIECE HERE: ------------------------------------------------------- TROUSERS – SHORT OVERVIEW OF THE PIECE: The piece is worked in the round with circular needle/double pointed needles, top down. The round starts mid-back. TROUSERS: Cast on (132) 144-156-180-192 (204-216) stitches with circular needle size 2 mm and Baby Merino. Work rib (= knit 1, purl 2) in the round for 4 cm, then work an elevation at the back as follows: Work (32) 35-38-44-47 (50-53) stitches in rib, turn, tighten the strand and work (64) 70-76-88-94 (100-106) stitches back in rib, turn, tighten the strand and work (58) 64-70-82-88 (94-100) stitches in rib, turn, tighten the strand and work (52) 58-64-76-82 (88-94) stitches back in rib. Continue like this, working 6 stitches less every time you turn and until you have worked over a total of (28) 34-40-40-46 (52-58) stitches. Now continue in the round as follows from the right side: Change to circular needle size 2.5 mm and work A.1 over all stitches. When the first round has been worked there are (88) 96-104-120-128 (136-144) stitches on the needle. Continue in the round with English rib according to A.1a. REMEMBER THE KNITTING TENSION! When the piece measures approx. (12) 14-15-16-17 (18-19) cm mid-front (adjust so the next round is knitted), work as follows: Work A.2 (= 2 stitches), A.1a over the next (42) 46-50-58-62 (66-70) stitches as before, A.2 over 2 stitches (= mid-front), A.1a over the last (42) 46-50-58-62 (66-70) stitches as before. When A.2 has been worked 1 time in height there are (120) 128-136-152-176 (184-192) stitches on the needle. When the piece measures (15) 17-18-21-22 (23-24) cm (increases should have finished), cast off (12) 12-12-12-16 (16-16) stitches mid-front and mid-back. Each leg is finished separately; place the stitches for the one leg on 1 thread. LEG: = (48) 52-56-64-72 (76-80) stitches. Divide the stitches onto 4 double pointed needles size 2.5 mm and continue A.1a in the round. When the leg measures approx. (9) 11-12-15-18 (23-28) cm (or to desired length; there are (4) 6-8-8-8 (8-8) cm left), change to double pointed needles size 2 mm and continue in the round with rib, with knit over knit and purl over purl (on the first round work the yarn-overs together with their stitches). When the leg measures (13) 17-20-23-26 (31-36) cm from the division, cast off loosely with knit over knit and purl over purl – read CASTING-OFF TIP. Place the stitches from the thread back on double pointed needles size 2.5 mm and work in the same way as the first leg. ASSEMBLY: Sew together the (12) 12-12-12-16 (16-16) stitches cast off front and back between the legs. |
|||||||||||||||||||
Diagram explanations |
|||||||||||||||||||
|
|||||||||||||||||||
|
|||||||||||||||||||
|
|||||||||||||||||||
|
Have you made this or any other of our designs? Tag your pictures in social media with #dropsdesign so we can see them! Do you need help with this pattern?You'll find tutorial videos, a Comments/Questions area and more by visiting the pattern on garnstudio.com. © 1982-2024 DROPS Design A/S. We reserve all rights. This document, including all its sub-sections, has copyrights. Read more about what you can do with our patterns at the bottom of each pattern on our site. |
|||||||||||||||||||


With over 40 years in knitting and crochet design, DROPS Design offers one of the most extensive collections of free patterns on the internet - translated to 17 languages. As of today we count 304 catalogues and 11422 patterns - 11422 of which are translated into English (UK/cm).
We work hard to bring you the best knitting and crochet have to offer, inspiration and advice as well as great quality yarns at incredible prices! Would you like to use our patterns for other than personal use? You can read what you are allowed to do in the Copyright text at the bottom of all our patterns. Happy crafting!
Comments / Questions (57)
Après la réhausse du dos, après les 40 (6-9 mois) dernières mailles tricotées, doit-on débuter le premier tour A.1 au centre de la réhausse? Donc, un tour complet moins 20 mailles? Ou bien on retourne le travail pour 20 mailles et on débute tour A.1?
12.04.2021 - 04:10DROPS Design answered:
Bonjour Mme Dufour, après la réhausse (dernier rang sur l'envers), tournez et tricotez sur l'endroit jusqu'au début des tours de nouveau (= milieu dos). Tricotez maintenant A.1 à partir d'ici = milieu dos. Bon tricot!
12.04.2021 - 11:08Buonasera. Non capisco come mai alla fine delle coste, dopo aver lavorato il giro con diagramma A. 1 il numero delle maglie diminuisca. (es taglia 6/9 da 180 a 120 punti). Dritto-rovescio-rovescio diventano gettato-passato-rovescio ma restano sempre 3 punti. Dove sbaglio? Grazie
14.02.2021 - 00:00DROPS Design answered:
Buonasera Arianna, per il 1° giro deve lavorare A.1, in cui si diminuiscono le maglie, poi proseguire con A.1a. Buon lavoro!
14.02.2021 - 19:37Er den første ribkant 1 ret og 2 vrang på skift, eller 1 ret og 1 vrang? Jeg kan ikke lige få det til at passe når jeg kigger på billedet eller videoen med 1ret og 2 vrang, men måske er det bare mig der blev forvirret.
07.02.2021 - 20:33DROPS Design answered:
Hei Ronja. Vrangborden strikkes 1 rett, 2 vrang omgangen rundt. mvh DROPS design
12.02.2021 - 14:53Ich bin an dem Hosenteil, hab nun an der vorderen Mitte und hinteren Mitte je 5 Maschen aufgenommen und komme nun in die erste Runde des A2Musters welches 1xin der Höhe gestrickt werden soll. Nun meine Frage: zählen die Umschläge der vorherigen Runde als Maschen? In der ersten Runde ist ja 1U,1links abheben, 1links stricken, 1U,1links abheben, 1links stricken, 1U,1links abheben, den U und M links zusammensteicken (fortlaufend). Dies geht bei mir nicht auf.
03.02.2021 - 23:42DROPS Design answered:
Liebe Anja, es werden nur 4 Maschen jeweils zugenommen (5 Maschen werden aus derselben Maschen herausgestrickt aber es werden nur 4 Maschen zugenommen. Dieses Video zeigt, wie man im Patent zunimmt und könnte Ihnen helfen - die Umschläge bei Patent sind nicht als Maschen gezählt, da sie zu den abgehobenen Maschen "gehören". Viel Spaß beim stricken!
04.02.2021 - 09:31I am working the A.1A chart, and round 1 is a 2 stitch pattern ending in a YO/Sl 1, but Round 2 starts with a YO/Sl 1, without a stitch between, as in the rest of the round. Likewise between R 2 and 3 - you end up with 2 “double” stitches in a row. The 2 stitch pattern actually involves 3 stitches, and 104 stitches (for my size) isn’t evenly divisible by 3, so that it can’t work, can it? Maybe I’m missing something?
27.01.2021 - 01:45DROPS Design answered:
Dear Midori, the very first row in A.1 is a decrease row, you repeat (YO, slip 1 st as if to P and purl the next 2 stitches together) repeat from (to) so that the last stitch worked is a decrease. On next row, repeat (K tog YO + slipped stitch, slip 1 as if to P). Are you working the 3rd size? You have then 156 sts on needle before A.1 - work 1st row decreasing with P2 tog as explained before, 104 sts remain. Now work the 2-sts repeat over the 104 sts. Happy knitting!
27.01.2021 - 07:44Buonasera, a mio avviso il modello non spiega con che tipo di cote va lavorata l’alzata: - coste inglesi - coste 1/1 - coste 1/2 Difficile capirlo. Soprattutto non essendoci una foto del dietro del pantaloncino. Grazie mille
14.01.2021 - 22:17DROPS Design answered:
Buongiorno Ilaria, la lavorazione dell'alzata segue quella delle coste in quel momento e cioè 1 maglia diritto, 2 maglie rovescio. Il punto di inizio della lavorazione a coste inglesi è indicato più avanti. Buon lavoro!
15.01.2021 - 09:56Buongiorno, l’alzata deve essere fatta a costa inglese? Se sì come posso allineare, come si vede nella foto, le coste a dritto della costa inglese con le coste a dritto del bordo di 4 cm (fatto con 1dritto e 2rov) ? Mille grazie Ilaria
14.01.2021 - 18:30DROPS Design answered:
Buonasera Ilaria, l'alzata dev'essere lavorata a coste come indicato. Buon lavoro!
14.01.2021 - 22:00Hvorfor er det ikke forhøyning bak?
11.01.2021 - 14:24DROPS Design answered:
Hei BenteL. Jo, det er forhøyning bra. Slik står det i oppskriften: BUKSE: Når vrangborden måler 4 cm, strikkes det forhøyning bak slik: Strikk (32) 35-38-44-47 (50-53) masker vrangbord, snu, stram tråden, strikk (64) 70-76-88-94 (100-106) masker vrangbord tilbake, snu, stram tråden, strikk (58) 64-70-82-88 (94-100) masker vrangbord, snu, stram tråden, strikk (52) 58-64-76-82 (88-94) masker vrangbord tilbake. Fortsett slik ved å strikke 6 masker mindre for hver gang det snus til det er strikket over totalt (28) 34-40-40-46 (52-58) masker. Nå strikkes arbeidet videre rundt fra retten. mvh DROPS design
11.01.2021 - 14:27I diagram A.2 str. 18 mdr. passer maskerne og udtagningen ikke sammen efter 3 udtagning. Er der måske en fejl? Kan se de andre rækker er der 4 før der rykkes et hak ud i digrammet men i denne er der kun 3. Jeg har strikket det om 3 gange og det passer bare ikke.
03.01.2021 - 01:50DROPS Design answered:
Hej Lone, det stemmer som du siger, 3.udtagning er ikke tegnet med ind i diagrammet. Det skal vi få rettet. Tak for info :)
14.01.2021 - 13:24Buongiorno, Sto per iniziare il lavoro ma non capisco perché devo montare 204 maglie (2anni) che corrispondono a 85cm (in base al campioncino 10*10 dove 24maglie =10cm) mentre il girovita dovrebbe misurare 56cm. Cosa non ho capito? Grazie mille per il chiarimento.
26.12.2020 - 11:45DROPS Design answered:
Buongiorno Nathalie, la prima parte dei pantaloncini è lavorata con i ferri più piccoli, mentre il campione è lavorato con quelli più grandi, e quindi la tensione sarà diversa. Buon lavoro!
27.12.2020 - 12:43