DROPS Flora
DROPS Flora
65% Wool, 35% Alpaca
from 3.30 $ /50g
Get the yarn to make this pattern from 6.60$.

The yarn cost is calculated from the pattern’s smallest size and the yarn’s cheapest product type. Looking for an even better price? You might find it on the DROPS Deals!

DROPS SS24

Afternoon Playdate

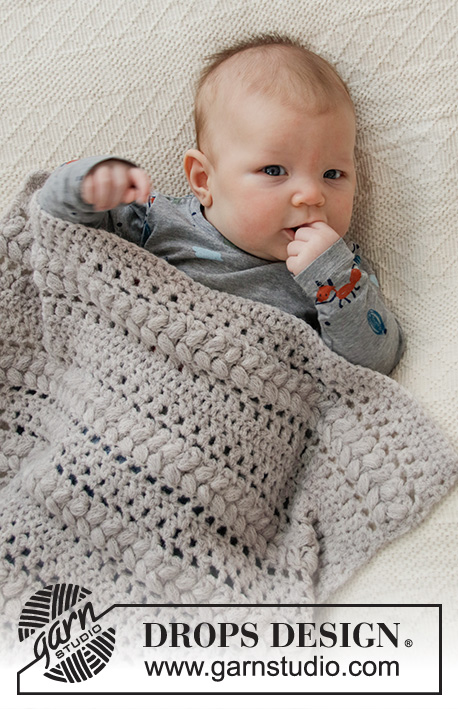
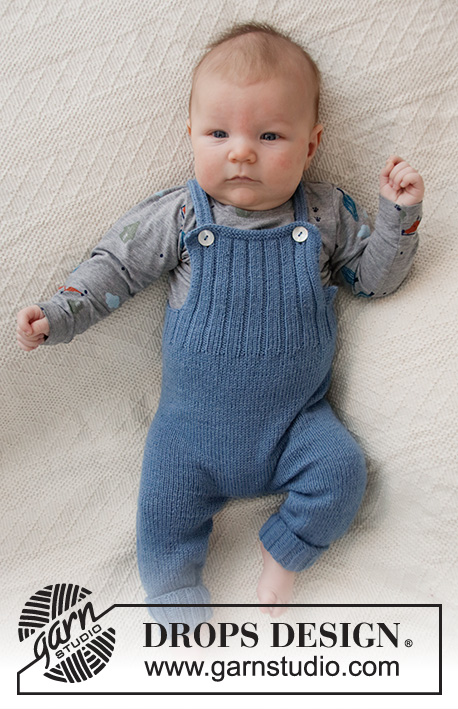
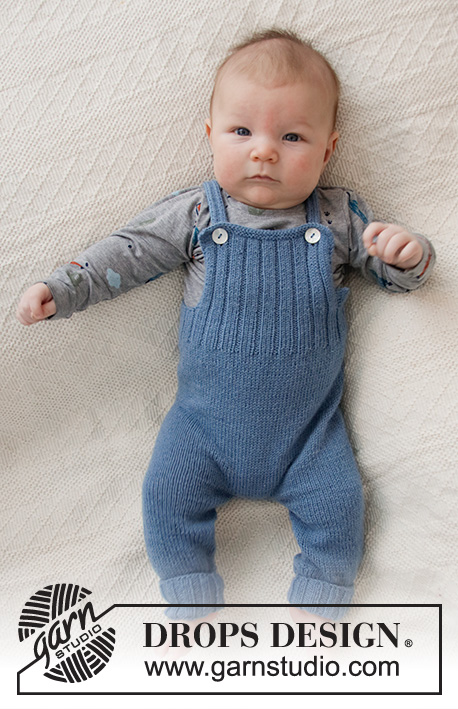
Knitted jumpsuit for babies in DROPS Flora. The piece is worked with rib and stockinette stitch. Sizes: Premature – 4 years.

DROPS Baby 36-4
DROPS Design: Pattern no fl-003-by
Yarn group A
-----------------------------------------------------------

SIZES:
(<0) 0/1 - 1/3 - 6/9 - 12/18 months (2 - 3/4) years
Size equivalent to approx. height of baby in cm:
(40/44) 48/52 - 56/62 - 68/74 - 80/86 (92 - 98/104) cm
Size equivalent to approx. height of baby in inches:
1ft4/1ft5) 1ft7/1ft8 – 1ft 10/2ft – 2ft3/2ft5 – 2ft7/2ft9 (3ft – 3ft3/3ft5)

MATERIALS:
DROPS FLORA from Garnstudio (belongs to yarn group A)
(100) 100-100-100-100 (150-150) g color 13, denim blue

KNITTING GAUGE:
24 stitches in width and 32 rows in height with stockinette stitch = 10 x 10 cm = 4" x 4".

NEEDLES:
DROPS DOUBLE POINTED NEEDLES SIZE 3 MM = US 2,5.
DROPS CIRCULAR NEEDLE SIZE 3 MM = US 2,5: Length 40 cm = 16" for stockinette stitch.
DROPS DOUBLE POINTED NEEDLES SIZE 2.5 MM = US 1,5.
DROPS CIRCULAR NEEDLE SIZE 2.5 MM = US 1,5: Length 40 cm = 16" for rib.
Needle size is only a guide. If you get too many stitches on 10 cm = 4", change to a larger needle size. If you get too few stitches on 10 cm = 4", change to a smaller needle size.

DROPS MOTHER OF PEARL BUTTONS, Arched (white) NO 521: 2 items in all sizes.

-------------------------------------------------------

Alternative Yarn – See how to change yarns here
Yarn Groups A to F – Use the same pattern and change the yarn here
Yarn usage using an alternative yarn – Use our yarn converter here

-------------------------------------------------------

DROPS Flora
DROPS Flora
65% Wool, 35% Alpaca
from 3.30 $ /50g
Get the yarn to make this pattern from 6.60$.

The yarn cost is calculated from the pattern’s smallest size and the yarn’s cheapest product type. Looking for an even better price? You might find it on the DROPS Deals!

Pattern instructions

NOTE: This pattern is written in American English. All measurements in charts are in cm. For conversion from inches to cm - click here. There are different terms for crocheting in American and British English. If this pattern includes crochet, click for "crochet terms" here. For this pattern in British English, please click here.
-------------------------------------------------------

EXPLANATIONS FOR THE PATTERN:

-------------------------------------------------------

RIDGE/GARTER STITCH (worked back and forth):
1 ridge in height = Knit 2 rows.

INCREASE TIP (for sides of legs):
Work until there is 1 stitch left before the marker, 1 yarn over, knit 2 (marker sits between these 2 stitches), 1 yarn over. On the next round knit the yarn overs twisted to avoid holes. Then work the new stitches in stockinette stitch.

DECREASE TIP:
Decrease 1 stitch on each side of the marker as follows: Work until there are 3 stitches left before the marker, knit 2 together, knit 2 (marker sits between these 2 stitches), slip 1 stitch as if to knit, knit 1, pass the slipped stitch over the knitted stitch. Decrease like this at both markers.

-------------------------------------------------------

START THE PIECE HERE:

-------------------------------------------------------

TROUSERS – SHORT OVERVIEW OF THE PIECE:
Each leg is worked separately with double pointed needles before putting them together and casting on stitches for the crutch. The piece is continued in the round with short circular needle. Front and back pieces are worked back and forth.

LEG:
Cast on (40) 44-48-48-56 (60-64) stitches with double pointed needles size 2.5 mm = US 1,5 and Flora. Knit 1 round. Then work rib (= knit 2, purl 2). When the piece measures 5 cm = 2", change to double pointed needles size 3 mm = US 2,5 and continue with stockinette stitch.
Insert 1 marker at the beginning of the round. Allow the marker to follow your work onwards; it marks the inside of the leg and will be used when increasing later. REMEMBER THE KNITTING GAUGE!
When the piece measures 10 cm = 4", increase (0) 1-1-1-1 (1-1) stitch on each side of the marker – read INCREASE TIP.
Increase like this every (0) 2-2-2-3 (5-7) cm = (0") ¾"-¾"-¾"-1⅛" (2"-2¾") a total of (0) 4-7-8-7 (6-5) times = (40) 52-62-64-70 (72-74) stitches.
Work stockinette stitch until the piece measures (16) 18-25-26-31 (39-42) cm = (6¼") 7"-9¾"-10¼"-12¼" (15¼"-16½").
Move the marker (20) 26-31-32-35 (36-37) stitches (= outside of leg). Allow the marker to follow your work onwards; it marks the outside of the leg and will be used when decreasing later. Cut the strand.
Work the other leg in the same way.

JUMP SUIT:
Now place both legs on circular needle size 3 mm = US 2,5 and continue in the round as follows:
Cast on (8) 8-8-10-10 (12-12) stitches, work the stitches from the one leg, cast on (8) 8-8-10-10 (12-12) stitches and work the stitches from the other leg = (96) 120-140-148-160 (168-172) stitches. The round starts mid-back, between the first (8) 8-8-10-10 (12-12) stitches.
The round starts mid-back.
Continue in the round with stockinette stitch.
When the piece measures 2 cm = ¾" from where the legs were joined, decrease (0) 1-1-1-1 (1-1) stitch on each side of both markers – read DECREASE TIP. Decrease like this every (0) 8-3-6-4 (8-10) cm = (0) 3⅛"-1⅛"-2⅜"-1½" (3⅛"-4") a total of (0) 2-5-3-4 (3-2) times = (96) 112-120-136-144 (156-164) stitches.
Work stockinette stitch until the piece measures (11) 13-14-17-18 (19-20) cm = (4⅜") 5⅛"-5½"-6¾"-7" (7½"-8") from the join.
Now work an elevation at the back as follows:
Knit (7) 7-9-9-9 (9-9), turn, tighten the strand and purl (14) 14-18-18-18 (18-18) stitches, turn, tighten the strand and knit (20) 20-26-26-26 (26-26) stitches, turn, tighten the strand and purl (26) 26-34-34-34 (34-34) stitches back. Continue like this, working (6) 6-8-8-8 (8-8) more stitches each time you turn and until you have worked over a total of (50) 50-66-66-82 (82-82) stitches. Turn, work to beginning of the round (= mid back).
Knit 1 round and adjust the number of stitches to (95) 115-120-140-145 (160-165) stitches (i.e. increase (0) 3-0-4-1 (4-1) stitches and decrease (1) 0-0-0-0 (0-0) stitch).

To make sure the front piece and back piece are placed correctly, the start of the round is now displaced as follows:
Move size premature: Knit until 1 stitch remains on round, now round starts here.
Move size 0/1 - 1/3 - 6/9 - 12/18 months (2 - 3/4) years: Knit 1, now round starts here.
Change to short circular needle size 2.5 mm = US 1.5. Work as follows in all sizes:
Work rib (= purl 2, knit 3) over all stitches. When the rib measures 4 cm = 1½", bind offf stitches as follows:
Purl 2, knit 3, purl 2, knit 3, work 1 stitch in GARTER STITCH – read description above, bind off the next (19) 24-24-34-34 (39-39) stitches, work 2 stitches in garter stitch, continue with rib over the next (33) 38-43-43-48 (53-58) stitches, work 2 stitches in garter stitch (= front piece), bind offf the next (19) 24-24-34-34 (39-39) stitches, work 1 stitch in garter stitch and work rib over the remaining (8) 13-13-13-13 (13-13) stitches.

BACK PIECE:
= (20) 25-25-25-25 (25-25) stitches. Continue back and forth with rib and 2 edge stitches in garter stitch on each side until the piece measures (2) 3-3-4-4 (5-5) cm = (3/4") 1⅛"-1⅛"-1½"-1½" (2"-2") from the division. The next row is worked as follows:
Work 1 stitch in garter stitch, knit 3, purl 2, knit 3, 1 stitch in garter stitch, bind offf the next (0) 5-5-5-5 (5-5) stitches, work 1 stitch in garter stitch, knit 3, purl 2, knit 3 and 1 stitch in garter stitch = 10 stitches left for each shoulder strap.

SHOULDER STRAP:
Continue with rib and 1 edge stitch in garter stitch on each side, back and forth until the strap measures approx. 18-24 cm = 7"-9½" (or to desired length). Bind off and repeat on the other side.

FRONT PIECE:
= (37) 42-47-47-52 (57-62) stitches. Continue back and forth with rib and 2 edge stitches in garter stitch on each side until the piece measures (4) 6-7-9-10 (11-12) cm = (1½") 2⅜"-2¾"-3½"-4" (4⅜"-4¾"), work 2 buttonholes from the right side as follows:
Work 2 stitches in garter stitch, knit 3, purl 2, knit 2 together, 1 yarn over, work as before until there are 10 stitches left, knit 2 together, 1 yarn over, knit 1, purl 2, knit 3, 2 stitches in garter stitch.
When the piece measures (5) 7-8-10-11 (12-13) cm = (2") 2¾"-3⅛"-4" (4⅜"-5⅛"), work 2 ridges over all stitches. Bind off.

ASSEMBLY:
Sew together the stitches in the crutch. Sew 1 button on each strap.

This pattern has been corrected.

Updated online: 16.11.2020
Correction: JUMP SUIT: ... Turn, work to beginning of the round (= mid back)...
Updated online: 15.01.2021
JUMP SUIT:
... To make sure the front piece and back piece are placed correctly, the start of the round is now displaced as follows:
Move size premature: Knit until 1 stitch remains on round, now round starts here.
Move size 0/1 - 1/3 - 6/9 - 12/18 months (2 - 3/4) years: Knit 1, now round starts here.
Change to short circular needle size 2.5 mm = US 1,5.
Work as follows in all sizes:

FRONT PIECE:
= (37) 42-47-47-52 (57-62) stitches. Continue back and forth with rib and 2 edge stitches in garter stitch on each side...

Diagram

All measurements in charts are in cm.

symbols = knitting direction
diagram

Each of our patterns has specific tutorial videos to help you.

Do you have a question? See a list of frequently asked questions (FAQ)

Knitting tension is what determines the final measurements of your work, and is usually measured per 10 x 10 cm. It is provided like so: number of stitches in width x number of rows in height - eg: 19 stitches x 26 rows = 10 x 10 cm.

The knitting tension is very individual; some people knit/crochet loosely while others work tightly. You adjust the knitting tension with the needle size, which is why the suggested needle size only serve as a guide! You need to adjust this (up or down) to ensure that YOUR knitting tension matches the knitting tension provided in the pattern. If you work with a different knitting tension than provided you will have a different yarn consumption, and your work will have different measurements than what the pattern suggests.

The knitting tension also determines which yarns can replace each other. As long as you achieve the same knitting tension you can replace one yarn with another.

See DROPS lesson: How to measure your tension/gauge

See DROPS video: How to make a gauge tension swatch

The required amount of yarn is provided in grams, eg: 450 g. To calculate how many balls you’ll need you first need to know how many grams are in 1 ball (25g, 50g or 100g). This information is available if you click on the individual yarn quality on our pages. Divide the amount required with the amount of each ball. For example, if each ball is 50g (the most common amount), the calculation will be as follows: 450 / 50 = 9 balls.

The important thing when changing from one yarn to another is that the knitting/crochet tension remains the same. This is so that the measurements of the finished piece will be the same as on the sketch provided. It is easier to achieve the same knitting tension using yarns from the same yarn group. It is also possible to work with multiple strands of a thinner yarn to achieve the knitting tension of a thicker one. Please try our yarn converter. We recommend you to always work a test swatch.

Please NOTE: when changing yarn the garment might have a different look and feel to the garment in the photo, due to individual properties and qualities of each yarn.

See DROPS lesson: Can I use a different yarn than the one mentioned in the pattern?

All our yarns are categorised into yarn groups (from A to F) according to thickness and knitting tension – group A contains the thinnest yarns and group F the thickest. This makes it easier for you to find alternative yarns to our patterns, should you wish to switch yarn. All yarns within the same group have a similar knitting tension and can easily replace each other. However, different yarn qualities have different structures and properties which will give the finished work a unique look and feel.

Click here for an overview of the yarns in each yarn group

At the top of all our patterns you’ll find a link to our yarn converter, which is a helpful tool should you wish to use a different yarn than suggested. By filling in the yarn quality you wish to replace, the amount (in your size) and number of strands, the converter will present good alternative yarns with the same knitting tension. Additionally it will tell you how much you’ll require in the new qualities and whether you’ll need to work with multiple strands. Most skeins are 50g (some are 25g or 100g).

If the pattern is worked with multiple colours, every colour will have to be converted separately. Similarly, if the pattern is worked with several strands of different yarns (for example 1 strand Alpaca and 1 strand Kid-Silk) you will have to find alternatives for each, individually.

Click here to see our yarn converter

Since different yarns have different qualities and textures we have chosen to keep the original yarn in our patterns. However, you can easily find options among our available qualities by using our yarn converter, or simply pick a yarn from the same yarn group.

It is possible that some retailers still have discontinued yarns in stock, or that someone has a few skeins at home that they would like to find patterns for.

The yarn converter will provide both alternative yarn as well as required amount in the new quality.

If you think it's hard to decide what size to make, it can be a good idea to measure a garment you own already and like the size of. Then you can pick the size by comparing those measures with the ones available in the pattern's size chart.

You'll find the size chart at the bottom of the pattern.

See DROPS lesson: How to read size chart

The needle size provided in the pattern serves only as a guide, the important thing is to follow the knitting tension. And since knitting tension is very individual, you will have to adjust the needle size to ensure that YOUR tension is the same as in the pattern – maybe you’ll have to adjust 1, or even 2 needle sizes, up or down to achieve the correct tension. For this, we recommend that you work test swatches.

Should you work with a different knitting tension than the one provided, the measurements of the finished garment might deviate from the measurement sketch.

See DROPS lesson: How to measure your tension/gauge

See DROPS video: How to make a gauge tension swatch

Working a garment top-down provides more flexibility and room for personal adjustment. For example it is easier to try the garment on while working, as well as making adjustments to length of yoke and shoulder caps.

The instructions are carefully explaining every step, in the correct order. Diagrams are adjusted to the knitting direction and are worked as usual.

The diagram depicts all rows/rounds, and every stitch seen from the right side. It is read from bottom to top, from right to left. 1 square = 1 stitch.

When working back and forth, every other row is worked from the right side and every other row is worked from the wrong side. When working from the wrong side, the diagram will have to be worked reversed: from left to right, knit stitches are purled, purl stitches are knit etc.

When working in the round every round is worked from the right side and the diagram are worked from right to left on all rounds.

See DROPS lesson: How to read knitting diagrams

The diagram depicts all rows/rounds, and every stitch seen from the right side. It is worked from bottom to top, from right to left.

When working back and forth every other row is worked from the right side: from right to left and every other row is worked from the wrong side: from left to right.

When working in the round, every row in the diagram are worked from the right side, from right to left.

When working a circular diagram you start in the middle and work your way outwards, counter clockwise, row by row.

The rows usually start with a given number of chain stitches (equivalent to the height of the following stitch), this will either be depicted in the diagram or explained in the pattern.

See DROPS lesson: How to read crochet diagrams

Instructions for working several diagrams after each other on the same row/round, will often be written like so: “work A.1, A.2, A.3 a total of 0-0-2-3-4 times". This means you work A.1 once, then A.2 is worked once, and A.3 is repeated (in width) the number of times provided for your size – in this case like so: S = 0 times, M = 0 times, L=2 times, XL= 3 times and XXL = 4 times.

The diagrams are worked as usual: begin with the first row in A.1, then work the first row in A.2 etc.

See DROPS lesson: How to read knitting diagrams

See DROPS lesson: How to read crochet diagrams

The total width of the garment (from wrist-to-wrist) will be larger in the larger sizes, despite the actual sleeves being shorter. The larger sizes have longer sleeve caps and wider shoulders, so there will be a good fit in all sizes.

The measurement sketch/schematic drawing provides information regarding the full length of the garment. If it’s a jumper or a jacket the length is measured from the highest point on the shoulder (usually closest to the neckline), and straight down to the bottom of the garment. It is NOT measured from the tip of shoulder. Similarly, the length of yoke is measured from the highest point on the shoulder and down to where yoke is split into body and sleeves.

See DROPS lesson: How to read a schematic drawing

Diagrams are often repeated on the round or in height. 1 repeat is the diagram the way it appears in the pattern. If it says to work 5 repeats of A.1 in the round, then you work A.1 a total of 5 times after/next to each other in the round. If it says to work 2 repeats of A.1 vertically/in height you work the entire diagram once, then begin again at the start and work the entire diagram one more time.

Chain stitches are slightly narrower than other stitches and to avoid working the cast-on edge too tight, we simply chain more stitches to begin with. The stitch count will be adjusted on the following row to fit the pattern and measurement sketch.

The rib edge is more elastic and will contract slightly compared to, for example, stocking stitch. By increasing before the rib edge, you avoid a visible difference in width between the rib edge and the rest of the body.

It’s very easy to cast off too tightly, and by making yarn overs while casting off (and simultaneously casting these off) you avoid a too tight cast off edge.

See DROPS video: How to bind off with yarn overs (yo)

To achieve an even increase (or decrease) you can increase on, for example: every 3rd and 4th row alternately, like so: work 2 rows and increase on the 3rd row, work 3 rows and increase on the 4th. Repeat this until the increase is complete.

See DROPS lesson: Increase or decrease 1 st on every 3rd and 4th row alternately

Should you prefer to work in the round instead of back and forth, you may of course adjust the pattern. You’ll need to add steeks mid-front (usually 5 stitches), and follow the instructions. When you would normally turn and work from the wrong side, simply work across the steek and continue in the round. At the end you’ll cut the piece open, pick up stitches to work bands, and cover the cut edges.

See DROPS video: How to knit steeks and cut open

Should you prefer to work back and forth instead of in the round, you may of course adjust the pattern so you work the pieces separately and then assemble them at the end. Divide the stitches for the body in 2, add 1 edge stitch in each side (for sewing) and work the front and back pieces separately.

See DROPS lesson: Can I adapt a pattern for circular needles into straight needles?

Pattern repeats can vary slightly in the different sizes, in order to get the correct proportions. If you’re not working the exact same size as the garment in the photo, yours might deviate slightly. This has been carefully developed and adjusted so that the complete impression of the garment is the same in all sizes.

Make sure to follow instructions and diagrams for your size!

If you have found a pattern you like which is available in women’s size it’s not very difficult to convert it to men’s size. The biggest difference will be the length of sleeves and body. Start working on the women size that you think would fit across the chest. The additional length will be worked right before you cast off for the armhole/sleeve cap. If the pattern is worked top-down you can add the length right after the armhole or before the first decrease on sleeve.

Regarding additional yarn amount, this will depend on how much length you add, but it is better with a skein too many than too few.

All yarns will have excess fibres (from production) that might come off as lint or shedding. Brushed yarns (ie hairier yarns) have more of these loose, excess fibres, causing more shedding.

Shedding also depends on what is worn under or over the garment, and whether this pulls at the yarn fibres. It’s therefore not possible to guarantee that there will be no shedding

Below are some tips on how to get the best result when working with hairier yarns:

1. When the garment is finished (before you wash it) shake it vigorously so the looser hairs come off. NOTE: do NOT use a lint roller, brush or any method that pulls at the yarn.

2. Place the garment in a plastic bag and put it in your freezer - the temperature will cause the fibres to become less attached to each other, and excess fibres will come off easier.

3. Leave in the freezer for a few hours before taking it out and shaking it again.

4. Wash the garment according to the instructions on the yarn label.

Pilling is a natural process that happens to even the most exclusive of fibers. It's a natural sign of wear and tear that is hard to avoid, and that is most visible in high friction areas of your garment like a sweater's arms and cuffs.

You can make your garment look as new by removing the pilling, using a fabric comb or a pill/lint remover.

Still can't find the answer you need? Then scroll down and leave your question so one of our experts can try to help you. This will be done normally within 5 to 10 working days.
In the meantime, you can read the questions and answers that others have left to this pattern or join the DROPS Workshop on Facebook to get help from fellow knitters/crocheters!

You might also like...

Afternoon Playdate

Estelle, United Kingdom

Afternoon Playdate

Monica, Italy

Afternoon Playdate

Frau-Sommer, Germany

Afternoon Playdate

Sasa, Germany

Afternoon Playdate

Aleksandra, Norway

Afternoon Playdate

Aleksandra, Norway

Afternoon Playdate

JoeJ5, France

Post a comment to pattern DROPS Baby 36-4

We would love to hear what you have to say about this pattern!

If you want to leave a question, please make sure you select the correct category in the form below, to speed up the answering process. Required fields are marked *.

Comments / Questions (75)

country flag Gaby wrote:

Hi. Nachdem ich die 5 cm Bündchen der Hosenbeine gestrickt habe, soll rechts gestrickt werden. Nun stellt sich mir die Frage nach 10 cm soll zugenommen werden. Sind die 5 cm des Bündchens in den 5 cm enthalten, oder erst nach 10 cm glatt rechts gestrickt?

22.02.2023 - 21:02

DROPS Design answered:

Liebe Gaby, die 10 cm messen Sie ab der Anschlagskante, dh mit den Bündchen. Viel Spaß beim stricken!

23.02.2023 - 14:43

country flag Marion Van Doremalen wrote:

Worden in dit patroon de pijpen van de broek wel heen en weer gebreid? Ik kan daar geen wijs uit. Later worden de pijpen samengevoegd en ga je verder op de rondbreinaald. Maar dan moeten de pijpen toch aan de binnenkant dichtgenaaid moeten worden? Ik lees dat nergens terug.

26.01.2023 - 22:21

DROPS Design answered:

Dag Marion,

De pijpen worden inderdaad in de rondte gebreid (op breinaalden zonder knop)

29.01.2023 - 18:37

country flag Leni wrote:

Hallo, wozu strickt man die Erhöhung? Ist diese Notwendig? Liebe Grüße Leni :)

03.11.2022 - 09:37

DROPS Design answered:

Liebe Leni,diese Erhöhung gibt eine Bequemlichkeit für die Windeln - Viel Spaß beim stricken!

03.11.2022 - 10:46

country flag Amanda Karlsson wrote:

Hello, at the end of the pants part and starting on the back panel it says at the end of the pants part you will have 13 stitches, but at the start of the back panel, you are supposed to have 25 stitches. How come? where do the extra stitches come from?

14.05.2022 - 11:30

DROPS Design answered:

Dear Amanda, at the end of the pants, you have a total of 13 (2+3+2+3+1+2) + 33 or 38 or... + 2 + 1 + 8 or 13 .... stitches. Since you start the round in the mid back, the first 11 stitches worked at the end of the pants and the last 14 sts are all part of the back. Happy knitting!

15.05.2022 - 23:55

country flag Amanda Karlsson wrote:

Hello I dont understand where the elevation is supposed to start?

12.05.2022 - 21:55

DROPS Design answered:

Hi Amanda, Start the instructions for the elevation at the beginning of the round = mid-back. Happy knitting!

13.05.2022 - 08:03

country flag Noa wrote:

Hello, thank you for this pattern! I am a bit confused about the 1-3m/o size instructions, as after the join it calls for 5 decreases, one every 3cm, but the decreases start 2cm after the join and it says to go until 14cm after the join, but the decreases alone would go way past 14cm. What should I do? "When the piece measures 2 cm from where the legs were joined, decrease 1 stitch on each side of both markers [...] Decrease like this every 3 cm a total of 5 times."

25.04.2022 - 21:38

DROPS Design answered:

Dear Noa, first decrease is worked by 2 cm, 2nd by 5 cm (2+3), 3rd by 8 cm (5+3), 4th by 11 cm (8+3) and 5th by 14 cm (11+3). Then after last decrease, you will start the elevation. Happy knitting!

26.04.2022 - 10:03

country flag Renata wrote:

Zou het mogelijk zijn dit patroon te maken met drukkertjes sluiting in het kruis?

14.01.2022 - 14:02

DROPS Design answered:

Dag Renata,

Dat vergt enige aanpassing, want je moet dan van de gehele binnenbeen een bies maken. Voor zover ik weet hebben we hiervoor geen patroon. Er zijn wel patronen van kruippakken met pijpen en met een sluiting midden voor.

16.01.2022 - 14:47

country flag HELENE LEPOUTRE wrote:

Où est il écrit le niveau requis pour ce modèle ... débutant... intermédiaire... expert...?

10.01.2022 - 15:12

DROPS Design answered:

Bonjour Mme Lepoutre, lisez attentivement les explications, consultez les leçons et les vidéos si besoin et, si vous avez des questions, utilisez cet espace pour les poser. Bon tricot!

10.01.2022 - 16:18

country flag MARTIN wrote:

Bonjour, si je ne souhaite pas faire de revers en bas des manches, je dois ôter 5 cm ? Merci.

29.12.2021 - 17:54

DROPS Design answered:

Bonsoir Martin, exactement. Bon tricot!

29.12.2021 - 20:48

country flag Maria Elena wrote:

Næste spørgsmål :D : "BAGSTYKKE: = (20) 25-25-25-25 (25-25) masker. " Hvordan ved jeg hvorfra jeg samler 25 masker op? Kunne det være muligt at se et billede af ryggen på dragten? Det ville hjælpe med bagstykket :)

21.11.2021 - 12:28

DROPS Design answered:

Hei Maria. Har sett igjennom vårt bildegalleri, men vi har dessverre ingen bilder fra bakstykket på denne buksen. Når du var ferdig med forhøyningen og har økte du med 3 masker (= 115 m), skulle det strikkes 1 maske rett. Starten på omgangen flyttes hit. Nå strikkes det en vrangbord på 4 cm før det felles masker i sidene. Når du har felt maskene i sidene, har du 11 masker på den ene siden av starten på omgangen og 14 masker på den andre siden av starten på omgangen = 25 masker til bakstykket. mvh DROPS Design

23.11.2021 - 13:31