
Popular categories
Looking for a yarn?


|
|||||||||||||||||||
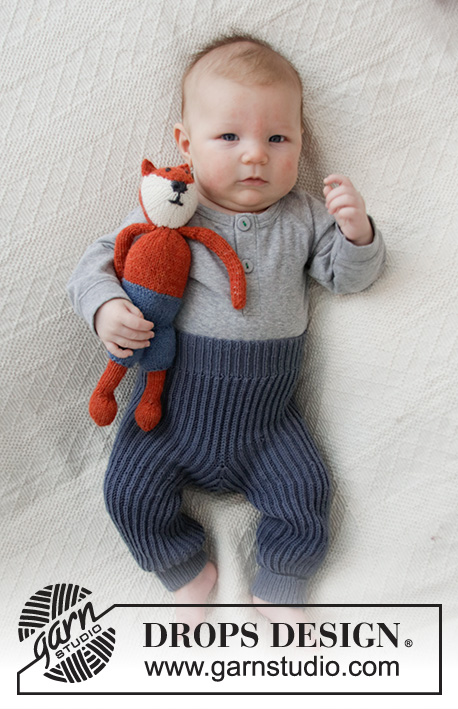
Baby Fox Onesie |
|||||||||||||||||||
 |
 |
||||||||||||||||||
Knitted body for babies in DROPS Alpaca. The piece is worked with a fox-pattern, with straps and pocket. Sizes: Premature – 4 years.
DROPS Baby 36-2 |
|||||||||||||||||||
|
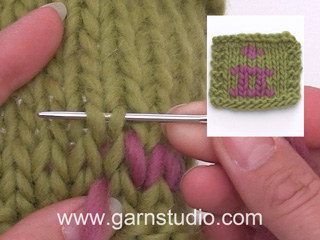
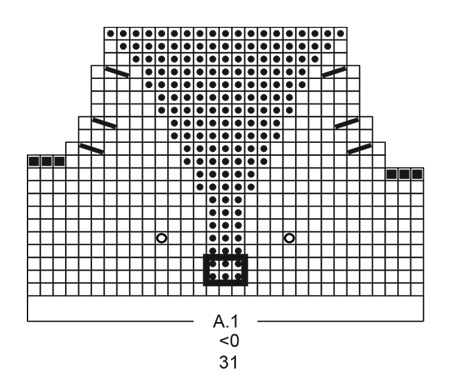
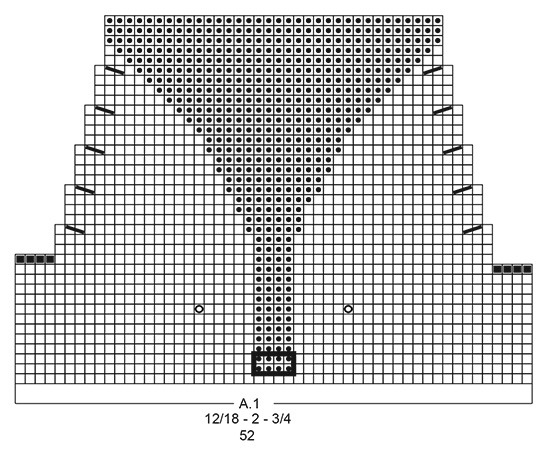
------------------------------------------------------- START THE PIECE HERE: ------------------------------------------------------- BODY – SHORT OVERVIEW OF THE PIECE: The piece is worked in 2 sections, back and forth before being put on the same short circular needle and continued in the round. The piece is divided for the front and back pieces and they are finished separately back and forth. An edge is knitted up around each leg. Then a loose pocket is worked with fox-pattern, which is sewn on to the body. BACK PIECE: Cast on (8) 10-10-12-12 (14-14) stitches with circular needle size 3 mm = US 2,5 and rust. Work 1 edge stitch in GARTER STITCH – read description above, work (6) 8-8-10-10 (12-12) stitches in stockinette stitch and 1 edge stitch in garter stitch. REMEMBER THE KNITTING GAUGE! When the piece measures (1) 1-2-2-2 (3-3) cm = (3/8") ⅜"-¾"-¾"-¾" (1⅛"-1⅛"), cast on 2 stitches at the end of each row a total of (5) 6-7-7-8 (8-9) times on each side, then cast on (5) 5-5-6-7 (8-9) stitches at the end of the next 2 rows = (38) 44-48-52-58 (62-68) stitches. Lay the piece to one side and work the front piece. FRONT PIECE: Cast on (8) 10-10-12-12 (14-14) stitches with circular needle size 3 mm = US 2,5 and rust. Work 1 edge stitch in garter stitch, (6) 8-8-10-10 (12-12) stitches in stockinette stitch and 1 edge stitch in garter stitch. When the piece measures (3) 4-5-6-7 (8-10) cm = (1⅛") 1½"-2"-2⅜"-2¾" (3⅛"-4"), cast on 2 stitches at the end of each row a total of 3 times on each side, then cast on (9) 11-13-14-17 (18-21) stitches at the end of the next 2 rows = (38) 44-48-52-58 (62-68) stitches. BODY: Place the stitches from the back and front pieces on the same short circular needle size 3 mm = US 2,5 = (76) 88-96-104-116 (124-136) stitches. Insert 1 marker between each piece. The markers will be used when binding off stitches for the armholes. Work stockinette stitch in the round. When the piece measures (9) 12-16-17-19 (21-23) cm = (3⅛") 4¾"-6¼"-6¾"-7½" (8¼"-9") from the markers, work 2 RIDGES – read description above – over 4 stitches on each side of both markers (= a total of 8 garter stitches on each side). On the next round bind off 3 stitches for the armholes on each side of both markers (= 6 stitches bind off on each side of the piece); front and back pieces are finished separately. FRONT PIECE: = (32) 38-42-46-52 (56-62) stitches. The piece is continued back and forth with 3 stitches in garter stitch on each side of the piece. On the first row from the right side decrease 1 stitch on each side of the piece – read DECREASE TIP! Decrease like this on each row from the right side a total of (4) 4-6-6-7 (6-7) times = (24) 30-30-34-38 (44-48) stitches. Continue with stockinette stitch and 3 stitches in garter stitch on each side until the piece measures (4) 5-5-6-7 (8-10) cm = (1½") 2"-2"-2⅜"-2¾" (3⅛"-4") from the division. On the next row from the wrong side decrease 1 stitch in the middle of the piece by purling 2 together = (23) 29-29-33-37 (43-47) stitches. On the next row from the right side work rib as follows: 3 stitches in garter stitch, * knit 1, 1 stitch in garter stitch *, work from *-* until there are 4 stitches left, finish with knit 1 and 3 stitches in garter stitch. When the piece measures (5) 6-6-7-8 (9-11) cm = (2") 2⅜"-2⅜"-2¾"-3⅛" (3½"-4⅜") from the division, work 2 buttonholes on the next row from the right side as follows: Work 3 stitches in garter stitch, knit 1, 1 stitch in garter stitch, slip 1 stitch as if to knit, knit 1, pass the slipped stitch over the knitted stitch, 1 yarn over, work as before until there are 7 stitches left, 1 yarn over, knit 2 together, 1 stitch in garter stitch, knit 1 and 3 stitches in garter stitch. Bind off with knit when the piece measures (6) 7-7-8-9 (10-12) cm = (2⅜") 2¾"-2¾"-3⅛"-3½" (4"-4¾") from the division. BACK PIECE: = (32) 38-42-46-52 (56-62) stitches. Work back and forth with 3 stitches in garter stitch in each side. On first row from right side decrease 1 stitch in each side of piece – read DECREASE TIP. Decrease like this on each row from right side a total of 4 times = (24) 30-34-38-44-(48-54) stitches. On the next row from the wrong side decrease 1 stitch in the middle of the piece by purling 2 together = (23) 29-33-37-43 (47-53) stitches. Continue back and forth in stockinette stitch with 3 garter stitches in each side until piece measures (4) 5-5-6-7 (8-10) cm = (1½") 2"-2"-2⅜"-2¾" (3⅛"-4") from division. On the next row from the right side work rib as follows: 3 stitches in garter stitch, * knit 1, 1 stitch in garter stitch *, work from *-* until there are 4 stitches left, finish with knit 1 and 3 stitches in garter stitch. Continue back and forth with rib until piece measures (6) 7-7-8-9 (10-12) cm = (2⅜") 2¾"-2¾"-3⅛"-3½" (4" -4¾") from division. Now bind off stitches for the neck and work the straps from the right side as follows: Work 3 stitches in garter stitch, * knit 1, 1 stitch in garter stitch *, work from *-* a total of (2) 3-3-3-3 (3-3) times, 2 stitches in garter stitch (= (9) 11-11-11-11 (11-11) stitches for strap), bind off the next (5)7-11-15-21(25-31) stitches, work 3 stitches in garter stitch, * knit 1, 1 stitch in garter stitch *, work from *-* a total of (2) 3-3-3-3 (3-3) times and finish with 2 stitches in garter stitch (= (9) 11-11-11-11 (11-11) stitches for strap). Work back and forth with rib and garter stitch over the one strap; leave the other stitches on the needle. Continue with rib until the piece measures 8-14 cm = 3⅛"-5½" from the division, work 2 ridges over all stitches, then bind off with knit. Work the other strap in the same way. POCKET: Cast on (33) 42-42-42-54 (54-54) stitches with circular needle size 3 mm = US 2,5 and light pearl grey. Work 1 edge stitch in garter stitch, A.1 (= (31) 40-40-40-52 (52-52) stitches) and finish with 1 edge stitch in garter stitch. Continue this pattern. The whole of A.1 is worked with 1 edge stitch in garter stitch on each side. When A.1 has been worked 1 time in height there are (21) 28-28-28-36 (36-36) stitches on the needle. The piece is now finished with rust. The piece measures approx. (7) 10-10-10-12 (12-12) cm = (2¾") 4"-4"-4"-4¾" (4¾"-4¾"). On the next row from the right side work rib as follows: 1 edge stitch in garter stitch, * knit 1, 1 stitch in garter stitch *, work from*-* until there are 2 stitches left, at the same time decrease (0) 1-1-1-1 (1-1) stitch, finish with knit 1 and 1 edge stitch in garter stitch = (21) 27-27-27-35 (35-35) stitches. Work rib for 2 cm = ¾" (or to desired length). Bind off with knit. Work 1 edge; from the (3) 4-4-4-4 (4-4) bind-off stitches on the pocket up to the bind-off edge as follows: Knit up 18-28 stitches inside the 1 edge stitch from the right side. Work rib starting from the wrong side as follows: * 1 stitch in garter stitch, purl 1 *, work from *-* over all stitches. Bind off with knit from the right side when the edge measures 1 cm = ⅜" – read BINDING-OFF TIP. Work a similar edge along the other side of the pocket. EDGE AROUND LEG: Knit up from the right side approx. 40 to 74 stitches along the one leg-opening with circular needle size 3 mm = US 2,5 and rust; adjust so the number of stitches is divisible by 2 and the edge is loose. Work rib (= knit 1, 1 stitch in garter stitch) back and forth with 1 edge stitch in garter stitch on each side of the piece. When the edge measures 2-4 cm = 3/4-1½", bind off with knit from the right side. Repeat around the other leg. ASSEMBLY: Sew the opening between the legs. Sew 1 button on each strap. Sew the fox’s eyes on the pocket with 1 duplicate stitch using dark grey on each light pearl grey section – see circle in diagram. Sew the nose on the pocket with 1 duplicate stitch using dark grey in each of the (3) 4-4-4-4 (4-4) stitches on rows 2 and 3 at the bottom of the pocket – see marked square in diagram. Fasten the cast-on edge on the pocket, approx. 2-4 cm = ¾"-1½" up from the last cast-on stitches on the front piece, using duplicate stitches and sew the bind-off edge to the body, so the pocket is flat. Sew the sides of the pocket to the body as far as the bind-off edge. |
|||||||||||||||||||
Diagram explanations |
|||||||||||||||||||
|
|||||||||||||||||||
|
|||||||||||||||||||

|
|||||||||||||||||||
|
|||||||||||||||||||

|
|||||||||||||||||||
|
Have you made this or any other of our designs? Tag your pictures in social media with #dropsdesign so we can see them! Do you need help with this pattern?You'll find tutorial videos, a Comments/Questions area and more by visiting the pattern on garnstudio.com. © 1982-2024 DROPS Design A/S. We reserve all rights. This document, including all its sub-sections, has copyrights. Read more about what you can do with our patterns at the bottom of each pattern on our site. |
|||||||||||||||||||


With over 40 years in knitting and crochet design, DROPS Design offers one of the most extensive collections of free patterns on the internet - translated to 17 languages. As of today we count 304 catalogs and 11422 patterns - 11417 of which are translated into English (US/in).
We work hard to bring you the best knitting and crochet have to offer, inspiration and advice as well as great quality yarns at incredible prices! Would you like to use our patterns for other than personal use? You can read what you are allowed to do in the Copyright text at the bottom of all our patterns. Happy crafting!
Comments / Questions (33)
Takakappaleen yläosassa neuvotaan: "Neulo kuten edessä" Onko kuitenkin niin ettei takakappaleessa tehdä samoja kavennuksia kuin etupuolella?
12.06.2021 - 18:10Buongiorno, per favore le correzioni che avete inserito nel modello, come devono essere eseguite? Ho visto che sono tre, quale delle tre devo fare? Grazie
17.02.2021 - 12:18DROPS Design answered:
Buongiorno Francesca, le spiegazioni online sono già corrette. Le correzioni vengono riportate per chi ha stampato il modello prima delle correzioni. Buon lavoro!
17.02.2021 - 15:01Buongiorno ho visto che le correzioni sono incorporate nel modello, ma non capisco come si devono eseguire. Potreste aiutarmi? Grazie
09.02.2021 - 18:30DROPS Design answered:
Buonasera Patrizia, deve semplicemente seguire le istruzioni del modello, senza dover lavorare le correzioni a parte: le spiegazioni del modello sono già corrette. Buon lavoro!
17.05.2021 - 22:17Buongiorno, non riesco a capire come seguire le correzioni. Potreste darmi dei chiarimenti a riguardo? Grazie
08.02.2021 - 10:39DROPS Design answered:
Buongiorno Patrizia, le correzioni sono già incorporate nel modello. Buon lavoro!
09.02.2021 - 12:10On first sentence of back piece, what does the last word "rust" mean?
04.02.2021 - 06:29DROPS Design answered:
Dear Sandra, it means you should use the rust colored yarn. I hope this helps. Happly Knitting!
04.02.2021 - 07:06An welchen Shop? Ich kenne mich mit dem System hier nicht aus. Danke
15.12.2020 - 14:01DROPS Design answered:
Liebe Frau Dilbaz, hier finden Sie die Liste von den DROPS Händlern in Deutschland. Viel Spaß beim häkeln!
15.12.2020 - 15:02Gäbe es eine Möglichkeit diese Strickanleitung auch in eine Häkelanleitung umzuwandeln??
14.12.2020 - 19:37DROPS Design answered:
Liebe Frau Dilbaz, wahrscheinlich aber leider können wir jeder Anleitung nach jedem individuellen Frage anpassen und einzelne Modelle auf individuellen Wunsch hin umrechnen. Wenn sie Hilfe damit brauchen, wenden Sie sich bitte an Ihrem Laden, dort hilft man Ihnen gerne weiter. Viel Spaß beim häkeln!
15.12.2020 - 08:30Därutöver får jag det inte att gå jämnt ut på 12-18 mån där jag har 44 m på bakstycket vid resår eftersom det är jämnt tal så går det inte att sticka varannan resår och börjar mer rätm och sluta med rätm innan kantmaskorna i rätstickning.
21.11.2020 - 14:45DROPS Design answered:
Hej Caroline: Nej där ser jag att det bör komma en rättelse, vi ber designavdelningen att se över detta. Tack för info! Mvh DROPS Design
24.11.2020 - 11:56På nästa varv från rätsidan stickas det resår: Sticka 3 m rätstickning * 1 rätm, 1 m rätstickning*, sticka *-* till det återstår 4 m, avsluta med 1 rätm och 3 m rätst. Detta betyder enligt mig att hela varvet stickas rät, eftersom rätstickning från rätsidan stickas räta när man stickar fram och tillbaka?
21.11.2020 - 14:44DROPS Design answered:
Hej Caroline. Ja det stämmer, från rätsidan stickas då alla maskor räta. Från avigsidan blir det varannan avigmaska och varannan rätmaska med 3 maskor i rätstickning i varje sida. Mvh DROPS Design
24.11.2020 - 11:31Die Beschreibung des Rücken stimmt nicht mit dem Foto (wo das Baby auf dem Bauch liegt) überein. Laut Foto werden vor Abketten der Halsmaschen wie beim Vorderteil Rippen mit 1 re 1 kraus re gestrickt. In der Anleitung steht davon nichts. Hier wird erst nach Teilung, also nur die Träger im Muster gestrickt.
04.11.2020 - 15:52DROPS Design answered:
Liebe Judith, danke für den Hinweis, Anleitung wird korrigiert. Viel Spaß beim stricken!
11.11.2020 - 15:04