DROPS Big Delight
DROPS Big Delight
100% Wool
Discontinued
find alternatives
DROPS Melody
DROPS Melody
71% Alpaca, 25% Wool, 4% Polyamide
from 4.25 £ /50g
DROPS SS24

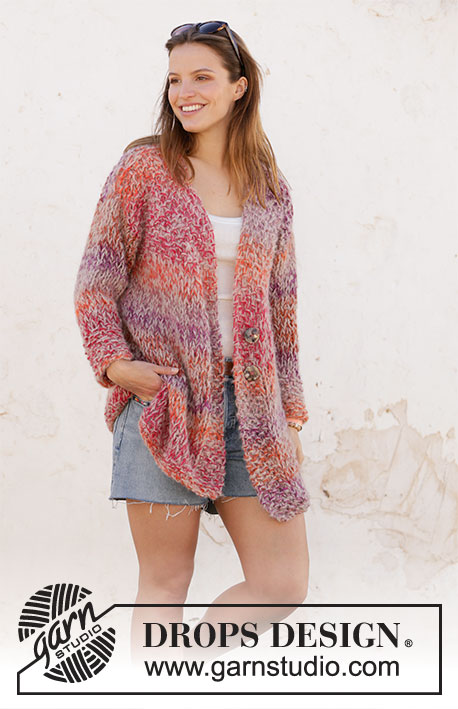
Sunsets and Sand Jacket

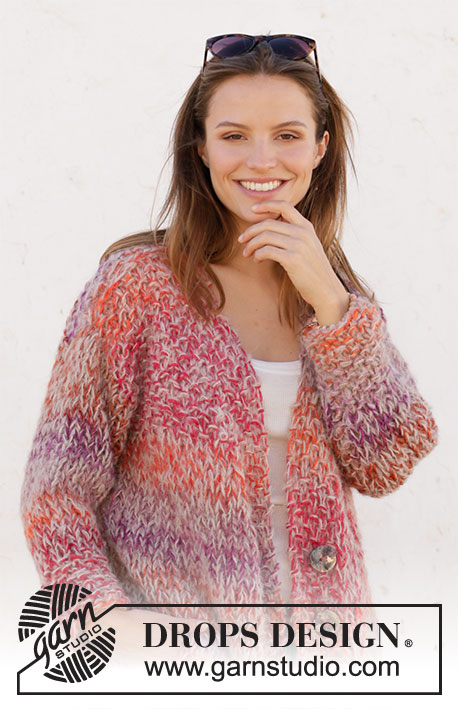
Knitted jacket with moss stitch and V-neck in DROPS Big Delight and DROPS Melody. Size XS–XXL.

DROPS 212-18
DROPS design: Pattern db-113
Yarn group C + D
----------------------------------------------------------

SIZE:
XS - S - M - L - XL - XXL

MATERIALS:
DROPS BIG DELIGHT from Garnstudio (belongs to yarn group C)
300-300-300-400-400-400 g colour no 07, sunrise
And use:
DROPS MELODY from Garnstudio (belongs to yarn group D)
200-200-200-250-250-300 g colour no 15, beige

KNITTING TENSION:
7 stitches in width and 10 rows vertically in stocking stitch and 1 strand of each quality (= 2 strands)= 10 x 10 cm.

NEEDLES:
DROPS CIRCULAR NEEDLE SIZE 15 mm : Length 80 cm for stocking stitch.
Needle size is only a suggestion! If you have too many stitches on 10 cm switch to a larger needle size. If you have too few stitches on 10 cm switch to a smaller needle size.

DROPS MOTHER-OF-PEARL BUTTON ARCHED (white), NO 540: 2 pieces for all sizes

-------------------------------------------------------

Alternative Yarn – See how to change yarns here
Yarn Groups A to F – Use the same pattern and change the yarn here
Yarn usage using an alternative yarn – Use our yarn converter here

-------------------------------------------------------

DROPS Big Delight
DROPS Big Delight
100% Wool
Discontinued
find alternatives
DROPS Melody
DROPS Melody
71% Alpaca, 25% Wool, 4% Polyamide
from 4.25 £ /50g

Pattern instructions

NOTE: This pattern is written in British English. All measurements in charts are in cm. For conversion from cm to inches - click here. There are different terms for crocheting in British and American English. If this pattern includes crochet, click for "crochet terms" here. For this pattern in American English, please click here.
----------------------------------------------------------

EXPLANATION FOR THE PATTERN:

----------------------------------------------------------

GARTER STITCH (back and forth):
Knit all rows.
1 ridge vertically = knit 2 rows.

MOSS STITCH (work back and forth on needle):
Row 1: * Knit 1, purl 1 *, repeat from *-*.
Row 2: Knit over purl and purl over knit.
Repeat 2nd row upwards.

DECREASE TIP (applies to V-neck):
All decreases are done from the right side.
DECREASE AS FOLLOWS AFTER 6 BAND STITCHES:
When first stitch is knit stitch: Slip 1 stitch knitwise, knit 1, pass slipped stitch over.
When first stitch is purl stitch: Purl 2 twisted together (i.e. work in back loop of stitch instead of front).
DECREASE AS FOLLOWS BEFORE 6 BAND STITCHES:
When last stitch is knit stitch: Knit 2 together.
When last stitch is purl stitch: Purl 2 together.

----------------------------------------------------------

START THE PIECE HERE:

----------------------------------------------------------

JACKET:
Work jacket back and forth on circular needle in parts, and sew together in the side when finished. Stitches for sleeves are picked up in armhole on body, and sleeves are worked top down.

BACK PIECE:
Work piece back and forth on circular needle. Cast on 34-38-40-42-46-50 stitches on circular needle size 15 mm with 1 strand of each yarn (= 2 strands). Work in MOSS STITCH - see explanation above. REMEMBER THE KNITTING TENSION!
When piece measures 3 cm, work in stocking stitch and 1 edge stitch in GARTER STITCH in each side – see explanation above. When piece measures 47-48-49-50-51-52 cm, cast off 1 stitch in each side (marks armholes) = 32-36-38-40-44-48 stitches. When piece measures 48-50-52-54-56-58 cm, work moss stitch over all stitches. Continue until piece measures 64-66-68-70-72-74 cm. Cast off the middle 6-6-8-8-8-10 stitches for neck, and finish each shoulder separately. On next row towards the neck, decrease 1 stitch = 12-14-14-15-17-18 stitches remain on shoulder. Loosely cast off all stitches when piece measures 66-68-70-72-74-76 cm. Work the other shoulder the same way.

LEFT FRONT PIECE:
Work piece back and forth on circular needle. Cast on 21-23-24-25-27-29 stitches on circular needle size 15 mm with 1 strand of each yarn (= 2 strands). Work in MOSS STITCH - see explanation above. REMEMBER THE KNITTING TENSION! When piece measures 3 cm, continue working 1 edge stitch in garter stitch, stocking stitch, but continue in moss stitch over the last 6 stitches on needle (seen from right side) = band. When piece measures 40-42-41-43-45-44 cm, decrease 1 stitch on the inside of band – READ DECREASE TIP. Repeat decrease every 3 cm 8-8-9-9-9-10 times in total. AT THE SAME TIME when piece measures 47-48-49-50-51-52 cm, cast off 1 stitch at the beginning of row on the right side (marks armhole). When piece measures 48-50-52-54-56-58 cm, continue with moss stitch over all stitches. Continue until piece measures 66-68-70-72-74-76 cm, cast off the remaining 12-14-14-15-17-18 stitches on shoulder.

RIGHT FRONT PIECE:
Cast on and work as left front piece but opposite, i.e. band is worked over the first 6 stitches on row, and cast off 1 stitch for armhole at the beginning of row on the wrong side.

ASSEMBLY:
Sew the shoulder seams.

LEFT SLEEVE:
Pick up stitches along the armhole at the top of jacket and work sleeve back and forth on circular needle, top down.

Begin where 1 stitch was cast off for armhole on left front piece, and pick up 26-28-30-30-32-34 stitches from right side with 1 strand of each quality ( = 2 strands) on circular needle size 15 mm. Pick up stitches along armhole on front piece and down along armhole on back piece where 1 stitch was cast off for armhole. Work in stocking stitch. When sleeve measures 3 cm, decrease 1 stitch in each side of piece. Decrease every 6-6-5-6-5-4 cm 5-5-6-5-6-7 times in total = 16-18-18-20-20-20 stitches. When piece measures 37-36-35-34-33-31 cm (shorter measurements in larger sizes because of shoulder shoulders), work moss stitch over all stitches. Cast off when piece measures 49-48-47-46-45-43 cm.

RIGHT SLEEVE:
Work as left sleeve but begin on back piece. Pick up stitches along armhole on back piece and down along armhole on front piece where 1 stitch was cast off for armhole.

ASSEMBLY - 2:
Sew side and sleeve seams in one in outer loops of edge stitch. Sew buttons on to left front piece- see picture. Button between 2 stitches on band.

Diagram

diagram measurements

Each of our patterns has specific tutorial videos to help you.

Do you have a question? See a list of frequently asked questions (FAQ)

Knitting tension is what determines the final measurements of your work, and is usually measured per 10 x 10 cm. It is provided like so: number of stitches in width x number of rows in height - eg: 19 stitches x 26 rows = 10 x 10 cm.

The knitting tension is very individual; some people knit/crochet loosely while others work tightly. You adjust the knitting tension with the needle size, which is why the suggested needle size is only meant as a guide! You need to adjust this (up or down) to ensure that YOUR knitting tension matches the knitting tension provided in the pattern. If you work with a different knitting tension than provided you will have a different yarn consumption, and your work will have different measurements than what the pattern suggests.

The knitting tension also determines which yarns can replace each other. As long as you achieve the same knitting tension you can replace one yarn with another.

See DROPS lesson: How to measure your tension/gauge

See DROPS video: How to make a gauge tension swatch

The required amount of yarn is provided in grams, eg: 450 g. To calculate how many balls you’ll need you first need to know how many grams are in 1 ball (25g, 50g or 100g). This information is available if you click on the individual yarn quality on our pages. Divide the amount required with the amount of each ball. For example, if each ball is 50g (the most common amount), the calculation will be as follows: 450 / 50 = 9 balls.

The important thing when changing from one yarn to another is that the knitting/crochet tension remains the same. This is so that the measurements of the finished piece will be the same as on the sketch provided. It is easier to achieve the same knitting tension using yarns from the same yarn group. It is also possible to work with multiple strands of a thinner yarn to achieve the knitting tension of a thicker one. Please try our yarn converter. We recommend you to always work a test swatch.

Please NOTE: when changing yarn the garment might have a different look and feel to the garment in the photo, due to individual properties and qualities of each yarn.

See DROPS lesson: Can I use a different yarn than the one mentioned in the pattern?

All our yarns are categorised into yarn groups (from A to F) according to thickness and knitting tension – group A contains the thinnest yarns and group F the thickest. This makes it easier for you to find alternative yarns to our patterns, should you wish to switch yarn. All yarns within the same group have a similar knitting tension and can easily replace each other. However, different yarn qualities have different structures and properties which will give the finished work a unique look and feel.

Click here for an overview of the yarns in each yarn group

At the top of all our patterns you’ll find a link to our yarn calculator, which is a helpful tool should you wish to use a different yarn than suggested. By filling in the yarn quality you wish to replace, the amount (in your size) and number of strands, the calculator will present good alternative yarns with the same knitting tension. Additionally it will tell you how much you’ll require in the new qualities and whether you’ll need to work with multiple strands. Most skeins are 50g (some are 25g or 100g).

If the pattern is worked with multiple colours, every colour will have to be calculated separately. Similarly, if the pattern is worked with several strands of different yarns (for example 1 strand Alpaca and 1 strand Kid-Silk) you will have to find alternatives for each, individually.

Click here to see our yarn calculator

Since different yarns have different qualities and textures we have chosen to keep the original yarn in our patterns. However, you can easily find options among our available qualities by using our yarn calculator, or simply pick a yarn from the same yarn group.

It is possible that some retailers still have discontinued yarns in stock, or that someone has a few skeins at home that they would like to find patterns for.

The yarn calculator will provide both alternative yarn as well as required amount in the new quality.

If you think it's hard to decide what size to make, it can be a good idea to measure a garment you own already and like the size of. Then you can pick the size by comparing those measures with the ones available in the pattern's size chart.

You'll find the size chart at the bottom of the pattern.

See DROPS lesson: How to read size chart

The needle size provided in the pattern serves only as a guide, the important thing is to follow the knitting tension. And since knitting tension is very individual, you will have to adjust the needle size to ensure that YOUR tension is the same as in the pattern – maybe you’ll have to adjust 1, or even 2 needle sizes, up or down to achieve the correct tension. For this, we recommend that you work test swatches.

Should you work with a different knitting tension than the one provided, the measurements of the finished garment might deviate from the measurement sketch.

See DROPS lesson: How to measure your tension/gauge

See DROPS video: How to make a tension/gauge swatch

Working a garment top-down provides more flexibility and room for personal adjustment. For example it is easier to try the garment on while working, as well as making adjustments to length of yoke and shoulder caps.

The instructions are carefully explaining every step, in the correct order. Diagrams are adjusted to the knitting direction and are worked as usual.

The diagram depicts all rows/rounds, and every stitch seen from the right side. It is read from bottom to top, from right to left. 1 square = 1 stitch.

When working back and forth, every other row is worked from the right side and every other row is worked from the wrong side. When working from the wrong side, the diagram will have to be worked reversed: from left to right, knit stitches are purled, purl stitches are knit etc.

When working in the round every round is worked from the right side and the diagram are worked from right to left on all rounds.

See DROPS lesson: How to read knitting diagrams

The diagram depicts all rows/rounds, and every stitch seen from the right side. It is worked from bottom to top, from right to left.

When working back and forth every other row is worked from the right side: from right to left and every other row is worked from the wrong side: from left to right.

When working in the round, every row in the diagram are worked from the right side, from right to left.

When working a circular diagram you start in the middle and work your way outwards, counter clockwise, row by row.

The rows usually start with a given number of chain stitches (equivalent to the height of the following stitch), this will either be depicted in the diagram or explained in the pattern.

See DROPS lesson: How to read crochet diagrams

Instructions for working several diagrams after each other on the same row/round, will often be written like so: “work A.1, A.2, A.3 a total of 0-0-2-3-4 times". This means you work A.1 once, then A.2 is worked once, and A.3 is repeated (in width) the number of times provided for your size – in this case like so: S = 0 times, M = 0 times, L=2 times, XL= 3 times and XXL = 4 times.

The diagrams are worked as usual: begin with the first row in A.1, then work the first row in A.2 etc.

See DROPS lesson: How to read knitting diagrams

See DROPS lesson: How to read crochet diagrams

The total width of the garment (from wrist-to-wrist) will be larger in the larger sizes, despite the actual sleeves being shorter. The larger sizes have longer sleeve caps and wider shoulders, so there will be a good fit in all sizes.

The measurement sketch/schematic drawing provides information regarding the full length of the garment. If it’s a jumper or a jacket the length is measured from the highest point on the shoulder closest to the neckline, and straight down to the bottom of the garment. It is NOT measured from the tip of shoulder. Similarly, the length of yoke is measured from the highest point on the shoulder and down to where yoke is split into body and sleeves.

On a jacket measures are never taken along bands, unless specifically stated. Always measure inside band stitches when measuring the length.

See DROPS lesson: How to read a schematic drawing

Diagrams are often repeated on the round or in height. 1 repeat is the diagram the way it appears in the pattern. If it says to work 5 repeats of A.1 in the round, then you work A.1 a total of 5 times after/next to each other in the round. If it says to work 2 repeats of A.1 vertically/in height you work the entire diagram once, then begin again at the start and work the entire diagram one more time.

Chain stitches are slightly narrower than other stitches and to avoid working the cast-on edge too tight, we simply chain more stitches to begin with. The stitch count will be adjusted on the following row to fit the pattern and measurement sketch.

The rib edge is more elastic and will contract slightly compared to, for example, stocking stitch. By increasing before the rib edge, you avoid a visible difference in width between the rib edge and the rest of the body.

It’s very easy to cast off too tightly, and by making yarn overs while casting off (and simultaneously casting these off) you avoid a too tight cast off edge.

See DROPS video: How to bind off with yarn overs (yo)

To achieve an even increase (or decrease) you can increase on, for example: every 3rd and 4th row alternately, like so: work 2 rows and increase on the 3rd row, work 3 rows and increase on the 4th. Repeat this until the increase is complete.

See DROPS lesson: Increase or decrease 1 st on every 3rd and 4th row alternately

Should you prefer to work in the round instead of back and forth, you may of course adjust the pattern. You’ll need to add steeks mid-front (usually 5 stitches), and follow the instructions. When you would normally turn and work from the wrong side, simply work across the steek and continue in the round. At the end you’ll cut the piece open, pick up stitches to work bands, and cover the cut edges.

See DROPS video: How to knit steeks and cut open

Should you prefer to work back and forth instead of in the round, you may of course adjust the pattern so you work the pieces separately and then assemble them at the end. Divide the stitches for the body in 2, add 1 edge stitch in each side (for sewing) and work the front and back pieces separately.

See DROPS lesson: Can I adapt a pattern for circular needles into straight needles?

Pattern repeats can vary slightly in the different sizes, in order to get the correct proportions. If you’re not working the exact same size as the garment in the photo, yours might deviate slightly. This has been carefully developed and adjusted so that the complete impression of the garment is the same in all sizes.

Make sure to follow instructions and diagrams for your size!

If you have found a pattern you like which is available in women’s size it’s not very difficult to convert it to men’s size. The biggest difference will be the length of sleeves and body. Start working on the women size that you think would fit across the chest. The additional length will be worked right before you cast off for the armhole/sleeve cap. If the pattern is worked top-down you can add the length right after the armhole or before the first decrease on sleeve.

Regarding additional yarn amount, this will depend on how much length you add, but it is better with a skein too many than too few.

All yarns will have excess fibres (from production) that might come off as lint or shedding. Brushed yarns (ie hairier yarns) have more of these loose, excess fibres, causing more shedding.

Shedding also depends on what is worn under or over the garment, and whether this pulls at the yarn fibres. It’s therefore not possible to guarantee that there will be no shedding

Below are some tips on how to get the best result when working with hairier yarns:

1. When the garment is finished (before you wash it) shake it vigorously so the looser hairs come off. NOTE: do NOT use a lint roller, brush or any method that pulls at the yarn.

2. Place the garment in a plastic bag and put it in your freezer - the temperature will cause the fibres to become less attached to each other, and excess fibres will come off easier.

3. Leave in the freezer for a few hours before taking it out and shaking it again.

4. Wash the garment according to the instructions on the yarn label.

Pilling is a natural process that happens to even the most exclusive of fibers. It's a natural sign of wear and tear that is hard to avoid, and that is most visible in high friction areas of your garment like a sweater's arms and cuffs.

You can make your garment look as new by removing the pilling, using a fabric comb or a pill/lint remover.

Still can't find the answer you need? Then scroll down and leave your question so one of our experts can try to help you. This will be done normally within 5 to 10 working days.
In the meantime, you can read the questions and answers that others have left to this pattern or join the DROPS Workshop on Facebook to get help from fellow knitters/crocheters!

You might also like...

Post a comment to pattern DROPS 212-18

We would love to hear what you have to say about this pattern!

If you want to leave a question, please make sure you select the correct category in the form below, to speed up the answering process. Required fields are marked *.

Comments / Questions (25)

country flag Eva Selander wrote:

Vilket är bystmåttet på storlek M

08.06.2020 - 22:02

DROPS Design answered:

Hei Eva. Målskissen med alle mål til denne jakken finner du nederst på oppskriften. God Fornøyelse!

09.06.2020 - 14:30

country flag Lovisa Dawrin wrote:

Vad är skillnaden att göra minskningen FÖRE 6 framkantmaskor och EFTER 6 framkantsmaskor? När ska man göra vad?

23.04.2020 - 09:36

DROPS Design answered:

Hej Minska före 6 framkantmaskor gör du på den sidan av arbetet när framkantmaskorna är sist på varvet och minska efter 6 framkantmaskor gör du när du har framkantmaskorna först på varvet (här stickar du alltså framkanten först och sedan minskar du). Lycka till!

23.04.2020 - 10:26

country flag Corinne wrote:

Je ne comprend toujours pas.. Pour une taille médium, à 42cm je commence 8 diminutions tous les 3 cm , ce qui fait que les diminutions sont terminées à 64cm. Entre-temps, à 50cm, je dois passer au point de riz. Comment faire ces diminutions quand je passe au point de riz? Dois je toujours les faire avant ou après la bordure ou on les fait au début du rang? Merci

23.03.2020 - 15:39

DROPS Design answered:

Bonjour Corinne, ces diminutions se font dans la partie avant les mailles de bordure des devants, autrement dit sur le devant gauche, vous tricotez sur l'endroit jusqu'à ce qu'il reste 8 mailles et diminuez soit 2 m ens à l'end soit 2 m ens à l'env en fonction de la dernière maille à tricoter. cf DIMINUTIONS Bon tricot!

23.03.2020 - 16:47

country flag Corinne wrote:

Bonjour, pour le devant , on fait 8 diminutions tous les 3 cm après ou avant les 6 mailles de bordure. Quand on passe au point de riz en haut de l’ouvrage, comment continuer les diminutions ? Merci pour votre réponse

22.03.2020 - 23:38

DROPS Design answered:

Bonjour Corinne, pour le devant gauche, on diminue avant les 6 m de bordure devant au point de riz, autrement dit, on tricote sur l'endroit jusqu'à ce qu'il reste 8 mailles (= les 6 m de bordure devant + 2 mailles), on diminue 1 m - cf DIMINUTIONS (encolure V) et on termine par les 6 m point de riz. Bon tricot!

23.03.2020 - 11:21

country flag Sylvaine wrote:

Bonjour, Toujours en train de chercher la melody couleur beige, numéro 15. Voici la réponse d'un de vos vendeurs : "Si nous n'en avons pas dans notre prochain arrivage c'est que le fournisseur est actuellement en rupture de stock. Nous en commanderons lorsque ce sera possible." Donc, je vous repose la question : je fais comment ? Cdt

21.03.2020 - 13:53

DROPS Design answered:

Bonjour Sylvaine, je vous confirme que nous avons bien de la Melody 15 en stock - certaines couleurs sont en rupture momentanée de stock mais pas la 15. Bon tricot!

23.03.2020 - 09:30

country flag Sylvaine wrote:

Bonjour, On ne trouve plus la Drops Melody en beige. J'ai déjà acheté la big delight ..... Je fais comment ? Cordialement, Sylvaine

20.03.2020 - 13:58

DROPS Design answered:

Bonjour Sylvaine, regardez dans d'autres magasins, DROPS Melody est toujours disponible en beige - votre magasin pourra vous en dire davantage sur ces délais de disponibilité; ou bien regardez les alternatives possibles ici. Bon tricot!

20.03.2020 - 14:34

country flag Sandra Boeren wrote:

Wat kan ik doen tegen het pluizen van de Melody wol? de kleding die ik onder het vest draag zit onder de “haren” van de wol!

11.03.2020 - 17:16

DROPS Design answered:

Dag Sandra,

Bij de lijst met meest gestelde vragen vindt informatie over hoe je dit kunt voorkomen. zie hier.

22.03.2020 - 11:02

country flag Marion wrote:

Wieviel Wolle brauch ich, wenn ich eine Farbe verwende?

21.02.2020 - 14:59

DROPS Design answered:

Liebe Marion, dann sollten Sie sich für eine Alternative zu Big Delight entscheiden - siehe unser Garnumrechner - aber Sie sollten immer mit Melody stricken, dh 1 Garn der Garngruppe C (= wie Big Delight) + 1 Garn der Garngruppe D (= Melody). Gerne wird Ihnen Ihr DROPS Laden andere passenden Farben empfehlen. Viel Spaß beim stricken!

21.02.2020 - 15:31

country flag Johanna wrote:

Kan dit model op een rondbreinaald van middenvoor tot middenvoor worden gebreid, zonder dikke zijnaden? Of wordt dit moeilijk/niet mooi?

10.02.2020 - 14:46

DROPS Design answered:

Dag Johanna,

Jazeker, kan dat. Neem wel een lange rondbreinaald, zodat alle steken er op passen.

12.02.2020 - 20:58

country flag Sara wrote:

Mooi model, mooie kleuren.

24.01.2020 - 11:02