DROPS Snow
DROPS Snow
100% Wool
from 2.00 £ /50g
Get the yarn to make this pattern from 32.00£.

The yarn cost is calculated from the pattern’s smallest size and the yarn’s cheapest product type. Looking for an even better price? You might find it on the DROPS Deals!

DROPS SS24

Winter Sunset

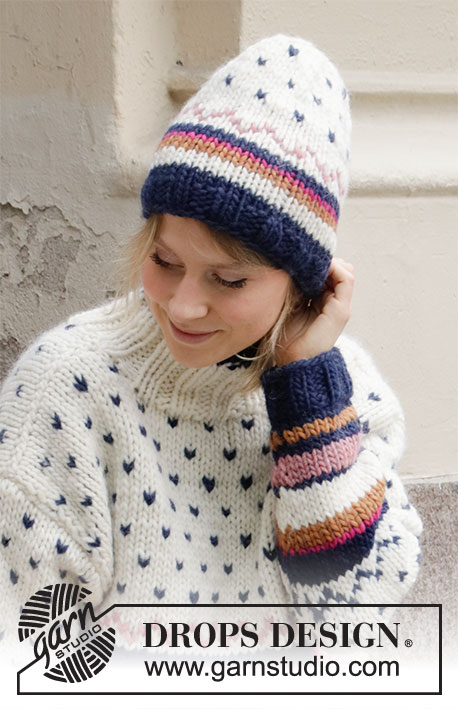
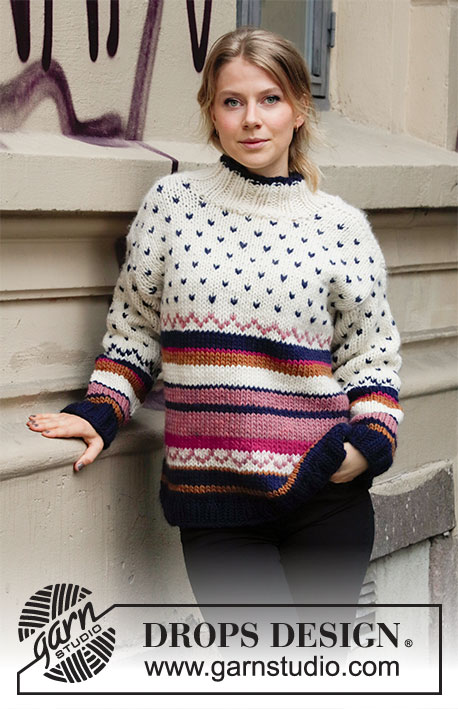
Knitted jumper in DROPS Snow. Piece is knitted with stripes and multicoloured pattern. Size: S - XXXL

DROPS 206-42
DROPS design: Pattern ee-675
Yarn group E or C + C
----------------------------------------------------------

SIZE:
S - M - L - XL - XXL – XXXL

MATERIALS:
DROPS SNOW from Garnstudio (belongs to yarn group E)
400-450-500-550-600-650 g colour 01, off white
200-250-250-300-300-350 g colour 57, navy blue
100-100-100-150-150-150 colour 83, mauve
50-50-100-100-100-100 colour 86, copper
50-50-50-50-100-100 colour 26, hot pink

KNITTING TENSION:
10 stitches in width and 14 rows vertically in stocking stitch = 10 x 10 cm.

NEEDLES:
DROPS DOUBLE POINTED NEEDLES SIZE 9 mm
DROPS CIRCULAR NEEDLE SIZE 9 mm : Length 40 and 80 cm for stocking stitch.
DROPS DOUBLE POINTED NEEDLES SIZE 8 mm
DROPS CIRCULAR NEEDLE SIZE 8 mm : Length 40 and 80 cm for rib.
Needle size is only a suggestion! If you have too many stitches on 10 cm switch to larger needles. If you have too few stitches on 10 cm switch to smaller needles.

-------------------------------------------------------

Alternative Yarn – See how to change yarns here
Yarn Groups A to F – Use the same pattern and change the yarn here
Yarn usage using an alternative yarn – Use our yarn converter here

-------------------------------------------------------

DROPS Snow
DROPS Snow
100% Wool
from 2.00 £ /50g
Get the yarn to make this pattern from 32.00£.

The yarn cost is calculated from the pattern’s smallest size and the yarn’s cheapest product type. Looking for an even better price? You might find it on the DROPS Deals!

Pattern instructions

NOTE: This pattern is written in British English. All measurements in charts are in cm. For conversion from cm to inches - click here. There are different terms for crocheting in British and American English. If this pattern includes crochet, click for "crochet terms" here. For this pattern in American English, please click here.
----------------------------------------------------------

EXPLANATION FOR THE PATTERN:

----------------------------------------------------------

GARTER STITCH (back and forth):
Knit all rows.
1 ridge vertically = knit 2 rows.

PATTERN: 
See diagrams A.1 to A.3. Work all stiches in diagrams in stocking stitch.

DECREASE TIP (evenly):
To calculate how to decrease evenly, use the total number of stitches on row (e.g. 136 stitches) and divide stitches by number of decreases to be done (e.g. 24) = 5.6. 
In this example decrease by knitting alternately every 4th and 5th stitch and every 5th and 6th stitch together.

STRIPES BODY:
STRIPE 1: Continue with navy blue until piece measures 7-7-8-8-9-9 cm in total from cast-on edge (including rib).
STRIPE 2: Work 2 rows with copper.
STRIPE 3: Work 4 rows with navy blue.
STRIPE 4: Work 1 row with copper.
STRIPE 5: Work pattern A.1.
STRIPE 6: Work 3 rows with hot pink.
STRIPE 7: Work 6 rows with mauve.
STRIPE 8: Work 2 rows with navy blue.
STRIPE 9: Work 4 rows with mauve.
STRIPE 10: Work 1 row with navy blue.
STRIPE 11: Work 5 rows with off white.
STRIPE 12: Work 3 rows with copper.
STRIPE 13: Work 1 row with hot pink.
STRIPE 14: Work 4 rows with navy blue.
STRIPE 15: Work pattern A.1.

STRIPES SLEEVE:
STRIPE 1: Continue with navy blue until piece measures 6 cm in total from cast-on edge (including rib at the bottom).
STRIPE 2: Work 2 rows with copper.
STRIPE 3: Work 2 rows with navy blue.
STRIPE 4: Work 4 rows with mauve.
STRIPE 5: Work 1 row with navy blue.
STRIPE 6: Work 5 rows with off white.
STRIPE 7: Work 3 rows with copper.
STRIPE 8: Work 1 row with hot pink.
STRIPE 9: Work 4 rows with navy blue.
STRIPE 10: Work pattern A.3. Work as many stitches in pattern as there is room for on round (i.e. the pattern might not fit under sleeve).
STRIPE 11: Work pattern A.2 until finished measurements. Work as many stitches in pattern as there is room for on round (i.e. the pattern might not fit under sleeve). NOTE! The dots should fit above each other vertically every other time, and when increasing stitches under sleeve, work the new stitches into pattern.

INCREASE TIP (applies to sleeves):
Work until 1 stitch remains before marker thread, make 1 yarn over, knit the next 2 stitches (marker thread is in the of these 2 stitches), make 1 yarn over (= 2 stitches increased). On next round knit yarn overs twisted to avoid holes.

----------------------------------------------------------

START THE PIECE HERE:

----------------------------------------------------------

JUMPER - SHORT OVERVIEW OF THE PIECE:
Worked in the round on circular needle up to armhole, then work front and back piece back and forth separately. Work sleeves in the round on double pointed needles/a short circular needle.

BODY:
Cast on 136-144-156-168-184-196 stitches on circular needle size 8 mm with navy blue. Knit 1 round. Then work rib (= knit 2/purl 2) for 5 cm. Knit 1 round while decreasing 24-24-28-28-32-32 stitches evenly - read DECREASE TIP = 112-120-128-140-152-164 stitches. Switch to circular needle size 9 mm. Now work stocking stitches and STRIPES BODY - read explanation above. REMEMBER THE KNITTING TENSION! When stripes have been worked vertically, work pattern A.2 in the round on round. When piece measures 40-41-42-43-44-45 cm, work next round as follows: Cast off the first 3-3-5-5-7-7 stitches for armhole, work A.2 as before over the next 49-53-55-61-61-67 stitches before slipping them on a stitch holder (= back piece), cast off the next 7-7-9-9-15-15 stitches for armhole, work A.2 as before over the next 49-53-55-61-61-67 stitches (= front piece), cast off the last 4-4-4-4-8-8 stitches on round. Cut the yarn. Then finish front and back piece separately.

FRONT PIECE:
= 49-53-55-61-61-67 stitches. Continue back and forth with A.2 as before and work 1 edge stitch in GARTER STITCH – read explanation above, in each side. If a dot is inside edge stitch in garter stitch in each side, work this stitch in off white. When piece measures 53-55-56-58-59-61 cm, slip the middle 9-9-9-11-11-11 stitches on a stitch holder for neck and finish each shoulder separately. Then cast off on every row from neck as follows: Cast off 2 stitches 1 time and 1 stitch 2 times = 16-18-19-21-21-24 stitches. Continue to work until piece measures 61-63-65-67-69-71 cm in total (armhole measures approx. 21-22-23-24-25-26 cm from where stitches were cast off) – adjust to finish after a row with off white in diagram. Cast off. Work the other shoulder the same way.

BACK PIECE:
Slip the 49-53-55-61-61-67 stitches from stitch holder back on circular needle size 9 mm. Continue back and forth with A.2 as before and work 1 edge stitch in garter stitch in each side. If a dot is inside edge stitch in garter stitch in each side, work this stitch in off white. When piece measures 59-61-63-65-67-69 cm, cast off the middle 15-15-15-17-17-17 stitches on needle for neck. Then cast off 1 stitch on next row from the neck = 16-18-19-21-21-24 stitches. Continue to work until piece measures 61-63-65-67-69-71 cm in total (armhole measures approx. 21-22-23-24-25-26 cm from where stitches were cast off) – adjust to finish after a row with off white in diagram. Cast off. Work the other shoulder the same way.

SLEEVE:
Cast on 28-28-32-32-32-36 stitches on double pointed needles size 8 mm with navy blue. Knit 1 round. Then work rib (= knit 2/purl 2) for 5 cm. Knit 1 round while decreasing 4-4-6-6-6-8 stitches evenly = 24-24-26-26-26-28 stitches. Change to double pointed needles size 9 and insert a marker thread at beginning of round. Work STRIPES SLEEVE - see explanation above. When sleeve measures 11-10-9-9-9-7 cm, increase 1 stitch on each side of marker thread under sleeve – read INCREASE TIP. Increase like this approx. every 4-3½-3½-3-2½-2½ cm 9-10-10-11-12-12 times in total = 42-44-46-48-50-52 stitches. Continue to work until piece measures 47-46-45-43-41-39 cm. Then work sleeve back and forth from mid under sleeve as follows: Work pattern A.2 as before with 1 edge stitch in garter stitch in each side. If a dot is inside edge stitch in garter stitch in each side, work this stitch in off white. When sleeve measures 51-50-50-48-49-47 cm, cast off all stitches. Work the other sleeve the same way.

ASSEMBLY:
Sew shoulder seams inside cast-off edge. Sew sleeves in body.

NECK EDGE:
Pick up 52-52-56-56-60-60 stitches around the neck edge (including stitches on stitch holder) on a short circular needle size 8 mm with off white. Work rib (knit 2/purl 2) in the round for 10 cm. Switch to navy blue. Work 1 more round navy blue. Cast off stitches with knit over knit and purl over purl.

This pattern has been corrected.

Updated online: 18.02.2020
Correction: ...Change to double pointed needles size 9 and insert..

Diagram

symbols = off white
symbols = navy blue
symbols = mauve
diagram

Each of our patterns has specific tutorial videos to help you.

Do you have a question? See a list of frequently asked questions (FAQ)

Knitting tension is what determines the final measurements of your work, and is usually measured per 10 x 10 cm. It is provided like so: number of stitches in width x number of rows in height - eg: 19 stitches x 26 rows = 10 x 10 cm.

The knitting tension is very individual; some people knit/crochet loosely while others work tightly. You adjust the knitting tension with the needle size, which is why the suggested needle size is only meant as a guide! You need to adjust this (up or down) to ensure that YOUR knitting tension matches the knitting tension provided in the pattern. If you work with a different knitting tension than provided you will have a different yarn consumption, and your work will have different measurements than what the pattern suggests.

The knitting tension also determines which yarns can replace each other. As long as you achieve the same knitting tension you can replace one yarn with another.

See DROPS lesson: How to measure your tension/gauge

See DROPS video: How to make a gauge tension swatch

The required amount of yarn is provided in grams, eg: 450 g. To calculate how many balls you’ll need you first need to know how many grams are in 1 ball (25g, 50g or 100g). This information is available if you click on the individual yarn quality on our pages. Divide the amount required with the amount of each ball. For example, if each ball is 50g (the most common amount), the calculation will be as follows: 450 / 50 = 9 balls.

The important thing when changing from one yarn to another is that the knitting/crochet tension remains the same. This is so that the measurements of the finished piece will be the same as on the sketch provided. It is easier to achieve the same knitting tension using yarns from the same yarn group. It is also possible to work with multiple strands of a thinner yarn to achieve the knitting tension of a thicker one. Please try our yarn converter. We recommend you to always work a test swatch.

Please NOTE: when changing yarn the garment might have a different look and feel to the garment in the photo, due to individual properties and qualities of each yarn.

See DROPS lesson: Can I use a different yarn than the one mentioned in the pattern?

All our yarns are categorised into yarn groups (from A to F) according to thickness and knitting tension – group A contains the thinnest yarns and group F the thickest. This makes it easier for you to find alternative yarns to our patterns, should you wish to switch yarn. All yarns within the same group have a similar knitting tension and can easily replace each other. However, different yarn qualities have different structures and properties which will give the finished work a unique look and feel.

Click here for an overview of the yarns in each yarn group

At the top of all our patterns you’ll find a link to our yarn calculator, which is a helpful tool should you wish to use a different yarn than suggested. By filling in the yarn quality you wish to replace, the amount (in your size) and number of strands, the calculator will present good alternative yarns with the same knitting tension. Additionally it will tell you how much you’ll require in the new qualities and whether you’ll need to work with multiple strands. Most skeins are 50g (some are 25g or 100g).

If the pattern is worked with multiple colours, every colour will have to be calculated separately. Similarly, if the pattern is worked with several strands of different yarns (for example 1 strand Alpaca and 1 strand Kid-Silk) you will have to find alternatives for each, individually.

Click here to see our yarn calculator

Since different yarns have different qualities and textures we have chosen to keep the original yarn in our patterns. However, you can easily find options among our available qualities by using our yarn calculator, or simply pick a yarn from the same yarn group.

It is possible that some retailers still have discontinued yarns in stock, or that someone has a few skeins at home that they would like to find patterns for.

The yarn calculator will provide both alternative yarn as well as required amount in the new quality.

If you think it's hard to decide what size to make, it can be a good idea to measure a garment you own already and like the size of. Then you can pick the size by comparing those measures with the ones available in the pattern's size chart.

You'll find the size chart at the bottom of the pattern.

See DROPS lesson: How to read size chart

The needle size provided in the pattern serves only as a guide, the important thing is to follow the knitting tension. And since knitting tension is very individual, you will have to adjust the needle size to ensure that YOUR tension is the same as in the pattern – maybe you’ll have to adjust 1, or even 2 needle sizes, up or down to achieve the correct tension. For this, we recommend that you work test swatches.

Should you work with a different knitting tension than the one provided, the measurements of the finished garment might deviate from the measurement sketch.

See DROPS lesson: How to measure your tension/gauge

See DROPS video: How to make a tension/gauge swatch

Working a garment top-down provides more flexibility and room for personal adjustment. For example it is easier to try the garment on while working, as well as making adjustments to length of yoke and shoulder caps.

The instructions are carefully explaining every step, in the correct order. Diagrams are adjusted to the knitting direction and are worked as usual.

The diagram depicts all rows/rounds, and every stitch seen from the right side. It is read from bottom to top, from right to left. 1 square = 1 stitch.

When working back and forth, every other row is worked from the right side and every other row is worked from the wrong side. When working from the wrong side, the diagram will have to be worked reversed: from left to right, knit stitches are purled, purl stitches are knit etc.

When working in the round every round is worked from the right side and the diagram are worked from right to left on all rounds.

See DROPS lesson: How to read knitting diagrams

The diagram depicts all rows/rounds, and every stitch seen from the right side. It is worked from bottom to top, from right to left.

When working back and forth every other row is worked from the right side: from right to left and every other row is worked from the wrong side: from left to right.

When working in the round, every row in the diagram are worked from the right side, from right to left.

When working a circular diagram you start in the middle and work your way outwards, counter clockwise, row by row.

The rows usually start with a given number of chain stitches (equivalent to the height of the following stitch), this will either be depicted in the diagram or explained in the pattern.

See DROPS lesson: How to read crochet diagrams

Instructions for working several diagrams after each other on the same row/round, will often be written like so: “work A.1, A.2, A.3 a total of 0-0-2-3-4 times". This means you work A.1 once, then A.2 is worked once, and A.3 is repeated (in width) the number of times provided for your size – in this case like so: S = 0 times, M = 0 times, L=2 times, XL= 3 times and XXL = 4 times.

The diagrams are worked as usual: begin with the first row in A.1, then work the first row in A.2 etc.

See DROPS lesson: How to read knitting diagrams

See DROPS lesson: How to read crochet diagrams

The total width of the garment (from wrist-to-wrist) will be larger in the larger sizes, despite the actual sleeves being shorter. The larger sizes have longer sleeve caps and wider shoulders, so there will be a good fit in all sizes.

The measurement sketch/schematic drawing provides information regarding the full length of the garment. If it’s a jumper or a jacket the length is measured from the highest point on the shoulder closest to the neckline, and straight down to the bottom of the garment. It is NOT measured from the tip of shoulder. Similarly, the length of yoke is measured from the highest point on the shoulder and down to where yoke is split into body and sleeves.

On a jacket measures are never taken along bands, unless specifically stated. Always measure inside band stitches when measuring the length.

See DROPS lesson: How to read a schematic drawing

Diagrams are often repeated on the round or in height. 1 repeat is the diagram the way it appears in the pattern. If it says to work 5 repeats of A.1 in the round, then you work A.1 a total of 5 times after/next to each other in the round. If it says to work 2 repeats of A.1 vertically/in height you work the entire diagram once, then begin again at the start and work the entire diagram one more time.

Chain stitches are slightly narrower than other stitches and to avoid working the cast-on edge too tight, we simply chain more stitches to begin with. The stitch count will be adjusted on the following row to fit the pattern and measurement sketch.

The rib edge is more elastic and will contract slightly compared to, for example, stocking stitch. By increasing before the rib edge, you avoid a visible difference in width between the rib edge and the rest of the body.

It’s very easy to cast off too tightly, and by making yarn overs while casting off (and simultaneously casting these off) you avoid a too tight cast off edge.

See DROPS video: How to bind off with yarn overs (yo)

To achieve an even increase (or decrease) you can increase on, for example: every 3rd and 4th row alternately, like so: work 2 rows and increase on the 3rd row, work 3 rows and increase on the 4th. Repeat this until the increase is complete.

See DROPS lesson: Increase or decrease 1 st on every 3rd and 4th row alternately

Should you prefer to work in the round instead of back and forth, you may of course adjust the pattern. You’ll need to add steeks mid-front (usually 5 stitches), and follow the instructions. When you would normally turn and work from the wrong side, simply work across the steek and continue in the round. At the end you’ll cut the piece open, pick up stitches to work bands, and cover the cut edges.

See DROPS video: How to knit steeks and cut open

Should you prefer to work back and forth instead of in the round, you may of course adjust the pattern so you work the pieces separately and then assemble them at the end. Divide the stitches for the body in 2, add 1 edge stitch in each side (for sewing) and work the front and back pieces separately.

See DROPS lesson: Can I adapt a pattern for circular needles into straight needles?

Pattern repeats can vary slightly in the different sizes, in order to get the correct proportions. If you’re not working the exact same size as the garment in the photo, yours might deviate slightly. This has been carefully developed and adjusted so that the complete impression of the garment is the same in all sizes.

Make sure to follow instructions and diagrams for your size!

If you have found a pattern you like which is available in women’s size it’s not very difficult to convert it to men’s size. The biggest difference will be the length of sleeves and body. Start working on the women size that you think would fit across the chest. The additional length will be worked right before you cast off for the armhole/sleeve cap. If the pattern is worked top-down you can add the length right after the armhole or before the first decrease on sleeve.

Regarding additional yarn amount, this will depend on how much length you add, but it is better with a skein too many than too few.

All yarns will have excess fibres (from production) that might come off as lint or shedding. Brushed yarns (ie hairier yarns) have more of these loose, excess fibres, causing more shedding.

Shedding also depends on what is worn under or over the garment, and whether this pulls at the yarn fibres. It’s therefore not possible to guarantee that there will be no shedding

Below are some tips on how to get the best result when working with hairier yarns:

1. When the garment is finished (before you wash it) shake it vigorously so the looser hairs come off. NOTE: do NOT use a lint roller, brush or any method that pulls at the yarn.

2. Place the garment in a plastic bag and put it in your freezer - the temperature will cause the fibres to become less attached to each other, and excess fibres will come off easier.

3. Leave in the freezer for a few hours before taking it out and shaking it again.

4. Wash the garment according to the instructions on the yarn label.

Pilling is a natural process that happens to even the most exclusive of fibers. It's a natural sign of wear and tear that is hard to avoid, and that is most visible in high friction areas of your garment like a sweater's arms and cuffs.

You can make your garment look as new by removing the pilling, using a fabric comb or a pill/lint remover.

Still can't find the answer you need? Then scroll down and leave your question so one of our experts can try to help you. This will be done normally within 5 to 10 working days.
In the meantime, you can read the questions and answers that others have left to this pattern or join the DROPS Workshop on Facebook to get help from fellow knitters/crocheters!

You might also like...

Post a comment to pattern DROPS 206-42

We would love to hear what you have to say about this pattern!

If you want to leave a question, please make sure you select the correct category in the form below, to speed up the answering process. Required fields are marked *.

Comments / Questions (7)

country flag Susan Lewis-Beeching wrote:

Could you please advise the best/ correct way to block a jumper made with Drops Snow? Should I wash in cold water and then reshape whilst damp? Or better to lightly mist or use steam iron?

24.01.2023 - 17:47

DROPS Design answered:

Dear Mrs Lewis-Beeching, some knitters are used to block some others don't - but in all cases, remember to follow thoroughly the washing instructions from label/shadecard + extra infos there. Your DROPS Store might have even more advices & tips for you they will share per mail or telephone. Enjoy!

25.01.2023 - 11:33

country flag Emmi wrote:

Hej! När man stickar fram och tillbaka på armen, börjar man i mitten utav de två understa pinnarna, med samma tråd som man använt tidigare. När jag sen maskar av så maskar jag av alla fyra tillsammans, det blev ju då ett stort hål i maskorna mellan fram och baksidan. Har jag gjort fel, eller ska det vara så?

16.01.2022 - 23:37

DROPS Design answered:

Hei Emmi. Litt usikker på spørsmålet ditt, men du starter å strikke ermet rundt på settpinner der det økes på ca hver 4.-3½.-3½.-3.-2½.-2½.cm totalt 9-10-10-11-12-12 ganger = 42-44-46-48-50-52 masker. Når økningene er ferdig og ermet er strikket til det måler 47-46-45-43-41-39 cm skal det nå strikkes frem og tilbake (nå kan det strikkes med 2 pinner). Så snu arbeidet og strikk (fremdeles etter A.2) pinnen ut og snu. Strikk til ermet måler 51-50-50-48-49-47 cm, fell nå av over alle masker. mvh DROPS Design

18.01.2022 - 11:24

country flag Berit wrote:

Hejsa. Jeg er igang med ærmet og læser, at når arbejdet måler 45 cm strikkes der Frem og Tilbage - godt 5cm? Betyder det at jeg kan erstatte de 4 strømpepinde med 2 pinde? Jeg vil bare være sikker på jeg gør det rigtige og ikke misforstår opskriften. På forhånd tak..

16.11.2020 - 15:38

DROPS Design answered:

Hej Berit. Ja när du stickar fram och tillbaka på ärmen så kan du byta till 2 pinde om du vill det. Mvh DROPS Design

17.11.2020 - 07:52

country flag Berit wrote:

Hejsa. Jeg er igang med ærmet og læser, at når arbejdet måler 45 cm strikkes der Frem og Tilbage - godt 5cm? Betyder det at jeg kan erstatte de 4 strømpepinde med 2 pinde? Jeg vil bare være sikker på jeg gør det rigtige og ikke misforstår opskriften. På forhånd tak..

12.11.2020 - 22:57

country flag Ella wrote:

Halløj. Kan denne strikkes uden halskanten, der er beskrevet til sidst?

05.11.2020 - 14:24

DROPS Design answered:

Hei Ella. Ja, det kan den. Men om du stopper å strikke før halskanten, vil den bli ganske vid i halsen. Om du ikke ønsker det, kan du felle masker før en evnt halskant i vrangbord eller riller. God Gornøyelse!

09.11.2020 - 11:10

country flag Cynthia wrote:

Hallo, C+C ist auch als Möglichkeit angegeben. Wäre auch A+A+A+A möglich bzw. 4 Fäden Alpaca?

21.08.2020 - 10:29

DROPS Design answered:

Liebe Cynthia, ja genau, hier lesen Sie mehr über Garnalternative. Viel Spaß beim stricken!

21.08.2020 - 13:09

country flag Lea wrote:

Bonjour, ne faut il pas changer d'aiguille pour les manches ? (8>9 après les côtes)? Merci

18.02.2020 - 08:20

DROPS Design answered:

Bonjour Lea, fort probablement, nos stylistes vont vérifier les manches, mais après les côtes, vous pouvez continuer avec les aiguilles doubles pointes 9. Bon tricot!

18.02.2020 - 10:26