
Popular categories
Looking for a yarn?


|
|
Avriel |
|
 |
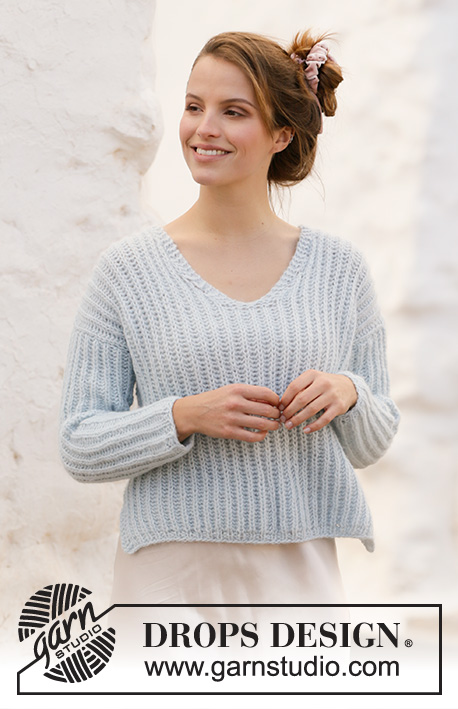 |
Knitted jumper with English rib and v-neck in DROPS Air. Sizes S – XXXL.
DROPS 210-25 |
|
|
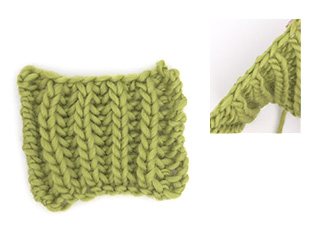
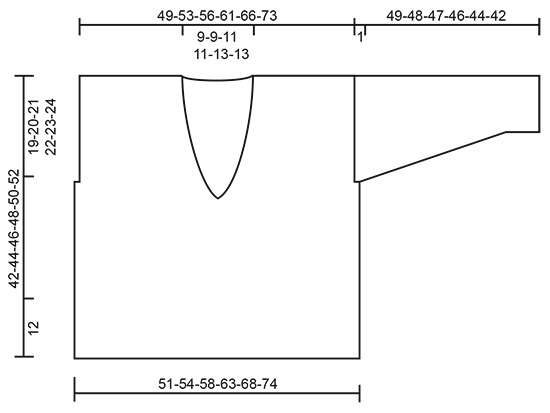
------------------------------------------------------- EXPLANATIONS FOR THE PATTERN: ------------------------------------------------------- RIDGE/GARTER STITCH (worked back and forth): Knit all rows. 1 ridge in height = Knit 2 rows. ENGLISH RIB: 2 rows of English rib give 1 visible stitch in height. ROW 1: * Knit 1, make 1 yarn over, slip 1 stitch as if to purl *, repeat from *-* until there is 1 stitch left before the edge stitches, knit 1. ROW 2: * Make 1 yarn over, slip 1 stitch as if to purl, knit the yarn over and slipped stitch together *, repeat from *-* until there is 1 stitch left before the edge stitch(es), make 1 yarn over and slip 1 stitch as if to purl. ROW 3: * Knit the yarn over and slipped stitch together, make 1 yarn over, slip 1 stitch as if to purl, *, repeat from *-* until there are 2 stitches left before the edge stitch(es), knit the yarn over and slipped stitch together. Repeat rows 2 and 3 onwards. DECREASE TIP: Decrease for the neck on the inside of the 3 edge stitches in garter stitch. All decreases are worked from the right side! Decrease as follows after the 3 edge stitches: Purl 2 twisted together (yarn over not counted as a stitch and is purled twisted together with the 2 stitches = 1 stitch decreased). Decrease as follows before the 3 edge stitches: Start 2 stitches before the 3 edge stitches and purl 2 together (yarn over not counted as a stitch and is purled together with the 2 stitches = 1 stitch decreased). INCREASE TIP (for sleeve): Increase 1 stitch on the inside of the 1 edge stitch in garter stitch by making 1 yarn over. On the next row work the yarn over twisted to avoid a hole. The increased stitches are worked into the English rib as you go. ------------------------------------------------------- START THE PIECE HERE: ------------------------------------------------------- JUMPER – SHORT OVERVIEW OF THE PIECE: The front and back pieces are worked separately, back and forth with circular needle. The sleeves are worked back and forth with circular needle. FRONT PIECE: Cast on slightly loosely 63-67-71-77-83-91 stitches with circular needle size 6 mm and Air. Purl 1 row (= wrong side). The next row is worked as follows from the right side: 3 edge stitches in GARTER STITCH – see description above, * knit 1, purl 1 *, repeat from *-* until there are 4 stitches left on the row, knit 1 and finish with 3 edge stitches in garter stitch. Work back from the wrong side with garter stitch over garter stitch, purl over purl and knit over knit. The next row is worked as follows from the right side: 3 edge stitches in garter stitch, work ENGLISH RIB – see description above – until there are 3 stitches left on the row and finish with 3 edge stitches in garter stitch. Continue with English rib and 3 edge stitches in garter stitch on each side. REMEMBER THE KNITTING TENSION! When the piece measures 12 cm, insert 1 marker on each side; mark the split on each side. When the piece measures 13 cm, work English rib with 1 edge stitch in garter stitch on each side. When the piece measures 23-24-25-26-27-28 cm, cast off 2 stitches at the beginning of the next 2 rows for the armholes = 59-63-67-73-79-87 stitches. Continue with English rib and 1 edge stitch in garter stitch on each side. AT THE SAME TIME when the piece measures 25-26-26-28-28-30 cm, work 2 ridges over the middle 7 stitches on the row (yarn overs not counted as stitches and are knitted together with each slipped stitch on the first row; the other stitches are worked as before). After the 2 ridges, work the next row as follows from the right side: 1 edge stitch in garter stitch, work 25-27-29-32-35-39 stitches in English rib, knit 5, pass the 4th stitch worked over the 5th stitch worked (= 1 stitch decreased mid front), knit 2, work 25-27-29-32-35-39 stitches in English rib and 1 edge stitch in garter stitch. Place the 29-31-33-36-39-43 stitches on the right side of the piece (seen from the right side) on 1 thread. Continue back and forth over the remaining 29-31-33-36-39-43 stitches with English rib,1 edge stitch in garter stitch towards the armhole and 3 edge stitches in garter stitch towards mid front. When you have worked 5 rows after the division and the next row is from the right side, decrease for the v-neck towards mid front – read DECREASE TIP. Decrease like this every 6th row a total of 2-2-3-3-4-4 times and then every 8th row a total of 3 times in all sizes = 24-26-27-30-32-36 stitches left on the row. Continue working until the piece measures 42-44-46-48-50-52 cm. Then LOOSELY cast off with knit over knit and purl over purl (yarn overs worked together with slipped knitted stitches when casting off). Work the stitches on the right side of the piece in the same way as the left side, but in reverse; i.e. the first row is worked as follows from the wrong side: Place the cast-off stitch mid front on the left needle and knit it together with the next stitch on the left needle (to avoid a “jump” at the bottom of the v-neck), knit 2, work 25-27-29-32-35-39 stitches in English rib and 1 edge stitch in garter stitch. Continue back and forth over the 29-31-33-36-39-43 stitches with 1 edge stitch in garter stitch towards the armhole and 3 edge stitches in garter stitch towards mid front. When you have worked 5 rows after the division and the next row is from the right side, decrease for the v-neck towards mid front. Decrease like this every 6th row a total of 2-2-3-3-4-4 times and then every 8th row a total of 3 times in all sizes = 24-26-27-30-32-36 stitches left on the row. Continue working until the piece measures 42-44-46-48-50-52 cm. Then LOOSELY cast off with knit over knit and purl over purl (yarn overs worked together with slipped knitted stitches when casting off). BACK PIECE: Cast on slightly loosely 63-67-71-77-83-91 stitches with circular needle size 6 mm and Air. Purl 1 row (= wrong side).The next row is worked as follows from the right side: 3 edge stitches in garter stitch, * knit 1, purl 1 *, repeat from *-* until there are 4 stitches left on the needle, knit 1 and finish with 3 edge stitches in garter stitch. Work back from the wrong side with garter stitch over garter stitch, purl over purl and knit over knit. The next row is worked as follows from the right side: 3 edge stitches in garter stitch, work English rib until there are 3 stitches left on the row and finish with 3 edge stitches in garter stitch. Continue with English rib and 3 edge stitches in garter stitch on each side. When the piece measures 12 cm, insert 1 marker on each side; mark the splits. When the piece measures 13 cm, work English rib with 1 edge stitch in garter stitch on each side. When the piece measures 23-24-25-26-27-28 cm, cast off 2 stitches at the beginning of the next 2 rows for the armholes = 59-63-67-73-79-87 stitches. Continue with English rib and 1 edge stitch in garter stitch on each side. When the piece measures 41-43-45-47-49-51 cm, work 2 ridges over the middle 15-15-17-17-19-19 stitches on the row (yarn overs not counted as stitches and are knitted together with each slipped stitch on the first row; the other stitches are worked as before). On the first row after the 2 ridges cast off the middle 9-9-11-11-13-13 stitches for the neck. Place the 25-27-28-31-33-37 stitches on the right side of the piece (seen from the right side) on 1 thread or leave them on the needle. Continue back and forth over the remaining 25-27-28-31-33-37 stitches with English rib, 1 edge stitch in garter stitch towards the armhole and 3 edge stitches in garter stitch towards the neck. AT THE SAME TIME on the next row from the right side decrease 1 stitch for the neck – read DECREASE TIP = 24-26-27-30-32-36 stitches left on the shoulder. Continue working until the piece measures 42-44-46-48-50-52 cm. LOOSELY cast off with knit over knit and purl over purl (yarn overs worked together with slipped knitted stitches when casting off). Work the other shoulder in the same way. SLEEVE: Cast on a little loosely 23-25-25-27-27-29 stitches with circular needle size 6 mm and Air. Purl 1 row (= wrong side). The next row is worked as follows from the right side: 1 edge stitch in garter stitch, * knit 1, purl 1 *, repeat from *-* until there are 2 stitches left on the row, knit 1 and finish with 1 edge stitch in garter stitch. Work back from the wrong side with garter stitch over garter stitch, purl over purl and knit over knit. The next row is worked as follows from the right side: 1 edge stitch in garter stitch, work English rib until there is 1 stitch left on the row and finish with 1 edge stitch in garter stitch. Continue with English rib and 1 edge stitch in garter stitch on each side. When the piece measures 8 cm increase 1 stitch on each side – read INCREASE TIP (= 2 stitches increased). Increase like this every 4½-4½-3½-3-2½-2½ cm a total of 9-9-11-11-12-12 times = 41-43-47-49-51-53 stitches. When the piece measures 48-47-46-45-43-41 cm, insert 1 marker on each side to mark where the sleeve will be sewn to the armhole. Continue working to 1 cm from the marker (the whole sleeve measures approx. 49-48-47-46-44-42 cm – NOTE: Shorter measurements in larger sizes due to wider shoulders). LOOSELY cast off with knit over knit and purl over purl (yarn overs worked with slipped knitted stitches when casting off). Work the other sleeve in the same way. ASSEMBLY: Sew the shoulder seams inside the cast-off edge – make sure the seam is not tight. Sew in the sleeves, inside the 1 edge stitch, and sew the bottom of the armhole (markers on sleeve should fit the side seam on the body). Sew the sleeve and side seams in the outermost loop of the outermost stitch, leaving approx. 12 cm at the bottom on each side for the splits. |
|
|
|
|
Have you made this or any other of our designs? Tag your pictures in social media with #dropsdesign so we can see them! Do you need help with this pattern?You'll find tutorial videos, a Comments/Questions area and more by visiting the pattern on garnstudio.com. © 1982-2024 DROPS Design A/S. We reserve all rights. This document, including all its sub-sections, has copyrights. Read more about what you can do with our patterns at the bottom of each pattern on our site. |
|


With over 40 years in knitting and crochet design, DROPS Design offers one of the most extensive collections of free patterns on the internet - translated to 17 languages. As of today we count 304 catalogues and 11422 patterns - 11422 of which are translated into English (UK/cm).
We work hard to bring you the best knitting and crochet have to offer, inspiration and advice as well as great quality yarns at incredible prices! Would you like to use our patterns for other than personal use? You can read what you are allowed to do in the Copyright text at the bottom of all our patterns. Happy crafting!
Comments / Questions (24)
If you knit in the English style with the yarn held in the right hand, the instructions for English rib do not work. The instructions as written for instance in row 2 have 2 yarn overs but if you are holding the yarn in your right hand you will end up with too many stitches. The pattern should say - yarn FORWARD, slip one stich as if to purl, knit yarn over and knit stitch together. Could you include instructions for English rib for an English knitter ?
06.11.2022 - 15:16DROPS Design answered:
Dear Julie, thank you for your suggestion. Our patterns have been designed for working with the continental method, which is the technique used by our design department. Happy knitting!
06.11.2022 - 23:40My previous comment also included a question - oops. Hope to hear from you. Thanks
27.06.2022 - 06:01DROPS Design answered:
Dear Allinson, the patterns for the new collection Autumn & Winter should be introduced and submitted to the vote at the beginning of August so that you should see more soon - thanks already for your patience. Happy knitting!
27.06.2022 - 10:21I would love to knit this with a single medium sized cable up the front - the rest of the garment in stocking stitch. Before I start to play, just checking to see if the Autumn / Winter designs have anything like this coming soon. I love this yarn. Thanks
27.06.2022 - 06:00Si je comprend bien avec 400gr je peut faire un XXL ?
12.02.2022 - 19:23DROPS Design answered:
Bonjour Denise, pour la taille XXL il faut 450 g (9 pelotes) de DROPS Air. Bon tricot!
14.02.2022 - 07:31Do you mean purl stitches or brioche purl stitches on the middle 7 stitches when it says work 2 ridges?
12.01.2022 - 03:38I would like to download instead of print the instructions. How do I do that? Thank you, Helena
27.07.2020 - 02:00DROPS Design answered:
Currently, we do not offer the download option. However, you can set up your printing to print the page a pdf file and thus create a downloadable file. Happy Knitting!
28.07.2020 - 11:01Hi there After 13cm where you only have 1 edge stitch, do you continue with 1 edge stitch until the first cast off or return to 3 edge stitches?
18.05.2020 - 12:13DROPS Design answered:
Dear Zay, when piece measures 13 cm you continue with English rib with now only 1 edge stitch in garter stitch in each side until you cast off for the armholes. Happy knitting!
19.05.2020 - 08:09Wat is gedraaid averecht samenbreien? Volgens de Engelse methode lijkt het gewoon twee steken tezamen averecht breien. Telkens na de mindering in de volgende naald heb ik een steek die niet verbonden is links en en rechts en die dieper ligt.
16.05.2020 - 12:22DROPS Design answered:
Dag Krista,
In deze video wordt uitgelegd hoe je averecht samen breit.
19.05.2020 - 13:38I can’t get the knitting gauge right on 6 mm needles I get 21 stitches and 16 rows for 10cm square on 10mm needles I get 12 stitches and 17 rows on 10 Cm square? What am I doing wrong?
08.05.2020 - 18:30DROPS Design answered:
Dear Mrs White, are you working English rib (= also called brioche) - see video here - try to make sure you get the right tension, this is the best way to get the correct measurements (read more here). Your Store might have some tricks and tips for you, do not hesitate to contact them even per mail or telephone. Happy knitting!
11.05.2020 - 08:19I can’t get the knitting gauge right on 6 mm needles I get 21 stitches and 16 rows for 10cm square on 10mm needles I get 12 stitches and 17 rows on 10 Cm square? What am I doing wrong?
08.05.2020 - 18:27