
Popular categories
Looking for a yarn?


|
||||||||||
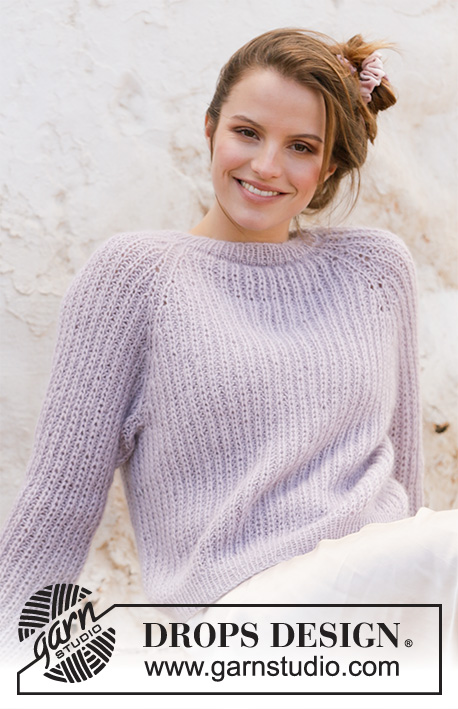
Lavender Breeze |
||||||||||
 |
 |
|||||||||
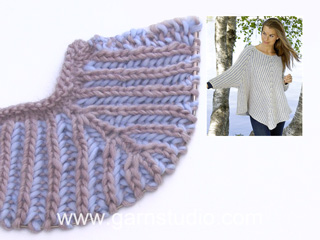
Knitted jacket in DROPS Alpaca and DROPS Kid-Silk. The piece is worked top down with English rib, raglan and v-neck. Sizes XS - XXL.
DROPS 213-7 |
||||||||||
|
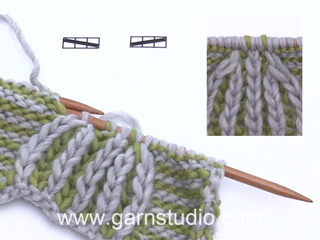
------------------------------------------------------- EXPLANATIONS FOR THE PATTERN: ------------------------------------------------------- ENGLISH RIB STITCH (on bands): From right side: Knit 1 under the next stitch. From wrong side: Purl the stitch. PATTERN: See diagrams A.1 and A.2. The diagrams show all rows in the pattern seen from the right side. INCREASE TO RAGLAN: Increase to raglan on each side of the purled stitch with marker (= raglan-stitch), i.e. increase in the knitted stitch and yarn over closest to the raglan-stitch. Increase 2 stitches on each side of all raglan-stitches (= 16 stitches increased on an increase-row). All increases are worked from the right side! Increase 2 stitches in the knitted stitch by working 3 stitches in the stitch and yarn over as follows: Knit together the stitch and yarn over but do not slip them onto the right needle, make 1 yarn over the right needle and knit together the stitch and yarn over 1 more time (= 2 stitches increased). Then work the new stitches in English rib (A.1/A.2) but be aware that on the first row after the increase the one increased stitch is knitted without a yarn over as there is no yarn over for this stitch. INCREASE TO V-NECK: Increase to v-neck in the knitted stitch and yarn over closest to the bands on each side towards mid front. All increases are worked from the right side! Increase 2 stitches in the knitted stitch and yarn over in the same way as described for increasing to raglan. DECREASE TIP (for sides of body and mid under the sleeves): Decrease in stitches closest to the purled stitches with markers mid under the sleeve and in the sides of the body. All decreases are worked on a row/round where the knitted stitches and yarn overs are knitted together! DECREASE 2 STITCHES TOWARDS THE LEFT AS FOLLOWS (i.e. start after the purled stitch with marker): Slip the first knitted stitch and yarn over onto the right needle as if to knit together, knit the next 2 stitches together (i.e. 1 purled + knitted stitch and yarn over), then pass the slipped stitch and yarn-over over the knitted together stitches (= 2 stitches decreased). DECREASE 2 STITCHES TOWARDS THE RIGHT AS FOLLOWS (i.e. start 3 stitches + 2 yarn overs before the purled stitch with marker): Slip the first knitted stitch and yarn over onto the right needle as if to knit together, purl 1, pass the slipped stitch and yarn-over over the purled stitch, slip the stitch back onto the left needle, pass the stitch and yarn-over over the stitch which was slipped back onto the left needle, and finally slip the remaining stitch onto the right needle (= 2 stitches decreased). BUTTONHOLES: Work buttonholes on the left band (when the garment is worn). Work from the right side at the beginning of the row as follows: Work the first 3 stitches as before, make 1 yarn over, knit 2 together and then continue as before. On the next row (wrong side), knit the yarn over to leave a hole. The first buttonhole is worked approx. 2 cm after the last increase for v-neck. Then work the next 3-3-4-4-4-4 buttonholes with approx. 9½-10-8½-9-8-8 cm between each one. NOTE: If the knitting tension is not correct in height this will affect the positioning of the buttonholes. Measure the piece when the v-neck is finished and adjust the position of the 4-4-5-5-5-5 buttonholes if necessary. CASTING-OFF TIP: To avoid the cast-off edge being tight you can cast off with a larger size needle. If the edge is still tight, make 1 yarn over after approx. each 4th stitch at the same time as casting off and the yarn overs are cast off as normal stitches. ------------------------------------------------------- START THE PIECE HERE: ------------------------------------------------------- JACKET – SHORT OVERVIEW OF THE PIECE: First you work 2 loose neck-edges (one for each front piece). These are placed on the circular needle and stitches are cast on for the neck as described in the text (the neck-edges are later sewn together mid-back and sewn to the neck-line at the back). The yoke is worked back and forth with circular needle from mid front, top down. AT THE SAME TIME you increase to v-neck and raglan. The sleeves are worked in the round with double pointed needles/short circular needle, top down. NOTE: All stitch counts given when working English rib are without the yarn overs; these are counted together with their respective stitches as 1 stitch. RIGHT NECK-EDGE (when the garment is worn): Cast on 7 stitches with needle size 4 mm and 1 strand Alpaca and 1 strand Kid-Silk (= 2 strands). Work as follows: ROW 1 (wrong side): Purl. ROW 2 (right side): Knit 1, 1 ENGLISH RIB STITCH – read description above, knit 2, 1 English rib stitch, knit 2. ROW 3 (wrong side): Knit 2, purl 1, knit 2, purl 1, knit 1. Repeat rows 2 and 3 until the neck-edge measures approx. 13-13-13-16-16-16 cm (adjust after a row from the wrong side). Cut the strand and lay the piece to one side. LEFT NECK-EDGE (when the garment is worn): Cast on 7 stitches with needle size 4 mm and 1 strand Alpaca and 1 strand Kid-Silk (= 2 strands). Work as follows: ROW 1 (wrong side): Purl. ROW 2 (right side): Knit 2, 1 English rib stitch, knit 2, 1 English rib stitch, knit 1. ROW 3 (wrong side): Knit 1, purl 1, knit 2, purl 1, knit 2. Repeat rows 2 and 3 until the neck-edge measures approx. 13-13-13-16-16-16 cm (adjust after a row from the right side). Place these 7 stitches on circular needle size 5 mm, do not cut the strand but cast on 51-53-59-59-59-59 new stitches on the needle (= sleeves and back piece) and then work the 7 stitches from the right neck-edge as before = 65-67-73-73-73-73 stitches on the needle. The outermost 7 stitches on each side are now called the band stitches. Insert 1 marker after the band at the beginning of the row. Then work the yoke as described below; the yoke is measured from the marker. YOKE: Change to circular needle size 5 mm and work the first row from the wrong side as follows: Work the 7 band stitches as before, * make 1 yarn over, slip 1 stitch as if to purl, knit 1 *, work from *-* until there are 8 stitches left on the row, 1 yarn over, slip 1 stitch as if to purl and finish with 7 band stitches as before. Now insert 4 markers in the piece as described below (without working the stitches); these markers are used when increasing to raglan. Count 8 stitches (= front piece), insert 1 marker in the next stitch (= raglan-stitch), count 11-11-13-13-13-11 stitches (= sleeve), insert 1 marker in the next stitch (= raglan-stitch), count 23-25-27-27-27-31 stitches (= back piece), insert 1 marker in the next stitch (= raglan-stitch), count 11-11-13-13-13-11 stitches (= sleeve), insert 1 marker in the next stitch (= raglan-stitch). There are 8 stitches left for the front piece after the last marker. The next row is worked as follows from the right side: Work the 7 band stitches as before, A.1 until there are 8 stitches left on the row (= 25-26-29-29-29-29 repeats of 2 stitches), A.2 (= 1 stitch) and finish with 7 band stitches as before. Continue this pattern back and forth. AT THE SAME TIME increase to RAGLAN and V-NECK as described below. REMEMBER THE KNITTING TENSION! RAGLAN: When you have worked 6-6-6-6-4-4 rows of A.1/A.2 (and the next row is to be worked from the right side), increase to RAGLAN – read description above (= 16 stitches increased on this increase-row). Increase like this every 8th-8th-8th-8th-6th-6th row (i.e. every 4th-4th-4th-4th-3rd-3rd row with visible English rib stitches in height) a total of 8-9-10-11-13-14 times. V-NECK: AT THE SAME TIME when you increase to raglan the 3rd-3rd-2nd-2nd-5th-5th time, increase to the V-NECK on each side as well – read description above. Increase to v-neck on every 8th-8th-8th-8th-6th-6th row a total of 5-5-6-6-6-7 times (when the increases to v-neck are finished there are 1-2-3-4-3-3 increases left to raglan). When all the increases to raglan and v-neck are finished there are 213-231-257-273-305-325 stitches on the needle. Continue A.1/A.2 back and forth with 7 band stitches on each side as before - remember BUTTONHOLES on left band - read explanation above. When the piece measures 18-20-22-24-26-28 cm from the marker in the neck (the piece measures approx. 22-24-26-28-30-32 cm from the shoulder), divide the yoke for body and sleeves as follows from the wrong side: Work 34-36-40-42-46-50 stitches as before (= front piece), place the next 45-49-55-59-67-69 stitches on 1 thread for the sleeve, cast on 5 new stitches on the needle (= in side under the sleeve), work 55-61-67-71-79-87 stitches as before (= back piece), place the next 45-49-55-59-67-69 stitches on 1 thread for the sleeve, cast on 5 new stitches on the needle (= in side under the sleeve) and work the remaining 34-36-40-42-46-50 stitches as before (= front piece). Body and sleeves are finished separately. THE PIECE IS NOW MEASURED FROM HERE! BODY: = 133-143-157-165-181-197 stitches. Insert 1 marker in the middle stitch of the 5 stitches cast on under each sleeve. Allow the markers to follow your work onwards; they will be used when decreasing in the sides. Continue back and forth with English rib and 7 band stitches on each side as before. DECREASE IN SIDES: When the piece measures 8 cm from the division, decrease on each front piece by decreasing 2 stitches in the English rib stitch closest to the purled stitch with the marker on each side – read DECREASE TIP; i.e. on the left front piece (when the garment is worn) decrease 2 stitches towards the right and on the right front piece decrease 2 stitches towards the left = 129-139-153-161-177-193 stitches. When the piece measures 18 cm from the division, decrease in the same way on the back piece (i.e. decrease 2 stitches towards the left at the beginning and 2 stitches towards the right at the end of the back piece) = 125-135-149-157-173-189 stitches. Continue working until the piece measures 30 cm from the division in all sizes (there is 4 cm left to finished length. You can try the garment on a work to the desired length). Change to circular needle size 4 mm and work rib back and forth (= knit 1 / purl 1) with 7 band stitches on each side as before – on the first row the yarn-overs are knitted together with the knitted stitches. When the rib measures 4 cm, loosely cast off with knit over knit and purl over purl – read CASTING-OFF TIP! The jacket measures approx. 56-58-60-62-64-66 cm from the shoulder down. SLEEVE: Place the 45-49-55-59-67-69 stitches from the thread on the one side of the piece on double pointed needles or short circular needle size 5 mm and knit up 1 stitch in each of the 5 stitches cast on under the sleeve = 50-54-60-64-72-74 stitches. Insert a marker thread in the middle stitch of the 5 stitches cast on under the sleeve. Allow the thread to follow your work onwards; it will be used when decreasing under the sleeve. Work A.3 in the round. AT THE SAME TIME on round 8 (i.e. on the 4th round of visible English rib stitches), decrease 4 stitches mid under the sleeve – read DECREASE TIP (decrease 2 stitches towards the left after the stitch with the marker and decrease 2 stitches towards the right before the stitch with the marker). Decrease like this every 8th-8th-8th-8th-6th-6th round (i.e. every 4th-4th-4th-4th-3rd-3rd round of visible English rib stitches) a total of 3-3-4-5-5-5 times = 38-42-44-44-52-54 stitches. Continue working until the sleeve measures 41-40-38-37-36-35 cm from the division (there is 4 cm left to finished length. You can try the garment on a work to the desired length). Change to double pointed needles size 4 mm. Work rib (= knit 1 / purl 1) – on the first round the yarn overs are knitted together with the knitted stitches. When the rib measures 4 cm, cast off with knit over knit and purl over purl – remember CASTING-OFF TIP! The sleeve measures approx. 45-44-42-41-40-39 cm from the division. Work the other sleeve in the same way. ASSEMBLY: Sew the neck-edge together mid back with the seam turning inwards. Stretch the neck-edge slightly and sew it to the neck-line at the back. Sew the buttons onto the left band. |
||||||||||
Diagram explanations |
||||||||||
|
||||||||||

|
||||||||||
|
Have you made this or any other of our designs? Tag your pictures in social media with #dropsdesign so we can see them! Do you need help with this pattern?You'll find tutorial videos, a Comments/Questions area and more by visiting the pattern on garnstudio.com. © 1982-2024 DROPS Design A/S. We reserve all rights. This document, including all its sub-sections, has copyrights. Read more about what you can do with our patterns at the bottom of each pattern on our site. |
||||||||||


With over 40 years in knitting and crochet design, DROPS Design offers one of the most extensive collections of free patterns on the internet - translated to 17 languages. As of today we count 304 catalogues and 11422 patterns - 11422 of which are translated into English (UK/cm).
We work hard to bring you the best knitting and crochet have to offer, inspiration and advice as well as great quality yarns at incredible prices! Would you like to use our patterns for other than personal use? You can read what you are allowed to do in the Copyright text at the bottom of all our patterns. Happy crafting!
Comments / Questions (98)
Heb wol besteld voor een xl ,6x alpaca en 5x kid silk .ik moet nog de boord doen van mijn eerste mouw en nog de volledige tweede mouw masr ik heb geen alpaca wol meer en nog een halve kid silk . Hoeveel van elk zou ik moeten bijbestellen ? Groeten
28.12.2020 - 20:06Heb problemen met het opzetten van de mouwen ,brei je die aan de goede of de verkeerde kant .al van alles geprobeerd maar de steken volgen mekaar niet op .
25.12.2020 - 22:09DROPS Design answered:
Dag Pysson K,
Ja, je breit de mouwen aan de goede kant. Je zet de steken op breinaalden zonder knop en je neemt 1 steek op in de 5 steken onder de mouw. Het begin van de naald is na de 5 opgezette steken en je breit A.3 in de rondte op de goede kant.
17.01.2021 - 14:18Hei! Minulla on ongelma raglanlisäysten jälkeisessä nurjassa kerroksessa. Miten neulon nämä lisätyt 3+3 silmukkaa, ja välissä olevan raglanlinjan silmukan (3+1+3)? En ymmärtänyt ohjeen kohtaa raglanlisäysten lopussa. Neulotaanko raglalinjan silmukka aina samoin, niin että oikealle puolelle tulee nurja silmukka? Vai "sisältyykö" raglalinjan silmukka täyspatenttiin?
21.12.2020 - 13:17Bonjour, je ne comprends pas comment les mailles doivent être tricotées sur l'envers du travail après les augmentations du raglan: où doit-on glisser les mailles , où doit on faire un jeté? Est-il possible d'avoir une explication pour ces 7 points?: la maille et ses deux augmentations à droite de la maille marquée, la maille marquée et la maille à gauche et ses deux augmentations? Je n'ai pas trouvé de tutoriel pour ce passage. Merci pour votre réponse.
11.12.2020 - 15:27DROPS Design answered:
Bonjour Marie-Laure, cette vidéo montre comment augmenter dans des côtes anglaises (0:53), dans la vidéo, on augmente 4 m, vous devez ici n'augmenter que 2 mailles (= vous tricotez alors 3 fois la maille), au rang suivant, tricotez les nouvelles mailles en côtes anglaises, en tricotant les jetés à l'endroit (au lieu d'ensemble à l'endroit avec le jeté) et en glissant le jeté (comme quand on doit glisser la m à l'envers). Bon tricot!
14.12.2020 - 06:58Dobry den, mám problém s pletením sedla. Po té, co podle upletu podle následovného návodu: 1x nahodíme, 1 oko sejmeme obrace, 1 oko upleteme hladce, mi na jehlici mimo krajních 7ok na obou stranách zůstává příliš mnoho ok (80) a tak mi nevychází pak následný požadavek na rozdělený značek. Je možné, že je nějaká chyba v návodu, nebo je něco špatně napsané? děkuji
16.11.2020 - 17:44DROPS Design answered:
Dobrý den, Petro, u chytového patentu je vždy v první řadě zdánlivě mnohem více ok - to proto, že v následující (a každé další) budeme splétat nahození s okem, počítáme je proto jako 1 oko. Podívejte se na video pro lepší představu: Hodně zdaru!
14.11.2021 - 13:18Chci se zeptat kam zmizelo schéma? Nikde ho tady nevidím a nemám se podle čeho řídit.
14.11.2020 - 17:24DROPS Design answered:
Dobrý den, Terezo, díky za upozornění - opraveno. Ať se vám hezky plete! Hana
15.11.2020 - 20:16Using 5mm short circular needle for this english rib pattern for the sleeves is impossible. I have 54 sts and its too few to knit well in the round. A magic loop is frustratring to use for this rib pattern. Dbl pointed needles is messy when the pattern calls for 5mm. Would have made it so much better if I could do the sleeves with the shortest circular needle which is 40mm but I have tried & its still too long for my 54 sts as it pulled.
11.11.2020 - 15:57Når begge halskantene er strikket inn på pinnen og neste pinne fra vrangen er strikket med kast, løft og 1 rett maske. Hvor mange masker skal det være totalt? Jeg får for mange masker igjen når jeg skal feste de 4 merkene.
01.11.2020 - 23:33DROPS Design answered:
Hei Marit. Det kommer an på hvilken størrelse du strikker. Du skal ha 65-67-73-73-73 eller 73 masker på pinnen. Husk å telle de maskene du setter merkene i. mvh DROPS design
16.11.2020 - 11:24Buongiorno, sono ancora io! Non mi è chiara ancora una cosa: la prima asola a due centimetri dal collo va fatta già in quel primo pezzo di bordo del collo sinistro che va lavorato in modo lasso? Inoltre, sempre due primissimi pezzi di bordo, cosa significa che vengono cuciti al centro dietro e alla scollatura sul dietro? Grazie mille!
30.09.2020 - 09:06DROPS Design answered:
Buongiorno Alessia. Abbiamo corretto il testo per le asole. Inizia ad aprire le asole, dopo aver terminato lo scollo a V (come può vedere dalla fotografia). All'inizio del lavoro, avvia solo le maglie del bordo a coste. Metterà poi insieme i due bordi avviando le m per lo scollo sul dietro. Ma le parti del bordo già lavorate, dovranno essere cucite alle maglie avviate per lo scollo e i lembi uniti tra loro. Il video che alleghiamo può aiutarla. Buon lavoro!
30.09.2020 - 09:53Buongiorno, non capisco quando devo iniziare a fare le asole? Grazie mille!
29.09.2020 - 14:31DROPS Design answered:
Buongiorno Alessia, per le asole deve fare riferimento al paragrafo dedicato, in ogni caso deve lavorare la prima asola quando le coste sul collo misurano circa 2 cm e le altre alla distanza indicata nel modello. Buon lavoro!
30.09.2020 - 08:56