DROPS Air
DROPS Air
65% Alpaca, 28% Polyamide, 7% Wool
from 5.30 € /50g
Get the yarn to make this pattern from 31.80€.

The yarn cost is calculated from the pattern’s smallest size and the yarn’s cheapest product type. Looking for an even better price? You might find it on the DROPS Deals!

DROPS SS24

September Story Sweater

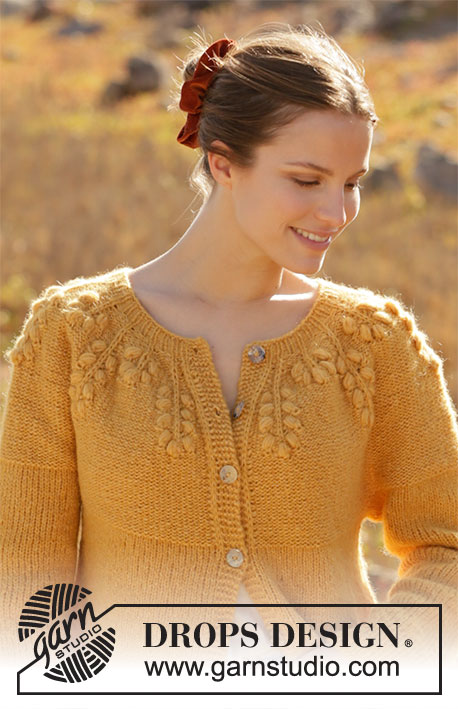
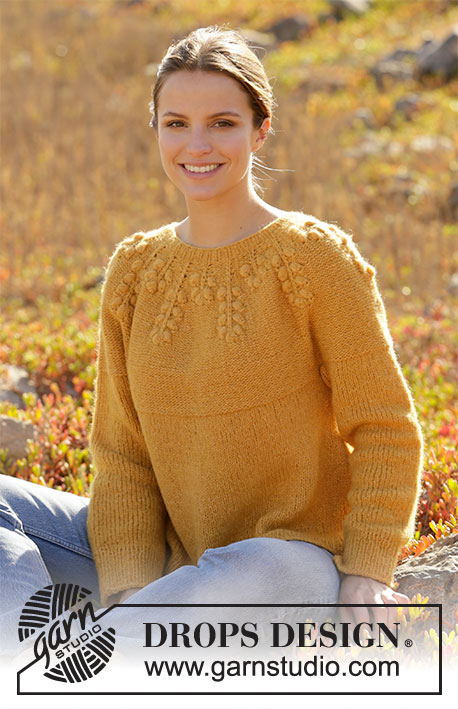
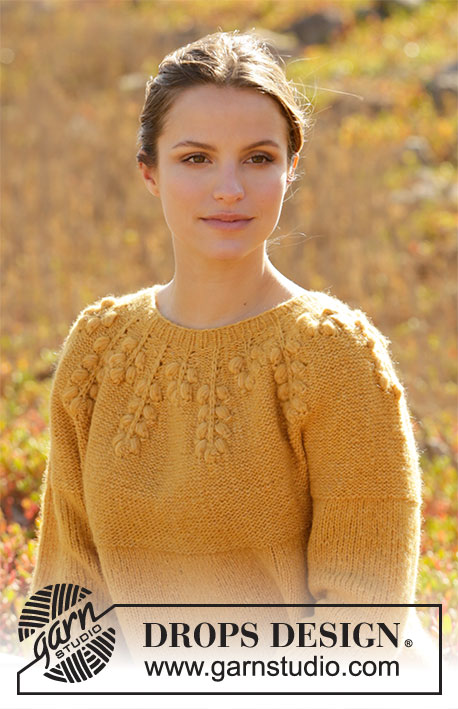
Knitted jumper with round yoke in DROPS Air. The piece is worked top down with bobbles. Sizes S - XXXL.

DROPS 213-25
DROPS Design: Pattern no ai-256
Yarn group C or A + A
-------------------------------------------------------

SIZES:
S - M - L - XL - XXL - XXXL

MATERIALS:
DROPS AIR from Garnstudio (belongs to yarn group C)
300-350-350-400-450-500 g colour 22, yellow

KNITTING TENSION:
16 stitches in width and 20 rows in height with stocking stitch = 10 x 10 cm.

NEEDLES:
DROPS DOUBLE POINTED NEEDLES SIZE 5.5 MM.
DROPS CIRCULAR NEEDLE SIZE 5.5 MM: Length 40 cm and 80 cm for stocking stitch.
DROPS DOUBLE POINTED NEEDLES SIZE 4.5 MM.
DROPS CIRCULAR NEEDLE SIZE 4.5 MM: Length 40 cm and 80 cm for rib.
Needle size is only a guide. If you get too many stitches on 10 cm, change to a larger needle size. If you get too few stitches on 10 cm, change to a smaller needle size.

-------------------------------------------------------

Alternative Yarn – See how to change yarns here
Yarn Groups A to F – Use the same pattern and change the yarn here
Yarn usage using an alternative yarn – Use our yarn converter here

-------------------------------------------------------

DROPS Air
DROPS Air
65% Alpaca, 28% Polyamide, 7% Wool
from 5.30 € /50g
Get the yarn to make this pattern from 31.80€.

The yarn cost is calculated from the pattern’s smallest size and the yarn’s cheapest product type. Looking for an even better price? You might find it on the DROPS Deals!

Pattern instructions

NOTE: This pattern is written in British English. All measurements in charts are in cm. For conversion from cm to inches - click here. There are different terms for crocheting in British and American English. If this pattern includes crochet, click for "crochet terms" here. For this pattern in American English, please click here.
-------------------------------------------------------

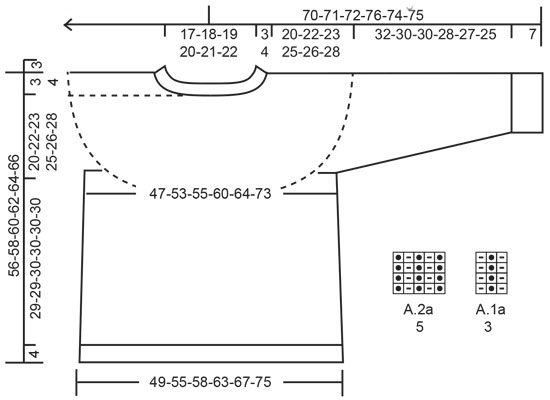
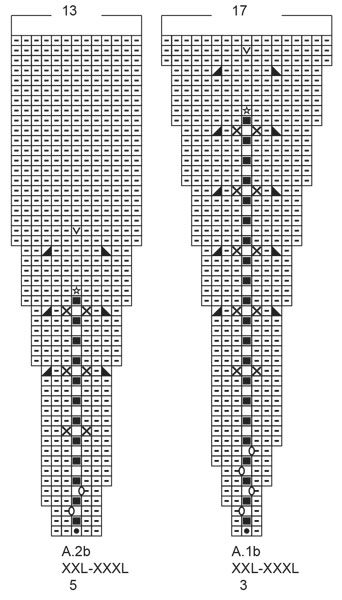
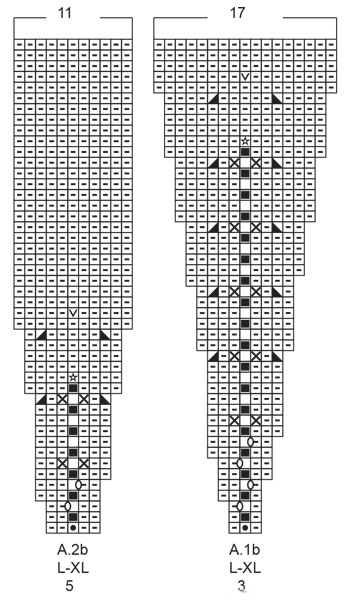
EXPLANATIONS FOR THE PATTERN:

-------------------------------------------------------

PATTERN: 
See diagrams A.1 and A.2. Choose diagram for your size.

INCREASE TIP (for sides of body):
Work until there are 2 stitches left before the marker thread, make 1 yarn over, knit 4 (marker thread sits between these 4 stitches) make 1 yarn over (= 2 stitches increased).
On the next round work the yarn overs twisted to avoid holes. The new stitches are knitted onwards. 

DECREASE TIP (for sleeves): 
Decrease 1 stitch on each side of the marker thread as follows: Work until there are 3 stitches left before the marker thread, knit 2 together, knit 2 (marker thread sits between these 2 stitches), slip 1 stitch as if to knit, knit 1 and pass the slipped stitch over the knitted stitch (= 2 stitches decreased).

CASTING-OFF TIP:
To avoid the cast-off edge being tight you can cast off with a larger size needle. If the edge is still tight, make 1 yarn over after approx. each 4th stitch at the same time as casting off and the yarn overs are cast off as normal stitches.

-------------------------------------------------------

START THE PIECE HERE:

-------------------------------------------------------

JUMPER – SHORT OVERVIEW OF THE PIECE:
The piece is worked in the round with circular needle, top down from mid back. The sleeves are worked in the round with double pointed needles, top down.

NECK:
Cast on 72-80-80-88-88-96 stitches with circular needle size 4.5 mm and Air.
Knit 1 round.
Then work * A.1a (= 3 stitches), A.2a (= 5 stitches) *, work from *-* over all stitches (= 9-10-10-11-11-12 times in width)
When the piece measures 3-3-3-3-4-4 cm change to circular needle size 5.5 mm.
Insert 1 marker at the beginning of the round mid back; the yoke will be measured from this marker!

YOKE:
Work A.1b over A.1a and A.2b over A.2a. REMEMBER THE KNITTING TENSION!
When A.1b and A.2b have been completed 1 time in height there are 234-260-280-308-330-360 stitches on the needle. Purl until the piece measures 20-22-23-25-26-28 cm from the marker.
The yoke is now divided for the body and sleeves as follows:
Knit 34-39-41-45-48-55, place the next 48-52-58-64-68-70 stitches on 1 thread for the sleeve, cast on 6 new stitches on the needle (= in side under the sleeve), knit 69-78-82-90-97-110 (= front piece), place the next 48-52-58-64-68-70 stitches on 1 thread for the sleeve, cast on 6 new stitches on the needle (= in side under the sleeve) and knit the remaining 35-39-41-45-49-55 stitches.
Body and sleeves are finished separately. THE PIECE IS NOW MEASURED FROM HERE!

BODY:
= 150-168-176-192-206-232 stitches. Insert 1 marker thread in the middle of the 6 stitches cast on under each sleeve. There are 75-84-88-96-103-116 stitches on both the back and front piece. Allow the threads to follow your work onwards; they will be used when increasing in the sides.
Knit in the round.
When the piece measures 6 cm from the division, increase 1 stitch on each side of both marker threads – read INCREASE TIP (= 4 stitches increased). Repeat this increase when the piece measures 16 cm = 158-176-184-200-214-240 stitches.
When the piece measures 29-29-30-30-30-30 cm from the division, change to circular needle size 4.5 mm and work rib (= knit 1, purl 1). Cast off with knit when the rib measures 4 cm – read CASTING-OFF TIP.

SLEEVE:
Place the 48-52-58-64-68-70 stitches from the thread on the one side of the piece on short circular needle size 5.5 mm and knit up 1 stitch in each of the 6 stitches cast on under the sleeve = 54-58-64-70-74-76 stitches.
Insert a marker thread in the middle of the 6 stitches under the sleeve. Allow the thread to follow your work onwards; it will be used when decreasing under the sleeve. Start at the marker thread and knit in the round.
When the sleeve measures 3 cm from the division, decrease 2 stitches mid under the sleeve – read DECREASE TIP. Decrease like this every 6-3-2½-2-1½-1½ cm a total of 5-7-9-11-12-12 times = 44-44-46-48-50-52 stitches.
Continue working until the sleeve measures 32-30-30-28-27-25 cm from the division (there is approx. 7 cm left to finished length; you can try the jumper on and work to desired length).
Change to double pointed needles size 4.5 mm and work rib (= knit 1, purl 1).
Cast off when the rib measures 7 cm.
The sleeve measures approx. 39-37-37-35-34-32 cm from the division.
Work the other sleeve in the same way.

Diagram

symbols = knit
symbols = purl
symbols = make 1 yarn over and slip the stitch onto the right needle as if to purl (= English rib stitch)
symbols = knit yarn over and slipped stitch together (= English rib stitch)
symbols = purl; in this stitch you will later pick up stitches for a bobble
symbols = purl 1, then insert right needle into the purled stitch 6 rounds further down, just before the English rib stitch (i.e. stitch marked with a cross) and work BOBBLE:
Pick up the strand on the needle; make sure it is not tight (i.e. the stitch needs to be approx. 2.5 cm long), * make 1 yarn over, pick up 1 more stitch in the same way*, work from *-* a total of 3 times (= 4 new stitches and 3 yarn overs), slip the 7 stitches/yarn-overs onto the left needle and knit them together (= 1 stitch increased)
symbols = before working the stitch, insert the right needle into the purled stitch 6 rounds further down, just after the English rib stitch (i.e. stitch marked with a cross) and work bobble, then purl 1
symbols = knit yarn-over and slipped stitch together (= English rib stitch); in this English rib stitch you will later pick up stitches for a bobble
symbols = before working the stitch, insert the right needle into the English rib stitch 6 rounds further down (i.e. stitch marked with a star) and work as follows:
Pick up the strand on the needle; make sure it is not tight (i.e. the stitch needs to be approx. 2.5 cm long), * make 1 yarn over, pick up 1 more stitch in the same way *, work from *-* a total of 3 times (= 4 new stitches and 3 yarn overs), slip the 7 stitches/yarn-overs onto the left needle and knit them together with the next stitch on the left needle (i.e. there is no increased stitch)
symbols = between 2 stitches make 1 yarn over; yarn over is worked twisted on next round to avoid a hole
diagram
diagram
diagram
diagram

Each of our patterns has specific tutorial videos to help you.

Do you have a question? See a list of frequently asked questions (FAQ)

Knitting tension is what determines the final measurements of your work, and is usually measured per 10 x 10 cm. It is provided like so: number of stitches in width x number of rows in height - eg: 19 stitches x 26 rows = 10 x 10 cm.

The knitting tension is very individual; some people knit/crochet loosely while others work tightly. You adjust the knitting tension with the needle size, which is why the suggested needle size is only meant as a guide! You need to adjust this (up or down) to ensure that YOUR knitting tension matches the knitting tension provided in the pattern. If you work with a different knitting tension than provided you will have a different yarn consumption, and your work will have different measurements than what the pattern suggests.

The knitting tension also determines which yarns can replace each other. As long as you achieve the same knitting tension you can replace one yarn with another.

See DROPS lesson: How to measure your tension/gauge

See DROPS video: How to make a gauge tension swatch

The required amount of yarn is provided in grams, eg: 450 g. To calculate how many balls you’ll need you first need to know how many grams are in 1 ball (25g, 50g or 100g). This information is available if you click on the individual yarn quality on our pages. Divide the amount required with the amount of each ball. For example, if each ball is 50g (the most common amount), the calculation will be as follows: 450 / 50 = 9 balls.

The important thing when changing from one yarn to another is that the knitting/crochet tension remains the same. This is so that the measurements of the finished piece will be the same as on the sketch provided. It is easier to achieve the same knitting tension using yarns from the same yarn group. It is also possible to work with multiple strands of a thinner yarn to achieve the knitting tension of a thicker one. Please try our yarn converter. We recommend you to always work a test swatch.

Please NOTE: when changing yarn the garment might have a different look and feel to the garment in the photo, due to individual properties and qualities of each yarn.

See DROPS lesson: Can I use a different yarn than the one mentioned in the pattern?

All our yarns are categorised into yarn groups (from A to F) according to thickness and knitting tension – group A contains the thinnest yarns and group F the thickest. This makes it easier for you to find alternative yarns to our patterns, should you wish to switch yarn. All yarns within the same group have a similar knitting tension and can easily replace each other. However, different yarn qualities have different structures and properties which will give the finished work a unique look and feel.

Click here for an overview of the yarns in each yarn group

At the top of all our patterns you’ll find a link to our yarn calculator, which is a helpful tool should you wish to use a different yarn than suggested. By filling in the yarn quality you wish to replace, the amount (in your size) and number of strands, the calculator will present good alternative yarns with the same knitting tension. Additionally it will tell you how much you’ll require in the new qualities and whether you’ll need to work with multiple strands. Most skeins are 50g (some are 25g or 100g).

If the pattern is worked with multiple colours, every colour will have to be calculated separately. Similarly, if the pattern is worked with several strands of different yarns (for example 1 strand Alpaca and 1 strand Kid-Silk) you will have to find alternatives for each, individually.

Click here to see our yarn calculator

Since different yarns have different qualities and textures we have chosen to keep the original yarn in our patterns. However, you can easily find options among our available qualities by using our yarn calculator, or simply pick a yarn from the same yarn group.

It is possible that some retailers still have discontinued yarns in stock, or that someone has a few skeins at home that they would like to find patterns for.

The yarn calculator will provide both alternative yarn as well as required amount in the new quality.

If you think it's hard to decide what size to make, it can be a good idea to measure a garment you own already and like the size of. Then you can pick the size by comparing those measures with the ones available in the pattern's size chart.

You'll find the size chart at the bottom of the pattern.

See DROPS lesson: How to read size chart

The needle size provided in the pattern serves only as a guide, the important thing is to follow the knitting tension. And since knitting tension is very individual, you will have to adjust the needle size to ensure that YOUR tension is the same as in the pattern – maybe you’ll have to adjust 1, or even 2 needle sizes, up or down to achieve the correct tension. For this, we recommend that you work test swatches.

Should you work with a different knitting tension than the one provided, the measurements of the finished garment might deviate from the measurement sketch.

See DROPS lesson: How to measure your tension/gauge

See DROPS video: How to make a tension/gauge swatch

Working a garment top-down provides more flexibility and room for personal adjustment. For example it is easier to try the garment on while working, as well as making adjustments to length of yoke and shoulder caps.

The instructions are carefully explaining every step, in the correct order. Diagrams are adjusted to the knitting direction and are worked as usual.

The diagram depicts all rows/rounds, and every stitch seen from the right side. It is read from bottom to top, from right to left. 1 square = 1 stitch.

When working back and forth, every other row is worked from the right side and every other row is worked from the wrong side. When working from the wrong side, the diagram will have to be worked reversed: from left to right, knit stitches are purled, purl stitches are knit etc.

When working in the round every round is worked from the right side and the diagram are worked from right to left on all rounds.

See DROPS lesson: How to read knitting diagrams

The diagram depicts all rows/rounds, and every stitch seen from the right side. It is worked from bottom to top, from right to left.

When working back and forth every other row is worked from the right side: from right to left and every other row is worked from the wrong side: from left to right.

When working in the round, every row in the diagram are worked from the right side, from right to left.

When working a circular diagram you start in the middle and work your way outwards, counter clockwise, row by row.

The rows usually start with a given number of chain stitches (equivalent to the height of the following stitch), this will either be depicted in the diagram or explained in the pattern.

See DROPS lesson: How to read crochet diagrams

Instructions for working several diagrams after each other on the same row/round, will often be written like so: “work A.1, A.2, A.3 a total of 0-0-2-3-4 times". This means you work A.1 once, then A.2 is worked once, and A.3 is repeated (in width) the number of times provided for your size – in this case like so: S = 0 times, M = 0 times, L=2 times, XL= 3 times and XXL = 4 times.

The diagrams are worked as usual: begin with the first row in A.1, then work the first row in A.2 etc.

See DROPS lesson: How to read knitting diagrams

See DROPS lesson: How to read crochet diagrams

The total width of the garment (from wrist-to-wrist) will be larger in the larger sizes, despite the actual sleeves being shorter. The larger sizes have longer sleeve caps and wider shoulders, so there will be a good fit in all sizes.

The measurement sketch/schematic drawing provides information regarding the full length of the garment. If it’s a jumper or a jacket the length is measured from the highest point on the shoulder closest to the neckline, and straight down to the bottom of the garment. It is NOT measured from the tip of shoulder. Similarly, the length of yoke is measured from the highest point on the shoulder and down to where yoke is split into body and sleeves.

On a jacket measures are never taken along bands, unless specifically stated. Always measure inside band stitches when measuring the length.

See DROPS lesson: How to read a schematic drawing

Diagrams are often repeated on the round or in height. 1 repeat is the diagram the way it appears in the pattern. If it says to work 5 repeats of A.1 in the round, then you work A.1 a total of 5 times after/next to each other in the round. If it says to work 2 repeats of A.1 vertically/in height you work the entire diagram once, then begin again at the start and work the entire diagram one more time.

Chain stitches are slightly narrower than other stitches and to avoid working the cast-on edge too tight, we simply chain more stitches to begin with. The stitch count will be adjusted on the following row to fit the pattern and measurement sketch.

The rib edge is more elastic and will contract slightly compared to, for example, stocking stitch. By increasing before the rib edge, you avoid a visible difference in width between the rib edge and the rest of the body.

It’s very easy to cast off too tightly, and by making yarn overs while casting off (and simultaneously casting these off) you avoid a too tight cast off edge.

See DROPS video: How to bind off with yarn overs (yo)

To achieve an even increase (or decrease) you can increase on, for example: every 3rd and 4th row alternately, like so: work 2 rows and increase on the 3rd row, work 3 rows and increase on the 4th. Repeat this until the increase is complete.

See DROPS lesson: Increase or decrease 1 st on every 3rd and 4th row alternately

Should you prefer to work in the round instead of back and forth, you may of course adjust the pattern. You’ll need to add steeks mid-front (usually 5 stitches), and follow the instructions. When you would normally turn and work from the wrong side, simply work across the steek and continue in the round. At the end you’ll cut the piece open, pick up stitches to work bands, and cover the cut edges.

See DROPS video: How to knit steeks and cut open

Should you prefer to work back and forth instead of in the round, you may of course adjust the pattern so you work the pieces separately and then assemble them at the end. Divide the stitches for the body in 2, add 1 edge stitch in each side (for sewing) and work the front and back pieces separately.

See DROPS lesson: Can I adapt a pattern for circular needles into straight needles?

Pattern repeats can vary slightly in the different sizes, in order to get the correct proportions. If you’re not working the exact same size as the garment in the photo, yours might deviate slightly. This has been carefully developed and adjusted so that the complete impression of the garment is the same in all sizes.

Make sure to follow instructions and diagrams for your size!

If you have found a pattern you like which is available in women’s size it’s not very difficult to convert it to men’s size. The biggest difference will be the length of sleeves and body. Start working on the women size that you think would fit across the chest. The additional length will be worked right before you cast off for the armhole/sleeve cap. If the pattern is worked top-down you can add the length right after the armhole or before the first decrease on sleeve.

Regarding additional yarn amount, this will depend on how much length you add, but it is better with a skein too many than too few.

All yarns will have excess fibres (from production) that might come off as lint or shedding. Brushed yarns (ie hairier yarns) have more of these loose, excess fibres, causing more shedding.

Shedding also depends on what is worn under or over the garment, and whether this pulls at the yarn fibres. It’s therefore not possible to guarantee that there will be no shedding

Below are some tips on how to get the best result when working with hairier yarns:

1. When the garment is finished (before you wash it) shake it vigorously so the looser hairs come off. NOTE: do NOT use a lint roller, brush or any method that pulls at the yarn.

2. Place the garment in a plastic bag and put it in your freezer - the temperature will cause the fibres to become less attached to each other, and excess fibres will come off easier.

3. Leave in the freezer for a few hours before taking it out and shaking it again.

4. Wash the garment according to the instructions on the yarn label.

Pilling is a natural process that happens to even the most exclusive of fibers. It's a natural sign of wear and tear that is hard to avoid, and that is most visible in high friction areas of your garment like a sweater's arms and cuffs.

You can make your garment look as new by removing the pilling, using a fabric comb or a pill/lint remover.

Still can't find the answer you need? Then scroll down and leave your question so one of our experts can try to help you. This will be done normally within 5 to 10 working days.
In the meantime, you can read the questions and answers that others have left to this pattern or join the DROPS Workshop on Facebook to get help from fellow knitters/crocheters!

You might also like...

September Story Sweater

@sifpetrea, Denmark

September Story Sweater

Laura, Germany

September Story Sweater

Nashknits, Qatar

Post a comment to pattern DROPS 213-25

We would love to hear what you have to say about this pattern!

If you want to leave a question, please make sure you select the correct category in the form below, to speed up the answering process. Required fields are marked *.

Comments / Questions (12)

country flag Simone wrote:

Hello, knitting another of your wonderful patterns.. September story but already I am stuck, Could you please explain the start of the yoke - Work A.1b over A.1a and A.2b over A.2a I don't understand how to proceed ? Work A/1b then A.1a then A.2b then A.2a or something else ? Many thanks again for your guidance

26.03.2023 - 21:54

DROPS Design answered:

Hi Simone, The stitches you have worked in A.1a will now be worked according to diagram A.1b and the same applies to the stitches in A.2a, now worked according to diagram A.2b (no longer work A.1a or A.2a). Happy knitting!

27.03.2023 - 06:54

country flag Megan wrote:

Third row of A.1b and A.2b: after knitting yarn over and slip stitch together, making one yarn over, am I supposed to purl three times before knitting the next yarn over and slip stitch together? But there are only two stitches from the previous row for me to purl? Thank you,

01.10.2022 - 19:47

DROPS Design answered:

Dear Megan, A.1b and A.2b are worked next to each other and repeated the whole row. Between the yarn over in A.1b and the yarn over in A.2b there are 3 purl stitches (1 from A.1b and 2 from A.2b). Happy knitting!

03.10.2022 - 00:57

country flag Megan wrote:

Thank you for your answering. If I yarn over once, slip a stitch to the right needle, I will have one more stitch for this row than what is shown in the diagram. Should I purl the next two stitches together then?

28.09.2022 - 16:37

DROPS Design answered:

Dear Mega, the yarn over worked over the slipped stitch doesn't count as 1 stitch, both yarn overs + slipped stitch will count as 1 stitch in English rib; on the next round, you will knit the yarn over + the slipped stitch together as 1 stitch in English rib. This video shows how to work a pattern with such stitches, it might help you. Happy knitting!

29.09.2022 - 08:17

country flag Megan wrote:

This is a follow up question to my previous question about “make 1 yarn over and slip the stitch onto the right needle as if to purl (= English rib stitch)” in second row of A.1b and A.2b. In the answer to this question, “slip 1 stitch onto the right needle as if to purl, purl 1 and repeat,” what does “slip one stitch” mean? Does it mean a yarn over?

27.09.2022 - 16:24

DROPS Design answered:

Hi Megan, Slipping a stitch means transferring it from the left needle to the right without working it. Slipping as if to purl means you insert the right needle from right to left when transferring it. Happy knitting!

28.09.2022 - 07:10

country flag Megan wrote:

“make 1 yarn over and slip the stitch onto the right needle as if to purl (= English rib stitch)” in second row of A.1b and A.2b, do you slip the stitch on the left needle onto the right needle and purl the next two stitches together? Thank you.

27.09.2022 - 06:54

DROPS Design answered:

Hi Megan, In A.1b row 2 you purl 1, slip 1 stitch onto the right needle as if to purl, purl 1 and repeat. In A.2b you purl 2, slip 1 stitch onto the right needle as if to purl, purl 2 and repeat. Happy knitting!

27.09.2022 - 07:25

country flag Megan wrote:

If I use long tail cast on method, which creates both a cast-on and the first row, do I still need to knit one round? "Insert 1 marker at the beginning of the round mid back" What does "mid back" mean? Does it mean this marker will be in the middle of the back? Thank you.

22.09.2022 - 05:43

DROPS Design answered:

Dear Megan, this knit row is worked before starting ribbing edge, just decide if you want it or rather start with rib. And correct, the rounds start /the marker is on the middle of back piece. Happy knitting!

22.09.2022 - 09:59

country flag Mary Culbertson wrote:

I am stuck on how to proceed with yoke. Have been studying videos and charts and am confused. This is my first sweater other than simple baby sweaters. I love the look but haven't worked with charts.

02.01.2022 - 03:01

DROPS Design answered:

Dear Mary, can you please tell us, exactly what confuses you? So we might be able to help you better. Thank you. Happy Stitching!

03.01.2022 - 02:05

country flag Kim Stellinga wrote:

Ik heb de trui gebreid (s) in drops Alaska. Hij is mooi, maar wanneer de pas 20 cm meet ga je over in tricotsteek. Dit maakt dat de overgang ribbel/tricot halverwege de borst valt. Dit vind ik niet zo mooi omdat die rand best dik is. Het zou mooier zijn als je na 25 cm de overgang maakt. Dan valt hij onder de borst. Bij jullie model is zo te zien de overgang ook niet na 20 cm gebreid, want bij haar valt het ook onder de borst. Dit zou naar mijn idee moeten worden aangepast in het patroon.

13.10.2021 - 23:49

country flag Christel Poeter wrote:

Die Anleitung will ich in Groesse M stricken Halsausschnitt 1 Reihe re. stricken u.dann 1a u.2a über alle Maschen strichen das verstehe ich nicht 1a sind 3 Ma. u.2a 5Ma. nur rechte u. linke Ma.?Danke für die Hilfe

08.05.2020 - 22:36

DROPS Design answered:

Liebe Frau Poeter, so sollen Sie stricken: *die 3 Maschen von A.1a, die 5 Maschen von A.2a*, diese 8 Maschen wiederholen Sie bis zur Ende der Runde, insgesamt 10 Mal = über alle 80 Maschen. Hier lesen Sie mehr über Diagramme. Viel Spaß beim stricken!

11.05.2020 - 08:37

country flag Johanne wrote:

Dette er opskriften på cardigan og ikke sweater

28.01.2020 - 17:21

DROPS Design answered:

Hei Johanne. Nei, dette er oppskriften på en genser/sweater, DROPS 213-25. En lik jakken/cardigan ligger under DROPS 213-26. mvh DROPS design

30.01.2020 - 10:32