DROPS BabyAlpaca Silk
70% Alpaca, 30% Silk
Discontinued
find alternatives
DROPS Kid-Silk
DROPS Kid-Silk
75% Mohair, 25% Silk
from 5.05 € /25g
DROPS SS24

Morning Rays

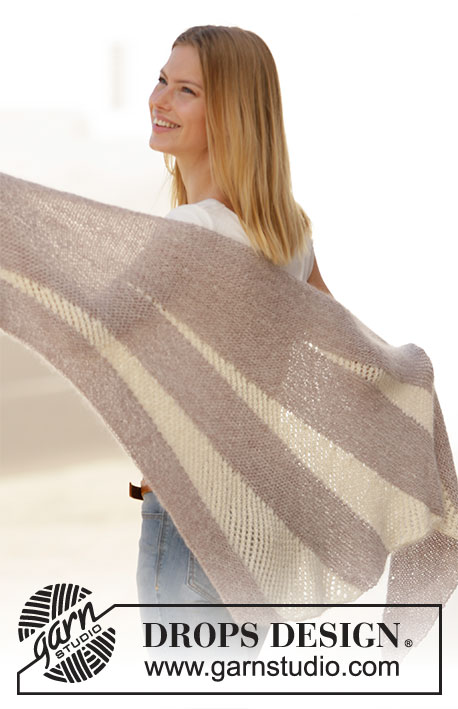
Knitted shawl with garter stitch and lace pattern in DROPS BabyAlpaca Silk and DROPS Kid-Silk. Work piece back and forth with short rows.

DROPS 210-38
DROPS design: Pattern bs-155
Yarn group A + A or C
----------------------------------------------------------

SIZE:
Height: Measured along the middle = approx. 60 cm
Width: Measured along the top side from side to side = approx. 180 cm.
Measure along the short side / cast-on edge = approx. 120 cm

MATERIALS:
DROPS BABYALPACA SILK from Garnstudio (belongs to yarn group A)
200 g colour 1760, light grey purple
50 g colour 0100, off white
And use:
DROPS KID-SILK from Garnstudio (belongs to yarn group A)
100 g colour 01, off white

KNITTING TENSION:
16 stitches in width and 30 rows vertically in garter stitch and 1 strand of each quality = 10 x 10 cm.

NEEDLES:
DROPS CIRCULAR NEEDLE SIZE 5.5 mm : Length 80 cm.
Needle size is only a suggestion! If you have too many stitches on 10 cm switch to larger needles. If you have too few stitches on 10 cm switch to smaller needles.

-------------------------------------------------------

Alternative Yarn – See how to change yarns here
Yarn Groups A to F – Use the same pattern and change the yarn here
Yarn usage using an alternative yarn – Use our yarn converter here

-------------------------------------------------------

DROPS BabyAlpaca Silk
70% Alpaca, 30% Silk
Discontinued
find alternatives
DROPS Kid-Silk
DROPS Kid-Silk
75% Mohair, 25% Silk
from 5.05 € /25g

Pattern instructions

----------------------------------------------------------

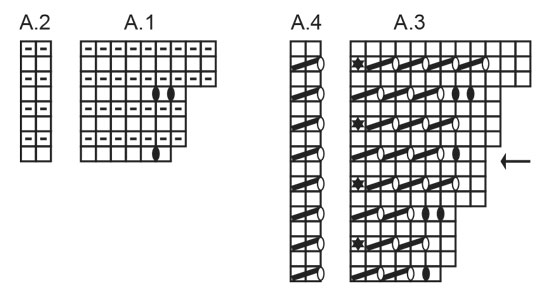
EXPLANATION FOR THE PATTERN:

----------------------------------------------------------

GARTER STITCH (back and forth):
Knit all rows.
1 ridge vertically = knit 2 rows.

PATTERN:
See diagrams A.1 to A.4. Diagrams show all rows in pattern seen from the right side.

----------------------------------------------------------

START THE PIECE HERE:

----------------------------------------------------------

SHAWL - SHORT OVERVIEW OF THE PIECE:
Work piece back and forth on circular needle. Work according to diagrams to increase in one side of piece, AT THE SAME TIME work short rows.

SHAWL:
Cast on 192 stitches on circular needle size 5.5 mm with 1 strand off white Kid-Silk and 1 strand light grey purple BabyAlpaca Silk. Knit 1 row (= wrong side). Then work 4 parts with short rows as follows:

PART 1:
Work according to diagrams A.1 and A.2 as follows:
From right side: Work diagram A.1 over 6 stitches, work according to diagram A.2 until 6 stitches remain on needle. Tighten yarn and turn piece.
From wrong side: Work diagram A.2 until 7 stitches remain, work A.1 over 7 stitches (remember to work the black yarn over from previous row twisted to avoid holes). Turn piece.
Continue to work diagrams like this but on every row from right side, turn piece 6 stitches earlier than last time. When the diagrams have been worked 1 time vertically, 3 stitches have been increased and there are 4 ridges in total (in addition to cast-on edge) = 195 stitches. Continue to work diagrams with short rows until diagrams have been worked 3 times vertically. There are 201 stitches on row, and 12 ridges have been worked (in addition to cast-on edge).

Switch to off white Kid-Silk and off white BabyAlpaca Silk.
Work according to diagrams A.3 and A.4 as follows:
From right side: Work diagram A.3 over 6 stitches, work A.4 until 6 stitches earlier than on previous turn. Turn piece.
From wrong side: Work diagram A.4 until 7 stitches remain, work A.3 over 7 stitches (remember that the black yarn over in diagram is purled twisted to avoid holes). Continue to work like this until diagrams have been worked 1 time vertically. 6 stitches have been increased, and there are 8 eyelet rows in total = 207 stitches.
Continue the same way by working short rows over 6 stitches less every time until diagrams have been worked 2.5 times vertically (see arrow in diagram that shows where diagram should end in the middle of a repetition). 216 stitches on row and 40 rows have been worked with lace pattern.

Switch to 1 strand Kid-Silk in off white and 1 strand BabyAlpaca Silk in light grey purple.
Knit 1 row over all stitches on row, make sure to tighten where piece is turned, so avoid large holes. Turn and knit 1 row from wrong side.

PART 2:
Work after same principle as 1st part, but work diagrams and short rows in a different way.

READ ALL OF THE FOLLOWING SECTION BEFORE CONTINUING!
Diagrams A.1 and A.2 are worked 4 times vertically with Kid-Silk in off white and BabyAlpaca Silk in light grey purple, then work diagram A.3 and A.4 with Kid-Silk in off white and BabyAlpaca Silk in off white 2 times vertically - AT THE SAME TIME turn piece first time when 7 stitches remain on needle, continue to turn 7 stitches earlier each time a total of 24 times (including the first turn), then turn 6 stitches earlier a total of 8 times. There are 240 stitches on needle.
Switch to 1 strand Kid-Silk in off white and 1 strand BabyAlpaca Silk in light grey purple.
Now work over all stitches on needle as follows: Work over all stitches on row, make sure to tighten where piece is turned, so avoid large holes. Turn and knit 1 row from wrong side.

PART 3:
Work after same principle as 1st and 2nd part, but work according to diagrams and short rows in a different way.

READ ALL OF THE FOLLOWING SECTION BEFORE CONTINUING!
Diagrams A.1 and A.2 are worked 5 times vertically with Kid-Silk in off white and BabyAlpaca Silk in light grey purple, then work diagrams A.3 and A.4 with Kid-Silk in off white and BabyAlpaca Silk in off white 1.5 times vertically (see arrow in diagram to show where diagram ends in the middle of a repetition) - AT THE SAME TIME turn piece first time when 8 stitches remain on needle, continue to turn 8 stitches earlier each time a total of 16 times (including the first turn), then turn 7 stitches earlier a total of 16 times. There are 264 stitches on needle.

Switch to 1 strand Kid-Silk in off white and 1 strand BabyAlpaca Silk in light grey purple. Now work over all stitches on needle as follows: Work over all stitches on row, make sure to tighten where piece is turned so avoid large holes. Turn and knit 1 row from wrong side.

PART 4:
Work after same principle as 1st, 2nd and 3rd part, but work diagrams and short rows in a different way.
READ ALL OF THE FOLLOWING SECTION BEFORE CONTINUING!
Diagrams A.1 and A.2 are worked 8 times vertically with Kid-Silk in off white and BabyAlpaca Silk in light grey purple, - AT THE SAME TIME turn piece first time when 9 stitches remain on needle, continue to turn 9 stitches earlier each time a total of 8 times (including the first turn), then turn 8 stitches earlier a total of 24 times. There are 288 stitches on needle.

Now work over all stitches on needle as follows:
Work over all stitches on row, make sure to tighten where piece is turned, so avoid large holes. Turn and knit 1 row from wrong side.
Loosely cast off by knitting on next row from right side.

This pattern has been corrected.

Updated online: 18.02.2020
Correction: Re-written part about short rows in part-2, part 3 and part-4.

Diagram

symbols = knit from the right side, purl from the wrong side
symbols = knit from wrong side
symbols = between 2 stitches make 1 yarn over, on next row work yarn over twisted to avoid holes
symbols = between 2 stitches make 1 yarn over, on next row purl yarn over to make holes
symbols = knit 2 together
symbols = stitch is not drawn in diagram, begin to work diagram A.4 from this stitch. If number of stitches do not fit A.4 when turning in pattern, work last stitch before turning in stocking stitch.
symbols = see explanation in pattern. Only applies to 1st and 3rd part.
diagram
Do you have a question? See a list of frequently asked questions (FAQ)

Knitting tension is what determines the final measurements of your work, and is usually measured per 10 x 10 cm. It is provided like so: number of stitches in width x number of rows in height - eg: 19 stitches x 26 rows = 10 x 10 cm.

The knitting tension is very individual; some people knit/crochet loosely while others work tightly. You adjust the knitting tension with the needle size, which is why the suggested needle size is only meant as a guide! You need to adjust this (up or down) to ensure that YOUR knitting tension matches the knitting tension provided in the pattern. If you work with a different knitting tension than provided you will have a different yarn consumption, and your work will have different measurements than what the pattern suggests.

The knitting tension also determines which yarns can replace each other. As long as you achieve the same knitting tension you can replace one yarn with another.

See DROPS lesson: How to measure your tension/gauge

See DROPS video: How to make a gauge tension swatch

The required amount of yarn is provided in grams, eg: 450 g. To calculate how many balls you’ll need you first need to know how many grams are in 1 ball (25g, 50g or 100g). This information is available if you click on the individual yarn quality on our pages. Divide the amount required with the amount of each ball. For example, if each ball is 50g (the most common amount), the calculation will be as follows: 450 / 50 = 9 balls.

The important thing when changing from one yarn to another is that the knitting/crochet tension remains the same. This is so that the measurements of the finished piece will be the same as on the sketch provided. It is easier to achieve the same knitting tension using yarns from the same yarn group. It is also possible to work with multiple strands of a thinner yarn to achieve the knitting tension of a thicker one. Please try our yarn converter. We recommend you to always work a test swatch.

Please NOTE: when changing yarn the garment might have a different look and feel to the garment in the photo, due to individual properties and qualities of each yarn.

See DROPS lesson: Can I use a different yarn than the one mentioned in the pattern?

All our yarns are categorised into yarn groups (from A to F) according to thickness and knitting tension – group A contains the thinnest yarns and group F the thickest. This makes it easier for you to find alternative yarns to our patterns, should you wish to switch yarn. All yarns within the same group have a similar knitting tension and can easily replace each other. However, different yarn qualities have different structures and properties which will give the finished work a unique look and feel.

Click here for an overview of the yarns in each yarn group

At the top of all our patterns you’ll find a link to our yarn calculator, which is a helpful tool should you wish to use a different yarn than suggested. By filling in the yarn quality you wish to replace, the amount (in your size) and number of strands, the calculator will present good alternative yarns with the same knitting tension. Additionally it will tell you how much you’ll require in the new qualities and whether you’ll need to work with multiple strands. Most skeins are 50g (some are 25g or 100g).

If the pattern is worked with multiple colours, every colour will have to be calculated separately. Similarly, if the pattern is worked with several strands of different yarns (for example 1 strand Alpaca and 1 strand Kid-Silk) you will have to find alternatives for each, individually.

Click here to see our yarn calculator

Since different yarns have different qualities and textures we have chosen to keep the original yarn in our patterns. However, you can easily find options among our available qualities by using our yarn calculator, or simply pick a yarn from the same yarn group.

It is possible that some retailers still have discontinued yarns in stock, or that someone has a few skeins at home that they would like to find patterns for.

The yarn calculator will provide both alternative yarn as well as required amount in the new quality.

If you think it's hard to decide what size to make, it can be a good idea to measure a garment you own already and like the size of. Then you can pick the size by comparing those measures with the ones available in the pattern's size chart.

You'll find the size chart at the bottom of the pattern.

See DROPS lesson: How to read size chart

The needle size provided in the pattern serves only as a guide, the important thing is to follow the knitting tension. And since knitting tension is very individual, you will have to adjust the needle size to ensure that YOUR tension is the same as in the pattern – maybe you’ll have to adjust 1, or even 2 needle sizes, up or down to achieve the correct tension. For this, we recommend that you work test swatches.

Should you work with a different knitting tension than the one provided, the measurements of the finished garment might deviate from the measurement sketch.

See DROPS lesson: How to measure your tension/gauge

See DROPS video: How to make a tension/gauge swatch

Working a garment top-down provides more flexibility and room for personal adjustment. For example it is easier to try the garment on while working, as well as making adjustments to length of yoke and shoulder caps.

The instructions are carefully explaining every step, in the correct order. Diagrams are adjusted to the knitting direction and are worked as usual.

The diagram depicts all rows/rounds, and every stitch seen from the right side. It is read from bottom to top, from right to left. 1 square = 1 stitch.

When working back and forth, every other row is worked from the right side and every other row is worked from the wrong side. When working from the wrong side, the diagram will have to be worked reversed: from left to right, knit stitches are purled, purl stitches are knit etc.

When working in the round every round is worked from the right side and the diagram are worked from right to left on all rounds.

See DROPS lesson: How to read knitting diagrams

The diagram depicts all rows/rounds, and every stitch seen from the right side. It is worked from bottom to top, from right to left.

When working back and forth every other row is worked from the right side: from right to left and every other row is worked from the wrong side: from left to right.

When working in the round, every row in the diagram are worked from the right side, from right to left.

When working a circular diagram you start in the middle and work your way outwards, counter clockwise, row by row.

The rows usually start with a given number of chain stitches (equivalent to the height of the following stitch), this will either be depicted in the diagram or explained in the pattern.

See DROPS lesson: How to read crochet diagrams

Instructions for working several diagrams after each other on the same row/round, will often be written like so: “work A.1, A.2, A.3 a total of 0-0-2-3-4 times". This means you work A.1 once, then A.2 is worked once, and A.3 is repeated (in width) the number of times provided for your size – in this case like so: S = 0 times, M = 0 times, L=2 times, XL= 3 times and XXL = 4 times.

The diagrams are worked as usual: begin with the first row in A.1, then work the first row in A.2 etc.

See DROPS lesson: How to read knitting diagrams

See DROPS lesson: How to read crochet diagrams

The total width of the garment (from wrist-to-wrist) will be larger in the larger sizes, despite the actual sleeves being shorter. The larger sizes have longer sleeve caps and wider shoulders, so there will be a good fit in all sizes.

The measurement sketch/schematic drawing provides information regarding the full length of the garment. If it’s a jumper or a jacket the length is measured from the highest point on the shoulder closest to the neckline, and straight down to the bottom of the garment. It is NOT measured from the tip of shoulder. Similarly, the length of yoke is measured from the highest point on the shoulder and down to where yoke is split into body and sleeves.

On a jacket measures are never taken along bands, unless specifically stated. Always measure inside band stitches when measuring the length.

See DROPS lesson: How to read a schematic drawing

Diagrams are often repeated on the round or in height. 1 repeat is the diagram the way it appears in the pattern. If it says to work 5 repeats of A.1 in the round, then you work A.1 a total of 5 times after/next to each other in the round. If it says to work 2 repeats of A.1 vertically/in height you work the entire diagram once, then begin again at the start and work the entire diagram one more time.

Chain stitches are slightly narrower than other stitches and to avoid working the cast-on edge too tight, we simply chain more stitches to begin with. The stitch count will be adjusted on the following row to fit the pattern and measurement sketch.

The rib edge is more elastic and will contract slightly compared to, for example, stocking stitch. By increasing before the rib edge, you avoid a visible difference in width between the rib edge and the rest of the body.

It’s very easy to cast off too tightly, and by making yarn overs while casting off (and simultaneously casting these off) you avoid a too tight cast off edge.

See DROPS video: How to bind off with yarn overs (yo)

To achieve an even increase (or decrease) you can increase on, for example: every 3rd and 4th row alternately, like so: work 2 rows and increase on the 3rd row, work 3 rows and increase on the 4th. Repeat this until the increase is complete.

See DROPS lesson: Increase or decrease 1 st on every 3rd and 4th row alternately

Should you prefer to work in the round instead of back and forth, you may of course adjust the pattern. You’ll need to add steeks mid-front (usually 5 stitches), and follow the instructions. When you would normally turn and work from the wrong side, simply work across the steek and continue in the round. At the end you’ll cut the piece open, pick up stitches to work bands, and cover the cut edges.

See DROPS video: How to knit steeks and cut open

Should you prefer to work back and forth instead of in the round, you may of course adjust the pattern so you work the pieces separately and then assemble them at the end. Divide the stitches for the body in 2, add 1 edge stitch in each side (for sewing) and work the front and back pieces separately.

See DROPS lesson: Can I adapt a pattern for circular needles into straight needles?

Pattern repeats can vary slightly in the different sizes, in order to get the correct proportions. If you’re not working the exact same size as the garment in the photo, yours might deviate slightly. This has been carefully developed and adjusted so that the complete impression of the garment is the same in all sizes.

Make sure to follow instructions and diagrams for your size!

If you have found a pattern you like which is available in women’s size it’s not very difficult to convert it to men’s size. The biggest difference will be the length of sleeves and body. Start working on the women size that you think would fit across the chest. The additional length will be worked right before you cast off for the armhole/sleeve cap. If the pattern is worked top-down you can add the length right after the armhole or before the first decrease on sleeve.

Regarding additional yarn amount, this will depend on how much length you add, but it is better with a skein too many than too few.

All yarns will have excess fibres (from production) that might come off as lint or shedding. Brushed yarns (ie hairier yarns) have more of these loose, excess fibres, causing more shedding.

Shedding also depends on what is worn under or over the garment, and whether this pulls at the yarn fibres. It’s therefore not possible to guarantee that there will be no shedding

Below are some tips on how to get the best result when working with hairier yarns:

1. When the garment is finished (before you wash it) shake it vigorously so the looser hairs come off. NOTE: do NOT use a lint roller, brush or any method that pulls at the yarn.

2. Place the garment in a plastic bag and put it in your freezer - the temperature will cause the fibres to become less attached to each other, and excess fibres will come off easier.

3. Leave in the freezer for a few hours before taking it out and shaking it again.

4. Wash the garment according to the instructions on the yarn label.

Pilling is a natural process that happens to even the most exclusive of fibers. It's a natural sign of wear and tear that is hard to avoid, and that is most visible in high friction areas of your garment like a sweater's arms and cuffs.

You can make your garment look as new by removing the pilling, using a fabric comb or a pill/lint remover.

Still can't find the answer you need? Then scroll down and leave your question so one of our experts can try to help you. This will be done normally within 5 to 10 working days.
In the meantime, you can read the questions and answers that others have left to this pattern or join the DROPS Workshop on Facebook to get help from fellow knitters/crocheters!

You might also like...

Post a comment to pattern DROPS 210-38

We would love to hear what you have to say about this pattern!

If you want to leave a question, please make sure you select the correct category in the form below, to speed up the answering process. Required fields are marked *.

Comments / Questions (25)

country flag Zaza wrote:

Bonjour Merci d'avoir répondu si vite . Bonne journée Cordialement . zaza

29.01.2024 - 13:47

country flag Zaza wrote:

Une derniere question ; quand vous dite ; 2ème PARTIE: Tricoter en suivant le même principe que pour la 1ère partie, mais tricoter les diagrammes et les rangs raccourcis d'une autre façon. qu'entendez vous d'une autre façon ?? cordialement

28.01.2024 - 22:07

DROPS Design answered:

La façon de tricoter les diagrammes sont décrits dans le paragraphe suivant sous LIRE ATTENTIVEMENT LA SECTION SUIVANTE AVANT DE CONTINUER!, on tricote les rangs raccourcis d'abord en laissant 7 mailles (24 fois au total) puis on laissera 6 mailles (8 fois). Bon tricot!

29.01.2024 - 12:52

country flag Zaza wrote:

Bonsoir, je suis a faire la 2ème fois de A3 et A4. Vous dite ceci :Continuer de la même façon, en rangs raccourcis, en tricotant 6 mailles en moins à chaque fois, jusqu'à ce que les diagrammes aient été tricotés 2.5 fois au total en hauteur (voir la flèche pour savoir où arrêter le diagramme). On a 216 mailles et on a tricoté 40 rangs du point ajouré. Est ce que les 6 mailles en moins jusqu'à la fin car dans la premiere partie c'etais 6 mailles et ensuite 7 mailles Cordialement

28.01.2024 - 22:02

DROPS Design answered:

Bonjour Zaza, on tricote les rangs raccourcis en laissant toujours 6 mailles avant de tourner, comme au 1er rang sur l'endroit, Sur l'envers on tricote jusqu'à ce qu'il reste 7mailles et on tricote A.1 au-dessus de ces 7 mailles = on tricote les mailles jusqu'à la fin du rang; autrement dit, on tricote toujours 6 m en moins à la fin de chaque rang sur l'endroit. Bon tricot!

29.01.2024 - 12:51

country flag Zaza wrote:

Bonjour, je viens de commencer ce chale et je suis arrivée a tricoter A1 et A2 (201 mailles ) Après avoir tricoté et défait plusieurs fois les 8 premiers rangs de A3 et A4, je pense que les rangs 5 et 13 ne doivent avoir qu un seul jeté tricoté torsé a l'envers au lieu de 2 comme indiqué sur le diagramme (quand on tricotera les rangs 6 et 14. Qu 'en pensez vous ? Cordialement

28.01.2024 - 17:41

country flag Vibe Acacia Snebjørk Toft wrote:

Sjal " Morning Ray" Model bs- 155 1. DEL: Diagram A1 A2 fortsættes 3 gange i højden. Skal de forkortede pinde fortsætte (ved 24. Pind og 48. Pind), eller starter du forfra hvergang du starter diagramet på ny? Det er lidt svært at se på billedet? Mvh Acacia Og tak

13.10.2022 - 08:59

DROPS Design answered:

Hej, vi forstår ikke dit spørgsmål. Skriv hvor du er i opskriften og hvilket stykke du ikke forstår, så skal vi prøve at svare :)

25.10.2022 - 10:57

country flag Elisa wrote:

Buonasera io ho un dubbio per quanto riguarda le parti 3 e 4.Per quanto riguarda la parte 3 viene indicato di ripetere i diagrammi A1 e A2 per 5 volte (per un totale di 40 ferri)ma vengono date indicazioni sui ferri accorciati solo per 32 ferri.La mia domanda è nell'ultima ripetizione dei diagrammi come devo comportarmi?Lo stesso vale per la parte 4 dove i ferri da lavorare sono 64 e vengono date indicazioni sempre per 32!Grazie mille Elisa

03.09.2022 - 18:12

DROPS Design answered:

Buonasera Elisa, per i ferri accorciati deve proseguire come indicato in precedenza. Buon lavoro!

27.09.2022 - 22:46

country flag Katja wrote:

Finns det fel i första delen? Har stickat första delen två gånger om, och maskantalet stämmer inte. Om man kontinuerligt vänder 6 maskor tidigare än förra varvet så blir man till slut med 163, maskor, inte 216.

24.09.2021 - 16:10

DROPS Design answered:

Hej Katje, fortsætter du med at tage ud ifølge diagrammerne?

06.10.2021 - 14:11

country flag Isabel Sarle wrote:

There is a message saying there is a correction on Section 2,3 and 4 but not what the corrections is. I am confused at the two knit rows between the sections.

23.07.2021 - 23:08

DROPS Design answered:

Dear Isabel, the corrections are written imto the pattern, as it was rephrased to make it easier to understands. The two knit rows are just that, two rows, knitted on all the stitches, but in the first row, when you get to the points where you turned earler, thighten the strand to make the hole made by the turn less noticeable. Happy Stitching!

24.07.2021 - 09:38

country flag Barbara wrote:

Guten Tag, ich bin am Anfang des Tuches, Teil 1. Ich habe eine Frage zu Diagramm A1 und A2: Werden die Zunahmen (A2) jeweils zu Beginn der Hinreihen gestrickt? Die verkürzten Reihen befinden sich am Ende der Hinreihe? Ich bin nicht sicher, ob ich das richtig verstanden habe. Falls ja, würde A2 somit in der Hinreihe den Beginn der Reihe zeigen. Herzlichen Dank für Ihre Antwort :-)

26.05.2021 - 18:46

DROPS Design answered:

Liebe Barbara, die Zunahmen werden in A.1 gestrickt, bei A.2 wird es nicht abgenommen - die verkürzten Reihen werden bei den Hinreihen gestrickt: bei der 1. Reihe (= Hinreihe) stricken Sie bis 6 Maschen übrig sind (verkürzte Reihe), wenden, die Rückreihe stricke, dann 3. Reihe = 2. Hinreihe in A.1/A.2 stricken und dann 6 Maschen weniger stricken (= die letzte 6 Maschen nicht stricken = es sind jetzt 12 M am Ende den Hinreihen, die nicht gearbeitet wurden ), usw. Viel Spaß beim stricken!

27.05.2021 - 09:22

country flag Amélie wrote:

Je vous remercie pour votre réponse. J'ai, à présent, un problème pour comprendre les instructions pour les rangs raccourcis en coloris naturel de la seconde partie. Le patron indique de tourner l'ouvrage 7 mailles plus tôt "à chaque fois" et 24 fois au total. Cela signifie-t-il qu'il faut faire des rangs raccourcis à l'endroit ET à l'envers ? J'avoue que spontanément je n'en aurais fait que sur les rangs envers ...

16.04.2021 - 22:53

DROPS Design answered:

... Juste encore une petite précision, les rangs raccourcis se font toujours du même côté: tricotez jusqu'à ce qu'il reste x mailles, tournez et tricotez le rang suivant, tricotez jusqu'à ce qu'il reste x + 7 (puis 6) m, tournez et tricotez le rang suivant et ainsi de suite. Bonne continuation!

19.04.2021 - 07:50