
Popular categories
Looking for a yarn?


|
|
Classic comfort |
|
 |
 |
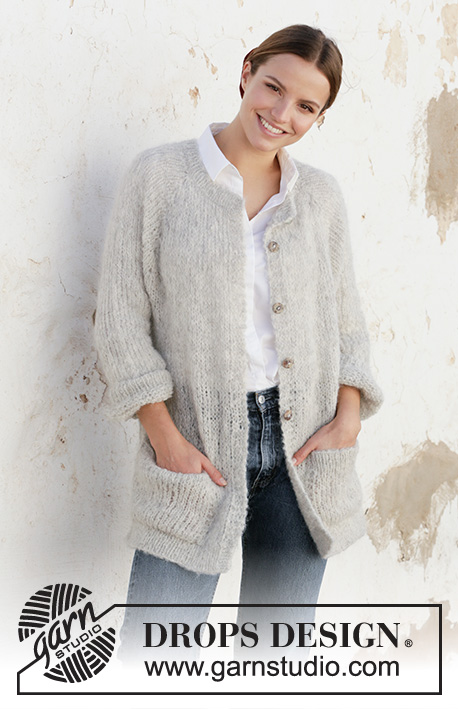
Knitted jacket in DROPS Melody. Piece is knitted top down with raglan, pockets and vents in the sides. Size XS–XXL.
DROPS 210-3 |
|
|
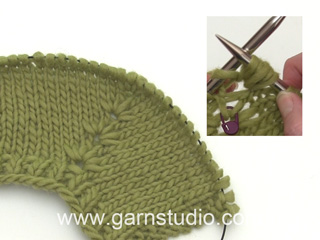
---------------------------------------------------------- EXPLANATION FOR THE PATTERN: ---------------------------------------------------------- GARTER STITCH (back and forth): Knit all rows. 1 ridge vertically = knit 2 rows. DECREASE/INCREASE TIP (evenly): To calculate how to decrease/increase evenly, use the total number of stitches on row (e.g. 95 stitches) minus bands (e.g. 8 stitches) , and divide the remaining 87 stitches by number of decrease/increases to be done (e.g. 25) = 3.5. In this example decrease by knitting alternately approx. every 2nd and 3rd stitch and every 3rd and 4th stitch together, and do not decrease over bands. If increasing make in this example 1 yarn over after alternately approx. every 3rd and 4th stitch, and do not increase over band . On next row work yarn overs twisted to avoid holes. RAGLAN: Increase for raglan in every transition between front/back piece and sleeves as explained below. All increases are done from right side and increase every 4th row (i.e. on every other row from right side) as explained in pattern. INCREASE 4 STITCHES AS FOLLOWS: Knit 1 in stitch below stitch with marker (raglan stitch), do not slip stitches off the needle, make 1 yarn over on right needle, knit 1 in same stitch, but wait to slip off the needle, make 1 yarn over on right needle and knit 1 in same stitch, then slip the stitch off the left needle (= 4 stitches increased). Insert 1 marker in the middle of these 5 stitches (for next increase). INCREASE 2 STITCHES AS FOLLOWS: Knit 1 in stitch below stitch with marker (raglan stitch), do not slip stitches off the needle, make 1 yarn over on right needle, knit 1 in same stitch, then slip the stitch off the left needle (= 2 stitches increased). Insert 1 marker in the middle of these 3 stitches (for next increase - only applies to size L). DECREASE TIP (applies to mid under sleeves): Decrease 1 stitch on each side of marker thread as follows: Work until 3 stitches remain before marker thread, knit 2 together, knit 2 (marker thread is between these 2 stitches), slip 1 stitch knitwise, knit 1, pass slipped stitch over stitch worked (= 2 stitches decreased by marker). BUTTONHOLES: Decrease for buttonholes on right band (when garment is worn). Decrease from right side when 3 stitches remain on row as follows: Make 1 yarn over, knit the next 2 stitches together, finish with 1 stitch in garter stitch. On next row (wrong side) knit the yarn over to make a hole. Decrease first buttonhole when neck edge measures approx. 2 cm = ¾". Then decrease the next 4-4-5-5-6-6 buttonholes, approx. 9-9½-8-8½-8-8½ cm = 3½"-3¾"-3⅛"-3¼"-3⅛"-3¼" apart. BIND-OFF TIP: To avoid a tight bind-off edge you may use a larger needle size. ---------------------------------------------------------- START THE PIECE HERE: ---------------------------------------------------------- JACKET - SHORT OVERVIEW OF THE PIECE: Work neck edge and yoke back and forth on circular needle from mid front, top down. Now divide yoke for front pieces, back piece and sleeves. Work front pieces and back piece back and forth on circular needle separately, top down. Work sleeves in the round on double pointed needles/short circular needle, top down. Then work pocket to sew on. NECK EDGE: Cast on 95-99-103-105-109-111 stitches (including 4 band stitches in each side towards mid front) on circular needle size 4.5 mm = US 7 with Melody. Purl 1 row (= wrong side). Work next row as follows from right side: Work 4 band stitches in GARTER STITCH - read explanation above, * knit 1, purl 1 *, work from *-* until 5 stitches remain on row, knit 1 and finish with 4 band stitches in garter stitch. Continue rib like this for 4 cm = 1½". When rib is done, knit 1 row from right side while at the same time decreasing 25-25-25-27-27-29 stitches evenly - read DECREASE/INCREASE TIP = 70-74-78-78-82-82 stitches. Insert 1 marker after band, at the beginning of row mid front. Measure yoke from this marker! Switch to circular needle size 8 mm = US 11 and purl 1 row from wrong side with 4 band stitches in garter stitch in each side. Then work yoke as explained below. YOKE: Insert 4 markers in the piece as explained below. Use markers when increasing for raglan. Count 14-15-16-16-17-17 stitches (= front piece), insert 1 marker in next stitch, count 10 stitches (= sleeve), insert 1 marker in next stitch, count 18-20-22-22-24-24 stitches (= back piece), insert 1 marker in next stitch, count 10 stitches (= sleeve), insert 1 marker in next stitch. There are 14-15-16-16-17-17 stitches after last marker on front piece. Now work and increase for raglan as explained below: Begin from right side and work in stockinette stitch back and forth with 4 band stitches in garter stitch in each side as before. REMEMBER THE KNITTING GAUGE! AT THE SAME TIME on first row from right side increase for RAGLAN – read explanation above. I.e. increase first 4 stitches in every stitch with marker (= 16 stitches in total increased on stitches). Continue like this and increase for raglan on every 4th row (i.e. every other row from right side) 5-6-7-7-9-9 times in total vertically = 150-170-190-190-226-226 stitches. Continue with increase every 4th row, but now increase only 2 stitches in every stitch with marker, as explained above (= 8 stitches in total increased on needle). Increase 2 stitches at every marker 1-1-1-2-0-1 times in total vertically. After last increase there are 158-178-198-206-226-234 stitches on needle. Work stockinette stitch with 4 band stitches in garter stitch in each side as before, until piece measures 19-21-23-25-27-29 cm = 7½"-8¼"-9"-9¾"-10⅝"-11⅜" from marker by the neck. Now divide yoke for body and sleeves. I.e. work next row as follows: Work 27-30-32-34-38-40 stitches as before (= front piece), slip the next 30-34-40-40-42-42 stitches on 1 stitch holder for sleeve, cast on 8-8-8-10-10-12 new stitches on row (= in the side under sleeve), work 44-50-54-58-66-70 stitches as before (= back piece), slip the next 30-34-40-40-42-42 stitches on 1 stitch holder for sleeve, cast on 8-8-8-10-10-12 new stitches on needle (= in the side under sleeve), work 27-30-32-34-38-40 stitches as before (= front piece). Finish body and sleeves separately as explained below. NOW MEASURE PIECE FROM HERE! BODY: = 114-126-134-146-162-174 stitches. Insert 1 marker after 31-34-36-39-43-46 stitches in from each side (= in the side of body). There are 52-58-62-68-76-82 stitches between markers on back piece. Now divide body at the markers to work back piece separately and front pieces separately. BACK PIECE: = 52-58-62-68-76-82 stitches. Work in stockinette stitch back and forth with 2 edge stitches in garter stitch in each side until piece measures 42-43-44-45-46-47 cm = 16½"-17"-17¼"-17¾"-18"-18½" from division (approx. 5 cm = 2" remain until finished measurements, try the jacket on and work to desired length). Switch to circular needle size 4.5 mm = US 7. Knit 1 row from right side while increasing 27-29-31-35-39-41 stitches evenly - remember INCREASE/DECREASE TIP = 79-87-93-103-115-123 stitches. Work next row as follows from wrong side: 2 edge stitches in garter stitch, * purl 1, knit 1 *, repeat from *-* until 3 stitches remain on needle, purl 1, and finish with 2 edge stitches in garter stitch. Continue rib like this for 5 cm = 2". Bind off stitches with knit over knit and purl over purl - read BIND OFF TIP! Jacket measures approx. 70-73-76-79-82-85 cm = 27½"-28¾"-30"-31"-32¼"-33½" from shoulder and down. RIGHT FRONT PIECE (when garment is worn): = 31-34-36-39-43-46 stitches. Work in stockinette stitch back and forth with 2 edge stitches in garter stitch towards the side and 4 band stitches in garter stitch towards mid front until front piece measures 42-43-44-45-46-47 cm = 16½"-17"-17¼"-17¾"-18"-18½" from division (adjust according to back piece). Switch to circular needle size 4.5 mm = US 7. Knit 1 row from right side while increasing 16-17-19-20-22-23 stitches evenly = 47-51-55-59-65-69 stitches. Work next row as follows from wrong side: 4 band stitches in garter stitch, * purl 1, knit 1 *, repeat from *-* until 3 stitches remain on needle, purl 1, and finish with 2 edge stitches in garter stitch. Continue rib like this for 5 cm = 2". Bind off stitches with knit over knit and purl over purl. LEFT FRONT PIECE (when garment is worn): = 31-34-36-39-43-46 stitches. Work in stockinette stitch back and forth with 4 band stitches in garter stitch towards mid front and 2 edge stitches in garter stitch towards the side until front piece measures 42-43-44-45-46-47 cm = 16½"-17"-17¼"-17¾"-18"-18½" from division (adjust according right front piece). Switch to circular needle size 4.5 mm = US 7. Knit 1 row from right side while increasing 16-17-19-20-22-23 stitches evenly = 47-51-55-59-65-69 stitches. Work next row as follows from wrong side: 2 edge stitches in garter stitch, * purl 1, knit 1 *, repeat from *-* until 5 stitches remain on needle, purl 1, and finish with 4 band stitches in garter stitch towards mid front. Continue rib like this for 5 cm = 2". Bind off stitches with knit over knit and purl over purl. SLEEVES: Slip the 30-34-40-40-42-42 stitches from stitch holder in one side of piece on double pointed needles or short circular needle size 8 mm = US 11, and pick in addition up 1 stitch in each of the 8-8-8-10-10-12 stitches under sleeve = 38-42-48-50-52-54 stitches. Insert 1 marker thread in the middle of the 8-8-8-10-10-12 stitches under sleeve and move the marker thread upwards when working. Use marker later when decreasing mid under sleeve. Begin round at the marker thread and work stockinette stitch in the round. When sleeve measures 3 cm = 1⅛" from division in all sizes, decrease 2 stitches mid under sleeve - read DECREASE TIP. Decrease like this every 12-6-4-3-3-3 cm = 4¾"-2⅜"-1½"-1⅛"-1⅛"-1⅛" 3-5-7-8-8-8 times in total = 32-32-34-34-36-38 stitches. Work until sleeve measures 37-35-34-32-31-29 cm = 14½"-13¾"-13⅜"-12½"-12¼"-11⅜" from division (approx. 5 cm = 2" remain until finished measurements, try the jacket on and work to desired length). Knit 1 round while increasing 16-16-16-18-18-18 stitches evenly = 48-48-50-52-54-56 stitches. Switch to double pointed needles size 4.5 mm = US 7. Work rib in the round = knit 1/purl 1 for 5 cm = 2". Bind off with knit over knit and purl over purl - remember BIND-OFF TIP. Sleeve measures approx. 42-40-39-37-36-34 cm = 16½"-15¾"-15¼"-14½"-14¼"-13⅜" from division. Work the other sleeve the same way. POCKET: Cast on 22-22-24-24-26-26 stitches on circular needle size 8 mm = US 11 with Melody. Work in stockinette stitch back and forth with 2 edge stitches in garter stitch in each side. When pocket measures 13-13-14-14-15-15 cm = 5⅛"-5⅛"-5½"-5½"-6"-6", switch to circular needle size 4.5 mm = US 7. Knit 1 row from right side while increasing 11-11-13-13-13-13 stitches evenly = 33-33-37-37-39-39 stitches. Continue in rib, i.e. work first row as follows from wrong side: 2 edge stitches in garter stitch, * purl 1, knit 1 *, repeat from *-* until 3 stitches remain on needle, purl 1, and finish with 2 edge stitches in garter stitch. Continue rib like this for 4 cm = 1½". Bind off stitches with knit over knit and purl over purl. Pocket measures approx. 18-18-20-20-22-22 cm = 7"-7"-8"-8"-8¾"-8¾" in width and 17-17-18-18-19-19 cm = 6¾"-6¾"-7"-7"-7½"-7½" vertically. Work the other pocket the same way. Sew one pocket on to each front piece, directly above rib in bottom edge and approx. 5-5-6-7-7-8 cm = 2"-2"-2⅜"-2¾"-2¾"-3⅛" in from mid front (try the jacket on and adjust placement of pockets). ASSEMBLY: Sew side seams on jacket – begin at the top under sleeve and sew edge to edge in outer loops of edge stitches to get a flat seam but stop seam when approx. 12 cm = 4¾" remain at the bottom in each side (= vent). Sew the buttons on to the left band. |
|

|
|
|
Have you made this or any other of our designs? Tag your pictures in social media with #dropsdesign so we can see them! Do you need help with this pattern?You'll find tutorial videos, a Comments/Questions area and more by visiting the pattern on garnstudio.com. © 1982-2024 DROPS Design A/S. We reserve all rights. This document, including all its sub-sections, has copyrights. Read more about what you can do with our patterns at the bottom of each pattern on our site. |
|


With over 40 years in knitting and crochet design, DROPS Design offers one of the most extensive collections of free patterns on the internet - translated to 17 languages. As of today we count 304 catalogs and 11422 patterns - 11417 of which are translated into English (US/in).
We work hard to bring you the best knitting and crochet have to offer, inspiration and advice as well as great quality yarns at incredible prices! Would you like to use our patterns for other than personal use? You can read what you are allowed to do in the Copyright text at the bottom of all our patterns. Happy crafting!
Comments / Questions (41)
Buonasera ho qualche difficoltà nel fare gli aumenti raglan dello sprone, invece che aumentare 16 maglie ogni 4 ferri posso aumentare 8 maglie ogni 2 ferri usando il metodo più semplice? Grazie lucia
14.10.2021 - 22:00DROPS Design answered:
Può lavorare in questo modo se preferisce, ma la vestibilità del capo potrebbe risultare diversa. Buon lavoro!
14.10.2021 - 23:34Buona sera ho una domanda in merito al segnapunti lo devo spostare a ogni ferro o solo quando ho realizzato l'aumento per il raglan? È forse un errore dove nella spiegazione del raglan scrivete 24 al posto di 2 aumenti? Grazie mille
09.10.2021 - 23:03DROPS Design answered:
Buonasera Lucia, i segnapunti per gli aumenti vanno spostati come indicato, quello sullo sprone rimane fisso. Per gli aumenti, abbiamo corretto il testo, sono 2 maglie. Grazie per la segnalazione. Buon lavoro!
10.10.2021 - 17:23Hæhæ. Ég átta mig ekki á því hvernig á að sauma saman fram-og bakstykki þannig að saumurinn verði flatur. Á garðaprjónið að sjást þegar búið er að sauma stykkin saman. Með fyrirfram þökk.
30.09.2021 - 22:16DROPS Design answered:
Blessuð Unnur. Þú saumar flíkina í ystu lykkjubogana í kantlykkjurnar. Þessar kantlykkjur eru til þess að sauma flíkina saman og sjást ekki frá réttu þegar búið er að sauma. Gangi þér vel.
05.10.2021 - 16:34Bonjour, Est il possible de tricoter directement le dos et les 2 devants après la séparation des manches? A quoi sert de les tricoter séparément ? Merci beaucoup !
14.08.2021 - 10:58DROPS Design answered:
Bonjour Anne, c'est a cause des fentes côtés. Vous pouvez modifier le modele et tricoter le dos et 2 devants ensemble, et les separer ensuite pour faire les fentes, Bon tricot!
15.08.2021 - 20:52Thank you very much for your prompt answer. Very useful! Kind regards.
13.08.2021 - 18:08Are the instructions for this pattern available for knitting it throughout with traditional straight needles? Thanks!
11.08.2021 - 19:37DROPS Design answered:
Dear Emeraude, this pattern is not available written specifically for straight needles, however we do have a lesson about how to convert pattern for them HERE. Happy Stitching!
12.08.2021 - 05:03Bonjour. J’ai utilisé le convertisseur pour une alternative avec 2 fils mais celui ci ne m’a pas trouvé de solution de remplacement. Auriez-vous une idée pour résoudre mon problème? Merci
04.03.2021 - 10:34DROPS Design answered:
Bonjour Mme Hourdebaigt, pour voir les alternatives proposées pour remplacer 1 fil DROPS Melody par 2 autres fils, utilisez le convertisseur en indiquant la quantité pour la taille et 1 fil Melody - Retrouvez d'autres infos sur les alternatives ici - Rappelez-vous de toujours bien faire votre échantillon au préalable pour vérifier si la texture vous convient avec les alternatives choisies. Votre magasin saura également vous conseiller, même par mail ou téléphone. Bon tricot!
04.03.2021 - 11:40Hallo, ich verstehe die Anleitung. Nur an einer Stelle bei den Ärmeln nicht: "und zusätzlich je 1 Masche aus den 8-8-8-10-10-12 Maschen an der unteren Ärmelmitte auffassen". Was bedeutet das? Und gibt es dazu eine Anleitung? Danke und viele Grüße Gila
10.01.2021 - 19:47DROPS Design answered:
Liebe Frau Antony, diese Lektion zeigt, wie man einen Pullover von oben nach unten strickt - das Foto 18B zeigt hier, wie man diese 8-8-8-10-10-12 Maschen in die 8-8-8-10-10-12 am End der Passen angeschlagten Maschen auffassen soll. Viel Spaß beim Stricken!
11.01.2021 - 09:55Drops 210-3. Er lige gået i gang med opskriften. Jeg mangler at der står hvor knaphullerne skal være. Er det noget man selv skal finde ud af?
28.10.2020 - 19:19DROPS Design answered:
Hej Mariann. Du hittar info om det under KNAPPHULL längst upp på oppskriften. Mvh DROPS Design
29.10.2020 - 07:32Hej! Stickar en kofta i melody (053) och har fastnat rejält i momentet att öka 4m. för raglan. Hur jag än räknar och funderar blir ökningen 5m. Alltså en maska för mycket. Jag vill ha hjälp och tips med detta. Vad kan jag göra för fel? Tack på förhand. Hälsningar Marianne.
20.10.2020 - 16:09DROPS Design answered:
Hej Marianne. Har du sett denna video? Där kan du se hur man ska göra för att öka 4 maskor i en maska. Mvh DROPS Design
21.10.2020 - 09:54