DROPS Air
DROPS Air
65% Alpaca, 28% Polyamide, 7% Wool
from 5.30 € /50g
Get the yarn to make this pattern from 37.10€.

The yarn cost is calculated from the pattern’s smallest size and the yarn’s cheapest product type. Looking for an even better price? You might find it on the DROPS Deals!

DROPS SS24

Graceful Cables

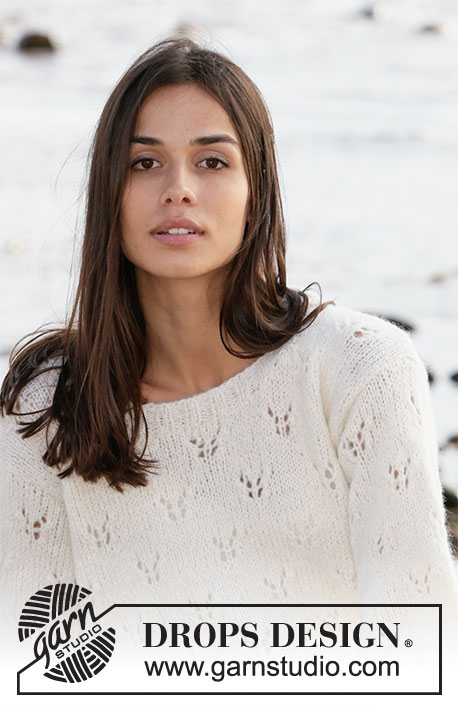
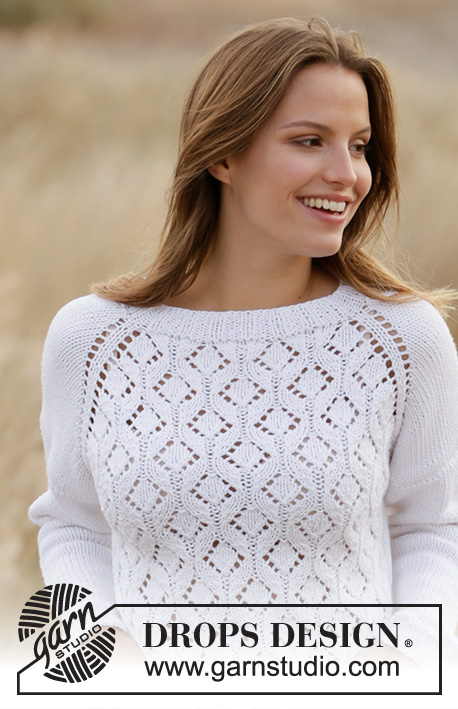
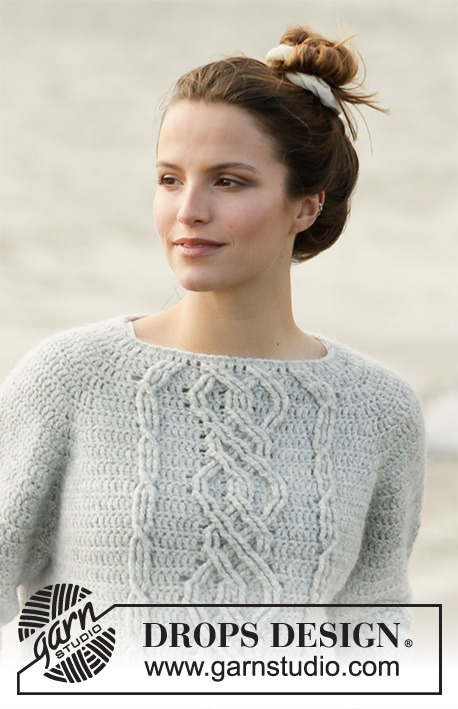
Crocheted jumper with raglan in DROPS Air. The piece is worked top down with cables and relief-stitches. Sizes XS - XXL.

DROPS 210-12
DROPS Design: Pattern no ai-268
Yarn group C or A + A
-------------------------------------------------------

SIZES:
XS - S - M - L - XL – XXL

MATERIALS:
DROPS AIR from Garnstudio (belongs to yarn group C)
350-400-450-500-500-550 g colour 03, pearl grey

CROCHET TENSION:
14 treble crochets in width and 8.5 rows in height on 10 x 10 cm. 12 rounds with pattern A.1 measures 10.5 cm in height.

CROCHET HOOK:
DROPS CROCHET HOOK SIZE 5 MM.
Hook size is only a guide. If you get too many stitches on 10 cm, change to a larger hook size. If you get too few stitches on 10 cm, change to a smaller hook size.

-------------------------------------------------------

Alternative Yarn – See how to change yarns here
Yarn Groups A to F – Use the same pattern and change the yarn here
Yarn usage using an alternative yarn – Use our yarn converter here

-------------------------------------------------------

DROPS Air
DROPS Air
65% Alpaca, 28% Polyamide, 7% Wool
from 5.30 € /50g
Get the yarn to make this pattern from 37.10€.

The yarn cost is calculated from the pattern’s smallest size and the yarn’s cheapest product type. Looking for an even better price? You might find it on the DROPS Deals!

Pattern instructions

-------------------------------------------------------

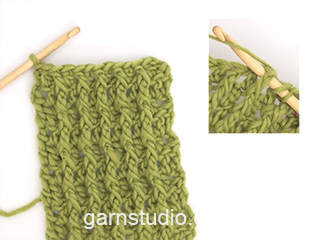
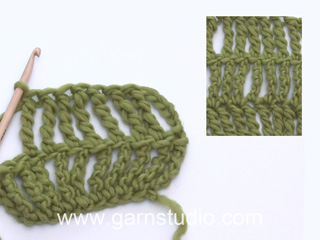
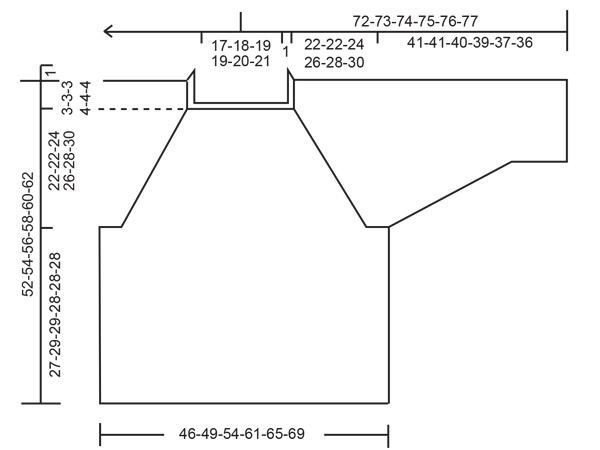
EXPLANATIONS FOR THE PATTERN:

-------------------------------------------------------

CROCHET TIP:
The first round of treble crochets is worked from the right side. Finish the round with 1 slip stitch in the 3rd chain stitch at the beginning of the round. Turn the piece and work the next round from the wrong side. Finish the round with 1 slip stitch in the first chain stitch at the beginning of the round. Turn the piece and work the next round from the right side.
Continue back and forth like this, with alternately a round of treble crochets from the right side and a round of double crochets from the wrong side.

CHAIN STITCH:
If you work outermost on the hook the chain stitch will often be too tight; 1 chain stitch should be as long as 1 double crochet/treble crochet is wide . 

CROCHET INFORMATION:
At the beginning of each round of treble crochets work 3 chain stitches; these chain stitches do not replace the first treble crochet. The round finishes with 1 slip stitch in the first treble crochet on the round.
At the beginning of each round of double crochets work 1 chain stitch; this chain stitch does not replace the first double crochet. The round finishes with 1 slip stitch in the first double crochet on the round.

RAGLAN:
Increase on each side of the marker threads in each transition between body and sleeves (= 8 stitches increased on the round).
Increase after the marker thread as follows: Work 1 stitch in the first stitch, work 2 stitches in the next stitch (= 1 stitch increased).
Increase before the marker thread as follows: Work until there are 2 stitches left before the marker thread, work 2 stitches in the first stitch (= 1 stitch increased), 1 stitch in the next stitch.
The new stitches are worked into pattern A.1; i.e. every other round of treble crochets and double crochets (on front and back pieces, the first 4 increases are drawn into each side of diagram A.2).

PATTERN: 
See diagrams A.1 to A.3.

DECREASE TIP-1 (for sleeves):
Decrease 1 double crochet on each side of the marker thread as follows: Work until there are 3 stitches left before the marker thread, work 2 DOUBLE CROCHETS TOGETHER – read description below, work 1 double crochet in each of the next 2 double crochets (the marker thread sits between these stitches), work 2 double crochets together.

WORK 2 DOUBLE CROCHETS TOGETHER:
* Insert the hook through the next stitch, pick up the strand *, work from *-* a total of 2 times, make 1 yarn over and pull it through all 3 loops on the hook (= 1 stitch decreased).

DECREASE TIP-2 (evenly spaced):
To work out how to decrease evenly, count the total number of stitches on the round (e.g. 78 stitches) and divide by number of decreases to be made (e.g. 14) = 5.6. 
In this example decrease by alternately crocheting together each 4th and 5th double crochet and each 5th and 6th double crochet.

-------------------------------------------------------

START THE PIECE HERE:

-------------------------------------------------------

JUMPER – SHORT OVERVIEW OF THE PIECE:
The piece is worked top down. First work the yoke and then divide for body and sleeves. The neck is worked to finish, where stitches are decreased evenly on the round. The whole piece is worked in the round at the same time as it is turned after each round – read CROCHET TIP.

YOKE:
Work 78-78-82-86-90-94 chain stitches with hook size 5 mm and Air – read CHAIN STITCH and form them into a ring with 1 slip stitch in the first chain stitch.
ROUND 1 (= right side): Work 3 chain stitches – read CROCHET INFORMATION, 1 treble crochet in each of the 78-78-82-86-90-94 chain stitches on the round, finish with 1 slip stitch in the 3rd chain stitch at the beginning of the round, turn the piece – remember CROCHET TIP.
Now insert 4 marker threads from the wrong side as follows:
Insert 1 marker thread at the beginning of the round (= in transition between back piece and left sleeve), skip the next 8-8-8-10-10-12 stitches, insert a marker thread here (= in transition between left sleeve and front piece), skip the next 31-31-33-33-35-35 stitches, insert a marker thread here (= in transition between front piece and right sleeve), skip the next 8-8-8-10-10-12 stitches, insert a marker thread here (= in transition between right sleeve and back piece), there are 31-31-33-33-35-35 stitches left on the round after the last marker thread.
Allow the threads to follow you work onwards. Insert a marker on the front piece in the first row of chain stitches worked. The yoke will be measured from here!
On the next round start to increase to RAGLAN – read description above, at the same time as you work pattern as follows:
ROUND 2 (= wrong side): Work * A.1 over the first 8-8-8-10-10-12 stitches, the next marker thread sits here, A.1 over the next 3-3-4-4-5-5 stitches, A.2 over the next 25 stitches, A.1 over the next 3-3-4-4-5-5 stitches, the next marker thread sits here *, work from *-* 1 more time on the round. REMEMBER THE CROCHET TENSION!
Continue back and forth working the pattern like this and increase to raglan on every round 11-13-15-17-19-20 times and then every 2nd round 4 times in all sizes (= a total of 15-17-19-21-23-24 times) = 198-214-234-254-274-286 stitches.
When A.2 has been completed in height, repeat A.3 over A.2 to finished length.
When all the increases to raglan are finished, continue with pattern until the piece measures 22-22-24-26-28-30 cm from the neck-edge mid front and down – adjust so the next round is a round of double crochets and is worked from the wrong side.

Cut the strand. Now divide the piece for body and sleeves. The transition between body and sleeves is no longer at the marker threads. In sizes XS, S and M start the round 1-1-1 stitch before the first marker thread (seen from the wrong side) and in sizes L, XL and XXL start the round 1-1-2 stitches after the first marker thread (seen from the wrong side). Move the marker thread here and work the next round with pattern as before): Fasten the strand with 1 slip stitch in the first stitch after the new marker thread (= beginning of the round), work 1 chain stitch (replaces the first double crochet on the round) work 6-6-6-8-8-10 loose chain stitches (= in side under the sleeve), skip the next 40-44-48-50-54-56 stitches for the sleeve, work the next 59-63-69-77-83-87 stitches (= front piece), work 6-6-6-8-8-10 loose chain stitches (= in side under the sleeve), skip the next 40-44-48-50-54-56 stitches for the sleeve, work the next 59-63-69-77-83-87 stitches (= back piece) and finish the round with 1 slip stitch in the first chain stitch worked. Body and sleeves are finished separately. Cut the strand. THE PIECE IS NOW MEASURED FROM HERE!

BODY:
= 130-138-150-170-182-194 stitches. Insert 1 marker thread on each side of the piece, in the middle of the new stitches cast on under each sleeve (= 3-3-3-4-4-5 new stitches on each side of the marker threads). There are 65-69-75-85-91-97 stitches between the marker threads. Start from the right side in the 3rd-3rd-3rd-4th-4th-5th chain stitch mid under the sleeve and work pattern as before – remember CROCHET TIP AND CROCHET INFORMATION. When the piece measures 27-29-29-28-28-28 cm from the division – adjust so you finish after a round of treble crochets, the jumper is finished. The piece measures approx. 52-54-56-58-60-62 cm from the shoulder down.

SLEEVES:
Fasten the strand in the 3rd-3rd-3rd-4th-4th-5th chain stitch mid under the sleeve and work A.1 in the round as before – remember CROCHET INFORMATION and CROCHET TIP. Work 1 stitch in each of the 3-3-3-4-4-5 loose chain stitches worked under the sleeve = 46-50-54-58-62-66 stitches on the round. When the sleeve measures 4 cm from the division decrease 1 stitch on each side of the marker thread – read DECREASE TIP-1. Decrease like this every 6-5-4-3-2-2 cm (decrease on a round of double crochets) a total of 5-6-7-9-10-11 times = 36-38-40-40-42-44 stitches. Continue working until the sleeve measures approx. 41-41-40-39-37-36 cm – adjust so you finish after a round of treble crochets. Cut and fasten the strand. Work the other sleeve in the same way.

NECK-EDGE:
Work 1 double crochet in each chain stitch and decrease at the same time 14-12-12-12-12-12 double crochets evenly spaced on the round – read DECREASE TIP-2 = 64-66-70-74-78-82 double crochets. Cut and fasten the strand.

This pattern has been corrected.

Updated online: 02.03.2021
Correction in symbol explanation:
= RELIEF-QUADRUPLE-TREBLE CROCHET
... * make 1 yarn over and pull it through the first 2 loops on the hook * ...

Diagram

symbols = this round has already been worked; start at arrow!
symbols = start here
symbols = double crochet in stitch
symbols = treble crochet in stitch
symbols = RELIEF-TRIPLE TREBLE CROCHET (only worked on rounds of treble crochets): Work 1 triple-treble crochet around 1 treble crochet from the previous round of treble crochets (do not work in the loops but around the treble crochet itself). The circle at the end of the triple-treble crochet shows which treble crochet from the previous round of treble crochets you are working around. Line-start = the round where this triple-treble crochet starts.
symbols = RELIEF-TRIPLE-TREBLE CROCHET (only worked on rounds of treble crochets): Work 1 triple-treble crochet around 1 triple-treble crochet/quadruple-treble crochet from the previous round of treble crochets (do not work in the loops but around the treble crochet/quadruple-treble crochet itself). The black spot at the end of the triple-treble crochet shows which triple-treble crochet/quadruple-treble crochet from the previous round of treble crochets you are working around. Line-start = the round where this triple-treble crochets starts.
symbols = RELIEF-QUADRUPLE-TREBLE CROCHET (only worked on rounds of treble crochets): Work 1 quadruple-treble crochet around 1 triple-treble crochet/quadruple-treble crochet from the previous round of treble crochets (do not work in the loops but around the treble crochet/quadruple-treble crochet itself). The square at the end of the quadruple-treble crochet shows which triple-treble crochet/quadruple-treble crochet from the previous round of treble crochets you are working around. Line-start = the round where this quadruple-treble crochet starts. Work 1 quadruple-treble crochet as follows: Make 4 yarn overs, insert the hook around the stitch, pick up the strand, * make 1 yarn over and pull it through the first 2 loops on the hook *, work from *-* a total of 5 times = 1 stitch.
symbols = RELIEF-TRIPLE-TREBLE CROCHET (only worked on rounds of treble crochets): Work 1 triple-treble crochet around 1 triple-treble crochet/quadruple-treble crochet from the previous round of treble crochets (do not work in the loops but around the treble crochet/quadruple-treble crochet itself). The star at the end of the triple-treble crochet shows which triple-treble crochet/quadruple-treble crochet from the previous round of treble crochets you are working around. Line-start = the row where this triple-treble crochet starts. NOTE: This triple-treble crochet is worked behind the third triple-/quadruple-treble crochet in the first cable in the diagram, and behind the first triple-/quadruple treble crochet in the last cable in the diagram, so it is cabled as a mirror-image of the first cable in A.2/A.3.
diagram
diagram
Do you have a question? See a list of frequently asked questions (FAQ)

Knitting tension is what determines the final measurements of your work, and is usually measured per 10 x 10 cm. It is provided like so: number of stitches in width x number of rows in height - eg: 19 stitches x 26 rows = 10 x 10 cm.

The knitting tension is very individual; some people knit/crochet loosely while others work tightly. You adjust the knitting tension with the needle size, which is why the suggested needle size is only meant as a guide! You need to adjust this (up or down) to ensure that YOUR knitting tension matches the knitting tension provided in the pattern. If you work with a different knitting tension than provided you will have a different yarn consumption, and your work will have different measurements than what the pattern suggests.

The knitting tension also determines which yarns can replace each other. As long as you achieve the same knitting tension you can replace one yarn with another.

See DROPS lesson: How to measure your tension/gauge

See DROPS video: How to make a gauge tension swatch

The required amount of yarn is provided in grams, eg: 450 g. To calculate how many balls you’ll need you first need to know how many grams are in 1 ball (25g, 50g or 100g). This information is available if you click on the individual yarn quality on our pages. Divide the amount required with the amount of each ball. For example, if each ball is 50g (the most common amount), the calculation will be as follows: 450 / 50 = 9 balls.

The important thing when changing from one yarn to another is that the knitting/crochet tension remains the same. This is so that the measurements of the finished piece will be the same as on the sketch provided. It is easier to achieve the same knitting tension using yarns from the same yarn group. It is also possible to work with multiple strands of a thinner yarn to achieve the knitting tension of a thicker one. Please try our yarn converter. We recommend you to always work a test swatch.

Please NOTE: when changing yarn the garment might have a different look and feel to the garment in the photo, due to individual properties and qualities of each yarn.

See DROPS lesson: Can I use a different yarn than the one mentioned in the pattern?

All our yarns are categorised into yarn groups (from A to F) according to thickness and knitting tension – group A contains the thinnest yarns and group F the thickest. This makes it easier for you to find alternative yarns to our patterns, should you wish to switch yarn. All yarns within the same group have a similar knitting tension and can easily replace each other. However, different yarn qualities have different structures and properties which will give the finished work a unique look and feel.

Click here for an overview of the yarns in each yarn group

At the top of all our patterns you’ll find a link to our yarn calculator, which is a helpful tool should you wish to use a different yarn than suggested. By filling in the yarn quality you wish to replace, the amount (in your size) and number of strands, the calculator will present good alternative yarns with the same knitting tension. Additionally it will tell you how much you’ll require in the new qualities and whether you’ll need to work with multiple strands. Most skeins are 50g (some are 25g or 100g).

If the pattern is worked with multiple colours, every colour will have to be calculated separately. Similarly, if the pattern is worked with several strands of different yarns (for example 1 strand Alpaca and 1 strand Kid-Silk) you will have to find alternatives for each, individually.

Click here to see our yarn calculator

Since different yarns have different qualities and textures we have chosen to keep the original yarn in our patterns. However, you can easily find options among our available qualities by using our yarn calculator, or simply pick a yarn from the same yarn group.

It is possible that some retailers still have discontinued yarns in stock, or that someone has a few skeins at home that they would like to find patterns for.

The yarn calculator will provide both alternative yarn as well as required amount in the new quality.

If you think it's hard to decide what size to make, it can be a good idea to measure a garment you own already and like the size of. Then you can pick the size by comparing those measures with the ones available in the pattern's size chart.

You'll find the size chart at the bottom of the pattern.

See DROPS lesson: How to read size chart

The needle size provided in the pattern serves only as a guide, the important thing is to follow the knitting tension. And since knitting tension is very individual, you will have to adjust the needle size to ensure that YOUR tension is the same as in the pattern – maybe you’ll have to adjust 1, or even 2 needle sizes, up or down to achieve the correct tension. For this, we recommend that you work test swatches.

Should you work with a different knitting tension than the one provided, the measurements of the finished garment might deviate from the measurement sketch.

See DROPS lesson: How to measure your tension/gauge

See DROPS video: How to make a tension/gauge swatch

Working a garment top-down provides more flexibility and room for personal adjustment. For example it is easier to try the garment on while working, as well as making adjustments to length of yoke and shoulder caps.

The instructions are carefully explaining every step, in the correct order. Diagrams are adjusted to the knitting direction and are worked as usual.

The diagram depicts all rows/rounds, and every stitch seen from the right side. It is read from bottom to top, from right to left. 1 square = 1 stitch.

When working back and forth, every other row is worked from the right side and every other row is worked from the wrong side. When working from the wrong side, the diagram will have to be worked reversed: from left to right, knit stitches are purled, purl stitches are knit etc.

When working in the round every round is worked from the right side and the diagram are worked from right to left on all rounds.

See DROPS lesson: How to read knitting diagrams

The diagram depicts all rows/rounds, and every stitch seen from the right side. It is worked from bottom to top, from right to left.

When working back and forth every other row is worked from the right side: from right to left and every other row is worked from the wrong side: from left to right.

When working in the round, every row in the diagram are worked from the right side, from right to left.

When working a circular diagram you start in the middle and work your way outwards, counter clockwise, row by row.

The rows usually start with a given number of chain stitches (equivalent to the height of the following stitch), this will either be depicted in the diagram or explained in the pattern.

See DROPS lesson: How to read crochet diagrams

Instructions for working several diagrams after each other on the same row/round, will often be written like so: “work A.1, A.2, A.3 a total of 0-0-2-3-4 times". This means you work A.1 once, then A.2 is worked once, and A.3 is repeated (in width) the number of times provided for your size – in this case like so: S = 0 times, M = 0 times, L=2 times, XL= 3 times and XXL = 4 times.

The diagrams are worked as usual: begin with the first row in A.1, then work the first row in A.2 etc.

See DROPS lesson: How to read knitting diagrams

See DROPS lesson: How to read crochet diagrams

The total width of the garment (from wrist-to-wrist) will be larger in the larger sizes, despite the actual sleeves being shorter. The larger sizes have longer sleeve caps and wider shoulders, so there will be a good fit in all sizes.

The measurement sketch/schematic drawing provides information regarding the full length of the garment. If it’s a jumper or a jacket the length is measured from the highest point on the shoulder closest to the neckline, and straight down to the bottom of the garment. It is NOT measured from the tip of shoulder. Similarly, the length of yoke is measured from the highest point on the shoulder and down to where yoke is split into body and sleeves.

On a jacket measures are never taken along bands, unless specifically stated. Always measure inside band stitches when measuring the length.

See DROPS lesson: How to read a schematic drawing

Diagrams are often repeated on the round or in height. 1 repeat is the diagram the way it appears in the pattern. If it says to work 5 repeats of A.1 in the round, then you work A.1 a total of 5 times after/next to each other in the round. If it says to work 2 repeats of A.1 vertically/in height you work the entire diagram once, then begin again at the start and work the entire diagram one more time.

Chain stitches are slightly narrower than other stitches and to avoid working the cast-on edge too tight, we simply chain more stitches to begin with. The stitch count will be adjusted on the following row to fit the pattern and measurement sketch.

The rib edge is more elastic and will contract slightly compared to, for example, stocking stitch. By increasing before the rib edge, you avoid a visible difference in width between the rib edge and the rest of the body.

It’s very easy to cast off too tightly, and by making yarn overs while casting off (and simultaneously casting these off) you avoid a too tight cast off edge.

See DROPS video: How to bind off with yarn overs (yo)

To achieve an even increase (or decrease) you can increase on, for example: every 3rd and 4th row alternately, like so: work 2 rows and increase on the 3rd row, work 3 rows and increase on the 4th. Repeat this until the increase is complete.

See DROPS lesson: Increase or decrease 1 st on every 3rd and 4th row alternately

Should you prefer to work in the round instead of back and forth, you may of course adjust the pattern. You’ll need to add steeks mid-front (usually 5 stitches), and follow the instructions. When you would normally turn and work from the wrong side, simply work across the steek and continue in the round. At the end you’ll cut the piece open, pick up stitches to work bands, and cover the cut edges.

See DROPS video: How to knit steeks and cut open

Should you prefer to work back and forth instead of in the round, you may of course adjust the pattern so you work the pieces separately and then assemble them at the end. Divide the stitches for the body in 2, add 1 edge stitch in each side (for sewing) and work the front and back pieces separately.

See DROPS lesson: Can I adapt a pattern for circular needles into straight needles?

Pattern repeats can vary slightly in the different sizes, in order to get the correct proportions. If you’re not working the exact same size as the garment in the photo, yours might deviate slightly. This has been carefully developed and adjusted so that the complete impression of the garment is the same in all sizes.

Make sure to follow instructions and diagrams for your size!

If you have found a pattern you like which is available in women’s size it’s not very difficult to convert it to men’s size. The biggest difference will be the length of sleeves and body. Start working on the women size that you think would fit across the chest. The additional length will be worked right before you cast off for the armhole/sleeve cap. If the pattern is worked top-down you can add the length right after the armhole or before the first decrease on sleeve.

Regarding additional yarn amount, this will depend on how much length you add, but it is better with a skein too many than too few.

All yarns will have excess fibres (from production) that might come off as lint or shedding. Brushed yarns (ie hairier yarns) have more of these loose, excess fibres, causing more shedding.

Shedding also depends on what is worn under or over the garment, and whether this pulls at the yarn fibres. It’s therefore not possible to guarantee that there will be no shedding

Below are some tips on how to get the best result when working with hairier yarns:

1. When the garment is finished (before you wash it) shake it vigorously so the looser hairs come off. NOTE: do NOT use a lint roller, brush or any method that pulls at the yarn.

2. Place the garment in a plastic bag and put it in your freezer - the temperature will cause the fibres to become less attached to each other, and excess fibres will come off easier.

3. Leave in the freezer for a few hours before taking it out and shaking it again.

4. Wash the garment according to the instructions on the yarn label.

Pilling is a natural process that happens to even the most exclusive of fibers. It's a natural sign of wear and tear that is hard to avoid, and that is most visible in high friction areas of your garment like a sweater's arms and cuffs.

You can make your garment look as new by removing the pilling, using a fabric comb or a pill/lint remover.

Still can't find the answer you need? Then scroll down and leave your question so one of our experts can try to help you. This will be done normally within 5 to 10 working days.
In the meantime, you can read the questions and answers that others have left to this pattern or join the DROPS Workshop on Facebook to get help from fellow knitters/crocheters!

You might also like...

Post a comment to pattern DROPS 210-12

We would love to hear what you have to say about this pattern!

If you want to leave a question, please make sure you select the correct category in the form below, to speed up the answering process. Required fields are marked *.

Comments / Questions (31)

country flag Julie wrote:

Hej. Jeg er har hæklet 2. omgang, men er i tvivl om hvad jeg skal gøre med 3 række, altså efter jeg har hæklet fastmasker med udtagninger. Kan nemlig ikke få det til at passe med de 8 masker af A1, 3 masker af A1, 25 masker af A2 og 3 masker af A1, når der er foretaget udtagninger. Dermed passer det heller ikke med mærketrådene. Håber i kan hjælpe og måske uddybe lidt mere.

22.06.2020 - 10:47

DROPS Design answered:

Hej Julie, Har du set videoen, her viser vi fra 2.række i diagrammet:

How to crochet cables and relief-stiches from Garnstudio Drops design on Vimeo.

25.06.2020 - 09:08

country flag Elena wrote:

I love the model but English not my first language and the instructions are very difficult for me. If you want to attract more people,I would suggest video tutorials so that more people can do this and more models.

29.05.2020 - 11:37

country flag Kayleigh wrote:

It would be much easier to understand if you just simply wrote the stitches row by row rather than forcing the person to go back and forth around the page to try and remember what to do. I've managed to get to row 2 but get stuck. How do I proceed? It says to do a1 for 10 stitches (for an XL) but a1 is a row of unfilled ovals which means double crochet? So i did 10 double crochet? Eventually it says to do 25 a2? a2 is a huge section of diagram, which stitch am i doing?! This is really not easy

13.05.2020 - 03:16

DROPS Design answered:

Dear Mrs Kayleigh, first row in both diagrams are the one with the arrow, so that on the first row you work 1 dc in the stitch for both A.1 and A.2. So that the first round in pattern is worked as follows: *A.1 (= 10 sts), marker thread, A.1 (= 4 sts), A.2 (= 25 sts on first row = the one with the arrow), A.1 (= 4 sts), marker thread* and repeat from *-* one more time. You can find here how to read diagrams. Happy crocheting!

13.05.2020 - 08:44

country flag Elina wrote:

The same in English: I'm eagerly waiting for Finnish translation for this pattern. When it will be published?

20.04.2020 - 13:53

DROPS Design answered:

Dear Elina. Here you can find the finnish translation: https://www.garnstudio.com/pattern.php?id=9537&cid=11 Happy crochetting!

22.04.2020 - 20:08

country flag Elina wrote:

Onko tämä ohje tarkoitus suomentaa jossain vaiheessa? Muilla kielillä ohje on ollut olemassa jo kuukausia.

16.04.2020 - 12:08

DROPS Design answered:

Hei, kyseinen ohje on nyt käännetty suomeksi.

13.05.2020 - 17:47

country flag Janny Kruimink wrote:

Ik kom niet uit de beschrijving. De eerste toer van de pas zijn stokjes, goede kant. Dan een toer vasten, markeerdraden, verkeerde kant. Dan begint het patroon A1 etc. in de 3e toer? En begint in de 3e toer ook de raglan? Ik vind het onduidelijk beschreven.

26.03.2020 - 21:40

DROPS Design answered:

Dag Janny,

Nadat je de eerste toer hebt gehaakt voeg je markeerdraden in, zonder te haken, om de raglanlijnen aan te geven. Dan begin je vanaf de 2e toer (op de verkeerde kant) tegelijkertijd met de raglanminderingen en het telpatroon. Dus je volgt het patroon en bij de markeerdraden maak je tegelijkertijd meerderingen. Hoe je meerdert staat boven aan in het patroon. Hoeveel je meerdert staat bij de beschrijving (neem het getal van jouw maat.) De eerste toer in telpatroon A.1, waar een zwarte ster bij staat haak je niet, dit is de toer met stokjes die je zojuist gehaakt hebt en is in het telpatroon getekend om aan te geven hoe je de 2e toer hierin moet haken.

27.03.2020 - 12:32

country flag Caroline wrote:

Hej! Vill bara påpeka att det är fel i diagrammet. Ni har missat att spegelvända första flätan på sista varvet i A.3. Nu ser det ut som att den på detta varv ska virkas på samma sätt som den sista flätan.

12.03.2020 - 16:14

country flag María Jose wrote:

Es muy chulo, tenía ganas de hacer un patrón así. Gracias

28.02.2020 - 00:27

country flag Mariëlle wrote:

Zijn er meer foto's van het haakwerk Ik kom niet uit de beschrijving. De trui wordt in het rond gehaakt. Wat is nu het verschil met de pas en het lijf. Ik moet 48 steken overslaan voor de mouwen. Moet ik dan eerst afhechten en dan weer aanzetten, anders heb je toch een draad?

27.02.2020 - 09:57

DROPS Design answered:

Dag Mariëlle,

Helaas zijn dit de enige foto's die we tot ons beschikking hebben. De pas is waar het lijf en de mouwen in een stuk in de rondte worden gebreid. Het lijf is het gedeelte vanaf de oksels, dus zonder de mouwen. Je haakt dus een aantal lossen en slaat de steken van de mouwen over en gaat gelijk verder met de volgende steek op het lijf, zonder een draad o.i.d. Hierdoor ontstaat a.h.w. een stukje korte mouw of armsgat. De mouw haak je hier later aan.

28.02.2020 - 19:22

country flag PAOLA wrote:

IO SONO UNA PRINCIPIANTE E NON RIESCO A SEGUIRE LO SCHEMA MI POTRESTE DARE UN AIUTO?NELLA LEGENDA LA MAGLIA MASSA VOLEVA ESSERE UNA MAGLI A BASSA?

08.02.2020 - 18:27

DROPS Design answered:

Buongiorno Paola. Abbiamo corretto il testo: è una maglia bassa. Buon lavoro!

08.02.2020 - 20:57