DROPS Air
DROPS Air
65% Alpaca, 28% Polyamide, 7% Wool
from 6.45 $ /50g
Get the yarn to make this pattern from 32.25$.

The yarn cost is calculated from the pattern’s smallest size and the yarn’s cheapest product type. Looking for an even better price? You might find it on the DROPS Deals!

DROPS SS24

Tulip Ring

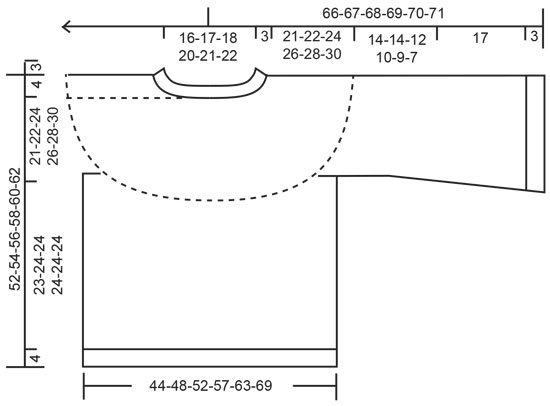
Knitted sweater with round yoke in DROPS Air. The piece is worked top down with lace pattern and trumpet-sleeves. Sizes S - XXXL.

DROPS 212-3
DROPS Design: Pattern no ai-261
Yarn group C or A + A
-------------------------------------------------------

SIZES:
S - M - L - XL - XXL – XXXL

Finished measurements:
Chest measurements: 88-96-104-114-126-138 cm = 34 5/8”- 37 3/4”-41”-45”-49 1/2”-54 1/4”
Full length: 52-54-56-58-60-62 cm = 20 1/2"-21 1/4"-22"-22 3/4"-23 5/8"-24 3/8"

All measurements in chart are in cm.

MATERIALS:
DROPS AIR from Garnstudio (belongs to yarn group C)
250-300-300-350-350-400 g color 01, off white

KNITTING GAUGE:
16 stitches in width and 20 rows in height with stockinette stitch = 10 x 10 cm = 4” x 4”.

NEEDLES:
DROPS DOUBLE POINTED NEEDLES SIZE 5.5 MM = US 9.
DROPS CIRCULAR NEEDLE SIZE 5.5 MM = US 9: Length 40 cm = 16” and 80 cm = 32” for stockinette stitch/pattern.
DROPS CIRCULAR NEEDLE SIZE 4.5 MM = US 7: Length 40 cm = 16” and 80 cm = 32” for rib.
Needle size is only a guide. If you get too many stitches on 10 cm = 4”, change to a larger needle size. If you get too few stitches on 10 cm = 4”, change to a smaller needle size.

-------------------------------------------------------

Alternative Yarn – See how to change yarns here
Yarn Groups A to F – Use the same pattern and change the yarn here
Yarn usage using an alternative yarn – Use our yarn converter here

-------------------------------------------------------

DROPS Air
DROPS Air
65% Alpaca, 28% Polyamide, 7% Wool
from 6.45 $ /50g
Get the yarn to make this pattern from 32.25$.

The yarn cost is calculated from the pattern’s smallest size and the yarn’s cheapest product type. Looking for an even better price? You might find it on the DROPS Deals!

Pattern instructions

NOTE: This pattern is written in American English. All measurements in charts are in cm. For conversion from inches to cm - click here. There are different terms for crocheting in American and British English. If this pattern includes crochet, click for "crochet terms" here. For this pattern in British English, please click here.
-------------------------------------------------------

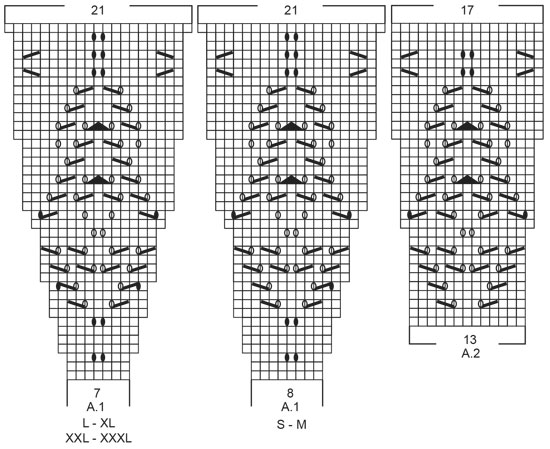
EXPLANATIONS FOR THE PATTERN:

-------------------------------------------------------

PATTERN:
See diagrams A.1 and A.2. Choose diagram for your size (applies to A.1).

INCREASE TIP (evenly spaced):
To work out how to increase evenly, count the total number of stitches on the needle (e.g. 76 stitches) and divide by the number of increases to be made (e.g. 4) = 19.
In this example, increase by making 1 yarn over after each 19th stitch. On the next round work the yarn overs twisted to avoid holes.

DECREASE TIP (for sleeves):
Decrease 1 stitch on each side of the marker thread as follows: Work until there are 3 stitches left before the marker thread, knit 2 together, knit 2 (marker thread sits between these 2 stitches), slip 1 stitch as if to knit, knit 1 and pass the slipped stitch over the knitted stitch.

BINDING-OFF TIP:
To avoid the bind-off edge being tight you can bind off with a larger size needle. If the edge is still tight, make 1 yarn over after approx. each 4th stitch at the same time as binding off and the yarn overs are bind off as normal stitches.

-------------------------------------------------------

START THE PIECE HERE:

-------------------------------------------------------

SWEATER – SHORT OVERVIEW OF THE PIECE:
The neck and yoke are worked in the round with circular needle, top down from mid back. The yoke is divided for body and sleeves and the body continued in the round with circular needle. The sleeves are worked in the round with short circular needle/double pointed needles, top down.

NECK:
Cast on 76-80-84-88-92-96 stitches with circular needle size 4.5 mm = US 7 and Air. Knit 1 round, then work rib (= knit 2 / purl 2) in the round for 3 cm = 1 1/8”.
When the rib is finished, knit 1 round where you increase 4-8-0-3-6-9 stitches evenly spaced – read INCREASE TIP = 80-88-84-91-98-105 stitches. Knit 1 round (yarn overs knitted twisted).
Change to circular needle size 5.5 mm = US 9 and insert 1 marker at the beginning of the round (after the rib); the yoke will be measured from this marker!

YOKE:
Work A.1 (choose diagram for your size) a total of 10-11-12-13-14-15 times on the round. REMEMBER THE KNITTING GAUGE! When A.1 has been completed there are 210-231-252-273-294-315 stitches on the needle. The piece measures approx. 20 cm = 8” from the marker. Continue with stockinette stitch and work in the different sizes as follows:

Size S:
Knit 1 round where you increase 6 stitches evenly spaced = 216 stitches. Continue working until the piece measures 21 cm = 8 1/4” from the marker. Then work as described below:

Sizes M, L, XL, XXL and XXXL:
Work stockinette stitch in the round. When the piece measures 21-22-23-24-25 cm = 8 1/4”-8 3/4”-9”-9 1/2”-9 3/4”, increase 7-10-9-16-17 stitches evenly spaced = 238-262-282-310-332 stitches. Continue working until the piece measures 22-24-26-28-30 cm = 8 3/4”-9 1/2”-10 1/4”-11”-11 3/4” from the marker. Then work as described below.

All sizes:
Now divide the yoke for body and sleeves. In sizes M, XL and XXXL there are an odd number of A.1 on the round; to make the pattern symmetrical mid-front displace the beginning of the round so it is no longer mid-back in these sizes.
The next round is worked as follows: Work the first 31-25-37-31-45-41 stitches (= approx. half back piece), place the next 46-50-56-60-64-66 stitches on a thread for the sleeve, cast on 8-8-8-10-10-10 new stitches on the needle (= in side under the sleeve), work the next 62-69-75-81-91-100 stitches (= front piece), place the next 46-50-56-60-64-66 stitches on a thread for the sleeve, cast on 8-8-8-10-10-10 new stitches on the needle (= in side under the sleeve), work the remaining 31-44-38-50-46-59 stitches (= approx. half back piece). Body and sleeves are finished separately. THE PIECE IS NOW MEASURED FROM HERE.

BODY:
= 140-154-166-182-202-220 stitches. Work stockinette stitch in the round. When the piece measures 23-24-24-24-24-24 cm = 9”-9 1/2”-9 1/2”-9 1/2”-9 1/2”-9 1/2” from the division, knit 1 round where you increase 16-18-18-18-22-24 stitches evenly spaced = 156-172-184-200-224-244 stitches.
Change to circular needle size 4.5 mm = US 7 and work rib (= knit 2 / purl 2) for 4 cm = 1 1/2”. Bind off with knit over knit and purl over purl – read BINDING-OFF TIP. The sweater measures approx. 52-54-56-58-60-62 cm = 20 1/2"-21 1/4"-22"-22 3/4"-23 5/8"-24 3/8" from the shoulder down.

SLEEVE:
Place the 46-50-56-60-64-66 stitches from the thread on the one side of the piece on short circular needle/double pointed needles size 5.5 mm = US 9 and knit up 1 stitch in each of the 8-8-8-10-10-10 stitches = 54-58-64-70-74-76 stitches. Insert a marker thread in the middle of the 8-8-8-10-10-10 stitches under the sleeve(4-4-4-5-5-5 new stitches on each side of the thread). Allow the thread to follow your work onwards; it will be used when decreasing under the sleeve. Work stockinette stitch in the round.
When the sleeve measures 4-4-4-2-2-2 cm = 1 1/2”-1 1/2”-1 1/2”-3/4”-3/4”-3/4” from the division, start to decrease under the sleeve – read DECREASE TIP. Decrease like this every 5-5-1½-1-1-1 cm = 2”-2”-1/2”-3/8”-3/8”-3/8” a total of 2-3-6-9-7-5 times = 50-52-52-52-60-66 stitches.
When the sleeve measures 14-14-12-10-9-7 cm = 5 1/2”-5 1/2”-4 3/4”-4”-3 1/2”-2 3/4” from the division (shorter measurements in larger sizes due to longer yoke), knit 1 round where you adjust the number of stitches to 52-52-52-52-56-60 stitches (i.e. in size S increase 2 stitches, in sizes M, L, XL do not increase or decrease and in sizes XXL and XXXL decrease 4-6 stitches). Now work pattern in the round as follows: * Knit 0-0-0-0-1-2, work A.2 *, work from *-* a total of 4 times on the round. When A.2 has been completed in height there are 68-68-68-68-72-76 stitches on the needles.
Knit 1 round where you increase 4 stitches evenly spaced in all sizes = 72-72-72-72-76-80 stitches. Change to circular needle size 4.5 mm = US 7 and work rib (= knit 2 / purl 2) for 3 cm = 1 1/8”. Bind off with knit over knit and purl over purl. The sleeve measures 34-34-32-30-29-27 cm = 13 3/8”-13 3/8”-12 1/2”-11 3/4”-11 3/8”-10 5/8”. Work the other sleeve in the same way.

Diagram

All measurements in charts are in cm.

symbols = knit
symbols = between 2 stitches make 1 yarn over. On the next round knit the yarn over – leaves a hole
symbols = between 2 stitches make 1 yarn over. On the next round knit the yarn over twisted to avoid a hole
symbols = knit 2 together
symbols = slip 1 stitch as if to knit, knit 1 and pass the slipped stitch over the knitted stitch
symbols = slip 1 stitch as if to knit, knit 2 together and pass the slipped stitch over the knitted together stitches
diagram
diagram

Each of our patterns has specific tutorial videos to help you.

Do you have a question? See a list of frequently asked questions (FAQ)

Knitting tension is what determines the final measurements of your work, and is usually measured per 10 x 10 cm. It is provided like so: number of stitches in width x number of rows in height - eg: 19 stitches x 26 rows = 10 x 10 cm.

The knitting tension is very individual; some people knit/crochet loosely while others work tightly. You adjust the knitting tension with the needle size, which is why the suggested needle size only serve as a guide! You need to adjust this (up or down) to ensure that YOUR knitting tension matches the knitting tension provided in the pattern. If you work with a different knitting tension than provided you will have a different yarn consumption, and your work will have different measurements than what the pattern suggests.

The knitting tension also determines which yarns can replace each other. As long as you achieve the same knitting tension you can replace one yarn with another.

See DROPS lesson: How to measure your tension/gauge

See DROPS video: How to make a gauge tension swatch

The required amount of yarn is provided in grams, eg: 450 g. To calculate how many balls you’ll need you first need to know how many grams are in 1 ball (25g, 50g or 100g). This information is available if you click on the individual yarn quality on our pages. Divide the amount required with the amount of each ball. For example, if each ball is 50g (the most common amount), the calculation will be as follows: 450 / 50 = 9 balls.

The important thing when changing from one yarn to another is that the knitting/crochet tension remains the same. This is so that the measurements of the finished piece will be the same as on the sketch provided. It is easier to achieve the same knitting tension using yarns from the same yarn group. It is also possible to work with multiple strands of a thinner yarn to achieve the knitting tension of a thicker one. Please try our yarn converter. We recommend you to always work a test swatch.

Please NOTE: when changing yarn the garment might have a different look and feel to the garment in the photo, due to individual properties and qualities of each yarn.

See DROPS lesson: Can I use a different yarn than the one mentioned in the pattern?

All our yarns are categorised into yarn groups (from A to F) according to thickness and knitting tension – group A contains the thinnest yarns and group F the thickest. This makes it easier for you to find alternative yarns to our patterns, should you wish to switch yarn. All yarns within the same group have a similar knitting tension and can easily replace each other. However, different yarn qualities have different structures and properties which will give the finished work a unique look and feel.

Click here for an overview of the yarns in each yarn group

At the top of all our patterns you’ll find a link to our yarn converter, which is a helpful tool should you wish to use a different yarn than suggested. By filling in the yarn quality you wish to replace, the amount (in your size) and number of strands, the converter will present good alternative yarns with the same knitting tension. Additionally it will tell you how much you’ll require in the new qualities and whether you’ll need to work with multiple strands. Most skeins are 50g (some are 25g or 100g).

If the pattern is worked with multiple colours, every colour will have to be converted separately. Similarly, if the pattern is worked with several strands of different yarns (for example 1 strand Alpaca and 1 strand Kid-Silk) you will have to find alternatives for each, individually.

Click here to see our yarn converter

Since different yarns have different qualities and textures we have chosen to keep the original yarn in our patterns. However, you can easily find options among our available qualities by using our yarn converter, or simply pick a yarn from the same yarn group.

It is possible that some retailers still have discontinued yarns in stock, or that someone has a few skeins at home that they would like to find patterns for.

The yarn converter will provide both alternative yarn as well as required amount in the new quality.

If you think it's hard to decide what size to make, it can be a good idea to measure a garment you own already and like the size of. Then you can pick the size by comparing those measures with the ones available in the pattern's size chart.

You'll find the size chart at the bottom of the pattern.

See DROPS lesson: How to read size chart

The needle size provided in the pattern serves only as a guide, the important thing is to follow the knitting tension. And since knitting tension is very individual, you will have to adjust the needle size to ensure that YOUR tension is the same as in the pattern – maybe you’ll have to adjust 1, or even 2 needle sizes, up or down to achieve the correct tension. For this, we recommend that you work test swatches.

Should you work with a different knitting tension than the one provided, the measurements of the finished garment might deviate from the measurement sketch.

See DROPS lesson: How to measure your tension/gauge

See DROPS video: How to make a gauge tension swatch

Working a garment top-down provides more flexibility and room for personal adjustment. For example it is easier to try the garment on while working, as well as making adjustments to length of yoke and shoulder caps.

The instructions are carefully explaining every step, in the correct order. Diagrams are adjusted to the knitting direction and are worked as usual.

The diagram depicts all rows/rounds, and every stitch seen from the right side. It is read from bottom to top, from right to left. 1 square = 1 stitch.

When working back and forth, every other row is worked from the right side and every other row is worked from the wrong side. When working from the wrong side, the diagram will have to be worked reversed: from left to right, knit stitches are purled, purl stitches are knit etc.

When working in the round every round is worked from the right side and the diagram are worked from right to left on all rounds.

See DROPS lesson: How to read knitting diagrams

The diagram depicts all rows/rounds, and every stitch seen from the right side. It is worked from bottom to top, from right to left.

When working back and forth every other row is worked from the right side: from right to left and every other row is worked from the wrong side: from left to right.

When working in the round, every row in the diagram are worked from the right side, from right to left.

When working a circular diagram you start in the middle and work your way outwards, counter clockwise, row by row.

The rows usually start with a given number of chain stitches (equivalent to the height of the following stitch), this will either be depicted in the diagram or explained in the pattern.

See DROPS lesson: How to read crochet diagrams

Instructions for working several diagrams after each other on the same row/round, will often be written like so: “work A.1, A.2, A.3 a total of 0-0-2-3-4 times". This means you work A.1 once, then A.2 is worked once, and A.3 is repeated (in width) the number of times provided for your size – in this case like so: S = 0 times, M = 0 times, L=2 times, XL= 3 times and XXL = 4 times.

The diagrams are worked as usual: begin with the first row in A.1, then work the first row in A.2 etc.

See DROPS lesson: How to read knitting diagrams

See DROPS lesson: How to read crochet diagrams

The total width of the garment (from wrist-to-wrist) will be larger in the larger sizes, despite the actual sleeves being shorter. The larger sizes have longer sleeve caps and wider shoulders, so there will be a good fit in all sizes.

The measurement sketch/schematic drawing provides information regarding the full length of the garment. If it’s a jumper or a jacket the length is measured from the highest point on the shoulder (usually closest to the neckline), and straight down to the bottom of the garment. It is NOT measured from the tip of shoulder. Similarly, the length of yoke is measured from the highest point on the shoulder and down to where yoke is split into body and sleeves.

See DROPS lesson: How to read a schematic drawing

Diagrams are often repeated on the round or in height. 1 repeat is the diagram the way it appears in the pattern. If it says to work 5 repeats of A.1 in the round, then you work A.1 a total of 5 times after/next to each other in the round. If it says to work 2 repeats of A.1 vertically/in height you work the entire diagram once, then begin again at the start and work the entire diagram one more time.

Chain stitches are slightly narrower than other stitches and to avoid working the cast-on edge too tight, we simply chain more stitches to begin with. The stitch count will be adjusted on the following row to fit the pattern and measurement sketch.

The rib edge is more elastic and will contract slightly compared to, for example, stocking stitch. By increasing before the rib edge, you avoid a visible difference in width between the rib edge and the rest of the body.

It’s very easy to cast off too tightly, and by making yarn overs while casting off (and simultaneously casting these off) you avoid a too tight cast off edge.

See DROPS video: How to bind off with yarn overs (yo)

To achieve an even increase (or decrease) you can increase on, for example: every 3rd and 4th row alternately, like so: work 2 rows and increase on the 3rd row, work 3 rows and increase on the 4th. Repeat this until the increase is complete.

See DROPS lesson: Increase or decrease 1 st on every 3rd and 4th row alternately

Should you prefer to work in the round instead of back and forth, you may of course adjust the pattern. You’ll need to add steeks mid-front (usually 5 stitches), and follow the instructions. When you would normally turn and work from the wrong side, simply work across the steek and continue in the round. At the end you’ll cut the piece open, pick up stitches to work bands, and cover the cut edges.

See DROPS video: How to knit steeks and cut open

Should you prefer to work back and forth instead of in the round, you may of course adjust the pattern so you work the pieces separately and then assemble them at the end. Divide the stitches for the body in 2, add 1 edge stitch in each side (for sewing) and work the front and back pieces separately.

See DROPS lesson: Can I adapt a pattern for circular needles into straight needles?

Pattern repeats can vary slightly in the different sizes, in order to get the correct proportions. If you’re not working the exact same size as the garment in the photo, yours might deviate slightly. This has been carefully developed and adjusted so that the complete impression of the garment is the same in all sizes.

Make sure to follow instructions and diagrams for your size!

If you have found a pattern you like which is available in women’s size it’s not very difficult to convert it to men’s size. The biggest difference will be the length of sleeves and body. Start working on the women size that you think would fit across the chest. The additional length will be worked right before you cast off for the armhole/sleeve cap. If the pattern is worked top-down you can add the length right after the armhole or before the first decrease on sleeve.

Regarding additional yarn amount, this will depend on how much length you add, but it is better with a skein too many than too few.

All yarns will have excess fibres (from production) that might come off as lint or shedding. Brushed yarns (ie hairier yarns) have more of these loose, excess fibres, causing more shedding.

Shedding also depends on what is worn under or over the garment, and whether this pulls at the yarn fibres. It’s therefore not possible to guarantee that there will be no shedding

Below are some tips on how to get the best result when working with hairier yarns:

1. When the garment is finished (before you wash it) shake it vigorously so the looser hairs come off. NOTE: do NOT use a lint roller, brush or any method that pulls at the yarn.

2. Place the garment in a plastic bag and put it in your freezer - the temperature will cause the fibres to become less attached to each other, and excess fibres will come off easier.

3. Leave in the freezer for a few hours before taking it out and shaking it again.

4. Wash the garment according to the instructions on the yarn label.

Pilling is a natural process that happens to even the most exclusive of fibers. It's a natural sign of wear and tear that is hard to avoid, and that is most visible in high friction areas of your garment like a sweater's arms and cuffs.

You can make your garment look as new by removing the pilling, using a fabric comb or a pill/lint remover.

Still can't find the answer you need? Then scroll down and leave your question so one of our experts can try to help you. This will be done normally within 5 to 10 working days.
In the meantime, you can read the questions and answers that others have left to this pattern or join the DROPS Workshop on Facebook to get help from fellow knitters/crocheters!

You might also like...

Tulip Ring

Maaike De Grande, Belgium

Tulip Ring

Sylwia, Norway

Tulip Ring

Annalisa, Italy

Post a comment to pattern DROPS 212-3

We would love to hear what you have to say about this pattern!

If you want to leave a question, please make sure you select the correct category in the form below, to speed up the answering process. Required fields are marked *.

Comments / Questions (31)

country flag Floriana wrote:

Buongiorno, io sto facendo questo bellissimo modello ed eseguo una taglia M...devo dividere il lavoro x il corpo e le maniche e c'è scritto che devo spostare l'inizio del giro...cosa vuol dire? Che devo spostare qualche punto dal segnapunti iniziale o che devo trovarmi le 31 maglie iniziali x fare circa la metà del dietro? Grazie mille

28.10.2023 - 14:03

DROPS Design answered:

Buongiorno Floriana, per la taglia M saranno 25 le maglie iniziali, può procedere come indicato. Buon lavoro!

30.12.2023 - 12:56

country flag Leone wrote:

Veel te wijde kraag en veel te korte mouwen!

23.09.2022 - 11:37

country flag Vaillant Isabelle wrote:

Bonjour voilà j ai encore petit souci mon ouvrage mesure 23 cm pour taille L on me demande augmenter 9 mailles mais cela ne correspond pas au total qui est 282m en sachant que j ai 252m après le dessin A1 merci pour votre réponse désolée de vous solliciter encore 1 fois isabelle

26.02.2022 - 05:12

DROPS Design answered:

Bonjour Isabelle, après A.1 vous avez 252 mailles, et dans le paragraphe Tailles M, L, XL, XXL et XXXL:, la taille L est désormais la 2ème taille, vous allez augmenter 10 mailles et vous aurez ainsi 262 mailles. Au paragraphe suivant Toutes les tailles, la taille L est de nouveau la 3ème taille. Bonne continuation!

28.02.2022 - 09:07

country flag Vaillant Isabelle wrote:

Bonsoir je fais la taille L j ai un doute avec le diagramme au 19 rg est-ce normal de faire au début du rang 1 jeté et 2 maille ensemble et au rang suivant le tricoter comme une maille torse pour une augmentation !!! Et non une maille pour former un trou !! Merci pour vous lire très vite cordialement isabelle

20.02.2022 - 23:06

DROPS Design answered:

Bonjour Isabelle, tout à fait, on doit continuer le point ajouré au milieu (= les 2 jetés qui vont se tricoter à l'endroit au 20ème tour), et les jetés au début/à la fin de A.1 vont se tricoter eux torse. Bon tricot!

21.02.2022 - 10:12

country flag Vaillant Isabelle wrote:

Bonjour j ai un doute pour la taille sachant que je mesure 1m62 te je met la taille 40 qu'elle taille que je dois tricoter M ouL merci beaucoup

16.02.2022 - 16:00

DROPS Design answered:

Bonjour Mme Vaillant, mesurez un vêtement similaire que vous avez et dont vous aimez la forme, et comparez ces mesures à celles du schéma, ce sera le meilleur moyen de trouver votre taille - retrouvez plus d'infos ici. Bon tricot!

16.02.2022 - 17:04

country flag Florence wrote:

Bjr, lors de la séparation des manches les 10 mailles sont elles à tricoter avec la manche ou avec le corps du tricot ?

03.01.2022 - 19:05

DROPS Design answered:

Bonjour Florence, les 10 mailles montées lors de la division de l'ouvrage appartiennent au dos/devant = bas du pull; vous relèverez plus tard 1 maille dans chacune de ces 10 mailles lorsque vous tricoterez les manches. Retrouvez ces étapes dans cette leçon: division de l'ouvrage à la fin de l'empiècement photo 10 et manches à partir de la photo 18 A/B. Bon tricot!

04.01.2022 - 07:08

country flag Ingmarie Eriksson-peck wrote:

To my question ,i found the misstake,it is in the yoke part. Size L. when A is done there is 252 m, at 23cm add 9 even spaced = 261. but pattern reads 282 for size L. To make pattern even I added 10. to a total of 262m.

08.12.2021 - 09:19

DROPS Design answered:

Dear Mrs Eriksson-peck, after diagram A.1 has been worked, there are 252 sts in size L, then you increase 10 sts in size L - in this section, size L is the 2nd size, so that there are 252+10=262 sts. Hope it will help. Happy knitting!

08.12.2021 - 13:57

country flag Ingmarie Eriksson-peck wrote:

Stickar storlek M.alla ökningar gjorda= 282 maskor, för at kolla maskantalet så räknade jag bara m

06.12.2021 - 13:47

DROPS Design answered:

Hej Ingmarie. Vad är frågan? Var i mönsteret är du?

08.12.2021 - 08:26

country flag Giuseppina Luongo wrote:

Buongiorno,purtroppo mi trovo con il n di maglie in 10 cm ma non con il n di ferri, come posso ovviare al problema? Io con 20 ferri arrivo a 8,5cm ! GRAZIE

04.12.2021 - 11:18

DROPS Design answered:

Buonasera Giuseppina, dovrebbe rifare il campione cercando di avvicinarsi a quello indicato, altrimenti il suo lavoro non risulterà come quello riportato. Buon lavoro!

06.12.2021 - 19:48

country flag Haanriitta wrote:

Hei! 312-3 ss238puolikas taka 31+46hiha+etu62+hiha46+puolikas taka 31, jää yli 22ss. Miten 238 jaetaan hihoille ,etu-ja takaosaan. Ohjeessa täytyy olla virhe. Terveisin Riitta

25.08.2021 - 10:42