DROPS Baby Merino
DROPS Baby Merino
100% Wool
from 3.75 € /50g
Get the yarn to make this pattern from 26.25€.

The yarn cost is calculated from the pattern’s smallest size and the yarn’s cheapest product type. Looking for an even better price? You might find it on the DROPS Deals!

DROPS SS24

Signs of Spring

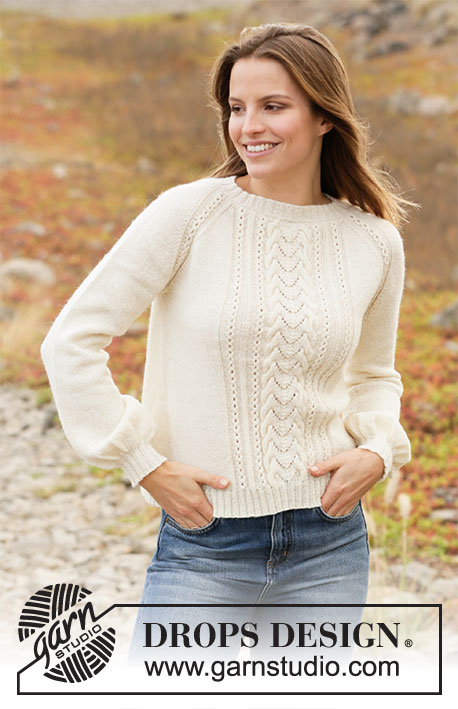
Knitted jumper in DROPS BabyMerino. The piece is worked top down with raglan, cables and lace pattern. Sizes S - XXXL.

DROPS 213-4
DROPS Design: Pattern no bm-076
Yarn group A
-------------------------------------------------------

SIZES:
S - M - L - XL - XXL - XXXL

MATERIALS:
DROPS BABY MERINO from Garnstudio (belongs to yarn group A)
350-350-400-450-450-500 g colour 02, off white

KNITTING TENSION:
24 stitches in width and 32 rows in height with stocking stitch = 10 x 10 cm.

NEEDLES:
DROPS DOUBLE POINTED NEEDLES SIZE 3 MM.
DROPS CIRCULAR NEEDLE SIZE 3 MM: Length 40 cm and 80 cm for stocking stitch and cable/lace pattern.
DROPS DOUBLE POINTED NEEDLES SIZE 2.5 MM.
DROPS CIRCULAR NEEDLE SIZE 2.5 MM: Length 40 cm and 80 cm for rib.
DROPS CABLE NEEDLE- for cables.
Needle size is only a guide. If you get too many stitches on 10 cm, change to a larger needle size. If you get too few stitches on 10 cm, change to a smaller needle size.

-------------------------------------------------------

Alternative Yarn – See how to change yarns here
Yarn Groups A to F – Use the same pattern and change the yarn here
Yarn usage using an alternative yarn – Use our yarn converter here

-------------------------------------------------------

DROPS Baby Merino
DROPS Baby Merino
100% Wool
from 3.75 € /50g
Get the yarn to make this pattern from 26.25€.

The yarn cost is calculated from the pattern’s smallest size and the yarn’s cheapest product type. Looking for an even better price? You might find it on the DROPS Deals!

Pattern instructions

-------------------------------------------------------

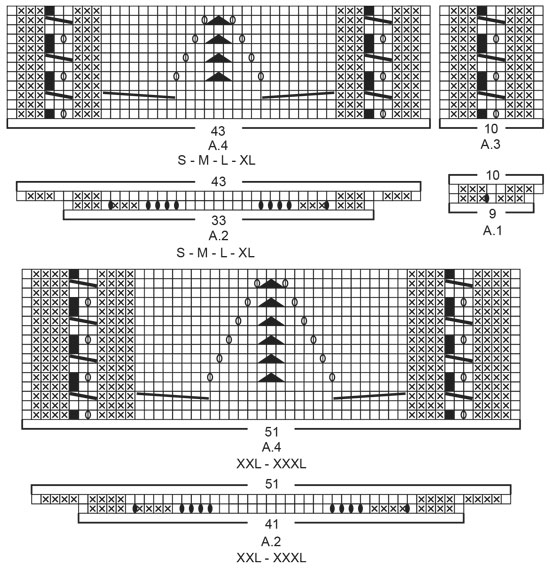
EXPLANATIONS FOR THE PATTERN:

-------------------------------------------------------

INCREASE TIP-1 (evenly spaced):
To work out how to increase evenly, count the total number of stitches on the needle (e.g. 116 stitches) and divide by the number of increases to be made (e.g. 36) = 3.2. 
In this example, increase by making 1 yarn over after approx. each 3rd stitch. On the next round work the yarn overs twisted to avoid holes.

PATTERN: 
See diagrams A.1 to A.4. Choose diagram for your size (applies to A.2 and A.4).

RAGLAN:
Increase 1 stitch on each side of the pattern-band along each raglan-line, i.e. on each side of A.3 (= 8 stitches increased on the round). Increase 1 stitch by making 1 yarn over. On the next round knit the yarn overs twisted to avoid holes. Then work the new stitches in stocking stitch.

INCREASE TIP-2 (for sides of body and mid under sleeves):
Work until there are 2 stitches left before the marker thread, make 1 yarn over, knit 4 (marker thread sits between these 4 stitches) make 1 yarn over (= 2 stitches increased at each marker thread).
On the next round knit the yarn overs twisted to avoid holes. Then work the new stitches in stocking stitch. 

DECREASE TIP (for mid under sleeves): 
Work until there are 3 stitches left before the marker thread, knit 2 together, knit 2 (marker thread sits between these 2 stitches), slip 1 stitch as if to knit, knit 1 and pass the slipped stitch over the knitted stitch (= 2 stitches decreased).

CASTING-OFF TIP:
To avoid the cast-off edge being tight you can cast off with a larger size needle. If the edge is still tight, make 1 yarn over after approx. each 4th stitch at the same time as casting off and the yarn overs are cast off as normal stitches.

-------------------------------------------------------

START THE PIECE HERE:

-------------------------------------------------------

JUMPER – SHORT OVERVIEW OF THE PIECE:
The neck and yoke are worked in the round with circular needle, top down. The yoke is divided for body and sleeves and the body continued in the round with circular needle. The sleeves are worked in the round with short circular needle/double pointed needles, top down.

NECK:
Cast on 116-120-124-128-136-140 stitches with circular needle size 2.5 mm and Baby Merino. Knit 1 round. Then work rib in the round (= knit 2 / purl 2) for 3 cm.
Knit 1 round where you increase 36-40-40-36-40-40 stitches evenly spaced – read INCREASE TIP-1 = 152-160-164-164-176-180 stitches. Knit 1 round without increasing and insert 1 marker in this round. Then work the yoke as described below. The yoke is measured from the marker. REMEMBER THE KNITTING TENSION!

YOKE:
Change to circular needle size 3 mm and work the first round as follows (from the left back raglan-line when the garment is worn):
Work A.1 (= 9 stitches), then 53-57-59-59-65-67 stitches in stocking stitch (= back piece), A.1 (= 9 stitches), 5 stitches in stocking stitch (= top of sleeve), A.1 (= 9 stitches), 1-3-4-4-3-4 stitches in stocking stitch, A.1 (= 9 stitches), A.2 (= 33-33-33-33-41-41 stitches mid front), A.1 (= 9 stitches), 1-3-4-4-3-4 stitches in stocking stitch, A.1 (= 9 stitches) and finish with 5 stitches in stocking stitch on top of sleeve. There are 168-176-180-180-192-196 stitches on the needle. Work the next round in the same way following the diagrams.

On the next round work as described below, AT THE SAME TIME increase to RAGLAN – read description above:
Work A.3 (= 10 stitches), increase 1 stitch to raglan, work 53-57-59-59-65-67 stitches in stocking stitch (= back piece) and increase 1 stitch to raglan, work A.3 (= 10 stitches), increase 1 stitch to raglan, 5 stitches in stocking stitch (= top of sleeve), increase 1 stitch to raglan, A.3 (= 10 stitches), increase 1 stitch to raglan, 1-3-4-4-3-4 stitches in stocking stitch, A.3 (= 10 stitches), A.4 (= 43-43-43-43-51-51 stitches mid-front), A.3 (= 10 stitches), 1-3-4-4-3-4 stitches in stocking stitch, increase 1 stitch to raglan, work A.3 (= 10 stitches), increase 1 stitch to raglan, 5 stitches in stocking stitch (= top of sleeve) and increase 1 stitch to raglan (= 8 stitches increased on the round).
Continue this pattern and increase to raglan every 2nd round a total of 13-16-19-24-28-31 times (including the round described above) and then every 4th round a total of 8-8-8-8-7-7 times. After the last increase to raglan there are 336-368-396-436-472-500 stitches on the needle.

Continue the same pattern but without further increases until the yoke measures 19-21-23-25-27-29 cm from the marker on the neck. Cut the strand.
Now divide the yoke for the body and sleeves on the next round as follows:
Place the first 10-10-11-10-9-7 stitches on 1 thread for the sleeve (without working these stitches), work stocking stitch over the next 95-105-111-123-137-149 stitches (= back piece), place the next 67-73-81-89-93-95 stitches on 1 thread for the sleeve, cast on 10-10-12-12-14-16 new stitches on the needle (= in side), continue with stocking stitch and pattern over the next 107-117-123-135-149-161 stitches (= front piece), place the remaining 57-63-70-79-84-88 stitches on the same thread as the first part of the sleeve at the beginning of the round and cast on 10-10-12-12-14-16 new stitches under the sleeve (= in side).

BODY:
= 222-242-258-282-314-342 stitches. Insert 1 marker thread on each side of the body in the middle of the 10-10-12-12-14-16 stitches cast on under each sleeve. Allow the threads to follow your work onwards; they will be used when increasing in the sides. Work stocking stitch over the back piece as far as the first marker thread. The round now starts here. Continue with stocking stitch in the round and A.3 and A.4 over the middle 63-63-63-63-71-71 stitches mid front as before.
When the piece measures 3 cm from the division, increase 1 stitch on each side of both marker threads – read INCREASE TIP-2 (= 4 stitches increased). Increase like this every 5 cm a total of 5 times on each side of the body = 242-262-278-302-334-362 stitches. Continue working until the body measures 27 cm from the division (there is 5 cm left to finished length; try the jumper on and continue to desired length).
On the next round decrease 12 stitches over the cables in A.3 and A.4 (decrease 4 stitches over each of the 2 large cables and 1 stitch over each of the small cables by knitting 2 together) = 230-250-266-290-322-350 stitches left on the needle.
Knit 1 round over all stitches and increase 70-74-78-86-98-106 stitches evenly spaced = 300-324-344-376-420-456 stitches.
Change to circular needle size 2.5 mm and work rib (= knit 2 / purl 2) for 5 cm. Loosely cast off with knit over knit and purl over purl – read CASTING-OFF TIP! The jumper measures approx. 54-56-58-60-62-64 cm from the shoulder down.

SLEEVES:
Place the 67-73-81-89-93-95 stitches from the thread on the one side of the piece on double pointed needles or short circular needle size 3 mm and knit up 1 stitch in each of the 10-10-12-12-14-16 stitches cast on under the sleeve = 77-83-93-101-107-111 stitches. Insert a marker thread in the middle of the 10-10-12-12-14-16 stitches under the sleeve. Allow the thread to follow your work onwards; it will be used when decreasing under the sleeve.
Start the round at the marker thread and work stocking stitch in the round.
When the piece measures 2 cm from the division decrease 2 stitches mid under the sleeve – read DECREASE TIP. Decrease like this 1½-1½.1½-1½-1½-2 cm a total of 7-7-8-8-7-5 times = 63-69-77-85-93-101 stitches.
When the piece measures 16 cm from the division, increase 2 stitches mid under the sleeve – read INCREASE TIP-2. Increase like this every 1 cm a total of 21-18-18-14-14-14 times = 105-105-113-113-121-129 stitches.
Continue working until the sleeve measures 41-39-38-36-35-33 cm from the division (there is 5 cm left to finished length; try the jumper on and continue to desired length). NOTE: Shorter measurements in larger sizes due to wider neck and longer yoke.
Knit 1 round where you decrease 1 stitch = 104-104-112-112-120-128 stitches.
On the next round knit all stitches together 2 and 2 = 52-52-56-56-60-64 stitches. Change to double pointed needles size 2.5 mm and work rib (= knit 2 / purl 2) for 5 cm. Loosely cast off with knit over knit and purl over purl. The sleeve measures approx. 46-44-43-41-40-38 cm from the division. Work the other sleeve in the same way.

This pattern has been corrected.

Updated online: 13.04.2021
New yarn amount:
DROPS BABY MERINO from Garnstudio
350-350-400-450-450-500 g colour 02, off white

Diagram

symbols = knit
symbols = purl
symbols = between 2 stitches make 1 yarn over, on the next round knit the yarn over (leaves a hole)
symbols = between 2 stitches make 1 yarn over, on the next round knit the yarn over twisted (avoids a hole)
symbols = this square has no stitch as it was decreased earlier; go straight to the next symbol in the diagram
symbols = knit 3, pass the first knitted stitch over the other 2 so it lies around them (= 1 stitch decreased)
symbols = place 4 stitches on cable needle at back of piece, knit 4, knit 4 from cable needle
symbols = place 4 stitches on cable needle in front of piece, knit 4, knit 4 from cable needle
symbols = slip 1 stitch as if to knit, knit 2 together and pass the slipped stitch over the knitted together stitches
diagram
diagram

Each of our patterns has specific tutorial videos to help you.

Do you have a question? See a list of frequently asked questions (FAQ)

Knitting tension is what determines the final measurements of your work, and is usually measured per 10 x 10 cm. It is provided like so: number of stitches in width x number of rows in height - eg: 19 stitches x 26 rows = 10 x 10 cm.

The knitting tension is very individual; some people knit/crochet loosely while others work tightly. You adjust the knitting tension with the needle size, which is why the suggested needle size is only meant as a guide! You need to adjust this (up or down) to ensure that YOUR knitting tension matches the knitting tension provided in the pattern. If you work with a different knitting tension than provided you will have a different yarn consumption, and your work will have different measurements than what the pattern suggests.

The knitting tension also determines which yarns can replace each other. As long as you achieve the same knitting tension you can replace one yarn with another.

See DROPS lesson: How to measure your tension/gauge

See DROPS video: How to make a gauge tension swatch

The required amount of yarn is provided in grams, eg: 450 g. To calculate how many balls you’ll need you first need to know how many grams are in 1 ball (25g, 50g or 100g). This information is available if you click on the individual yarn quality on our pages. Divide the amount required with the amount of each ball. For example, if each ball is 50g (the most common amount), the calculation will be as follows: 450 / 50 = 9 balls.

The important thing when changing from one yarn to another is that the knitting/crochet tension remains the same. This is so that the measurements of the finished piece will be the same as on the sketch provided. It is easier to achieve the same knitting tension using yarns from the same yarn group. It is also possible to work with multiple strands of a thinner yarn to achieve the knitting tension of a thicker one. Please try our yarn converter. We recommend you to always work a test swatch.

Please NOTE: when changing yarn the garment might have a different look and feel to the garment in the photo, due to individual properties and qualities of each yarn.

See DROPS lesson: Can I use a different yarn than the one mentioned in the pattern?

All our yarns are categorised into yarn groups (from A to F) according to thickness and knitting tension – group A contains the thinnest yarns and group F the thickest. This makes it easier for you to find alternative yarns to our patterns, should you wish to switch yarn. All yarns within the same group have a similar knitting tension and can easily replace each other. However, different yarn qualities have different structures and properties which will give the finished work a unique look and feel.

Click here for an overview of the yarns in each yarn group

At the top of all our patterns you’ll find a link to our yarn calculator, which is a helpful tool should you wish to use a different yarn than suggested. By filling in the yarn quality you wish to replace, the amount (in your size) and number of strands, the calculator will present good alternative yarns with the same knitting tension. Additionally it will tell you how much you’ll require in the new qualities and whether you’ll need to work with multiple strands. Most skeins are 50g (some are 25g or 100g).

If the pattern is worked with multiple colours, every colour will have to be calculated separately. Similarly, if the pattern is worked with several strands of different yarns (for example 1 strand Alpaca and 1 strand Kid-Silk) you will have to find alternatives for each, individually.

Click here to see our yarn calculator

Since different yarns have different qualities and textures we have chosen to keep the original yarn in our patterns. However, you can easily find options among our available qualities by using our yarn calculator, or simply pick a yarn from the same yarn group.

It is possible that some retailers still have discontinued yarns in stock, or that someone has a few skeins at home that they would like to find patterns for.

The yarn calculator will provide both alternative yarn as well as required amount in the new quality.

If you think it's hard to decide what size to make, it can be a good idea to measure a garment you own already and like the size of. Then you can pick the size by comparing those measures with the ones available in the pattern's size chart.

You'll find the size chart at the bottom of the pattern.

See DROPS lesson: How to read size chart

The needle size provided in the pattern serves only as a guide, the important thing is to follow the knitting tension. And since knitting tension is very individual, you will have to adjust the needle size to ensure that YOUR tension is the same as in the pattern – maybe you’ll have to adjust 1, or even 2 needle sizes, up or down to achieve the correct tension. For this, we recommend that you work test swatches.

Should you work with a different knitting tension than the one provided, the measurements of the finished garment might deviate from the measurement sketch.

See DROPS lesson: How to measure your tension/gauge

See DROPS video: How to make a tension/gauge swatch

Working a garment top-down provides more flexibility and room for personal adjustment. For example it is easier to try the garment on while working, as well as making adjustments to length of yoke and shoulder caps.

The instructions are carefully explaining every step, in the correct order. Diagrams are adjusted to the knitting direction and are worked as usual.

The diagram depicts all rows/rounds, and every stitch seen from the right side. It is read from bottom to top, from right to left. 1 square = 1 stitch.

When working back and forth, every other row is worked from the right side and every other row is worked from the wrong side. When working from the wrong side, the diagram will have to be worked reversed: from left to right, knit stitches are purled, purl stitches are knit etc.

When working in the round every round is worked from the right side and the diagram are worked from right to left on all rounds.

See DROPS lesson: How to read knitting diagrams

The diagram depicts all rows/rounds, and every stitch seen from the right side. It is worked from bottom to top, from right to left.

When working back and forth every other row is worked from the right side: from right to left and every other row is worked from the wrong side: from left to right.

When working in the round, every row in the diagram are worked from the right side, from right to left.

When working a circular diagram you start in the middle and work your way outwards, counter clockwise, row by row.

The rows usually start with a given number of chain stitches (equivalent to the height of the following stitch), this will either be depicted in the diagram or explained in the pattern.

See DROPS lesson: How to read crochet diagrams

Instructions for working several diagrams after each other on the same row/round, will often be written like so: “work A.1, A.2, A.3 a total of 0-0-2-3-4 times". This means you work A.1 once, then A.2 is worked once, and A.3 is repeated (in width) the number of times provided for your size – in this case like so: S = 0 times, M = 0 times, L=2 times, XL= 3 times and XXL = 4 times.

The diagrams are worked as usual: begin with the first row in A.1, then work the first row in A.2 etc.

See DROPS lesson: How to read knitting diagrams

See DROPS lesson: How to read crochet diagrams

The total width of the garment (from wrist-to-wrist) will be larger in the larger sizes, despite the actual sleeves being shorter. The larger sizes have longer sleeve caps and wider shoulders, so there will be a good fit in all sizes.

The measurement sketch/schematic drawing provides information regarding the full length of the garment. If it’s a jumper or a jacket the length is measured from the highest point on the shoulder closest to the neckline, and straight down to the bottom of the garment. It is NOT measured from the tip of shoulder. Similarly, the length of yoke is measured from the highest point on the shoulder and down to where yoke is split into body and sleeves.

On a jacket measures are never taken along bands, unless specifically stated. Always measure inside band stitches when measuring the length.

See DROPS lesson: How to read a schematic drawing

Diagrams are often repeated on the round or in height. 1 repeat is the diagram the way it appears in the pattern. If it says to work 5 repeats of A.1 in the round, then you work A.1 a total of 5 times after/next to each other in the round. If it says to work 2 repeats of A.1 vertically/in height you work the entire diagram once, then begin again at the start and work the entire diagram one more time.

Chain stitches are slightly narrower than other stitches and to avoid working the cast-on edge too tight, we simply chain more stitches to begin with. The stitch count will be adjusted on the following row to fit the pattern and measurement sketch.

The rib edge is more elastic and will contract slightly compared to, for example, stocking stitch. By increasing before the rib edge, you avoid a visible difference in width between the rib edge and the rest of the body.

It’s very easy to cast off too tightly, and by making yarn overs while casting off (and simultaneously casting these off) you avoid a too tight cast off edge.

See DROPS video: How to bind off with yarn overs (yo)

To achieve an even increase (or decrease) you can increase on, for example: every 3rd and 4th row alternately, like so: work 2 rows and increase on the 3rd row, work 3 rows and increase on the 4th. Repeat this until the increase is complete.

See DROPS lesson: Increase or decrease 1 st on every 3rd and 4th row alternately

Should you prefer to work in the round instead of back and forth, you may of course adjust the pattern. You’ll need to add steeks mid-front (usually 5 stitches), and follow the instructions. When you would normally turn and work from the wrong side, simply work across the steek and continue in the round. At the end you’ll cut the piece open, pick up stitches to work bands, and cover the cut edges.

See DROPS video: How to knit steeks and cut open

Should you prefer to work back and forth instead of in the round, you may of course adjust the pattern so you work the pieces separately and then assemble them at the end. Divide the stitches for the body in 2, add 1 edge stitch in each side (for sewing) and work the front and back pieces separately.

See DROPS lesson: Can I adapt a pattern for circular needles into straight needles?

Pattern repeats can vary slightly in the different sizes, in order to get the correct proportions. If you’re not working the exact same size as the garment in the photo, yours might deviate slightly. This has been carefully developed and adjusted so that the complete impression of the garment is the same in all sizes.

Make sure to follow instructions and diagrams for your size!

If you have found a pattern you like which is available in women’s size it’s not very difficult to convert it to men’s size. The biggest difference will be the length of sleeves and body. Start working on the women size that you think would fit across the chest. The additional length will be worked right before you cast off for the armhole/sleeve cap. If the pattern is worked top-down you can add the length right after the armhole or before the first decrease on sleeve.

Regarding additional yarn amount, this will depend on how much length you add, but it is better with a skein too many than too few.

All yarns will have excess fibres (from production) that might come off as lint or shedding. Brushed yarns (ie hairier yarns) have more of these loose, excess fibres, causing more shedding.

Shedding also depends on what is worn under or over the garment, and whether this pulls at the yarn fibres. It’s therefore not possible to guarantee that there will be no shedding

Below are some tips on how to get the best result when working with hairier yarns:

1. When the garment is finished (before you wash it) shake it vigorously so the looser hairs come off. NOTE: do NOT use a lint roller, brush or any method that pulls at the yarn.

2. Place the garment in a plastic bag and put it in your freezer - the temperature will cause the fibres to become less attached to each other, and excess fibres will come off easier.

3. Leave in the freezer for a few hours before taking it out and shaking it again.

4. Wash the garment according to the instructions on the yarn label.

Pilling is a natural process that happens to even the most exclusive of fibers. It's a natural sign of wear and tear that is hard to avoid, and that is most visible in high friction areas of your garment like a sweater's arms and cuffs.

You can make your garment look as new by removing the pilling, using a fabric comb or a pill/lint remover.

Still can't find the answer you need? Then scroll down and leave your question so one of our experts can try to help you. This will be done normally within 5 to 10 working days.
In the meantime, you can read the questions and answers that others have left to this pattern or join the DROPS Workshop on Facebook to get help from fellow knitters/crocheters!

You might also like...

Post a comment to pattern DROPS 213-4

We would love to hear what you have to say about this pattern!

If you want to leave a question, please make sure you select the correct category in the form below, to speed up the answering process. Required fields are marked *.

Comments / Questions (53)

country flag Marit Trosterud wrote:

A1 andre omgang der hvor 3 vrange starter en foran forrige omgang. Når jeg så skal strikke 2 rette + den som inneholder kastet fra forrige omgang, så blir det vel 2 rette og 3 vrange. Disse tre vrange blir så til høyre og ikke rett over fra forrige omgang. Stemmer dette?

01.04.2022 - 21:18

DROPS Design answered:

Hei Marit. Når du strikker 2. pinne av diagrammet blir det 1 rett, 3 vrange, 3 rette (den siste retten strikkes vridd rett), 3 vrange, 1 rett. De 3 siste vrang maskene forskyves mot venstre. mvh DROPS Design

04.04.2022 - 14:57

country flag Ulla Lindblad wrote:

Varför står det vä bakre raglan - stickningen går vidare med bak stycket . Borde stå hö bakre raglan ?? Skriv tydligare att A1 A2 görs klart innan man börjar med A3 varvet .

08.02.2022 - 09:54

DROPS Design answered:

Hej Ulla, du starter på din venstre side når tøjet er på, strikker ryggen, så højre ærme, forstykke og sidst venstre ærme. Begge pinde i A.1 og A.2 er beskrevet i opskriften. God fornøjelse!

09.02.2022 - 12:30

country flag Riviere wrote:

Bonjour, je suis au niveau des cotés et j'ai une question sur la forme en trapeze. il est dit de faire une augmentation de 5*4 puis diminution de 12m puis à nouveau augmentation avant les cotes. Est-ce que cela donne un résultat un peu bouffant et large ? sur les photos cela n'est pas visible. J'ai peur que le pull soit large. Et si je ne fais pas les 5*4 augmentations quel rendu aurra-t-il ? Merci

26.01.2022 - 18:40

DROPS Design answered:

Bonjour Mme Rivière, les augmentations sur les côtés (5 x 4 mailles tous les 5 cm) vont donner la largeur indiquée dans le schéma; lorsque vous diminuez 12 mailles dans les torsades, c'est pour conserver la bonne largeur de l'ouvrage (il faut davantage de mailles pour les torsades que pour le jersey), puis vous augmentez des mailles juste avant de tricoter les côtes, pour éviter qu'elles ne resserrent le bas du pull. Si vous ne souhaitez pas la forme trapèze, vous pouvez ne pas faire les augmentations des côtés si vous le souhaitez, ajustez le nombre d'augmentations avant les côtes pour avoir un multiple de 4. Bon tricot!

27.01.2022 - 08:36

country flag Nelly Otten wrote:

Is the raglan just before A3 every round? So raglan (over) stitch, and than immediately A3 (pattern) every round? Extra raglan, A3 ,extra raglan, or else??

13.01.2022 - 11:54

DROPS Design answered:

Dear Mrs Otten, yes correct you increase 1 stitch on each side of each A.3, as described under YOKE, ie the increase before the first A.3 on the round will be worked at the end of the round. After ou have increased 13 to 31 times (see size) on every other round, increase on every 4th round (8 or 7 times - see size). Happy knitting!

13.01.2022 - 13:23

country flag Maria Elena wrote:

Maglione sofficissimo, ho fatto la taglia L e ho acquistato un gomitolo in più per farlo un po' più lungo all'altezza dei fianchi, sono molto soddisfatta!

01.01.2022 - 22:06

country flag Signe wrote:

Hej. Jeg forstår ikke, at der i A3 er angivet, at man har lukket en maske af tidligere - så vidt jeg kan se, har man da ikke lukket masker af endnu. Hvordan skal jeg strikke dette? Venligst Signe

03.12.2021 - 21:36

DROPS Design answered:

Hei Signe. Første gang du strikker A.3, strikkes diagrammet over A.1. Siste omgang i A.1 går over 10 masker og da vil det stemme med A.3. Når du strikker 3. omgang av A.3 feller du 1 maske (skrå strek over 3 masker), da vil du ha 1 maske mindre pr gang du strikker diagrammet og på neste omgang er den masken som er felt (ingen masker) marker med en sort firkant. mvh DROPS Design

07.12.2021 - 10:02

country flag Bükki Márta wrote:

A minta leírása a magyar fordításban csapnivaló!

02.09.2021 - 19:13

country flag Anna wrote:

I sådana fall kanske ni bör förtydliga det i mönstret, för jag hade lite panik ett tag över de 8 extra maskorna

27.04.2021 - 14:36

country flag Anna wrote:

Jag räknade mina maskor efter ökningarna i raglan och hade rätt antal, men precis när jag skulle dela upp arbetet i fram-och bakstycke (efter 21 cm, storlek M) hade jag plötsligt 8 maskor för mycket. Jag tror att det beror på att jag delade upp arbetet efter omslagen i de 8 smala mönstren, men innan minskningarna som görs genom att lyfta en maska över två andra. Kan det stämma?

27.04.2021 - 13:52

country flag Gunnbjørg Myrmo wrote:

Nydelig genser - finnes denne (eller nesten lik) oppskriften med start nede og strikkes opp?

10.04.2021 - 16:33

DROPS Design answered:

Hei Gunnbjørg, Hvis du skriver 'genser nedenfra opp' i søkeboksen, får du alle slike oppskrifter. Håper du finner en du liker og god fornøyelse!

12.04.2021 - 07:00