DROPS Sky
DROPS Sky
74% Alpaca, 18% Polyamide, 8% Wool
from 5.40 € /50g
Get the yarn to make this pattern from 27.00€.

The yarn cost is calculated from the pattern’s smallest size and the yarn’s cheapest product type. Looking for an even better price? You might find it on the DROPS Deals!

DROPS SS24

Evening Glow

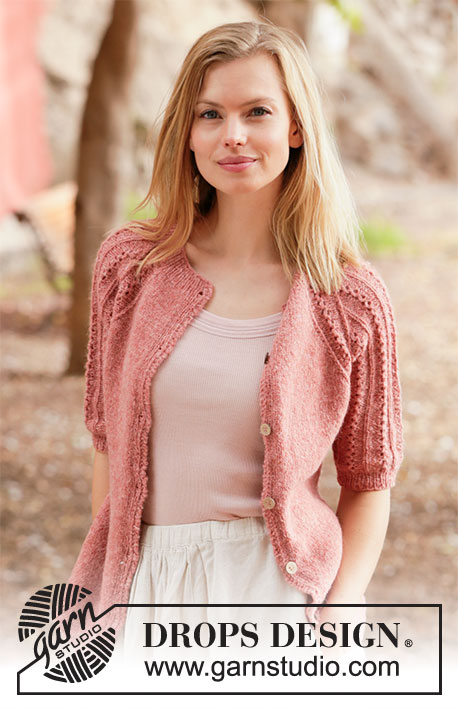
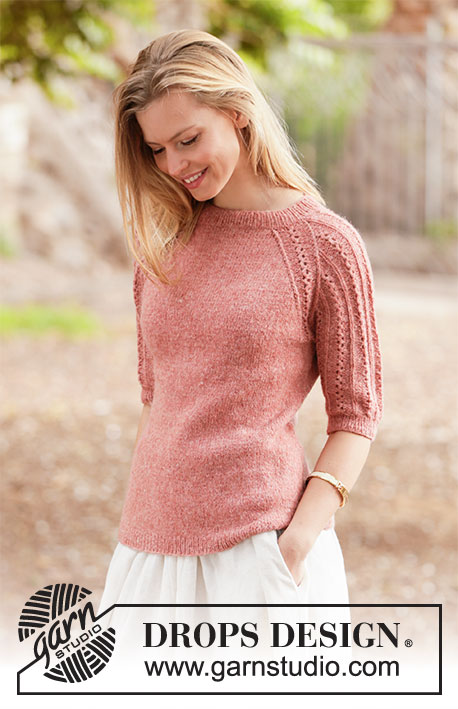
Knitted jumper in DROPS Sky. Piece is knitted top down with raglan and short sleeves with lace pattern. Size: S - XXXL

DROPS 212-1
DROPS design: Pattern sk-076
Yarn group B
----------------------------------------------------------

SIZE:
S - M - L - XL - XXL - XXXL

MATERIALS:
DROPS SKY from Garnstudio (belongs to yarn group B)
250-300-300-350-350-400 g colour 19, brick

KNITTING TENSION:
21 stitches in width and 28 rows vertically in stocking stitch = 10 x 10 cm.

NEEDLES:
DROPS DOUBLE POINTED NEEDLES SIZE 4 mm
DROPS CIRCULAR NEEDLE SIZE 4 mm : Length 40 and 60 or 80 cm for stocking stitch.
DROPS DOUBLE POINTED NEEDLES SIZE 3 mm
DROPS CIRCULAR NEEDLE SIZE 3 mm : Length 40 and 80 cm for rib.
Needle size is only a suggestion! If you have too many stitches on 10 cm switch to a larger needle size. If you have too few stitches on 10 cm switch to a smaller needle size.

-------------------------------------------------------

Alternative Yarn – See how to change yarns here
Yarn Groups A to F – Use the same pattern and change the yarn here
Yarn usage using an alternative yarn – Use our yarn converter here

-------------------------------------------------------

DROPS Sky
DROPS Sky
74% Alpaca, 18% Polyamide, 8% Wool
from 5.40 € /50g
Get the yarn to make this pattern from 27.00€.

The yarn cost is calculated from the pattern’s smallest size and the yarn’s cheapest product type. Looking for an even better price? You might find it on the DROPS Deals!

Pattern instructions

----------------------------------------------------------

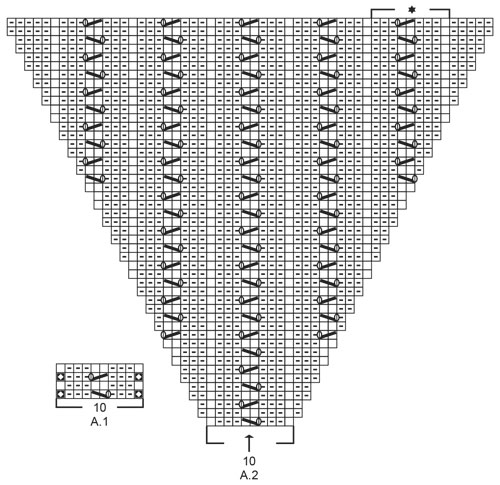
EXPLANATION FOR THE PATTERN:

----------------------------------------------------------


INCREASE/DECREASE TIP (evenly):
To calculate how to increase/decrease evenly, use the total number of stitches on row (e.g. 92 stitches) and divide stitches by number of increases/decreases to be done (e.g. 4) = 23. 
In this example increase by making 1 yarn over after every 23rd stitch. On next round work yarn overs twisted to avoid holes.
To decrease in this example knit every 22nd and 23rd stitch together.

PATTERN:
See diagram A.1 (raglan line) and A.2 (pattern on sleeves).

RAGLAN:
Increase 1 stitch for raglan in each side of the 10 stitches in A.1 in every transition between front/back piece and sleeves (= 8 stitches increased in total on increase round).
Increase 1 stitch by making 1 yarn over. On next round knit yarn overs twisted to avoid holes. Then work the new stitches in stocking stitch on front and back piece and in A.2 on sleeves.

DECREASE TIP-1 (applies to sides of body): 
Decrease 1 stitch on each side of marker thread as follows: Work until 3 stitches remain before marker thread, knit 2 together, knit 2 stitches (marker thread is between these 2 stitches), slip 1 stitch knitwise, knit 1, pass slipped stitch over stitch worked (= 2 stitches decreased).

DECREASE TIP-2 (applies to mid under sleeves):
Decrease 1 stitch on each side of marker thread as follows: Work until 3 stitches remain before marker thread, purl 2 together, purl 2 (marker thread is in the middle of these 2 stitches), purl 2 twisted together (= 2 stitches decreased).

INCREASE TIP (applies to sides of body):
Work until 1 stitch remains before marker thread, make 1 yarn over, knit 2 (marker thread is between these 2 stitches), make 1 yarn over (= 2 stitches increased). On next round knit yarn overs twisted to avoid holes. Then work the new stitches in stocking stitch. 

CAST-OFF TIP:
To avoid a tight cast-off edge you may use a larger needle size. If this also is too tight, work a 1 yarn over after approx. every 8th stitch while casting off (cast off yarn overs as regular stitches).

----------------------------------------------------------

START THE PIECE HERE:

----------------------------------------------------------

JUMPER - SHORT OVERVIEW OF THE PIECE:
Work neck edge and yoke in the round on circular needle from mid back, top down. Now divide yoke for body and sleeves. Body is worked in the round from the side, top down. Work sleeves in the round on double pointed needles/short circular needle, top down.

NECK EDGE:
Cast on 92-96-100-106-110-114 stitches on circular needle size 3 mm with Sky. Knit 1 round. Then work rib in the round (= knit 1/purl 1) for 3 cm.
When rib is done, knit 1 round while increasing 4-8-8-6-2-6 stitches evenly - read DECREASE/INCREASE TIP = 96-104-108-112-112-120 stitches. Insert 1 marker in the middle of row (= mid front). Measure yoke from this marker. 
Switch to circular needle size 4 mm and knit 1 round (knit all yarn overs twisted).
Then work yoke as explained below. REMEMBER THE KNITTING TENSION!

YOKE:
Insert 4 marker threads in piece as explained below (insert marker threads without working the stitches):
Count 14-16-17-18-18-20 stitches (= ½ back piece), insert 1 marker thread before next stitch, count 20 stitches (= sleeve), insert 1 marker thread before next stitch, count 28-32-34-36-36-40 stitches (= front piece), insert 1 marker thread before next stitch, count 20 stitches (= sleeve), insert 1 marker thread before next stitch. 14-16-17-18-18-20 stitches remain on back piece after last marker thread.

On next round begin pattern as explained below, AT THE SAME TIME increase for RAGLAN - read explanation above. I.e. work next round as follows:
Work 9-11-12-13-13-15 stitches in stocking stitch (= ½ back piece), increase 1 stitch for raglan,
work A.1 (= 10 stitches – marker thread is in the middle of A.1), increase 1 stitch for raglan,
work A.2 (= 10 stitches), increase 1 stitch for raglan,
work A.1 (= 10 stitches – marker thread is in the middle of A.1), increase 1 stitch for raglan,
work 18-22-24-26-26-30 stitches in stocking stitch (= front piece), increase 1 stitch for raglan,
work A.1 (= 10 stitches – marker thread is in the middle of A.1), increase 1 stitch for raglan,
work A.2 (= 10 stitches), increase 1 stitch for raglan,
work A.1 (= 10 stitches – marker thread is in the middle of A.1), increase 1 stitch for raglan,
work 9-11-12-13-13-15 stitches in stocking stitch (= ½ back piece).

Continue pattern like this, and increase for raglan every other round 23-25-29-33-37-40 times in total (including increases explained on first round. NOTE! Work the increased stitches on sleeves in pattern until there are 5-5-7-7-7-7 repetitions in width over sleeve (see star in diagram that marks 1 repetition), then purl the next increased stitches until finished measurements (A.2 shows sleeve with all increases in size S).
After last increase for raglan there are 280-304-340-376-408-440 stitches on needle.
Work without increases until piece measures 19-21-23-25-27-29 cm from marker by the neck.
Now divide yoke for body and sleeves, i.e. work last round as follows: Work 40-44-49-54-60-66 stitches in stocking stitch (= ½ back piece), slip the next 60-64-72-80-84-88 stitches on 1 stitch holder, cast on 8 new stitches on needle (= in the side under sleeve), work 80-88-98-108-120-132 stitches in stocking stitch (= front piece), slip the next 60-64-72-80-84-88 stitches on 1 stitch holder, cast on 8 new stitches on needle (= in the side under sleeve) and work the remaining 40-44-49-54-60-66 stitches in stocking stitch (= ½ back piece). Cut the yarn. Finish body and sleeves separately.

BODY:
= 176-192-212-232-256-280 stitches. Insert 1 marker thread in each side on body, in the middle of the 8 stitches cast on under each sleeve= 88-96-106-116-128-140 stitches between marker threads. Move the marker threads upwards when working; they should be used for increase and decrease later in the sides on body.
Work in stocking stitch in the round. When piece measures 3 cm from division, decrease 1 stitch on each side of both marker threads - read DECREASE TIP-1 (= 4 stitches decreased). Decrease like this every 3 cm 4 times in total in each side = 160-176-196-216-240-264 stitches.
Work until piece measures 16 cm from division. On next round increase 1 stitch on each side of both marker threads – read INCREASE TIP (= 4 stitches increased). Increase like this every 2½ cm 6 times in total in each side = 184-200-220-240-264-288 stitches.
Work until piece measures 33 cm from division (approx. 3 cm remain until finished measurements, try the jumper on and work to desired length).
Switch to circular needle size 3 mm. Knit 1 round while increasing 36-40-44-48-52-58 stitches evenly - read INCREASE/DECREASE TIP = 220-240-264-288-316-346 stitches.
Work rib in the round = knit 1/purl 1 for 3 cm. Cast off with knit over knit and purl over purl - read CAST-OFF TIP. Jumper measures approx. 58-60-62-64-66-68 cm from shoulder and down.

SLEEVES:
Slip the 60-64-72-80-84-88 stitches from stitch holder in one side of piece on double pointed needles or a short circular needle size 4 mm, and pick in addition up 1 stitch in each of the 8 stitches cast on under sleeve = 68-72-80-88-92-96 stitches.
Insert 1 marker thread in the middle of the 8 stitches cast on under sleeve. Move the marker thread upwards when working; it should be used for decrease mid under sleeve.
Begin round at the marker thread and continue pattern in the round with A.2 over the middle 46-46-64-64-64-64 stitches, and purl the remaining 22-26-16-24-28-32 stitches mid under sleeve.
When sleeve measures 2 cm from division in all sizes, decrease 2 stitches mid under sleeve - read DECREASE TIP-2. Decrease like this every 3-2-1½-1-½-½ cm 5-6-8-10-12-13 times in total = 58-60-64-68-68-70 stitches.
Work until sleeve measures 17-15-14-12-11-9 cm from division (approx. 3 cm remain until finished measurements, try the jumper on and work to desired length). NOTE! Shorter measurements in the larger sizes because of wider neck and longer yoke.
Knit 1 round while decreasing 6-6-8-10-8-8 stitches evenly - remember INCREASE/DECREASE TIP = 52-54-56-58-60-62 stitches.
Switch to double pointed needles size 3 mm. Work rib in the round = knit 1/purl 1 for 3 cm. Cast off with knit over knit and purl over purl - read CAST-OFF TIP. Work the other sleeve the same way.

Diagram

symbols = knit
symbols = purl
symbols = between 2 stitches make 1 yarn over, on next round knit yarn over to make a hole
symbols = knit 2 together
symbols = slip 1 stitch knitwise, knit 1, pass slipped stitch over stitch worked
symbols = knit 1 in stitch under next stitch
symbols = 1 repetition in width
diagram
diagram

Each of our patterns has specific tutorial videos to help you.

Do you have a question? See a list of frequently asked questions (FAQ)

Knitting tension is what determines the final measurements of your work, and is usually measured per 10 x 10 cm. It is provided like so: number of stitches in width x number of rows in height - eg: 19 stitches x 26 rows = 10 x 10 cm.

The knitting tension is very individual; some people knit/crochet loosely while others work tightly. You adjust the knitting tension with the needle size, which is why the suggested needle size is only meant as a guide! You need to adjust this (up or down) to ensure that YOUR knitting tension matches the knitting tension provided in the pattern. If you work with a different knitting tension than provided you will have a different yarn consumption, and your work will have different measurements than what the pattern suggests.

The knitting tension also determines which yarns can replace each other. As long as you achieve the same knitting tension you can replace one yarn with another.

See DROPS lesson: How to measure your tension/gauge

See DROPS video: How to make a gauge tension swatch

The required amount of yarn is provided in grams, eg: 450 g. To calculate how many balls you’ll need you first need to know how many grams are in 1 ball (25g, 50g or 100g). This information is available if you click on the individual yarn quality on our pages. Divide the amount required with the amount of each ball. For example, if each ball is 50g (the most common amount), the calculation will be as follows: 450 / 50 = 9 balls.

The important thing when changing from one yarn to another is that the knitting/crochet tension remains the same. This is so that the measurements of the finished piece will be the same as on the sketch provided. It is easier to achieve the same knitting tension using yarns from the same yarn group. It is also possible to work with multiple strands of a thinner yarn to achieve the knitting tension of a thicker one. Please try our yarn converter. We recommend you to always work a test swatch.

Please NOTE: when changing yarn the garment might have a different look and feel to the garment in the photo, due to individual properties and qualities of each yarn.

See DROPS lesson: Can I use a different yarn than the one mentioned in the pattern?

All our yarns are categorised into yarn groups (from A to F) according to thickness and knitting tension – group A contains the thinnest yarns and group F the thickest. This makes it easier for you to find alternative yarns to our patterns, should you wish to switch yarn. All yarns within the same group have a similar knitting tension and can easily replace each other. However, different yarn qualities have different structures and properties which will give the finished work a unique look and feel.

Click here for an overview of the yarns in each yarn group

At the top of all our patterns you’ll find a link to our yarn calculator, which is a helpful tool should you wish to use a different yarn than suggested. By filling in the yarn quality you wish to replace, the amount (in your size) and number of strands, the calculator will present good alternative yarns with the same knitting tension. Additionally it will tell you how much you’ll require in the new qualities and whether you’ll need to work with multiple strands. Most skeins are 50g (some are 25g or 100g).

If the pattern is worked with multiple colours, every colour will have to be calculated separately. Similarly, if the pattern is worked with several strands of different yarns (for example 1 strand Alpaca and 1 strand Kid-Silk) you will have to find alternatives for each, individually.

Click here to see our yarn calculator

Since different yarns have different qualities and textures we have chosen to keep the original yarn in our patterns. However, you can easily find options among our available qualities by using our yarn calculator, or simply pick a yarn from the same yarn group.

It is possible that some retailers still have discontinued yarns in stock, or that someone has a few skeins at home that they would like to find patterns for.

The yarn calculator will provide both alternative yarn as well as required amount in the new quality.

If you think it's hard to decide what size to make, it can be a good idea to measure a garment you own already and like the size of. Then you can pick the size by comparing those measures with the ones available in the pattern's size chart.

You'll find the size chart at the bottom of the pattern.

See DROPS lesson: How to read size chart

The needle size provided in the pattern serves only as a guide, the important thing is to follow the knitting tension. And since knitting tension is very individual, you will have to adjust the needle size to ensure that YOUR tension is the same as in the pattern – maybe you’ll have to adjust 1, or even 2 needle sizes, up or down to achieve the correct tension. For this, we recommend that you work test swatches.

Should you work with a different knitting tension than the one provided, the measurements of the finished garment might deviate from the measurement sketch.

See DROPS lesson: How to measure your tension/gauge

See DROPS video: How to make a tension/gauge swatch

Working a garment top-down provides more flexibility and room for personal adjustment. For example it is easier to try the garment on while working, as well as making adjustments to length of yoke and shoulder caps.

The instructions are carefully explaining every step, in the correct order. Diagrams are adjusted to the knitting direction and are worked as usual.

The diagram depicts all rows/rounds, and every stitch seen from the right side. It is read from bottom to top, from right to left. 1 square = 1 stitch.

When working back and forth, every other row is worked from the right side and every other row is worked from the wrong side. When working from the wrong side, the diagram will have to be worked reversed: from left to right, knit stitches are purled, purl stitches are knit etc.

When working in the round every round is worked from the right side and the diagram are worked from right to left on all rounds.

See DROPS lesson: How to read knitting diagrams

The diagram depicts all rows/rounds, and every stitch seen from the right side. It is worked from bottom to top, from right to left.

When working back and forth every other row is worked from the right side: from right to left and every other row is worked from the wrong side: from left to right.

When working in the round, every row in the diagram are worked from the right side, from right to left.

When working a circular diagram you start in the middle and work your way outwards, counter clockwise, row by row.

The rows usually start with a given number of chain stitches (equivalent to the height of the following stitch), this will either be depicted in the diagram or explained in the pattern.

See DROPS lesson: How to read crochet diagrams

Instructions for working several diagrams after each other on the same row/round, will often be written like so: “work A.1, A.2, A.3 a total of 0-0-2-3-4 times". This means you work A.1 once, then A.2 is worked once, and A.3 is repeated (in width) the number of times provided for your size – in this case like so: S = 0 times, M = 0 times, L=2 times, XL= 3 times and XXL = 4 times.

The diagrams are worked as usual: begin with the first row in A.1, then work the first row in A.2 etc.

See DROPS lesson: How to read knitting diagrams

See DROPS lesson: How to read crochet diagrams

The total width of the garment (from wrist-to-wrist) will be larger in the larger sizes, despite the actual sleeves being shorter. The larger sizes have longer sleeve caps and wider shoulders, so there will be a good fit in all sizes.

The measurement sketch/schematic drawing provides information regarding the full length of the garment. If it’s a jumper or a jacket the length is measured from the highest point on the shoulder closest to the neckline, and straight down to the bottom of the garment. It is NOT measured from the tip of shoulder. Similarly, the length of yoke is measured from the highest point on the shoulder and down to where yoke is split into body and sleeves.

On a jacket measures are never taken along bands, unless specifically stated. Always measure inside band stitches when measuring the length.

See DROPS lesson: How to read a schematic drawing

Diagrams are often repeated on the round or in height. 1 repeat is the diagram the way it appears in the pattern. If it says to work 5 repeats of A.1 in the round, then you work A.1 a total of 5 times after/next to each other in the round. If it says to work 2 repeats of A.1 vertically/in height you work the entire diagram once, then begin again at the start and work the entire diagram one more time.

Chain stitches are slightly narrower than other stitches and to avoid working the cast-on edge too tight, we simply chain more stitches to begin with. The stitch count will be adjusted on the following row to fit the pattern and measurement sketch.

The rib edge is more elastic and will contract slightly compared to, for example, stocking stitch. By increasing before the rib edge, you avoid a visible difference in width between the rib edge and the rest of the body.

It’s very easy to cast off too tightly, and by making yarn overs while casting off (and simultaneously casting these off) you avoid a too tight cast off edge.

See DROPS video: How to bind off with yarn overs (yo)

To achieve an even increase (or decrease) you can increase on, for example: every 3rd and 4th row alternately, like so: work 2 rows and increase on the 3rd row, work 3 rows and increase on the 4th. Repeat this until the increase is complete.

See DROPS lesson: Increase or decrease 1 st on every 3rd and 4th row alternately

Should you prefer to work in the round instead of back and forth, you may of course adjust the pattern. You’ll need to add steeks mid-front (usually 5 stitches), and follow the instructions. When you would normally turn and work from the wrong side, simply work across the steek and continue in the round. At the end you’ll cut the piece open, pick up stitches to work bands, and cover the cut edges.

See DROPS video: How to knit steeks and cut open

Should you prefer to work back and forth instead of in the round, you may of course adjust the pattern so you work the pieces separately and then assemble them at the end. Divide the stitches for the body in 2, add 1 edge stitch in each side (for sewing) and work the front and back pieces separately.

See DROPS lesson: Can I adapt a pattern for circular needles into straight needles?

Pattern repeats can vary slightly in the different sizes, in order to get the correct proportions. If you’re not working the exact same size as the garment in the photo, yours might deviate slightly. This has been carefully developed and adjusted so that the complete impression of the garment is the same in all sizes.

Make sure to follow instructions and diagrams for your size!

If you have found a pattern you like which is available in women’s size it’s not very difficult to convert it to men’s size. The biggest difference will be the length of sleeves and body. Start working on the women size that you think would fit across the chest. The additional length will be worked right before you cast off for the armhole/sleeve cap. If the pattern is worked top-down you can add the length right after the armhole or before the first decrease on sleeve.

Regarding additional yarn amount, this will depend on how much length you add, but it is better with a skein too many than too few.

All yarns will have excess fibres (from production) that might come off as lint or shedding. Brushed yarns (ie hairier yarns) have more of these loose, excess fibres, causing more shedding.

Shedding also depends on what is worn under or over the garment, and whether this pulls at the yarn fibres. It’s therefore not possible to guarantee that there will be no shedding

Below are some tips on how to get the best result when working with hairier yarns:

1. When the garment is finished (before you wash it) shake it vigorously so the looser hairs come off. NOTE: do NOT use a lint roller, brush or any method that pulls at the yarn.

2. Place the garment in a plastic bag and put it in your freezer - the temperature will cause the fibres to become less attached to each other, and excess fibres will come off easier.

3. Leave in the freezer for a few hours before taking it out and shaking it again.

4. Wash the garment according to the instructions on the yarn label.

Pilling is a natural process that happens to even the most exclusive of fibers. It's a natural sign of wear and tear that is hard to avoid, and that is most visible in high friction areas of your garment like a sweater's arms and cuffs.

You can make your garment look as new by removing the pilling, using a fabric comb or a pill/lint remover.

Still can't find the answer you need? Then scroll down and leave your question so one of our experts can try to help you. This will be done normally within 5 to 10 working days.
In the meantime, you can read the questions and answers that others have left to this pattern or join the DROPS Workshop on Facebook to get help from fellow knitters/crocheters!

You might also like...

Evening Glow

Marija Jakopin, Slovenia

Evening Glow

Marta, Poland

Evening Glow

Yarnophilics, New Zealand

Evening Glow

Lisa, Greece

Post a comment to pattern DROPS 212-1

We would love to hear what you have to say about this pattern!

If you want to leave a question, please make sure you select the correct category in the form below, to speed up the answering process. Required fields are marked *.

Comments / Questions (52)

country flag Ragne wrote:

Hei. Slik jeg har forstått oppskriften så havner den første og siste vrangmasken over et kast, når eksempelvis 2. linje av A2 skal strikkes. Skal disse vrangmaskene strikkes vridd?

09.06.2020 - 07:57

DROPS Design answered:

Hej Ragne, ja når du har taget ud på hver side af A.2 på første pind, så har du 1 ny maske på hver side af A.2, som ifølge diagrammet skal strikkes drejet vrang på næste pind. God fornøjelse!

12.06.2020 - 10:45

country flag Larysa Marcadé wrote:

Hello, thank you for this beautiful pattern. I noticed observing the pics and reading the pattern, that on the pic you have this nice, a bit relief line along the raglan (A.1) from both sides. In the description you have just simple yarn over for increasing, but you cannot get this effect with this technique. Could you please specify of possible, what the technique was used to do this line? thank you!

28.04.2020 - 17:25

DROPS Design answered:

Dear Mrs Marcadé, this relief is worked with the first + the last stitch in A.1, when you knit the stitch under next stitch on every other round (this technique. Happy knitting!

29.04.2020 - 08:57

country flag Lene wrote:

Jeg har strikket bærestykket, raglan og fulgt mønster, men mine masker stemmer ikke. Ifølge opskriften skal jeg have 304 masker, hvilket stemmer med de 104 masker fra halsen samt raglan udtagninger. Men der er også udtagninger i A2 - så er det bare mig eller stemmer opskriften ikke?

13.04.2020 - 11:55

DROPS Design answered:

Hej Lene, jeg kan ikke finde hvor du er i opskriften, jeg kan ikke se hvor det står 304 masker... hvilken størrelse strikker du?

28.04.2020 - 15:43

country flag Pia wrote:

Hallo, in A1 und A2 sind entweder vor dem Überheben der re. Masche odeer nach dem rechts Zusammenstrickenein "R" zu lesen. Was bedeudet dies. Ich habe keine Erklärung dazu gefunden. Danke für die Hilfe, Pia Hoffmann

05.04.2020 - 18:14

DROPS Design answered:

Liebe Pia, das, was Sie als "R" lesen, ist das Symbol für den Umschlag. Direkt nachdem Sie zwei Maschen rechts zusammenstricken bzw. direkt bevor Sie 1 Masche überziehen, wird 1 Umschlag gearbeitet. Viel Spaß beim Weiterstricken!

09.04.2020 - 20:54

country flag Béatrice Schaefle wrote:

Bonjour, je souhaiterais tricoter ce magnifique modèle dans une laine plus fine (groupe de fils A). Est-il possible de recalculer le modèle et comment. Merci

11.03.2020 - 10:15

DROPS Design answered:

Bonjour Mme Schaefle, il vous faudra tout recalculer en fonction de votre propre échantillon, nous ne sommes malheureusement pas en mesure de pouvoir adapter chaque modèle à chaque demande; merci de bien vouloir contacter votre magasin ou un forum pour une assistance plus personnalisée. Merci pour votre compréhension. Bon tricot!

11.03.2020 - 13:53

country flag Kasia wrote:

Zaczęłam od karczku zgodnie z wytycznymi dla rozmiaru M. Użwywam tej samej włóczki i przy 96 oczkach na drutach nr.3, po przerobieniu kilku rzędów, mam wątpliwości, czy tak wykonany karczek przejdzie przez głowę. Na zdjęciu gotowego swetra widać, że dekolt ładnie rozkłada się na ramionach, a nie opina się ciasno wokół szyi. Czy jeśli zmienię rozmiar drutów na większe przy wykonywaniu ściągaczy powinnam także użyć większych drutów na dzersej?

21.02.2020 - 23:00

DROPS Design answered:

Hi, can you please write your question in english, then we will answer as soon as possible :)

24.02.2020 - 16:31

country flag Anna Schisani wrote:

Hello. I noticed that raglan lines on the left and right of the back and front pieces are not the same. I follow the pattern but one side has the raglan line nice and tight and straight while the other side is loose and have holes. What can cause that? Is there any other way I should yarn over to get the same effect on both sides? Kind regards, Anna

11.02.2020 - 12:10

DROPS Design answered:

Dear Mrs Schisani, make sure that the yarn overs are not too loose nor too tight - you will find here a video showing how to work a top down jumper with raglan and increasing with yarn overs, that might help you. Feel free to contact the store where you bought the yarn, they might also have more tips for you. Happy knitting!

11.02.2020 - 12:58

country flag Monika wrote:

Beautiful pattern and style!

06.02.2020 - 23:57

country flag Cathy wrote:

Très beau modèle avec une belle coupe.

04.02.2020 - 20:57

country flag Lisbeth wrote:

Når jeg skal strikke de 2 midterste masker af A1 og A2 i 3 række, skal de to masker så strikkes sammen til en? og mangler jeg så ikke en maske når jeg skal strikke 4. række? Vh Lisbeth

03.02.2020 - 19:40

DROPS Design answered:

Hej Lisbeth, ja hver gang du ser en skrå streg som går over 2 masker skal de strikkes sammen ifølge symbolforklaringen og der skal laves et omslag enten før eller efter de 2 masker som strikkes sammen. God fornøjelse!

11.02.2020 - 09:57