DROPS Brushed Alpaca Silk
77% Alpaca, 23% Silk
from 5.50 CAD /25g
Get the yarn to make this pattern from 38.50CAD.

The yarn cost is calculated from the pattern’s smallest size and the yarn’s cheapest product type. Looking for an even better price? You might find it on the DROPS Deals!

DROPS SS24

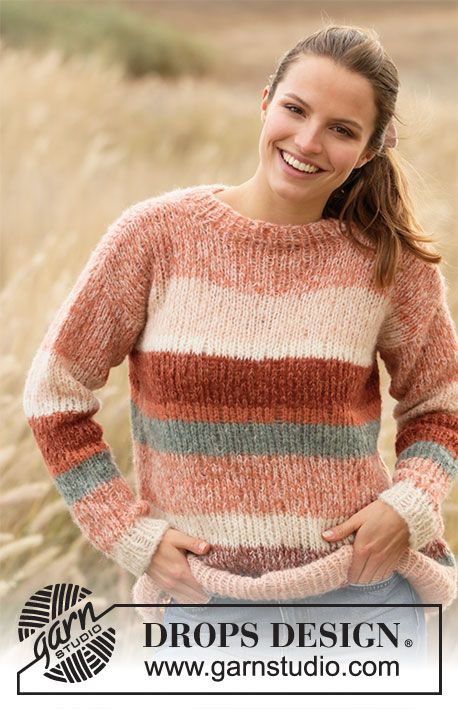
Frosted Foliage Jacket

Knitted jacket with round yoke in 2 strands DROPS Brushed Alpaca Silk. The piece is worked top down. Sizes S - XXXL.

DROPS 212-35
DROPS Design: Pattern no as-125
Yarn group C + C or E
-------------------------------------------------------

SIZES:
S - M - L - XL - XXL – XXXL

Finished measurements:
Chest measurements: 88-96-104-112-118-134 cm = 34⅝"-37¾"-41"-44"-46½"-52¾"
Full length: 56-58-60-62-64-66 cm = 22"-22¾"-23⅝"-24⅜"-25¼"-26"

All measurements in charts are in cm.

MATERIALS:
DROPS BRUSHED ALPACA SILK from Garnstudio (belongs to yarn group C)
100-100-100-125-125-125 g color 22, pale rust
75-100-100-100-125-125 g color 01, off white

KNITTING GAUGE:
11 stitches in width and 15 rows in height with stockinette stitch and 2 strands = 10 x 10 cm = 4" x 4".

NEEDLES:
DROPS DOUBLE POINTED NEEDLES SIZE 8 MM = US 11.
DROPS CIRCULAR NEEDLE SIZE 8 MM = US 11: Length 40 cm = 16" and 80 cm = 32" for stockinette stitch.
DROPS DOUBLE POINTED NEEDLES SIZE 6 MM = US 10.
DROPS CIRCULAR NEEDLE SIZE 6 MM = US 10: Length 80 cm = 32" for rib.
Needle size is only a guide. If you get too many stitches on 10 cm = 4", change to a larger needle size. If you get too few stitches on 10 cm = 4", change to a smaller needle size.

DROPS MOTHER OF PEARL BUTTONS, Arched (white) NO 522: 6-6-7-7-7-7 items.

-------------------------------------------------------

Alternative Yarn – See how to change yarns here
Yarn Groups A to F – Use the same pattern and change the yarn here
Yarn usage using an alternative yarn – Use our yarn converter here

-------------------------------------------------------

DROPS Brushed Alpaca Silk
77% Alpaca, 23% Silk
from 5.50 CAD /25g
Get the yarn to make this pattern from 38.50CAD.

The yarn cost is calculated from the pattern’s smallest size and the yarn’s cheapest product type. Looking for an even better price? You might find it on the DROPS Deals!

Pattern instructions

NOTE: This pattern is written in American English. All measurements in charts are in cm. For conversion from inches to cm - click here. There are different terms for crocheting in American and British English. If this pattern includes crochet, click for "crochet terms" here. For this pattern in British English, please click here.
-------------------------------------------------------

EXPLANATIONS FOR THE PATTERN:

-------------------------------------------------------

PATTERN:
See diagrams A.1 to A.4. The diagrams show all the rows in the pattern seen from the right side.

INCREASE TIP (evenly spaced):
To work out how to increase evenly, count the total number of stitches on the needle (e.g. 66 stitches) minus the bands (e.g. 12 stitches) and divide the remaining stitches by the number of increases to be made (e.g. 6) = 9.
In this example, increase by making 1 yarn over after each 9th stitch and do not increase on bands. On the next row work the yarn overs twisted to avoid holes.
DECREASE TIP (for sleeves):
Decrease 1 stitch on each side of the marker thread as follows: Work until there are 3 stitches left before the marker thread, knit 2 together, knit 2 (marker thread sits between these 2 stitches), slip 1 stitch as if to knit, knit 1 and pass the slipped stitch over the knitted stitch.

BUTTONHOLES:
Work buttonholes on right band (when garment is worn). Work from the right side when there are 6 stitches left on the row as follows: Knit 2, make 1 yarn over, knit 2 together and work the last stitches. On the next row (wrong side) knit the yarn over to leave a hole.
The first buttonhole is worked when the neck measures 3 cm = 1⅛". The other 5-5-6-6-6-6 buttonholes are worked with approx. 9½-10-8½-9-9½-9½ cm = 3¾"-4"-3¼"-3½"-3¾"-3¾" between each one.

BINDING-OFF TIP:
To avoid the bind-off edge being tight you can bind off with a larger size needle. If the edge is still tight, make 1 yarn over after approx. each 4th stitch at the same time as binding off and the yarn overs are bind off as normal stitches.

-------------------------------------------------------

START THE PIECE HERE:

-------------------------------------------------------

JACKET – SHORT OVERVIEW OF THE PIECE.
The neck and yoke are worked back and forth with circular needle, from mid front and top down. The yoke is divided for body and sleeves and the body continued back and forth with circular needle. The sleeves are worked in the round with double pointed needles/short circular needle, top down.

NECK:
Cast on 66-66-70-74-74-78 stitches (including 6 band stitches on each side towards mid front) with circular needle size 6 mm = US 10 and 2 strands pale rust (= 2 strands). Purl 1 row (= wrong side). Change to 1 strand pale rust and 1 strand off-white. The next row is worked as follows from the right side: Work A.1 over the first 6 stitches (= band), * knit 2, purl 2 *, work from *-* until there are 8 stitches left on the row, knit 2 and finish with A.2 over the last 6 stitches (= band). Continue this rib for 3 cm = 1⅛" – remember the BUTTONHOLES on right band – read description above.
When the rib is finished knit 1 row from the right side where you increase 6-11-12-13-18-24 stitches evenly spaced – read INCREASE TIP = 72-77-82-87-92-102 stitches. Purl 1 row from the wrong side (yarn overs are purled twisted and the bands are worked as before).
Change to circular needle size 8 mm = US 11. Insert 1 marker after the band at the beginning of the row (mid front); the yoke will be measured from this marker!

YOKE:
Work stockinette stitch back and forth with A.1 and A.2 over the outermost 6 stitches on each side as before. REMEMBER THE KNITTING GAUGE!
When the piece measures 4 cm = 1½" from the marker increase as follows:
INCREASE 1: Work A.1 over the first 6 stitches, A.3 until there are 6 stitches left (= 12-13-14-15-16-18 repeats of 5 stitches), A.2 over the last 6 stitches. When A.3 has been completed in height you have increased 24-26-28-30-32-36 stitches = 96-103-110-117-124-138 stitches. Continue with stockinette stitch and 6 band stitches on each side until the piece measures 8-9-10-10-11-12 cm = 3⅛"-3½"-4"-4"-4⅜"-4¾".
INCREASE 2: Work A.1 over the first 6 stitches, knit 0-1-1-2-2-0, work A.4 until there are 6-6-7-7-8-6 stitches left (= 14-15-16-17-18-21 repeats of 6 stitches), knit 0-0-1-1-2-0, work A.2 over the last 6 stitches. When A.4 has been completed in height you have increased 28-30-32-34-36-42 stitches = 124-133-142-151-160-180 stitches. Continue with stockinette stitch and 6 band stitches on each side until the piece measures 12-14-16-17-19-20 cm = 4¾"-5½"-6¼"-6¾"-7½"-8".
INCREASE 3: Work A.1 over the first 6 stitches, knit 2-1-2-1-2-0, work A.4 until there are 8-6-8-6-8-6 stitches left (= 18-20-21-23-24-28 repeats of 6 stitches), knit 2-0-2-0-2-0, work A.2 over the last 6 stitches. When A.4 has been completed in height you have increased 36-40-42-46-48-56 stitches = 160-173-184-197-208-236 stitches. Continue with stockinette stitch and 6 band stitches on each side until the piece measures 18-20-22-24-26-28 cm = 7"-8"-8¾"-9½"-10¼"-11" – adjust so the last row is worked from the wrong side. Now divide the yoke for body and sleeves on the next row as follows: Work the first 27-29-30-32-34-39 stitches as before (= right front piece), place the next 32-34-37-39-42-46 stitches on 1 thread for the sleeve, cast on 6-6-8-8-8-8 new stitches on the needle (= in side under the sleeve), work 42-47-50-55-56-66 stitches as before (= back piece), place the next 32-34-37-39-42-46 stitches on 1 thread for the sleeve, cast on 6-6-8-8-8-8 new stitches on the needle (= in side under the sleeve) and work the remaining 27-29-30-32-34-39 stitches as before (= left front piece). Body and sleeves are finished separately. THE PIECE IS NOW MEASURED FROM HERE!

BODY:
= 108-117-126-135-140-160 stitches. Continue with 1 strand of each color (= 2 strands), stockinette stitch and 6 band stitches on each side as before.
When the piece measures 30 cm = 11¾", increase 18-21-24-27-30-30 stitches evenly spaced = 126-138-150-162-170-190 stitches. Change to circular needle size 6 mm = US 10 and work rib as follows: A.1 over the first 6 stitches, * knit 2, purl 2 *, work from *-* until there are 8 stitches left, knit 2 and work, A.2 over the last 6 stitches. Continue back and forth like this until the rib measures 4 cm = 1½". Change to 2 strands pale rust. Bind off with knit over knit and purl over purl – read BINDING-OFF TIP. The jacket measures approx. 56-58-60-62-64-66 cm = 22"-22¾"-23⅝"-24⅜"-25¼"-26" from the shoulder down.

SLEEVE:
Place the 32-34-37-39-42-46 stitches from the thread on the one side of the piece on short circular needle size 8 mm = US 11 and knit up 1 stitch in each of the 6-6-8-8-8-8 stitches cast on under the sleeve = 38-40-45-47-50-54 stitches. Insert a marker thread in the middle of the 6-6-8-8-8-8 stitches under the sleeve. Allow the thread to follow your work onwards; it will be used when decreasing under the sleeve.
Start the round at the marker thread and work stockinette stitch in the round with 1 strand of each color (= 2 strands).
When the sleeve measures 4 cm = 1½" from the division in all sizes, decrease 2 stitches under the sleeve – read DECREASE TIP. Decrease like this every 6-5-3½-3½-3-2½ cm = 2⅜"-2"-1¼"-1¼"-1⅛"-⅞" a total of 6-7-9-9-10-12 times = 26-26-27-29-30-30 stitches. When the sleeve measures 40-39-37-35-34-32 cm = 15¾"-15¼"-14½"-13¾"-13⅜"-12½" (shorter measurements in larger sizes due to longer yoke) increase 2-2-5-3-6-6 stitches evenly spaced = 28-28-32-32-36-36 stitches. Change to double pointed needles size 6 mm = US 10 and work rib (= knit 2 /purl 2) for 4 cm = 1½". Change to 2 strands pale rust. Bind off with knit over knit and purl over purl – remember BINDING-OFF TIP. The sleeve measures approx. 44-43-41-39-38-36 cm = 17¼"-17"-16⅛"-15¼"-15"-14¼" from the division. Work the other sleeve in the same way.

Diagram

symbols = knit from right side, purl from wrong side
symbols = purl from right side, knit from wrong side
symbols = between 2 stitches make 1 yarn over. On the next row (wrong side) purl the yarn over, leaving a hole
diagram
Do you have a question? See a list of frequently asked questions (FAQ)

Knitting tension is what determines the final measurements of your work, and is usually measured per 10 x 10 cm. It is provided like so: number of stitches in width x number of rows in height - eg: 19 stitches x 26 rows = 10 x 10 cm.

The knitting tension is very individual; some people knit/crochet loosely while others work tightly. You adjust the knitting tension with the needle size, which is why the suggested needle size only serve as a guide! You need to adjust this (up or down) to ensure that YOUR knitting tension matches the knitting tension provided in the pattern. If you work with a different knitting tension than provided you will have a different yarn consumption, and your work will have different measurements than what the pattern suggests.

The knitting tension also determines which yarns can replace each other. As long as you achieve the same knitting tension you can replace one yarn with another.

See DROPS lesson: How to measure your tension/gauge

See DROPS video: How to make a gauge tension swatch

The required amount of yarn is provided in grams, eg: 450 g. To calculate how many balls you’ll need you first need to know how many grams are in 1 ball (25g, 50g or 100g). This information is available if you click on the individual yarn quality on our pages. Divide the amount required with the amount of each ball. For example, if each ball is 50g (the most common amount), the calculation will be as follows: 450 / 50 = 9 balls.

The important thing when changing from one yarn to another is that the knitting/crochet tension remains the same. This is so that the measurements of the finished piece will be the same as on the sketch provided. It is easier to achieve the same knitting tension using yarns from the same yarn group. It is also possible to work with multiple strands of a thinner yarn to achieve the knitting tension of a thicker one. Please try our yarn converter. We recommend you to always work a test swatch.

Please NOTE: when changing yarn the garment might have a different look and feel to the garment in the photo, due to individual properties and qualities of each yarn.

See DROPS lesson: Can I use a different yarn than the one mentioned in the pattern?

All our yarns are categorised into yarn groups (from A to F) according to thickness and knitting tension – group A contains the thinnest yarns and group F the thickest. This makes it easier for you to find alternative yarns to our patterns, should you wish to switch yarn. All yarns within the same group have a similar knitting tension and can easily replace each other. However, different yarn qualities have different structures and properties which will give the finished work a unique look and feel.

Click here for an overview of the yarns in each yarn group

At the top of all our patterns you’ll find a link to our yarn converter, which is a helpful tool should you wish to use a different yarn than suggested. By filling in the yarn quality you wish to replace, the amount (in your size) and number of strands, the converter will present good alternative yarns with the same knitting tension. Additionally it will tell you how much you’ll require in the new qualities and whether you’ll need to work with multiple strands. Most skeins are 50g (some are 25g or 100g).

If the pattern is worked with multiple colours, every colour will have to be converted separately. Similarly, if the pattern is worked with several strands of different yarns (for example 1 strand Alpaca and 1 strand Kid-Silk) you will have to find alternatives for each, individually.

Click here to see our yarn converter

Since different yarns have different qualities and textures we have chosen to keep the original yarn in our patterns. However, you can easily find options among our available qualities by using our yarn converter, or simply pick a yarn from the same yarn group.

It is possible that some retailers still have discontinued yarns in stock, or that someone has a few skeins at home that they would like to find patterns for.

The yarn converter will provide both alternative yarn as well as required amount in the new quality.

If you think it's hard to decide what size to make, it can be a good idea to measure a garment you own already and like the size of. Then you can pick the size by comparing those measures with the ones available in the pattern's size chart.

You'll find the size chart at the bottom of the pattern.

See DROPS lesson: How to read size chart

The needle size provided in the pattern serves only as a guide, the important thing is to follow the knitting tension. And since knitting tension is very individual, you will have to adjust the needle size to ensure that YOUR tension is the same as in the pattern – maybe you’ll have to adjust 1, or even 2 needle sizes, up or down to achieve the correct tension. For this, we recommend that you work test swatches.

Should you work with a different knitting tension than the one provided, the measurements of the finished garment might deviate from the measurement sketch.

See DROPS lesson: How to measure your tension/gauge

See DROPS video: How to make a gauge tension swatch

Working a garment top-down provides more flexibility and room for personal adjustment. For example it is easier to try the garment on while working, as well as making adjustments to length of yoke and shoulder caps.

The instructions are carefully explaining every step, in the correct order. Diagrams are adjusted to the knitting direction and are worked as usual.

The diagram depicts all rows/rounds, and every stitch seen from the right side. It is read from bottom to top, from right to left. 1 square = 1 stitch.

When working back and forth, every other row is worked from the right side and every other row is worked from the wrong side. When working from the wrong side, the diagram will have to be worked reversed: from left to right, knit stitches are purled, purl stitches are knit etc.

When working in the round every round is worked from the right side and the diagram are worked from right to left on all rounds.

See DROPS lesson: How to read knitting diagrams

The diagram depicts all rows/rounds, and every stitch seen from the right side. It is worked from bottom to top, from right to left.

When working back and forth every other row is worked from the right side: from right to left and every other row is worked from the wrong side: from left to right.

When working in the round, every row in the diagram are worked from the right side, from right to left.

When working a circular diagram you start in the middle and work your way outwards, counter clockwise, row by row.

The rows usually start with a given number of chain stitches (equivalent to the height of the following stitch), this will either be depicted in the diagram or explained in the pattern.

See DROPS lesson: How to read crochet diagrams

Instructions for working several diagrams after each other on the same row/round, will often be written like so: “work A.1, A.2, A.3 a total of 0-0-2-3-4 times". This means you work A.1 once, then A.2 is worked once, and A.3 is repeated (in width) the number of times provided for your size – in this case like so: S = 0 times, M = 0 times, L=2 times, XL= 3 times and XXL = 4 times.

The diagrams are worked as usual: begin with the first row in A.1, then work the first row in A.2 etc.

See DROPS lesson: How to read knitting diagrams

See DROPS lesson: How to read crochet diagrams

The total width of the garment (from wrist-to-wrist) will be larger in the larger sizes, despite the actual sleeves being shorter. The larger sizes have longer sleeve caps and wider shoulders, so there will be a good fit in all sizes.

The measurement sketch/schematic drawing provides information regarding the full length of the garment. If it’s a jumper or a jacket the length is measured from the highest point on the shoulder (usually closest to the neckline), and straight down to the bottom of the garment. It is NOT measured from the tip of shoulder. Similarly, the length of yoke is measured from the highest point on the shoulder and down to where yoke is split into body and sleeves.

See DROPS lesson: How to read a schematic drawing

Diagrams are often repeated on the round or in height. 1 repeat is the diagram the way it appears in the pattern. If it says to work 5 repeats of A.1 in the round, then you work A.1 a total of 5 times after/next to each other in the round. If it says to work 2 repeats of A.1 vertically/in height you work the entire diagram once, then begin again at the start and work the entire diagram one more time.

Chain stitches are slightly narrower than other stitches and to avoid working the cast-on edge too tight, we simply chain more stitches to begin with. The stitch count will be adjusted on the following row to fit the pattern and measurement sketch.

The rib edge is more elastic and will contract slightly compared to, for example, stocking stitch. By increasing before the rib edge, you avoid a visible difference in width between the rib edge and the rest of the body.

It’s very easy to cast off too tightly, and by making yarn overs while casting off (and simultaneously casting these off) you avoid a too tight cast off edge.

See DROPS video: How to bind off with yarn overs (yo)

To achieve an even increase (or decrease) you can increase on, for example: every 3rd and 4th row alternately, like so: work 2 rows and increase on the 3rd row, work 3 rows and increase on the 4th. Repeat this until the increase is complete.

See DROPS lesson: Increase or decrease 1 st on every 3rd and 4th row alternately

Should you prefer to work in the round instead of back and forth, you may of course adjust the pattern. You’ll need to add steeks mid-front (usually 5 stitches), and follow the instructions. When you would normally turn and work from the wrong side, simply work across the steek and continue in the round. At the end you’ll cut the piece open, pick up stitches to work bands, and cover the cut edges.

See DROPS video: How to knit steeks and cut open

Should you prefer to work back and forth instead of in the round, you may of course adjust the pattern so you work the pieces separately and then assemble them at the end. Divide the stitches for the body in 2, add 1 edge stitch in each side (for sewing) and work the front and back pieces separately.

See DROPS lesson: Can I adapt a pattern for circular needles into straight needles?

Pattern repeats can vary slightly in the different sizes, in order to get the correct proportions. If you’re not working the exact same size as the garment in the photo, yours might deviate slightly. This has been carefully developed and adjusted so that the complete impression of the garment is the same in all sizes.

Make sure to follow instructions and diagrams for your size!

If you have found a pattern you like which is available in women’s size it’s not very difficult to convert it to men’s size. The biggest difference will be the length of sleeves and body. Start working on the women size that you think would fit across the chest. The additional length will be worked right before you cast off for the armhole/sleeve cap. If the pattern is worked top-down you can add the length right after the armhole or before the first decrease on sleeve.

Regarding additional yarn amount, this will depend on how much length you add, but it is better with a skein too many than too few.

All yarns will have excess fibres (from production) that might come off as lint or shedding. Brushed yarns (ie hairier yarns) have more of these loose, excess fibres, causing more shedding.

Shedding also depends on what is worn under or over the garment, and whether this pulls at the yarn fibres. It’s therefore not possible to guarantee that there will be no shedding

Below are some tips on how to get the best result when working with hairier yarns:

1. When the garment is finished (before you wash it) shake it vigorously so the looser hairs come off. NOTE: do NOT use a lint roller, brush or any method that pulls at the yarn.

2. Place the garment in a plastic bag and put it in your freezer - the temperature will cause the fibres to become less attached to each other, and excess fibres will come off easier.

3. Leave in the freezer for a few hours before taking it out and shaking it again.

4. Wash the garment according to the instructions on the yarn label.

Pilling is a natural process that happens to even the most exclusive of fibers. It's a natural sign of wear and tear that is hard to avoid, and that is most visible in high friction areas of your garment like a sweater's arms and cuffs.

You can make your garment look as new by removing the pilling, using a fabric comb or a pill/lint remover.

Still can't find the answer you need? Then scroll down and leave your question so one of our experts can try to help you. This will be done normally within 5 to 10 working days.
In the meantime, you can read the questions and answers that others have left to this pattern or join the DROPS Workshop on Facebook to get help from fellow knitters/crocheters!

You might also like...

Post a comment to pattern DROPS 212-35

We would love to hear what you have to say about this pattern!

If you want to leave a question, please make sure you select the correct category in the form below, to speed up the answering process. Required fields are marked *.

Comments / Questions (10)

country flag Dorte Mandal wrote:

Rust 27 g colour 22 dyelot 533626 , hvid 26 g colour 1 dyelot 307587 strikkefasthed passer. der er 6 g tilbage af nøgle 3 af rust og 1 meter af den hvide. og i min verden burde der være brugt mest rust .

31.10.2022 - 14:53

country flag Dorte Mandal wrote:

Se tidligere spørgsmål og svar. Kan godt se der skal bruges mere rust og derfor forstår jeg ikke at jeg har brugt mindre rust indtil nu. Det 3 nøgle af hver jeg er i gang med og det hvide er opbrugt og det rust er der en del tilbage af. Har endnu 2 rust og 1 hvidt tilbage også

31.10.2022 - 13:39

DROPS Design answered:

Hei Dorte. Kan du veie nøstene? Hvert nøste skal veie 25 gram. Kanskje rust veier litt mer en 25 gram og natur litt mindre enn 25 gram, eller omvendt derfor blir det den forskjellen. Kan du også opplyse hvilket partnr. disse nøstene har, så får vi dobbeltsjekke. Og gjerne hvilken strikkefasthet du får med disse 2 garnene sammen. mvh DROPS Design

31.10.2022 - 13:44

country flag Dorte Mandal wrote:

Forstår hvorfor der ikke er lige mange nøgler af hver farve til alle størrelser. Kommer til at mangle 1 nøgle hvid 01. Der er tilsyneladende heller ikke lige antal meter i røde og hvide . Har 2 1/4 nøgle rød og kun 1 nøgle hvid tilbage og mangler begge ærmer og nederste rib . Har købt hos Garnius, de ville kontakte jer ang. opskriften.

30.10.2022 - 19:38

DROPS Design answered:

Hei Dorte. Det strikkes litt mer av lys rust fargen enn natur (kantene på halsen, ermene og vrangbordskanten helt nederst), derfor er det 1 nøste mer av lys rust enn natur. Begge fargene / nøstene skal veie 25 gram og ha ca en løpelengde på 140 meter, men det kan forekomme litt forskjell, både at et nøste veier litt mer eller litt mindre. mvh DROPS Design

31.10.2022 - 13:01

country flag Janne wrote:

Jeg strikker str L? Jeg får ei maske mer(4) på slutten før stolpen etter siste øking enn fra starten hvor jeg strikker 3 masker etter stolpe og før første øking?? Dette gjelder 2.øking. Maskeantall er riktig!

16.01.2022 - 12:06

DROPS Design answered:

Hei Janne. Ja, du vil få 1 maske mer både på 2. og 3. økning på den ene siden (den siden før du strikker stolpen, fra retten). mvh DROPS Design

18.01.2022 - 10:18

country flag Jane wrote:

Klarer ikke å forstå hvordan jeg begynner. Har legg opp og strikket første omgang. Sliter med halskant og hvordan jeg får en vrangbord i forhold til oppskriften. Får det ikke til å stemme. Hår det an å få oppskrift på genseren isteden, eventuelt en forklaring som er litt lettere å forstå. Er litt ny i dette

04.07.2021 - 15:08

country flag Olga Stefanidou wrote:

Bonjour. Je souhaite demander une clarification: "La taille des aiguilles est uniquement indiquée à titre indicatif. Si vous avez trop de mailles pour 10 cm, essayez avec des aiguilles plus grosses. Si vous n'avez pas assez de mailles pour 10 cm, essayez avec des aiguilles plus fines." n' est-ce pas le contraire que vous entendez dire? il se peut que je comprenne mal mais si j' ai trop de mailles il ne me faudrait pas des aiguilles plus fines et vice-versa?

21.02.2021 - 09:37

DROPS Design answered:

Bonjour Mme Stefanidou, si vous avez trop de mailles pour 10 cm, c'est que vous tricotez trop serré, il vous faudra réessayer avec des aiguilles plus fines (et si vous n'avez pas assez de mailles pour 10 cm, c'est que vous tricotez plus lâche que l'échantillon, il faudra essayer avec des aiguilles plus fines). Retrouvez ici plus d'informations sur l'échantillon. Bon tricot!

22.02.2021 - 10:03

country flag Britta wrote:

Hallo! Die senkrechte Blende (Knopfleiste) rollt sich auf (am Übergang zwischen 2 rechten und 2 linken Maschen). Wie kann ich das verhindern? Vielen Dank für die Antwort! Herzliche Grüße 😊

07.02.2021 - 16:10

DROPS Design answered:

Liebe Britta, Sie können die Jacke mit Stecknadeln auf einer geeigneten Unterlage spannen, anfeuchten (z.B. mit einer Sprühflasche für Blumen) und trocknen lassen, danach entfernen Sie die Stecknadeln, dann sollte sich die Blende nicht mehr rollen. :)

08.02.2021 - 10:17

country flag Anne Berit Nordhaug wrote:

Jeg får ikke lastet ned oppskriften

15.07.2020 - 10:41

DROPS Design answered:

Hei Anne Berit. Sjekk internett tilgangen din. Vi har ingen problemer, jakken ligger ute på våre hjemmesider. mvh DROPS design

15.07.2020 - 14:44

country flag Gudrun Schneider wrote:

Hei, oppskrift 212-35 står det ‘fortsett vrangborden slik i 3cm - husk knapphull’. Men i tips om knapphull står det at det lages når vrangborden er 3 cm: men da skal man jo egentlig slutte med vrangborden. Betyr det at knapphullet kommer i siste rette i vrangborden?

31.03.2020 - 15:04

DROPS Design answered:

Hei Gudrun. Det står ca 3 cm, bare avpass at du får felt fra retten. God Fornøyelse!

17.04.2020 - 09:21

country flag Mafalda Silva wrote:

Modelo muito bonito, vou tentar fazer, gostava tb de ter o modelo para bébé

17.01.2020 - 14:13