DROPS Air
DROPS Air
65% Alpaca, 28% Polyamide, 7% Wool
from 4.80 £ /50g
DROPS Brushed Alpaca Silk
77% Alpaca, 23% Silk
from 2.90 £ /25g
Get the yarn to make this pattern from 23.10£.

The yarn cost is calculated from the pattern’s smallest size and the yarn’s cheapest product type. Looking for an even better price? You might find it on the DROPS Deals!

DROPS SS24

Summer Peach

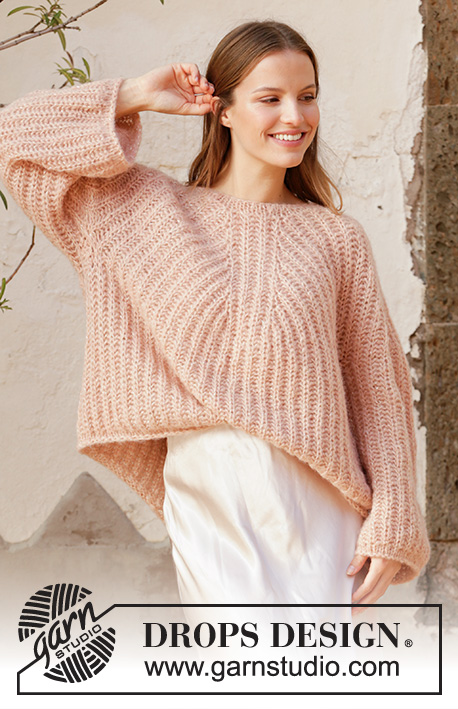
Knitted jumper in DROPS Air and DROPS Brushed Alpaca Silk. Piece is knitted top down with Fisherman’s rib stitches on yoke and ¾ sleeves. Size XS – XXL.

DROPS 212-26
DROPS design: Pattern ai-266
Yarn group C + C or E
----------------------------------------------------------

SIZE:
XS - S - M - L - XL - XXL

MATERIALS:
DROPS AIR from Garnstudio (belongs to yarn group C)
150-200-200-200-250-250 g colour 01, off white
And use:
DROPS BRUSHED ALPACA SILK from Garnstudio (belongs to yarn group C)
75-100-100-125-125-125 g colour 20, pink sand

KNITTING TENSION:
10 stitches in width and 14 rows vertically in stocking stitch and 1 strand of each quality = 10 x 10 cm.

NEEDLES:
DROPS DOUBLE POINTED NEEDLES SIZE 9 mm
DROPS CIRCULAR NEEDLE SIZE 9 mm : Length 40 and 80 cm for stocking stitch.
DROPS DOUBLE POINTED NEEDLES SIZE 8 mm
DROPS CIRCULAR NEEDLE SIZE 8 mm : Length 40 cm and 80 cm for edges.
Needle size is only a suggestion! If you have too many stitches on 10 cm switch to larger needles. If you have too few stitches on 10 cm switch to smaller needles.

-------------------------------------------------------

Alternative Yarn – See how to change yarns here
Yarn Groups A to F – Use the same pattern and change the yarn here
Yarn usage using an alternative yarn – Use our yarn converter here

-------------------------------------------------------

DROPS Air
DROPS Air
65% Alpaca, 28% Polyamide, 7% Wool
from 4.80 £ /50g
DROPS Brushed Alpaca Silk
77% Alpaca, 23% Silk
from 2.90 £ /25g
Get the yarn to make this pattern from 23.10£.

The yarn cost is calculated from the pattern’s smallest size and the yarn’s cheapest product type. Looking for an even better price? You might find it on the DROPS Deals!

Pattern instructions

NOTE: This pattern is written in British English. All measurements in charts are in cm. For conversion from cm to inches - click here. There are different terms for crocheting in British and American English. If this pattern includes crochet, click for "crochet terms" here. For this pattern in American English, please click here.
----------------------------------------------------------

EXPLANATION FOR THE PATTERN:

----------------------------------------------------------

GARTER STITCH (worked in the round):
1 ridge = 2 rounds, i.e. knit 1 round and purl 1 round.

PATTERN: 
See diagrams A.1 to A.4.

INCREASE TIP (applies to sides of body):
Work until 2 stitches remain before marker thread, make 1 yarn over, knit 4 (marker thread is in the middle of these 4 stitches), make 1 yarn over= 2 stitches increased at the marker thread and 4 stitches increased in total on round.
On next round knit yarn overs twisted to avoid holes.. Then work the new stitches in stocking stitch

DECREASE TIP (applies to mid under sleeve, and in the 4 smallest sizes)
Begin 3 stitches before marker thread and knit 2 together, knit 2 (marker thread is between these 2 stitches), slip 1 stitch knitwise, knit 1, pass slipped stitch over stitch worked = 2 stitches decreased.

CAST-OFF TIP:
To avoid a tight cast-off edge you may use a larger needle.

----------------------------------------------------------

START THE PIECE HERE:

----------------------------------------------------------

JUMPER - SHORT OVERVIEW OF THE PIECE:
Neck edge and yoke are worked in the round on circular needle, top down. Now divide yoke for body and sleeves. Body is worked in the round on circular needle, top down. Work sleeves in the round on double pointed needles/short circular needle, top down.

NECK EDGE:
Cast on 32-34-36-42-44-46 stitches on short circular needle size 8 mm with 2 strands Air + 1 strand Brushed Alpaca Silk (= 3 strands).
Remove one of the strands in Air and work the rest of garment with 1 strand in each quality (= 2 strands). Knit 1 round. Then work A.1 in the round.
When neck edge measures 4 cm, work next round as follows: * Work 1 Fisherman’s rib stitch (i.e. knit 1 stitch below next stitch), make 1 yarn over, purl 1 *, work from *-* the entire round = 48-51-54-63-66-69 stitches on needle.
Work 1 round with knit over Fisherman’s rib stitch and purl over purl (purl the yarn overs twisted to avoid holes).
Insert 1 marker at beginning of round. Work yoke as explained below, measure yoke from this marker.

YOKE:
Switch to a short circular needle size 9 mm and work A.2 in the round (= 16-17-18-21-22-23 repetitions of 3 stitches). Continue pattern like this. REMEMBER THE KNITTING TENSION!
When piece measures 3-3-3-3-4-4 cm from marker at the neck, work next round as follows: * Work 1 Fisherman’s rib stitch and purl 2, make 1 yarn over *, work from *-* the entire round = 64-68-72-84-88-92 stitches. Work 1 round with knit stitch over Fisherman’s rib stitch and purl over purl (purl the yarn overs twisted to avoid holes). Then work A.3 in the round.
When piece measures 6-6-6-7-7-8 cm from marker at the neck, work, A.4 in the round (= 16-17-18-21-22-23 repetitions of 4 stitches). When A.4 has been worked vertically, there are 128-136-144-168-176-184 stitches on needle. Then work A.3 in the round (= 32-34-36-42-44-46 repetitions of 4 stitches).
When piece measures 14-15-17-19-20-22 cm from marker at the neck, work A.1 in the round.

When piece measures approx. 18-20-22-24-26-28 cm from marker at the neck, divide yoke for body and sleeves. I.e. work next round as follows from mid back: Knit 18-20-21-24-26-28 (= ½ back piece), slip the next 28-28-30-36-36-36 stitches on 1 stitch holder for sleeve, cast on 6-6-8-6-6-8 new stitches on row (= in the side under sleeve), knit 36-40-42-48-52-56 (= front piece), slip the next 28-28-30-36-36-36 stitches on 1 stitch holder for sleeve, cast on 6-6-8-6-6-8 new stitches on row (= in the side under sleeve) and knit the remaining 18-20-21-24-26-28 stitches (= ½ back piece). Finish body and sleeves separately. NOW MEASURE THE PIECE FROM HERE!

BODY:
= 84-92-100-108-116-128 stitches. Insert 1 marker thread at beginning of round, and 1 marker thread after 42-46-50-54-58-64 stitches (= in the sides on body). Move the marker threads upwards when working; they should be used for increase later in the sides.
Work in stocking stitch in the round. When piece measures 8 cm from division, increase 1 stitch on each side of both marker threads – read INCREASE TIP. Repeat increase when piece measures 16 cm from division = 92-100-108-116-124-136 stitches.
Work until piece measures 28 cm from division in all sizes (approx. 3 cm remain until finished measurements, try the jumper on and work to desired length).
Switch to circular needle size 8 mm. Work 3 ridges in GARTER STITCH - read explanation above. Cast off by knitting– read CAST-OFF TIP. Jumper measures approx. 52-54-56-58-60-62 cm from shoulder and down.

SLEEVE:
Slip the 28-28-30-36-36-36 stitches from stitch holder in one side of piece on double pointed needles or a short circular needle size 9 mm and pick in addition up 1 stitch in each of the 6-6-8-6-6-8 new stitches cast on under sleeve = 34-34-38-42-42-44 stitches.
Insert 1 marker thread in the middle of the new 6-6-8-6-6-8 stitches that were cast on under sleeve.
Begin round at the marker thread and work stocking stitch in the round.
When sleeve measures 2 cm from division, decrease 2 stitch mid under sleeve (applies to XS, S, M and L) = 32-32-36-40-42-44 stitches.
Work until piece measures approx. 28-26-25-22-21-19 cm from division (approx. 3 cm remain until finished measurements, try the jumper on and work to desired length). NOTE! Shorter measurements in the larger sizes because of wider neck and longer yoke.
Switch to double pointed needles or short circular needle size 8 mm. Work 3 ridges. Cast off by knitting– remember cast-off tip. Sleeve measures approx. 31-29-28-25-24-22 cm from division. Work the other sleeve the same way.

Diagram

symbols = purl
symbols = knit
symbols = knit 1 in stitch below next stitch - this stitch is now called an Fisherman’s rib stitch
symbols = work 5 stitches in Fisherman’s rib stitch as follows: Knit 1, but wait to slip the stitch off the needle, * make 1 yarn over on right needle, knit same stitch without slipping the stitch off left needle *, work from *-* 2 times in total, then drop this stitch off left needle = 5 stitches (i.e. 4 stitches increased)
symbols = begin here
diagram
diagram

Each of our patterns has specific tutorial videos to help you.

Do you have a question? See a list of frequently asked questions (FAQ)

Knitting tension is what determines the final measurements of your work, and is usually measured per 10 x 10 cm. It is provided like so: number of stitches in width x number of rows in height - eg: 19 stitches x 26 rows = 10 x 10 cm.

The knitting tension is very individual; some people knit/crochet loosely while others work tightly. You adjust the knitting tension with the needle size, which is why the suggested needle size is only meant as a guide! You need to adjust this (up or down) to ensure that YOUR knitting tension matches the knitting tension provided in the pattern. If you work with a different knitting tension than provided you will have a different yarn consumption, and your work will have different measurements than what the pattern suggests.

The knitting tension also determines which yarns can replace each other. As long as you achieve the same knitting tension you can replace one yarn with another.

See DROPS lesson: How to measure your tension/gauge

See DROPS video: How to make a gauge tension swatch

The required amount of yarn is provided in grams, eg: 450 g. To calculate how many balls you’ll need you first need to know how many grams are in 1 ball (25g, 50g or 100g). This information is available if you click on the individual yarn quality on our pages. Divide the amount required with the amount of each ball. For example, if each ball is 50g (the most common amount), the calculation will be as follows: 450 / 50 = 9 balls.

The important thing when changing from one yarn to another is that the knitting/crochet tension remains the same. This is so that the measurements of the finished piece will be the same as on the sketch provided. It is easier to achieve the same knitting tension using yarns from the same yarn group. It is also possible to work with multiple strands of a thinner yarn to achieve the knitting tension of a thicker one. Please try our yarn converter. We recommend you to always work a test swatch.

Please NOTE: when changing yarn the garment might have a different look and feel to the garment in the photo, due to individual properties and qualities of each yarn.

See DROPS lesson: Can I use a different yarn than the one mentioned in the pattern?

All our yarns are categorised into yarn groups (from A to F) according to thickness and knitting tension – group A contains the thinnest yarns and group F the thickest. This makes it easier for you to find alternative yarns to our patterns, should you wish to switch yarn. All yarns within the same group have a similar knitting tension and can easily replace each other. However, different yarn qualities have different structures and properties which will give the finished work a unique look and feel.

Click here for an overview of the yarns in each yarn group

At the top of all our patterns you’ll find a link to our yarn calculator, which is a helpful tool should you wish to use a different yarn than suggested. By filling in the yarn quality you wish to replace, the amount (in your size) and number of strands, the calculator will present good alternative yarns with the same knitting tension. Additionally it will tell you how much you’ll require in the new qualities and whether you’ll need to work with multiple strands. Most skeins are 50g (some are 25g or 100g).

If the pattern is worked with multiple colours, every colour will have to be calculated separately. Similarly, if the pattern is worked with several strands of different yarns (for example 1 strand Alpaca and 1 strand Kid-Silk) you will have to find alternatives for each, individually.

Click here to see our yarn calculator

Since different yarns have different qualities and textures we have chosen to keep the original yarn in our patterns. However, you can easily find options among our available qualities by using our yarn calculator, or simply pick a yarn from the same yarn group.

It is possible that some retailers still have discontinued yarns in stock, or that someone has a few skeins at home that they would like to find patterns for.

The yarn calculator will provide both alternative yarn as well as required amount in the new quality.

If you think it's hard to decide what size to make, it can be a good idea to measure a garment you own already and like the size of. Then you can pick the size by comparing those measures with the ones available in the pattern's size chart.

You'll find the size chart at the bottom of the pattern.

See DROPS lesson: How to read size chart

The needle size provided in the pattern serves only as a guide, the important thing is to follow the knitting tension. And since knitting tension is very individual, you will have to adjust the needle size to ensure that YOUR tension is the same as in the pattern – maybe you’ll have to adjust 1, or even 2 needle sizes, up or down to achieve the correct tension. For this, we recommend that you work test swatches.

Should you work with a different knitting tension than the one provided, the measurements of the finished garment might deviate from the measurement sketch.

See DROPS lesson: How to measure your tension/gauge

See DROPS video: How to make a tension/gauge swatch

Working a garment top-down provides more flexibility and room for personal adjustment. For example it is easier to try the garment on while working, as well as making adjustments to length of yoke and shoulder caps.

The instructions are carefully explaining every step, in the correct order. Diagrams are adjusted to the knitting direction and are worked as usual.

The diagram depicts all rows/rounds, and every stitch seen from the right side. It is read from bottom to top, from right to left. 1 square = 1 stitch.

When working back and forth, every other row is worked from the right side and every other row is worked from the wrong side. When working from the wrong side, the diagram will have to be worked reversed: from left to right, knit stitches are purled, purl stitches are knit etc.

When working in the round every round is worked from the right side and the diagram are worked from right to left on all rounds.

See DROPS lesson: How to read knitting diagrams

The diagram depicts all rows/rounds, and every stitch seen from the right side. It is worked from bottom to top, from right to left.

When working back and forth every other row is worked from the right side: from right to left and every other row is worked from the wrong side: from left to right.

When working in the round, every row in the diagram are worked from the right side, from right to left.

When working a circular diagram you start in the middle and work your way outwards, counter clockwise, row by row.

The rows usually start with a given number of chain stitches (equivalent to the height of the following stitch), this will either be depicted in the diagram or explained in the pattern.

See DROPS lesson: How to read crochet diagrams

Instructions for working several diagrams after each other on the same row/round, will often be written like so: “work A.1, A.2, A.3 a total of 0-0-2-3-4 times". This means you work A.1 once, then A.2 is worked once, and A.3 is repeated (in width) the number of times provided for your size – in this case like so: S = 0 times, M = 0 times, L=2 times, XL= 3 times and XXL = 4 times.

The diagrams are worked as usual: begin with the first row in A.1, then work the first row in A.2 etc.

See DROPS lesson: How to read knitting diagrams

See DROPS lesson: How to read crochet diagrams

The total width of the garment (from wrist-to-wrist) will be larger in the larger sizes, despite the actual sleeves being shorter. The larger sizes have longer sleeve caps and wider shoulders, so there will be a good fit in all sizes.

The measurement sketch/schematic drawing provides information regarding the full length of the garment. If it’s a jumper or a jacket the length is measured from the highest point on the shoulder closest to the neckline, and straight down to the bottom of the garment. It is NOT measured from the tip of shoulder. Similarly, the length of yoke is measured from the highest point on the shoulder and down to where yoke is split into body and sleeves.

On a jacket measures are never taken along bands, unless specifically stated. Always measure inside band stitches when measuring the length.

See DROPS lesson: How to read a schematic drawing

Diagrams are often repeated on the round or in height. 1 repeat is the diagram the way it appears in the pattern. If it says to work 5 repeats of A.1 in the round, then you work A.1 a total of 5 times after/next to each other in the round. If it says to work 2 repeats of A.1 vertically/in height you work the entire diagram once, then begin again at the start and work the entire diagram one more time.

Chain stitches are slightly narrower than other stitches and to avoid working the cast-on edge too tight, we simply chain more stitches to begin with. The stitch count will be adjusted on the following row to fit the pattern and measurement sketch.

The rib edge is more elastic and will contract slightly compared to, for example, stocking stitch. By increasing before the rib edge, you avoid a visible difference in width between the rib edge and the rest of the body.

It’s very easy to cast off too tightly, and by making yarn overs while casting off (and simultaneously casting these off) you avoid a too tight cast off edge.

See DROPS video: How to bind off with yarn overs (yo)

To achieve an even increase (or decrease) you can increase on, for example: every 3rd and 4th row alternately, like so: work 2 rows and increase on the 3rd row, work 3 rows and increase on the 4th. Repeat this until the increase is complete.

See DROPS lesson: Increase or decrease 1 st on every 3rd and 4th row alternately

Should you prefer to work in the round instead of back and forth, you may of course adjust the pattern. You’ll need to add steeks mid-front (usually 5 stitches), and follow the instructions. When you would normally turn and work from the wrong side, simply work across the steek and continue in the round. At the end you’ll cut the piece open, pick up stitches to work bands, and cover the cut edges.

See DROPS video: How to knit steeks and cut open

Should you prefer to work back and forth instead of in the round, you may of course adjust the pattern so you work the pieces separately and then assemble them at the end. Divide the stitches for the body in 2, add 1 edge stitch in each side (for sewing) and work the front and back pieces separately.

See DROPS lesson: Can I adapt a pattern for circular needles into straight needles?

Pattern repeats can vary slightly in the different sizes, in order to get the correct proportions. If you’re not working the exact same size as the garment in the photo, yours might deviate slightly. This has been carefully developed and adjusted so that the complete impression of the garment is the same in all sizes.

Make sure to follow instructions and diagrams for your size!

If you have found a pattern you like which is available in women’s size it’s not very difficult to convert it to men’s size. The biggest difference will be the length of sleeves and body. Start working on the women size that you think would fit across the chest. The additional length will be worked right before you cast off for the armhole/sleeve cap. If the pattern is worked top-down you can add the length right after the armhole or before the first decrease on sleeve.

Regarding additional yarn amount, this will depend on how much length you add, but it is better with a skein too many than too few.

All yarns will have excess fibres (from production) that might come off as lint or shedding. Brushed yarns (ie hairier yarns) have more of these loose, excess fibres, causing more shedding.

Shedding also depends on what is worn under or over the garment, and whether this pulls at the yarn fibres. It’s therefore not possible to guarantee that there will be no shedding

Below are some tips on how to get the best result when working with hairier yarns:

1. When the garment is finished (before you wash it) shake it vigorously so the looser hairs come off. NOTE: do NOT use a lint roller, brush or any method that pulls at the yarn.

2. Place the garment in a plastic bag and put it in your freezer - the temperature will cause the fibres to become less attached to each other, and excess fibres will come off easier.

3. Leave in the freezer for a few hours before taking it out and shaking it again.

4. Wash the garment according to the instructions on the yarn label.

Pilling is a natural process that happens to even the most exclusive of fibers. It's a natural sign of wear and tear that is hard to avoid, and that is most visible in high friction areas of your garment like a sweater's arms and cuffs.

You can make your garment look as new by removing the pilling, using a fabric comb or a pill/lint remover.

Still can't find the answer you need? Then scroll down and leave your question so one of our experts can try to help you. This will be done normally within 5 to 10 working days.
In the meantime, you can read the questions and answers that others have left to this pattern or join the DROPS Workshop on Facebook to get help from fellow knitters/crocheters!

You might also like...

Post a comment to pattern DROPS 212-26

We would love to hear what you have to say about this pattern!

If you want to leave a question, please make sure you select the correct category in the form below, to speed up the answering process. Required fields are marked *.

Comments / Questions (32)

country flag Ana Maria Hernández Lacal wrote:

Cuántos ovillos necesito para ese jersey ai -266 en talla m?

22.10.2020 - 13:08

DROPS Design answered:

Hola Ana Maria, DROPS Air 4 ovillos, DROPS Brushed Alpaca Silk 4 ovillos. Buen trabajo!

22.10.2020 - 13:13

country flag Jax wrote:

Hi, I would like to use Yarn Group E - would you suggest Eskimo or Andes? and how many gr for size S?

29.09.2020 - 21:15

DROPS Design answered:

Dear Jax, please contact your DROPS store for any individual assistance , they will help you - even per mail or telephone choosing the best matching yarn. Happy knitting!

30.09.2020 - 08:13

country flag Susanne Bøhvad wrote:

Man kan da umuligt få hovedet igennem den halskant med det maskeantal, uanset hvor løst der slås op.

31.07.2020 - 20:42

country flag Koi Barbara wrote:

Kötéspróbánál a magyar fordításban elírás történt: a harisnyakötés az nem 1 sima 1 fordított, hanem végig sima mivel körben kötünk!

05.06.2020 - 15:25

country flag Magdaléna wrote:

Hi 🙂 Is it possible to translate this patern to czech? Thank you

21.04.2020 - 22:12

DROPS Design answered:

Dobrý den, Magdaléno, díky za zprávu - návod přidám během následujících několika dnů :-) Hezký den! Hana

22.04.2020 - 07:04

country flag Kirsten Garde wrote:

Jeg er nu kommet til deling til krop og ærmer - der står at man skal sætte mærketråd, som skal bruges til senere udtagning, Min mærketråd sidder midt foran og midt bag. Nu står der at udtagningen skal være i siderne - men mine tråde er for og bag. Hvad gør jeg forkert? Kirsten

12.04.2020 - 23:42

country flag Koi Barbara wrote:

A DROPS 212-26 minta magyar fordításában elírás történt: Vállrész nyakkivágáshoz tett jelölőtől 6-7-8 cm-re A4. mintát kell kötni nem A2-t! Üdv: Barbara

02.04.2020 - 13:54

country flag Ellen Christine Sjølie wrote:

Hei. Jeg har et spørsmål vedrørende mønster A4. Hva betyr den sorte prikken i første linje?

19.02.2020 - 07:48

DROPS Design answered:

Hej Ellen, du finder diagramteksten lige over måleskitsen, teksten til ruden med sort prik står lige over pilen. God fornøjelse!

19.02.2020 - 08:18

country flag Pia Hyldig wrote:

Er det virkelig korrekt, at der kun skal slås 36 m op til halskant (str. M)? Jeg synes den bliver alt for snæver og umulig at få hovedet igennem.

17.02.2020 - 16:54

DROPS Design answered:

Hej Pia, ja det stemmer, men du skal slå LØST op med 3 tråde for at kanten ikke skal stramme. God fornøjelse!

18.02.2020 - 11:44

country flag Anne-Marie wrote:

Jag undrar om garnmängden för Drops Air verkligen stämmer. Har nu stickat oket och ca 20 cm på fram och bakstycket och har bara ett nystan kvar som ska räcka till resten av tröjan. Stickfastheten stämmer. Mvh /Anne-Marie

02.02.2020 - 13:27

DROPS Design answered:

Hei Anne-Marie. Det høres litt lite ut med et nøste igjen, men vi har nå veid genseren og garnmengden stemmer. Hvilken størrelse strikker du? mvh DROPS design

03.02.2020 - 11:08