DROPS Nepal
DROPS Nepal
65% Wool, 35% Alpaca
from 2.40 £ /50g
Get the yarn to make this pattern from 26.40£.

The yarn cost is calculated from the pattern’s smallest size and the yarn’s cheapest product type. Looking for an even better price? You might find it on the DROPS Deals!

DROPS SS24

Blue November

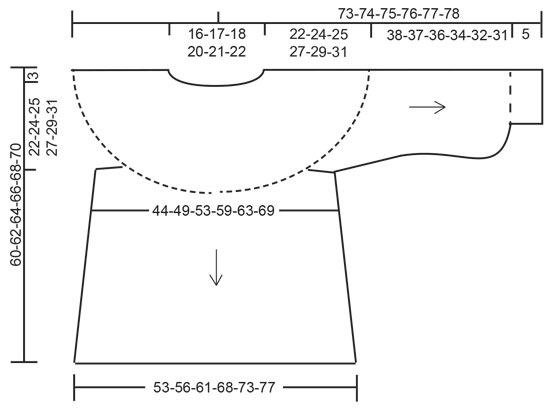
Knitted jumper with balloon sleeves in DROPS Nepal. Piece is knitted top down with round yoke. Size S-XXXL.

DROPS 205-31
DROPS design: Pattern ne-310
Yarn group A + A or C
----------------------------------------------------------

SIZE:
S - M - L - XL - XXL – XXXL

MATERIALS:
DROPS NEPAL from Garnstudio (belongs to yarn group C)
550-600-700-750-850-900 g colour no 8913, light blue

KNITTING TENSION:
16 stitches in width and 20 rows vertically in stocking stitch = 10 x 10 cm.

NEEDLES:
DROPS DOUBLE POINTED NEEDLES SIZE: 5.5 for stocking stitch.
DROPS CIRCULAR NEEDLE SIZE 5.5 mm : Length 40 and 80 cm for stocking stitch.
DROPS DOUBLE POINTED NEEDLES SIZE 4.5 mm – for edges in garter stitch.
DROPS CIRCULAR NEEDLE SIZE 4.5 mm : Length 40 and 80 cm for edges in garter stitch. 
Needle size is only a suggestion! If you have too many stitches on 10 cm switch to larger needles. If you have too few stitches on 10 cm switch to smaller needles.

-------------------------------------------------------

Alternative Yarn – See how to change yarns here
Yarn Groups A to F – Use the same pattern and change the yarn here
Yarn usage using an alternative yarn – Use our yarn converter here

-------------------------------------------------------

DROPS Nepal
DROPS Nepal
65% Wool, 35% Alpaca
from 2.40 £ /50g
Get the yarn to make this pattern from 26.40£.

The yarn cost is calculated from the pattern’s smallest size and the yarn’s cheapest product type. Looking for an even better price? You might find it on the DROPS Deals!

Pattern instructions

NOTE: This pattern is written in British English. All measurements in charts are in cm. For conversion from cm to inches - click here. There are different terms for crocheting in British and American English. If this pattern includes crochet, click for "crochet terms" here. For this pattern in American English, please click here.
----------------------------------------------------------

EXPLANATION FOR THE PATTERN:

----------------------------------------------------------

GARTER STITCH (worked in the round):
1 ridge = 2 rounds. Knit 1 round and purl 1 round. 

PATTERN: 
See diagram A.1. Choose diagram for your size. Diagrams show all rows in pattern seen from the right side

INCREASE TIP-1 (applies to round yoke):
To calculate how to increase evenly, use the total number of stitches on round (e.g. 74 stitches) and divide stitches by number of increases to be done (e.g. 6) = 12.3. In this example increase after approx. every 12th stitch by making 1 yarn over. On next round knit yarn overs twisted to avoid holes.

INCREASE TIP-2 (applies to sides of body):
Work until 2 stitches remain before marker, 1 yarn over, knit 4 (marker is in the middle of these stitches), 1 yarn over. On next round knit yarn over twisted to avoid holes. Then work the new stitches in stocking stitch

DECREASE TIP-1 (applies to mid under sleeve):
Begin 3 stitches before marker, knit 2 together, knit 2 (marker is between these 2 stitches), slip 1 stitch knitwise, knit 1, pass slipped stitch over stitch worked (= 2 stitches decreased).

DECREASE TIP-2 (evenly spaced at the bottom of sleeve):
To calculate how to decrease evenly, use the total number of stitches on round (e.g. 64 stitches) and divide stitches by number of decreases to be done (e.g. 26) = 2.4. In this example, knit alternately approx. every 1st and 2nd, and 2nd and 3rd stitch together.

KNITTING TIP (applies to sleeve length):
Length of sleeves can be adjusted as explained in pattern but note that the sleeve length should be a bit longer than usual to make the sleeve baggy at the bottom.
----------------------------------------------------------

START THE PIECE HERE:

----------------------------------------------------------

JUMPER - SHORT OVERVIEW OF THE PIECE:
Worked top down. Work yoke in the round on circular needle until piece is divided into body and sleeves. Continue body in the round on circular needle. Continue sleeves in the round on a short circular needle or double pointed needles.

YOKE:
Cast on 70-74-76-82-84-90 stitches on circular needle size 4.5 mm with Nepal. Knit 1 round and purl 1 round. Knit 1 round while increasing 2-6-4-6-4-6 stitches evenly - read INCREASE TIP-1 = 72-80-80-88-88-96 stitches.
Purl 1 round. Switch to circular needle size 5.5 mm and work according to diagram as follows: Work diagram A.1 (= 8 stitches) 9-10-10-11-11-12 times in total in width.
REMEMBER THE KNITTING TENSION!
When A.1 has been worked 1 time vertically, there are 207-240-250-286-286-312 stitches on round. Knit 1 round while increasing 5-2-8-0-6-10 stitches evenly = 212-242-258-286-292-322 stitches. Continue with stocking stitch until piece measures 22-24-25-27-29-31 cm from cast-on edge on the shortest. Now divide the piece for sleeves and body on next round as follows: Slip the first 44-51-55-58-58-62 stitches on a stitch holder for sleeve without working them, cast on 8-8-10-10-12-12 stitches under sleeve, work 62-70-74-85-88-99 stitches in stocking stitch (= front piece), slip the next 44-51-55-58-58-62 stitches on a stitch holder for sleeve without working them, and cast on 8-8-10-10-12-12 stitches under sleeve and work 62-70-74-85-88-99 stitches in stocking stitch (= back piece).

BODY:
= 140-156-168-190-200-222 stitches. Insert 1 marker in the middle of the 8-8-10-10-12-12 stitches cast on under each sleeve. Work in stocking stitch in the round, and when body measures 3 cm from where body was divided for sleeves, increase 1 stitch on each side of every marker - read INCREASE TIP-2 (= 4 stitches increased in total). Increase like this every 4-4½-4-4-3½-4½ cm 7-6-7-7-8-6 times in total = 168-180-196-218-232-246 stitches. 
When piece measures 33-33-34-34-34-34 cm from where body was divide from sleeves, switch to circular needle size 4.5 mm and work in garter stitch over all stitches. Cast off by knitting when piece measures 35-35-36-36-36-36 cm from where body was divided from sleeves. 

SLEEVE:
Slip the 44-51-55-58-58-62 stitches from stitch holder in one side of piece on double pointed needles size 5.5 mm and pick up 1 stitch in each of the 8-8-10-10-12-12 stitches under sleeve = 52-59-65-68-70-74 stitches. Insert 1 marker in the middle of the 8-8-10-10-12-12 stitches. Work in stocking stitch in the round. 
When sleeve measures 3 cm from where sleeve was divided from body, decrease 1 stitch on each side of marker - read DECREASE TIP-1! Decrease like this every 10-3-3-3-5-5 cm 2-4-4-4-3-3 times in total = 48-51-57-60-64-68 stitches. 
When sleeve measures 22-21-20-19-17-16 cm from where sleeve was divided from body, increase 8 stitches as follows: 
* Knit 6-6-7-7-8-8, 1 yarn over *, work from *-* 8 times in total and finish with knit 0-3-1-4-0-4 = 56-59-65-68-72-76 stitches.
Knit yarn overs twisted on next round to avoid holes. 
When sleeve measures 24-23-22-21-19-18 cm from where sleeve was divided from body, increase 8 stitches as follows: 
* Knit 7-7-8-8-9-9, 1 yarn over *, work from *-* 8 times in total and finish with knit 0-3-1-4-0-4 = 64-67-73-76-80-84 stitches.
Continue to work until sleeve measures 38-37-36-34-32-31 cm from division (approx. 5 cm remain until finished measurements - read KNITTING TIP). NOTE! Shorter measurements in the larger sizes because of wider neck and longer yoke. On next round decrease 26-29-33-34-36-40 stitches evenly read KNITTING TIP-2! 38-38-40-42-44-44 stitches remain on sleeve. Switch to double pointed needle size 4.5 mm and work in GARTER STITCH in the round for 5 cm - read explanation above. Sleeve measures 43-42-41-39-37-36 cm from where sleeve was divided from body. Cast off by knitting. 
Work the other sleeve the same way.

This pattern has been corrected.

Updated online: 25.03.2021
Under YOKE: Increase before division and division for body and sleeves corrected.

Diagram

symbols = knit
symbols = purl
symbols = between 2 stitches make 1 yarn over, knit yarn over twisted on next round, it should not make a hole
diagram
diagram
diagram

Each of our patterns has specific tutorial videos to help you.

Do you have a question? See a list of frequently asked questions (FAQ)

Knitting tension is what determines the final measurements of your work, and is usually measured per 10 x 10 cm. It is provided like so: number of stitches in width x number of rows in height - eg: 19 stitches x 26 rows = 10 x 10 cm.

The knitting tension is very individual; some people knit/crochet loosely while others work tightly. You adjust the knitting tension with the needle size, which is why the suggested needle size is only meant as a guide! You need to adjust this (up or down) to ensure that YOUR knitting tension matches the knitting tension provided in the pattern. If you work with a different knitting tension than provided you will have a different yarn consumption, and your work will have different measurements than what the pattern suggests.

The knitting tension also determines which yarns can replace each other. As long as you achieve the same knitting tension you can replace one yarn with another.

See DROPS lesson: How to measure your tension/gauge

See DROPS video: How to make a gauge tension swatch

The required amount of yarn is provided in grams, eg: 450 g. To calculate how many balls you’ll need you first need to know how many grams are in 1 ball (25g, 50g or 100g). This information is available if you click on the individual yarn quality on our pages. Divide the amount required with the amount of each ball. For example, if each ball is 50g (the most common amount), the calculation will be as follows: 450 / 50 = 9 balls.

The important thing when changing from one yarn to another is that the knitting/crochet tension remains the same. This is so that the measurements of the finished piece will be the same as on the sketch provided. It is easier to achieve the same knitting tension using yarns from the same yarn group. It is also possible to work with multiple strands of a thinner yarn to achieve the knitting tension of a thicker one. Please try our yarn converter. We recommend you to always work a test swatch.

Please NOTE: when changing yarn the garment might have a different look and feel to the garment in the photo, due to individual properties and qualities of each yarn.

See DROPS lesson: Can I use a different yarn than the one mentioned in the pattern?

All our yarns are categorised into yarn groups (from A to F) according to thickness and knitting tension – group A contains the thinnest yarns and group F the thickest. This makes it easier for you to find alternative yarns to our patterns, should you wish to switch yarn. All yarns within the same group have a similar knitting tension and can easily replace each other. However, different yarn qualities have different structures and properties which will give the finished work a unique look and feel.

Click here for an overview of the yarns in each yarn group

At the top of all our patterns you’ll find a link to our yarn calculator, which is a helpful tool should you wish to use a different yarn than suggested. By filling in the yarn quality you wish to replace, the amount (in your size) and number of strands, the calculator will present good alternative yarns with the same knitting tension. Additionally it will tell you how much you’ll require in the new qualities and whether you’ll need to work with multiple strands. Most skeins are 50g (some are 25g or 100g).

If the pattern is worked with multiple colours, every colour will have to be calculated separately. Similarly, if the pattern is worked with several strands of different yarns (for example 1 strand Alpaca and 1 strand Kid-Silk) you will have to find alternatives for each, individually.

Click here to see our yarn calculator

Since different yarns have different qualities and textures we have chosen to keep the original yarn in our patterns. However, you can easily find options among our available qualities by using our yarn calculator, or simply pick a yarn from the same yarn group.

It is possible that some retailers still have discontinued yarns in stock, or that someone has a few skeins at home that they would like to find patterns for.

The yarn calculator will provide both alternative yarn as well as required amount in the new quality.

If you think it's hard to decide what size to make, it can be a good idea to measure a garment you own already and like the size of. Then you can pick the size by comparing those measures with the ones available in the pattern's size chart.

You'll find the size chart at the bottom of the pattern.

See DROPS lesson: How to read size chart

The needle size provided in the pattern serves only as a guide, the important thing is to follow the knitting tension. And since knitting tension is very individual, you will have to adjust the needle size to ensure that YOUR tension is the same as in the pattern – maybe you’ll have to adjust 1, or even 2 needle sizes, up or down to achieve the correct tension. For this, we recommend that you work test swatches.

Should you work with a different knitting tension than the one provided, the measurements of the finished garment might deviate from the measurement sketch.

See DROPS lesson: How to measure your tension/gauge

See DROPS video: How to make a tension/gauge swatch

Working a garment top-down provides more flexibility and room for personal adjustment. For example it is easier to try the garment on while working, as well as making adjustments to length of yoke and shoulder caps.

The instructions are carefully explaining every step, in the correct order. Diagrams are adjusted to the knitting direction and are worked as usual.

The diagram depicts all rows/rounds, and every stitch seen from the right side. It is read from bottom to top, from right to left. 1 square = 1 stitch.

When working back and forth, every other row is worked from the right side and every other row is worked from the wrong side. When working from the wrong side, the diagram will have to be worked reversed: from left to right, knit stitches are purled, purl stitches are knit etc.

When working in the round every round is worked from the right side and the diagram are worked from right to left on all rounds.

See DROPS lesson: How to read knitting diagrams

The diagram depicts all rows/rounds, and every stitch seen from the right side. It is worked from bottom to top, from right to left.

When working back and forth every other row is worked from the right side: from right to left and every other row is worked from the wrong side: from left to right.

When working in the round, every row in the diagram are worked from the right side, from right to left.

When working a circular diagram you start in the middle and work your way outwards, counter clockwise, row by row.

The rows usually start with a given number of chain stitches (equivalent to the height of the following stitch), this will either be depicted in the diagram or explained in the pattern.

See DROPS lesson: How to read crochet diagrams

Instructions for working several diagrams after each other on the same row/round, will often be written like so: “work A.1, A.2, A.3 a total of 0-0-2-3-4 times". This means you work A.1 once, then A.2 is worked once, and A.3 is repeated (in width) the number of times provided for your size – in this case like so: S = 0 times, M = 0 times, L=2 times, XL= 3 times and XXL = 4 times.

The diagrams are worked as usual: begin with the first row in A.1, then work the first row in A.2 etc.

See DROPS lesson: How to read knitting diagrams

See DROPS lesson: How to read crochet diagrams

The total width of the garment (from wrist-to-wrist) will be larger in the larger sizes, despite the actual sleeves being shorter. The larger sizes have longer sleeve caps and wider shoulders, so there will be a good fit in all sizes.

The measurement sketch/schematic drawing provides information regarding the full length of the garment. If it’s a jumper or a jacket the length is measured from the highest point on the shoulder closest to the neckline, and straight down to the bottom of the garment. It is NOT measured from the tip of shoulder. Similarly, the length of yoke is measured from the highest point on the shoulder and down to where yoke is split into body and sleeves.

On a jacket measures are never taken along bands, unless specifically stated. Always measure inside band stitches when measuring the length.

See DROPS lesson: How to read a schematic drawing

Diagrams are often repeated on the round or in height. 1 repeat is the diagram the way it appears in the pattern. If it says to work 5 repeats of A.1 in the round, then you work A.1 a total of 5 times after/next to each other in the round. If it says to work 2 repeats of A.1 vertically/in height you work the entire diagram once, then begin again at the start and work the entire diagram one more time.

Chain stitches are slightly narrower than other stitches and to avoid working the cast-on edge too tight, we simply chain more stitches to begin with. The stitch count will be adjusted on the following row to fit the pattern and measurement sketch.

The rib edge is more elastic and will contract slightly compared to, for example, stocking stitch. By increasing before the rib edge, you avoid a visible difference in width between the rib edge and the rest of the body.

It’s very easy to cast off too tightly, and by making yarn overs while casting off (and simultaneously casting these off) you avoid a too tight cast off edge.

See DROPS video: How to bind off with yarn overs (yo)

To achieve an even increase (or decrease) you can increase on, for example: every 3rd and 4th row alternately, like so: work 2 rows and increase on the 3rd row, work 3 rows and increase on the 4th. Repeat this until the increase is complete.

See DROPS lesson: Increase or decrease 1 st on every 3rd and 4th row alternately

Should you prefer to work in the round instead of back and forth, you may of course adjust the pattern. You’ll need to add steeks mid-front (usually 5 stitches), and follow the instructions. When you would normally turn and work from the wrong side, simply work across the steek and continue in the round. At the end you’ll cut the piece open, pick up stitches to work bands, and cover the cut edges.

See DROPS video: How to knit steeks and cut open

Should you prefer to work back and forth instead of in the round, you may of course adjust the pattern so you work the pieces separately and then assemble them at the end. Divide the stitches for the body in 2, add 1 edge stitch in each side (for sewing) and work the front and back pieces separately.

See DROPS lesson: Can I adapt a pattern for circular needles into straight needles?

Pattern repeats can vary slightly in the different sizes, in order to get the correct proportions. If you’re not working the exact same size as the garment in the photo, yours might deviate slightly. This has been carefully developed and adjusted so that the complete impression of the garment is the same in all sizes.

Make sure to follow instructions and diagrams for your size!

If you have found a pattern you like which is available in women’s size it’s not very difficult to convert it to men’s size. The biggest difference will be the length of sleeves and body. Start working on the women size that you think would fit across the chest. The additional length will be worked right before you cast off for the armhole/sleeve cap. If the pattern is worked top-down you can add the length right after the armhole or before the first decrease on sleeve.

Regarding additional yarn amount, this will depend on how much length you add, but it is better with a skein too many than too few.

All yarns will have excess fibres (from production) that might come off as lint or shedding. Brushed yarns (ie hairier yarns) have more of these loose, excess fibres, causing more shedding.

Shedding also depends on what is worn under or over the garment, and whether this pulls at the yarn fibres. It’s therefore not possible to guarantee that there will be no shedding

Below are some tips on how to get the best result when working with hairier yarns:

1. When the garment is finished (before you wash it) shake it vigorously so the looser hairs come off. NOTE: do NOT use a lint roller, brush or any method that pulls at the yarn.

2. Place the garment in a plastic bag and put it in your freezer - the temperature will cause the fibres to become less attached to each other, and excess fibres will come off easier.

3. Leave in the freezer for a few hours before taking it out and shaking it again.

4. Wash the garment according to the instructions on the yarn label.

Pilling is a natural process that happens to even the most exclusive of fibers. It's a natural sign of wear and tear that is hard to avoid, and that is most visible in high friction areas of your garment like a sweater's arms and cuffs.

You can make your garment look as new by removing the pilling, using a fabric comb or a pill/lint remover.

Still can't find the answer you need? Then scroll down and leave your question so one of our experts can try to help you. This will be done normally within 5 to 10 working days.
In the meantime, you can read the questions and answers that others have left to this pattern or join the DROPS Workshop on Facebook to get help from fellow knitters/crocheters!

You might also like...

Post a comment to pattern DROPS 205-31

We would love to hear what you have to say about this pattern!

If you want to leave a question, please make sure you select the correct category in the form below, to speed up the answering process. Required fields are marked *.

Comments / Questions (21)

country flag Maria Grazia wrote:

Non capisco che significa dimuinuire in modo alternato: devo lavorare insieme la prima e la seconda maglia e poi la terza e la quarta? Praticamente devo lavorare ogni maglia che mi trovo con quella successiva?

18.03.2022 - 16:54

DROPS Design answered:

Buonasera Maria Grazia, alla 1° diminuzione lavora insieme la 1° e 2° maglia e alla seconda diminuzione la 2° e la 3° maglia e poi ricomincia. Buon lavoro!

18.03.2022 - 20:56

country flag Eugenia wrote:

Size M.

09.01.2022 - 09:55

DROPS Design answered:

Ok then in size M, 2nd row will be: K2, YO, K6, YO, K2 = 10 sts increased to 12. Happy knitting!

10.01.2022 - 08:40

country flag Eugenia wrote:

Hello! I need help reading the diagram. The second round with increases begin with 2 - one increase -7- one increase - 2. The forth round of increases are 2-increase-5-increase-5-increase-2. Is it correct? Thank you!

09.01.2022 - 09:53

DROPS Design answered:

Dear Eugenia, diagrams are read from bottom up, first row with increases will be worked the same way in all sizes: K2, YO, K4, YO, K2 - 2nd row will be different depending on the size, with either 2 or 3 yarn overs. Hope it will help, happy knitting!

10.01.2022 - 08:39

country flag Susanne wrote:

Når man deler arbejdet til ryg, forstykke og ærmer efter anvisning,, bliver der 8 masker til overs i str. xxll. Det er de 8 masker der er taget ud jævnt fordelt på sidste omgang på bærestykket.

07.11.2020 - 13:39

DROPS Design answered:

Hei Susanne. Ja, det er noe som ikke stemmer der. Oppskriften er oversendt til design avd slik at de kan dobbeltsjekke og evnt komme med rettelse. mvh DROPS design

09.11.2020 - 13:25

country flag Nelly Gautier wrote:

Bonjour Je veux faire ce pull en laine baby merino le xxxl Combien de pelotes de laine me faut-il Merci

12.08.2020 - 21:41

DROPS Design answered:

Bonjour Mme Gautier, utilisez notre convertisseur pour connaître le poids nécessaire pour remplacer 1 fil DROPS Nepal par 2 fils DROPS BabyMerino - vous trouverez ici plus d'infos sur les alternatives. Bon tricot!

13.08.2020 - 09:32

country flag Nelly Gautier wrote:

Pouvez vous me dire si je peux vous renvoyer les laines qui ne me conviennent pas et si je les renvoi sans payer le frais de port Merci

12.08.2020 - 18:33

DROPS Design answered:

Bonjour Mme Gautier, merci de bien vouloir contacter votre magasin DROPS pour toute information sur les retours, etc.. Lui seul pourra vous répondre et vous aider. Bon tricot!

13.08.2020 - 09:25

country flag Nelly Gautier wrote:

Bonjour Trouvant la laine trop épaisse, comment l échanger avec une autre laine ?merci

11.08.2020 - 18:00

DROPS Design answered:

Bonjour Mme Gautier, ce modèle a été conçu pour un échantillon de 16 m x 20 rangs = 10 x10 cm - si vous souhaitez le réaliser, il vous faudra obtenir le même échantillon, si vous préférez utiliser une laine plus fine, regardez parmi nos autres modèles en laine plus fine (cf liens dans la réponse précédente), vous y trouverez probablement un autre à votre goût. Bon tricot!

12.08.2020 - 07:48

country flag Nelly Gautier wrote:

Je le trouve trop epais Merci

09.08.2020 - 11:31

country flag Nelly Gautier wrote:

Je suis pourtant experte mais commencer par le col est un defi😁 Pouvez vous me conseiller pour fair ce pull avec une laine plus fine et comment recalculer mes mailles ? Merci

09.08.2020 - 11:30

DROPS Design answered:

Bonjour Mme Gautier, nous ne sommes malheureusement pas en mesure de pouvoir adapter chacun de nos modèles à chaque demande; vous pouvez vous inspirer d'un modèle similaire avec la tension souhaitée dans nos modèles en fil du groupe A ou du groupeB - n'hésitez pas à filtrer en choisissant votre tension. Bon tricot!

10.08.2020 - 10:05

country flag Nelly Gautier wrote:

Bonjour Je voudrais faire ce modèle avec une laine fine pouvez vous me conseiller une laine Je suis pourtant expert mais en France nous commençons par le bas est ce possible d avoir le modèle en commençant par le bas J adore votre cite maigre la difficulté des modeles Merci Nelly

09.08.2020 - 10:56