DROPS Nord
DROPS Nord
45% Alpaca, 30% Polyamide, 25% Wool
from 2.70 £ /50g
DROPS Brushed Alpaca Silk
77% Alpaca, 23% Silk
from 2.90 £ /25g
Get the yarn to make this pattern from 28.20£.

The yarn cost is calculated from the pattern’s smallest size and the yarn’s cheapest product type. Looking for an even better price? You might find it on the DROPS Deals!

DROPS SS24

Snow Scents

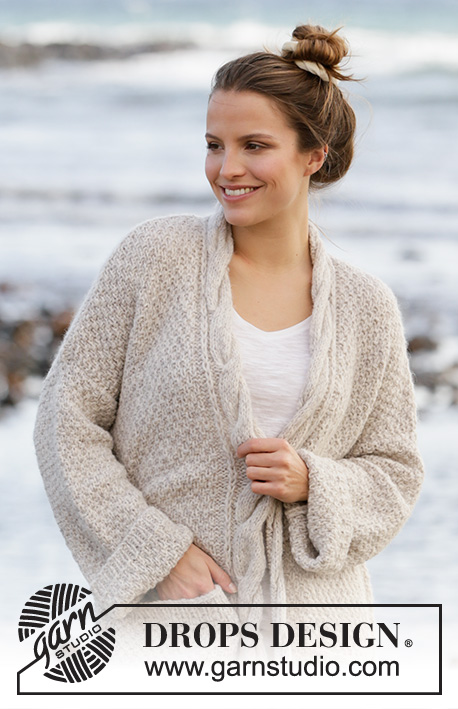
Knitted jumper with raglan in DROPS Brushed Alpaca Silk and DROPS Nord. Piece is knitted top down with cable mid front. Size: S - XXXL

DROPS 206-43
DROPS design: Pattern no-030
Yarn group C + A or D
----------------------------------------------------------

SIZE:
S - M - L - XL - XXL – XXXL

MATERIALS:
DROPS NORD from Garnstudio (belongs to yarn group A)
200-250-250-300-300-350 g colour 0100, off white
And use:
DROPS BRUSHED ALPACA SILK from Garnstudio (belongs to yarn group C)
150-150-175-175-200-225 g colour 01, off white

KNITTING TENSION:
13 stitches in width and 18 rows vertically in stocking stitch and 1 strand of each quality = 10 x 10 cm.

NEEDLES:
DROPS DOUBLE POINTED NEEDLES SIZE 7 mm
DROPS CIRCULAR NEEDLE SIZE 8 mm : Length 60 or 80 cm for edges in stocking stitch. 40 cm for sleeve.
DROPS DOUBLE POINTED NEEDLES SIZE 8 mm
DROPS CIRCULAR NEEDLE SIZE 7 mm: Length 40 and 80 cm for rib.
DROPS CABLE NEEDLE - for cables.
Needle size is only a suggestion! If you have too many stitches on 10 cm switch to larger needles. If you have too few stitches on 10 cm switch to smaller needles.

-------------------------------------------------------

Alternative Yarn – See how to change yarns here
Yarn Groups A to F – Use the same pattern and change the yarn here
Yarn usage using an alternative yarn – Use our yarn converter here

-------------------------------------------------------

DROPS Nord
DROPS Nord
45% Alpaca, 30% Polyamide, 25% Wool
from 2.70 £ /50g
DROPS Brushed Alpaca Silk
77% Alpaca, 23% Silk
from 2.90 £ /25g
Get the yarn to make this pattern from 28.20£.

The yarn cost is calculated from the pattern’s smallest size and the yarn’s cheapest product type. Looking for an even better price? You might find it on the DROPS Deals!

Pattern instructions

NOTE: This pattern is written in British English. All measurements in charts are in cm. For conversion from cm to inches - click here. There are different terms for crocheting in British and American English. If this pattern includes crochet, click for "crochet terms" here. For this pattern in American English, please click here.
----------------------------------------------------------

EXPLANATION FOR THE PATTERN:

----------------------------------------------------------

PATTERN: 
See diagrams A.1 and A.2.

INCREASE TIP (applies to sides of body):
Work until 2 stitches remain before marker thread, 1 yarn over, knit 4 (marker thread is in the middle of these stitches), 1 yarn over = 4 stitches increased on round. On next round knit yarn overs twisted to avoid holes. Then work the new stitches in stocking stitch

RAGLAN:
Increase 1 stitch on each side of 2 stitches in garter stitch in every transition between body and sleeves (= 8 stitches increased on round). Increase 1 stitch by making 1 yarn over. On next round knit yarns over twisted to avoid holes. Then work the new stitches in stocking stitch. 

DECREASE TIP (applies to sleeves): 
Decrease 1 stitch on each side of marker thread as follows: Work until 3 stitches remain before marker thread and knit 2 together, knit 2 (marker thread is between these stitches), slip 1 stitch knitwise, knit 1, pass slipped stitch over stitch worked.

----------------------------------------------------------

START THE PIECE HERE:

----------------------------------------------------------

JUMPER - SHORT OVERVIEW OF THE PIECE:
Neck edge and yoke are worked in the round on circular needle, top down. Now divide yoke for body and sleeves. Continue body in the round on circular needle, top down. Work sleeves in the round on double pointed needles/a short circular needle, top down.

NECK EDGE:
Cast on 63-63-67-67-71-71 stitches on circular needle size 7 mm with 1 strand Brushed Alpaca Silk and 1 strand Nord (= 2 strands). Knit 1 round. Work next round as follows from transition between left shoulder and back piece: * Knit 1, purl 1 *, repeat from *-* over the next 24-24-26-26-28-28 stitches, knit 2, purl 1, knit 1, purl 1, knit 1, purl 1, knit 2, purl 1-1-1-1-2-2, knit 1-1-2-2-2-2, A.1 (= 18 stitches), knit 1-1-1-1-2-2, purl 1-1-2-2-2-2, knit 2, purl 1, knit 1, purl 1, knit 1, purl 1, knit 1. Work until A.1 has been worked 1 time vertically.
Then work yoke as explained below.

YOKE:
Insert 4 marker threads in piece as explained below (this is done without working the stitches). Use markers when increasing for raglan.
Count 25-25-27-27-29-29 stitches (= back piece), insert 1 marker, count 7 stitches (= sleeve), insert 1 marker, count 24-24-26-26-28-28 stitches (= front piece), insert 1 marker, count 7 stitches (= sleeve) and insert 1 marker.
Switch to circular needle size 8 mm and work as follows: Knit 1, 1 yarn over, knit 23-23-25-25-27-27, 1 yarn over, knit 2, 1 yarn over, knit 5, 1 yarn over, knit 2, 1 yarn over, knit 2-2-3-3-4-4, A.2, knit 2-2-3-3-4-4, 1 yarn over, knit 2, 1 yarn over, knit 5, 1 yarn over, knit 1.
When first round has been worked, there are 4 stitches increased in A.2 and 8 stitches in every transition between body and sleeve (= first increase for raglan). There are now 75-75-79-79-83-83 stitches on needle. REMEMBER THE KNITTING TENSION! Continue with A.2 and stocking stitch and continue increase on every other round 17-20-20-23-26-30 times in total - read explanation above. After last increase there are 203-227-231-255-283-315 stitches on needle. Continue with stocking stitch and pattern (without increasing) until piece measures 22-25-25-28-32-36 cm from cast-on edge.
Work next round as follows: Work 59-65-67-73-81-89 stitches in stocking stitch (= back piece), slip the next 41-47-47-53-59-67 stitches on 1 stitch holder for sleeve, cast on 6-6-8-8-8-8 new stitches on needle (= in the side under sleeve), work 62-68-70-76-84-92 stitches in pattern and stocking stitch (= front piece), slip the next 41-47-47-53-59-67 stitches on 1 stitch holder for sleeve, cast on 6-6-8-8-8-8 new stitches on needle (= in the side under sleeve). Then finish body and sleeves separately. NOW MEASURE PIECE FROM HERE!

BODY:
= 133-145-153-165-181-197 stitches. Insert 1 marker thread in each side, in the middle of the new stitches that were cast on. Continue in the round in stocking stitch and A.2 until piece measures 8 cm. Increase 1 stitch on each side of marker thread - read INCREASE TIP. Repeat increase when piece measures 16 and 24 cm = 145-157-165-177-193-209 stitches. Continue until piece measures 34-33-35-34-32-30 cm from division. Switch to circular needle size 7 mm and work 1 round while decreasing 4 stitches over cable in A.2. = 141-153-161-173-189-205 stitches. Work next round as follows:
Size S, XL, XXL and XXXL: * Knit 1, purl 1 *, repeat from *-* over the first 96-120-132-144 stitches, knit 1, A.1 over stitches in A.2, * knit 1, purl 1 *, repeat from *-* over the last 26-34-38-42 stitches.
Size M and L: * Purl 1, knit 1 *, repeat from *-* over the first 106-112 stitches, A.1 over the stitches in A.2, * knit 1, purl 1 *, repeat from *-* over the next 28-30 stitches, knit 1.
Continue until rib measures 40-39-41-40-38-36 cm from division (= approx. 6 cm rib). Cast off stitches with knit over knit and purl over purl.
Jumper measures approx. 66-68-70-72-74-76 cm from shoulder and down.

SLEEVE:
Slip the 41-47-47-53-59-67 stitches from stitch holder in one side of piece on a short circular needle/double pointed needles size 8 mm and pick in addition up 1 stitch in each of the 6-6-8-8-8-8 stitches cast on under sleeve = 47-53-55-61-67-75 stitches. Insert 1 marker in the middle of the 6-6-8-8-8-8 stitches under sleeve. Use marker later when decreasing mid under sleeve. Work in stocking stitch in the round. When piece measures 3 cm from division, decrease 2 stitches mid under sleeve - read DECREASE TIP. Decrease like this every 4½-3½-3-2-1½-1 cm 7-10-10-13-15-18 times in total = 33-33-35-35-37-39 stitches. Continue until sleeve measures 36-36-34-32-28-25 cm from division (shorter measurements in the larger sizes because of wider neck and longer yoke). Switch to double pointed needles size 7 mm. Work rib in the round (= knit 1/purl 1) for 6 cm (or desired length), on first round increase 1 stitch = 34-34-36-36-38-40 stitches. Loosely cast off stitches with knit over knit and purl over purl. Sleeve measures approx. 42-42-40-38-34-31 cm from division. Work the other sleeve the same way.

This pattern has been corrected.

Updated online: 06.12.2019
New text; fourth symbol in diagram A.2.

Diagram

symbols = knit
symbols = purl from the right side, knit from the wrong side
symbols = between 2 stitches make 1 yarn over, on next row knit yarn over twisted to avoid holes
symbols = slip 9 stitches on cable needle in front of piece, knit 9, knit 9 from cable needle
symbols = when diagram has been worked vertically, repeat diagram from row with arrow
diagram
diagram

Each of our patterns has specific tutorial videos to help you.

Do you have a question? See a list of frequently asked questions (FAQ)

Knitting tension is what determines the final measurements of your work, and is usually measured per 10 x 10 cm. It is provided like so: number of stitches in width x number of rows in height - eg: 19 stitches x 26 rows = 10 x 10 cm.

The knitting tension is very individual; some people knit/crochet loosely while others work tightly. You adjust the knitting tension with the needle size, which is why the suggested needle size is only meant as a guide! You need to adjust this (up or down) to ensure that YOUR knitting tension matches the knitting tension provided in the pattern. If you work with a different knitting tension than provided you will have a different yarn consumption, and your work will have different measurements than what the pattern suggests.

The knitting tension also determines which yarns can replace each other. As long as you achieve the same knitting tension you can replace one yarn with another.

See DROPS lesson: How to measure your tension/gauge

See DROPS video: How to make a gauge tension swatch

The required amount of yarn is provided in grams, eg: 450 g. To calculate how many balls you’ll need you first need to know how many grams are in 1 ball (25g, 50g or 100g). This information is available if you click on the individual yarn quality on our pages. Divide the amount required with the amount of each ball. For example, if each ball is 50g (the most common amount), the calculation will be as follows: 450 / 50 = 9 balls.

The important thing when changing from one yarn to another is that the knitting/crochet tension remains the same. This is so that the measurements of the finished piece will be the same as on the sketch provided. It is easier to achieve the same knitting tension using yarns from the same yarn group. It is also possible to work with multiple strands of a thinner yarn to achieve the knitting tension of a thicker one. Please try our yarn converter. We recommend you to always work a test swatch.

Please NOTE: when changing yarn the garment might have a different look and feel to the garment in the photo, due to individual properties and qualities of each yarn.

See DROPS lesson: Can I use a different yarn than the one mentioned in the pattern?

All our yarns are categorised into yarn groups (from A to F) according to thickness and knitting tension – group A contains the thinnest yarns and group F the thickest. This makes it easier for you to find alternative yarns to our patterns, should you wish to switch yarn. All yarns within the same group have a similar knitting tension and can easily replace each other. However, different yarn qualities have different structures and properties which will give the finished work a unique look and feel.

Click here for an overview of the yarns in each yarn group

At the top of all our patterns you’ll find a link to our yarn calculator, which is a helpful tool should you wish to use a different yarn than suggested. By filling in the yarn quality you wish to replace, the amount (in your size) and number of strands, the calculator will present good alternative yarns with the same knitting tension. Additionally it will tell you how much you’ll require in the new qualities and whether you’ll need to work with multiple strands. Most skeins are 50g (some are 25g or 100g).

If the pattern is worked with multiple colours, every colour will have to be calculated separately. Similarly, if the pattern is worked with several strands of different yarns (for example 1 strand Alpaca and 1 strand Kid-Silk) you will have to find alternatives for each, individually.

Click here to see our yarn calculator

Since different yarns have different qualities and textures we have chosen to keep the original yarn in our patterns. However, you can easily find options among our available qualities by using our yarn calculator, or simply pick a yarn from the same yarn group.

It is possible that some retailers still have discontinued yarns in stock, or that someone has a few skeins at home that they would like to find patterns for.

The yarn calculator will provide both alternative yarn as well as required amount in the new quality.

If you think it's hard to decide what size to make, it can be a good idea to measure a garment you own already and like the size of. Then you can pick the size by comparing those measures with the ones available in the pattern's size chart.

You'll find the size chart at the bottom of the pattern.

See DROPS lesson: How to read size chart

The needle size provided in the pattern serves only as a guide, the important thing is to follow the knitting tension. And since knitting tension is very individual, you will have to adjust the needle size to ensure that YOUR tension is the same as in the pattern – maybe you’ll have to adjust 1, or even 2 needle sizes, up or down to achieve the correct tension. For this, we recommend that you work test swatches.

Should you work with a different knitting tension than the one provided, the measurements of the finished garment might deviate from the measurement sketch.

See DROPS lesson: How to measure your tension/gauge

See DROPS video: How to make a tension/gauge swatch

Working a garment top-down provides more flexibility and room for personal adjustment. For example it is easier to try the garment on while working, as well as making adjustments to length of yoke and shoulder caps.

The instructions are carefully explaining every step, in the correct order. Diagrams are adjusted to the knitting direction and are worked as usual.

The diagram depicts all rows/rounds, and every stitch seen from the right side. It is read from bottom to top, from right to left. 1 square = 1 stitch.

When working back and forth, every other row is worked from the right side and every other row is worked from the wrong side. When working from the wrong side, the diagram will have to be worked reversed: from left to right, knit stitches are purled, purl stitches are knit etc.

When working in the round every round is worked from the right side and the diagram are worked from right to left on all rounds.

See DROPS lesson: How to read knitting diagrams

The diagram depicts all rows/rounds, and every stitch seen from the right side. It is worked from bottom to top, from right to left.

When working back and forth every other row is worked from the right side: from right to left and every other row is worked from the wrong side: from left to right.

When working in the round, every row in the diagram are worked from the right side, from right to left.

When working a circular diagram you start in the middle and work your way outwards, counter clockwise, row by row.

The rows usually start with a given number of chain stitches (equivalent to the height of the following stitch), this will either be depicted in the diagram or explained in the pattern.

See DROPS lesson: How to read crochet diagrams

Instructions for working several diagrams after each other on the same row/round, will often be written like so: “work A.1, A.2, A.3 a total of 0-0-2-3-4 times". This means you work A.1 once, then A.2 is worked once, and A.3 is repeated (in width) the number of times provided for your size – in this case like so: S = 0 times, M = 0 times, L=2 times, XL= 3 times and XXL = 4 times.

The diagrams are worked as usual: begin with the first row in A.1, then work the first row in A.2 etc.

See DROPS lesson: How to read knitting diagrams

See DROPS lesson: How to read crochet diagrams

The total width of the garment (from wrist-to-wrist) will be larger in the larger sizes, despite the actual sleeves being shorter. The larger sizes have longer sleeve caps and wider shoulders, so there will be a good fit in all sizes.

The measurement sketch/schematic drawing provides information regarding the full length of the garment. If it’s a jumper or a jacket the length is measured from the highest point on the shoulder closest to the neckline, and straight down to the bottom of the garment. It is NOT measured from the tip of shoulder. Similarly, the length of yoke is measured from the highest point on the shoulder and down to where yoke is split into body and sleeves.

On a jacket measures are never taken along bands, unless specifically stated. Always measure inside band stitches when measuring the length.

See DROPS lesson: How to read a schematic drawing

Diagrams are often repeated on the round or in height. 1 repeat is the diagram the way it appears in the pattern. If it says to work 5 repeats of A.1 in the round, then you work A.1 a total of 5 times after/next to each other in the round. If it says to work 2 repeats of A.1 vertically/in height you work the entire diagram once, then begin again at the start and work the entire diagram one more time.

Chain stitches are slightly narrower than other stitches and to avoid working the cast-on edge too tight, we simply chain more stitches to begin with. The stitch count will be adjusted on the following row to fit the pattern and measurement sketch.

The rib edge is more elastic and will contract slightly compared to, for example, stocking stitch. By increasing before the rib edge, you avoid a visible difference in width between the rib edge and the rest of the body.

It’s very easy to cast off too tightly, and by making yarn overs while casting off (and simultaneously casting these off) you avoid a too tight cast off edge.

See DROPS video: How to bind off with yarn overs (yo)

To achieve an even increase (or decrease) you can increase on, for example: every 3rd and 4th row alternately, like so: work 2 rows and increase on the 3rd row, work 3 rows and increase on the 4th. Repeat this until the increase is complete.

See DROPS lesson: Increase or decrease 1 st on every 3rd and 4th row alternately

Should you prefer to work in the round instead of back and forth, you may of course adjust the pattern. You’ll need to add steeks mid-front (usually 5 stitches), and follow the instructions. When you would normally turn and work from the wrong side, simply work across the steek and continue in the round. At the end you’ll cut the piece open, pick up stitches to work bands, and cover the cut edges.

See DROPS video: How to knit steeks and cut open

Should you prefer to work back and forth instead of in the round, you may of course adjust the pattern so you work the pieces separately and then assemble them at the end. Divide the stitches for the body in 2, add 1 edge stitch in each side (for sewing) and work the front and back pieces separately.

See DROPS lesson: Can I adapt a pattern for circular needles into straight needles?

Pattern repeats can vary slightly in the different sizes, in order to get the correct proportions. If you’re not working the exact same size as the garment in the photo, yours might deviate slightly. This has been carefully developed and adjusted so that the complete impression of the garment is the same in all sizes.

Make sure to follow instructions and diagrams for your size!

If you have found a pattern you like which is available in women’s size it’s not very difficult to convert it to men’s size. The biggest difference will be the length of sleeves and body. Start working on the women size that you think would fit across the chest. The additional length will be worked right before you cast off for the armhole/sleeve cap. If the pattern is worked top-down you can add the length right after the armhole or before the first decrease on sleeve.

Regarding additional yarn amount, this will depend on how much length you add, but it is better with a skein too many than too few.

All yarns will have excess fibres (from production) that might come off as lint or shedding. Brushed yarns (ie hairier yarns) have more of these loose, excess fibres, causing more shedding.

Shedding also depends on what is worn under or over the garment, and whether this pulls at the yarn fibres. It’s therefore not possible to guarantee that there will be no shedding

Below are some tips on how to get the best result when working with hairier yarns:

1. When the garment is finished (before you wash it) shake it vigorously so the looser hairs come off. NOTE: do NOT use a lint roller, brush or any method that pulls at the yarn.

2. Place the garment in a plastic bag and put it in your freezer - the temperature will cause the fibres to become less attached to each other, and excess fibres will come off easier.

3. Leave in the freezer for a few hours before taking it out and shaking it again.

4. Wash the garment according to the instructions on the yarn label.

Pilling is a natural process that happens to even the most exclusive of fibers. It's a natural sign of wear and tear that is hard to avoid, and that is most visible in high friction areas of your garment like a sweater's arms and cuffs.

You can make your garment look as new by removing the pilling, using a fabric comb or a pill/lint remover.

Still can't find the answer you need? Then scroll down and leave your question so one of our experts can try to help you. This will be done normally within 5 to 10 working days.
In the meantime, you can read the questions and answers that others have left to this pattern or join the DROPS Workshop on Facebook to get help from fellow knitters/crocheters!

You might also like...

Post a comment to pattern DROPS 206-43

We would love to hear what you have to say about this pattern!

If you want to leave a question, please make sure you select the correct category in the form below, to speed up the answering process. Required fields are marked *.

Comments / Questions (17)

country flag MaryLou wrote:

For the yoke, In size small, “After last increase there are 203 stitches on needle.” After the dividing for front, back and sleeves, under the heading: “ Body:” it says “=133 stitches” for size small. This doesn’t make sense to me, can you please explain how the stitch count changes?

18.06.2022 - 22:43

DROPS Design answered:

Dear MaryLou, the 133 stitches are: 59 stitches in the back, 62 stitches in the front and 6 stitches cast on under arm on each side. You have taken out the 41 stitches for each sleeve (203-82= 121) and cast on 6 stitches on each side (121+12= 133). Happy knitting!

19.06.2022 - 16:53

country flag Jutta wrote:

Wenn ich Baby Merino und brushed alpaca silk zusammen für diese Anleitung nehmen kann, kann ich dann auch ein Garn der garngruppe c oder d nehmen als Alternative für nur einen Faden?

07.03.2022 - 14:19

DROPS Design answered:

Liebe Jutta, Brushed Alpaca Silk gehört der Garngruppe C, so C+A (Baby Merino) = D, wenn Sie nur 1 Faden stricken möchten, stricken Sie Melody. Viel Spaß beim stricken!

08.03.2022 - 10:50

country flag Jutta wrote:

In der Anleitung steht:Garngruppe A+A oder C. Nord ist A und brushed alpaca silk C. Ist zusammen eigentlich D. Könnte ich dann auch mit Baby Merino und brushed alpaca silk Stricken und müsste ich dann in Gruppe c oder D gucken bei den Anleitungen?

06.03.2022 - 16:19

DROPS Design answered:

Liebe Jutta, stimmt, danke für den Hinweis, das wird korrigert. Sie können BabyMerino benutzen (=Garngruppe A wie Nord) und mit Brushed Alpaca Silk auch stricken, beachten Sie nur, daß Ihre Maschenprobe stimmt (also wie immer). Viel Spaß beim stricken!

07.03.2022 - 09:08

country flag Susanne Krüger wrote:

Hej hej. kan jeg bruge 2 tråde karisma til denne opskrift. hvis ja er det så dobbelt op i garn. Mvh. Susanne

04.08.2021 - 15:57

DROPS Design answered:

Hej Susanne, ja det kan du gøre, ja det stemmer ca med dobbelt op :)

05.08.2021 - 13:17

country flag Helene Kraayvanger wrote:

How come I can't find the download button anywhere?

27.10.2020 - 19:48

DROPS Design answered:

Dear Mrs Kraayvanger, our patterns can only be printed, choosing a virtual printer will allow you to save them as a .PDF file. Happy knitting!

28.10.2020 - 07:45

country flag Karen Baker wrote:

I appreciate your answer to my initial question. For the medium size you suggested 5 balls of Nord and 3 of the brushed alpaca silk. When I started to order I found the brushed alpaca is in 25g balls. Doesn't that mean I need 6? I started to put them in my basket but it shows in British pounds. Is this coming from England?

26.03.2020 - 03:59

DROPS Design answered:

Dear Mrs Baker, correct, you need to divide 150 g by 25 = 6 balls Brushed Alpaca Silk at 25 g + 5 balls at 50 g Nord - yarn are shipped from our Superstore in UK - you can edit currency on their page (on the top corner on the right side). Do not hesitate to contact them - even per mail or on social medias for any question. Happy knitting!

26.03.2020 - 10:01

country flag Karen Baker wrote:

I have just found your site and think it has lovely patterns and yarn. I want to make pattern no-030 but not in the off white color. I wonder if the light grays go well together and what you would put with the jeans blue? I am about the size of the model, usually choose a medium but don't want to run short of yarn. How much of each should I purchase? When should I expect a shipment to Rockville, Maryland, USA? Thank you!

20.03.2020 - 22:08

DROPS Design answered:

Dear Karen, the light grays would look wonderful in this pattern, and so would the jeans blue, which you can combine with any grays or lighter blue for a more heathered effect. For size M, you will need 250 gramms (that is 5 balls of the Nord yarn and 150 gramms (3 balls) of our Brushed alpaca silk yarn. At the current circumstances we cannot estimate on any shipping time, you can check that directly with the place you are odering from. Happy Knitting!

22.03.2020 - 11:42

country flag Amel Meziani wrote:

Lovely knitting and color

06.02.2020 - 21:53

country flag Jana wrote:

Hallo, Ich möchte dieses Modell gerne in einer anderen Farbe stricken. Aber da kein Laden/Geschäft von Ihnen in meiner Nähe ist, muss ich online bestellen und kann mir die Wolle und Farbe nicht ansehen. Würden die Farben von Nord und Brushed Alpaca Silk in der Farbe Jeansblau oder Rostrot gut zusammen passen im Farbton? Oder weichen sie voneinander ab? Es wäre toll, wenn Sie mir helfen könnten! Danke und ein gutes neues Jahr wünscht Jana

03.01.2020 - 12:52

DROPS Design answered:

Liebe Jana, am besten wenden Sie sich an Ihrem DROPS Laden, gerne bekommen Sie bei ihnen direkt Hilfe, auch telefonisch oder per Mail. Viel Spaß beim stricken!

03.01.2020 - 14:27

country flag Sabine wrote:

Was bedeutet „4 Maschen über dem Zopf von A2 abnehmen“? An welcher Stelle genau muss ich 4 Maschen abnehmen? Muss ich die 4 Maschen verteilt in der Runde abnehmen oder 4 Maschen direkt über dem Zopf hintereinander abketten oder 5 M zusammenstricken?

15.12.2019 - 17:22

DROPS Design answered:

Liebe Sabine, wenn die Arbeit eine Länge von 34-33-35-34-32-30 cm ab der Teilung hat, stricken Sie die nächste Runde mit Nadeln Nr 7, gleichzeitig bei dieser Runde nehmen Sie 4 Maschen über dem Zopf von A.2, dh Sie stricken 2 M rechts zusammen insgesamt 4 Mal über die mittleren 18 Maschen von A.2. Viel Spaß beim stricken!

16.12.2019 - 08:45