
Vinsælir flokkar
Ertu að leita að garni?


|
|||||||||||||||||||||||||
Fields of Blue |
|||||||||||||||||||||||||
 |
 |
||||||||||||||||||||||||
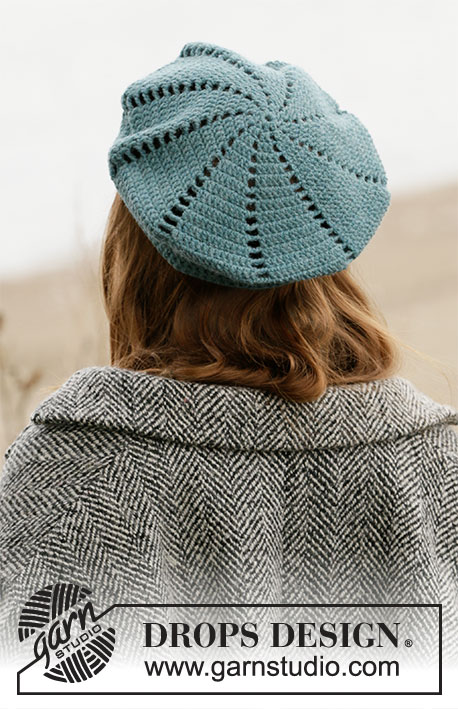
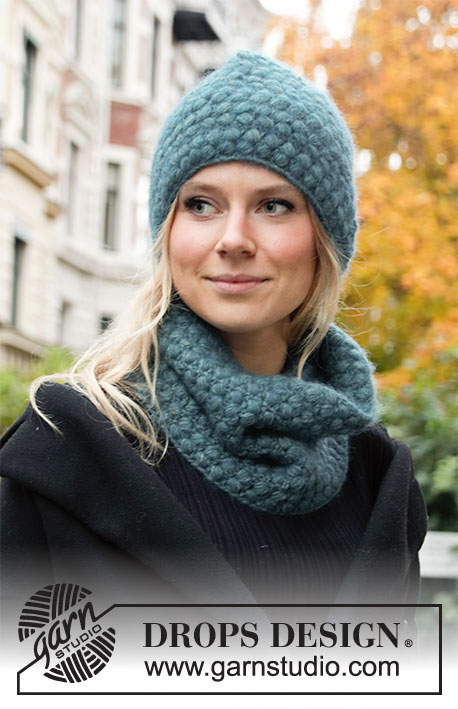
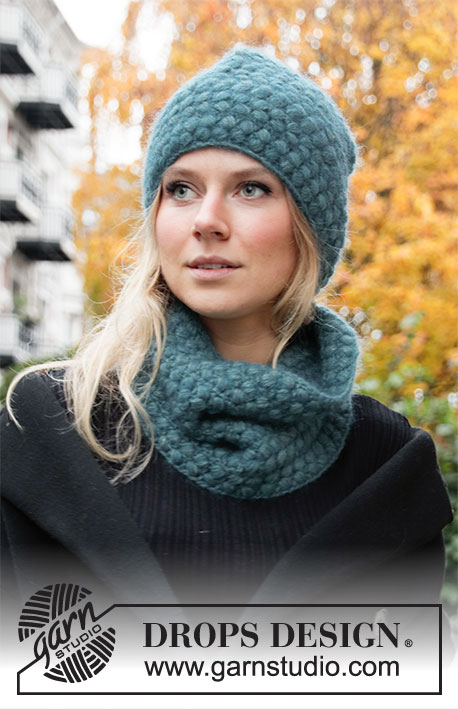
Hekluð húfa og hálsskjól með pufflykkjum. Allt settið er heklað úr DROPS Sky og DROPS Kid-Silk.
DROPS 204-16 |
|||||||||||||||||||||||||
|
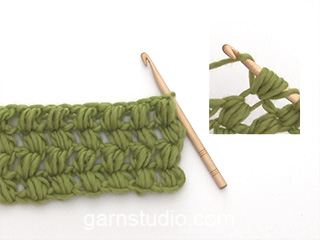
------------------------------------------------------- UPPLÝSINGAR FYRIR MYNSTUR: ------------------------------------------------------- MYNSTUR (á við um bæði húfu og kraga): Sjá mynsturteikningu A.1 til A.4. HEKLLEIÐBEININGAR FYRIR LOFTLYKKJU: Ef þú heklar yst á heklunálinni þá kemur loftlykkjan oft til með að verða of stíf. 1 loftlykkja á að vera álíka löng og breiddin á 1 fastalykkju/stuðli. 1 PUFFLYKKJA: Heklið í sömu lykkju þannig (það er mikilvægt að hekla í lykkjuna, ekki um lykkjuna): * bregðið þræðinum 1 sinni um heklunálina, stingið heklunálinni í gegnum lykkjuna, bregðið þræðinum 1 sinni um hekluðnálina og dragið uppsláttinn í gegnum lykkjuna, dragið báða uppslættina langa (til að koma í veg fyrir að pufflykkjurnar verði smáar og þéttar er mikilvægt að uppslátturinn sé dreginn eins langt og hægt er, þ.e.a.s. ca 2 cm) *, heklið *-* alls 5 sinnum, bregðið þræðinum 1 sinni um heklunálina og dragið þráðinn í gegnum allar lykkjurnar á heklunálinni. ÚRTAKA (jafnt yfir): Til þess að reikna út hvernig fækka eigi jafnt í umferð, teljið fjölda lykkja í umferð (t.d. 63 lykkjur), deilið þessum lykkjufjölda með fjölda úrtöku sem á að gera (t.d. 28) = 2,3. Í þessu dæmi þá er lykkjum fækkað með því að prjóna ca hverja og aðra hverja fastalykkju saman þannig: Stingið heklunálinni í gegnum næstu lykkju, bregðið þræðinum 1 sinni um heklunálina og dragið uppsláttinn í gegnum lykkjuna, stingið heklunálinni í gegnum næstu lykkju, bregðið þræðinum 1 sinni um heklunálina, dragið uppsláttinn í gegnum lykkjuna, bregðið þræðinum 1 sinni um heklunálina og dragið uppsláttinn í gegnum allar 3 lykkjurnar (= 1 lykkja færri). ------------------------------------------------------- BYRJIÐ Á STYKKI HÉR: ------------------------------------------------------- HÚFA - STUTT ÚTSKÝRING Á STYKKI: Húfan er hekluð fram og til baka frá miðju að aftan, neðan frá og upp og saumuð saman mitt að aftan í lokin. HÚFA: Heklið 75-77-82 loftlykkjur með heklunál 5,5 með 1 þræði Sky + 1 þræði Kid-Silk (= 2 þræðir). Fyrsta umferð er hekluð þannig: Heklið 1 fastalykkju í 3. loftlykkju frá heklunálinni, heklið 1 fastalykkju í hverja og eina af 0-2-1 næstu loftlykkjum, * hoppið yfir 1 loftlykkju, heklið 1 fastalykkju í hverja og eina af 5 næstu loftlykkjum *, heklið *-* út umferðina = 62-64-68 fastalykkjur í umferð. Næsta umferð er hekluð þannig: Heklið A.1 yfir fyrstu lykkjuna, heklið A.2 þar til 3 lykkjur eru eftir í umferð, heklið A.3 yfir 2 lykkjur og endið með A.4 yfir síðustu lykkju. Haldið áfram með mynstur fram og til baka. ATHUGIÐ HEKLFESTUNA! Þegar stykkið mælist ca 20-21-22 cm, fækkið um 28-30-30 lykkjur jafnt yfir í 3. eða 6. umferð í mynsturteikningu (merkt með ör í mynsturteikningu) – sjá ÚRTAKA = 34-34-38 lykkjur. Heklið 2 umferðir til viðbótar með pufflykkjum. Í næstu umferð (umferð með fastalykkjum), fækkið lykkjum með því að hekla allar fastalykkjurnar saman 2 og 2 = 17-17-19 fastalykkjur eftir. Heklið síðan 2 umferðir fastalykkjur þar sem allar fastalykkjurnar eru heklaðar saman 2 og 2 í báðum umferðum = 5 fastalykkjur eftir í öllum stærðum. Klippið frá, en skiljið eftir nægilega langan þráð til nota til að sauma stykkið saman með. Þræðið þráðinn upp og niður í gegnum 5 lykkjurnar á toppnum á húfunni, herðið á þræði og festið vel. Húfan mælist ca 26-27-28 cm ofan frá og niður. FRÁGANGUR: Saumið húfuna saman mitt að aftan – saumið kant í kant í ystu lykkjubogana þannig að saumurinn verði flatur. ------------------------------------------------------- HÁLSSKJÓL - STUTT ÚTSKÝRING Á STYKKI: Stykkið er heklað fram og til baka frá miðju að aftan, neðan frá og upp og saumað saman mitt að aftan í lokin. HÁLSSKJÓL: Heklið 94-101-108 loftlykkjur með heklunál 5,5 með 1 þræði Sky + 1 þræði Kid-Silk (= 2 þræðir). Fyrsta umferð er hekluð þannig: Heklið 1 fastalykkju í 3. loftlykkju frá heklunálinni, 1 fastalykkja í hverja og eina af 1-2-3 næstu loftlykkju, * hoppið yfir 1 loftlykkju, heklið 1 fastalykkju í hverja og eina af 5 næstu loftlykkjum *, heklið frá *-* út umferðina = 78-84-90 fastalykkjur í umferð. Næsta umferð er hekluð þannig: Heklið A.1A yfir fyrstu lykkju, heklið A.2 þar til 3 lykkjur eru eftir í umferð, heklið A.3 yfir 2 lykkjur og endið með A.4 yfir síðustu lykkju. ATHUGIÐ HEKLFESTUNA! Haldið áfram með mynstur fram og til baka svona þar til stykkið mælist ca 24-27-30 cm (eða að óskaðri lengd), en endið eftir 3. eða 6. umferð í mynsturteikningu. Klippið frá, en skiljið eftir nægilega langan þráð til að nota til að sauma stykkið saman með. |
|||||||||||||||||||||||||
Skýringar á teikningu |
|||||||||||||||||||||||||
|
|||||||||||||||||||||||||

|
|||||||||||||||||||||||||
|
Hefur þú gert þessa eða einhverja af annarri hönnun frá okkur? Merktu myndirnar þínar á samfélagsmiðlum með #dropsdesign svo að við séð þær! Vantar þig aðstoð með þetta mynstur?Þú finnur kennslumyndbönd, dálk með athugasemdum/spruningum og fleira með því að skoða mynstrið á garnstudio.com © 1982-2024 DROPS Design A/S. Við áskiljum okkur öll réttindi. Þetta skjal ásamt öllum undirhlutum þess, hefur höfundarétt. Lestu meira varðandi hvað þú mátt gera við mynstrin okkar neðst á hverju mynstri á síðunni okkar. |
|||||||||||||||||||||||||


Með yfir 40 ára prjóna- og hekl hönnun, býður DROPS Design uppá eitt umfangsmesta vöruúrval af mynstrum án endurgjalds á netinu – þýdd á 17 tungumálum. Í dag þá erum við komin í 304 vörulista og 11422 mynstur - 6917 mynstur sem eru þýdd á íslensku.
Við vinnum hörðum höndum við að færa þér það besta sem prjón og hekl hefur uppá að bjóða, innblástur, ráðgjöf og auðvitað frábært gæða garn á ótrúlegu verði! Langar þig að nota mynstrin okkar fyrir annað en til einkanota? Þú getur lesið hér ákvæði hvað leyfilegt er að gera í textanum Copyright sem er neðst á öllum mynstrunum okkar.
Athugasemdir / Spurningar (33)
Hola, he comenzado a hacer el cuello. Si lo pongo en plano sobre la mesa me queda circular, no un rectángulo, como pensaba que tendría que quedar. Pienso que pasa esto porque en la primera vuelta dice que hay que saltarse una cadena. ¿Esto es correcto? O yo no lo he entendido bien? Gracias
19.05.2021 - 15:40DROPS Design answered:
Hola Olga, la forma obtenida no es por la cadeneta saltada, sino que por la tensión del tejido. Efectivamente, se tiene que saltar una cadeneta; siempre se montan más cadenetas que las necesarias para evitar que la labor se tense.
30.05.2021 - 20:53Thanks. However the instructions for the box (□) say 'skip 1 puff-stitch + 1 chain stitch, work 1 treble crochet in the next treble crochet' - this uses 3 stitches. The instructions for the cross (X) say 'skip 1 stitch, work 1 treble crochet in next stitch' - this uses 2 stitches. It worked in the second row of the pattern fine because the box (□)was used all the way along the row (not the cross X). Please could you get someone to explain this. Thanks.
14.04.2021 - 13:10The very top row of the pattern (before the last row of double crochet) doesn't seem to work for me. I am working it right to left, A1 over 1st stitch, A2 until the last 3 stitches, A3 over last 2 stitches and A1 over last stitch. Because A2 is a cross (X) and not a box (□) (like row No 2), there ends up being more puff stitches because the chain stitch isn't being missed (there is a puff stitch being made every 2 stitches instead of 3). Should this symbol not be a box to prevent this?
13.04.2021 - 21:08DROPS Design answered:
Dear Jean, the X is worked over 2 stitches (1 treble in the 2. one, and one puff into the first one, cossing the tr), and the square is also wprked over two stitches (puff stitch into the 2. stotch, and treble into the first one) so you should not end up (both symbols have crossed stitches, only teh direction is different), so you should not end up with extra stitches. Happy Crafting!
13.04.2021 - 21:58Hej ! I flere af Drops opskrifter møder jeg 3 tal med bindestreg imellem f. eks. i Drops 204-16: "hækl 1 fastmaske i hver af de 0-2-1 næste luftmasker, . . . " Hvad betyder 0-2-1 næste luftmaske ? Eller i strikkeopskriften Drops Clementin Hat "Strik 0-1-0 maske ret, strik derefter . . ." Hvad betyder det ? Med venlig hilsen Annette
25.02.2021 - 06:50DROPS Design answered:
Hej Annette, det er tallene i de 3 forskellige størrelser. Strikker du den mindste, følger du det første tal igennem hele opskriften osv. God fornøjelse!
25.02.2021 - 14:20Efter att ha virkat de två första varven (först fastmaskor... sedan första varvet på diagrammet) står: "Fortsätt mönstret fram och tillbaka så". Hur menas? Är det det nedersta varvet som ska upprepas till 20 cm och för att sedan gå uppåt i diagrammet? Eller ska jag följa hela diagrammet uppåt direkt? Med vänlig hälsning, Annica
31.01.2021 - 20:02DROPS Design answered:
Hei Annica. Den nederst raden i diagrammet hekler du kun 1 gang, slik det står beskrevet i oppskriften. I diagramteksten med sort stjerne står det: denne raden skal ikke hekles, den er allerede heklet og viser kun hvordan neste rad skal hekles i maskene . Så du skal kun repetere de 6 radene i diagrammet (starter med 3 luftmasker) i høyden. God Fornøyelse!
08.02.2021 - 10:18Bonjour, Pour faire mon échantillon, vous dites : "13 double-brides/mailles serrées de large avec 1 fil de chaque qualité = 10 cm." Je ne comprends pas bien : je fais des double-brides ou des mailles serrées ? Et dans la hauteur, comment je peux voir ce qu'il y a dans 10 cm ? Merci de me répondre car je reste bloquée sur mon échantillon !
17.11.2020 - 11:14DROPS Design answered:
Bonjour Mme Lasalle, vos mailles doivent être toutes de la même largeur, autrement dit 13 double-brides = 13 mailles serrées = 10 cm de large. La hauteur est indiquée pour A.2 = 3 rangs de A.2 = environ 3,25 cm. Bon crochet!
17.11.2020 - 13:56Thanks so much for your patience. That explains well how the row of 78 dbl crochet stitches are worked into. However, after you have done the first row of puff stitches, and then count the stitches, there are 116 stitches. This is because each X box contains 3 stitches (a treble, a chain and a puff) and this is being worked into 2 dc stitches. So at the end of the row you have 38 extra stitches (because there are 38 puff stitches). Can you possibly work out why I am going wrong here. Thanks
30.07.2020 - 09:40DROPS Design answered:
Dear Roro, work simply following the diagram and video previously linked, making sure you have 38 puff stitches on every row - if your tension is right, you should have then the right measurements. Happy crocheting!
30.07.2020 - 12:34Thanks for your response. However, there is an increase from the row of double crochets to the 1st row of puff stitches if you follow the pattern (see question below). In the pattern it looks like each 3rd double crochet is possibly missed, which would actually even out the number of stitches if that was the case - is this where I'm possibly going wrong? Thanks for your patience.
29.07.2020 - 18:01DROPS Design answered:
Dear Roro, on neck warmer you cast on 94-101-108 sts and work first row skipping chains evenly so that there are 78-84-90 sts at the end of this first row. Then work: A.1 over 1st st, repeat A.2 until 3 sts remain = repeat A.2 a total of 37-40-43 times in width (= over the next 74-80-86 sts), and finish with A.3 (= 2 sts) and A.4 over the last stitch = 1+74-80-86+2+1=78-84-90 sts and 38-41-44 puff stitches. Hope this help. Happy crocheting!
30.07.2020 - 08:54Thanks for all your help. The fundamental reason I don't understand this pattern is this: On the 1st row (after dbl crochet row ) the puff stitches which produce 3 stitches (1 treble + 1 chain + 1 puff) are worked into 2 dbl crochet stitches (1 missed - into which a puff stitch goes after the treble + 1 for the treble). This results in an increase of stitches. That would maybe make sense in the 1st row of the item, but not further up. Should the 'X' box say 'miss 2 stitches' instead? Thanks
29.07.2020 - 16:02DROPS Design answered:
Dear Roro, there shouldn't be any increase, you should work "straight", each treble will be worked in the treble from the previous row so that the number of sts will remain constant. This video shows how to crochet these 2 rows with same symbols. Happy crocheting!
29.07.2020 - 17:11Sorry there are so many questions. I'm kind of struggling a bit with this pattern. The 'CROCHET INFORMATION' section states that each row will finish with a slip stitch. Does this mean that the last stitch in the row in the diagram is not actually the last stitch because a slip stitch comes after it. So in effect there is 2 stitches worked in A4 (Right side) or A1 (Wrong side). For example the 1st row ends in A4 with '1 treble crochet in stitch' - is there a slip stitch after this? Thanks.
18.07.2020 - 00:59DROPS Design answered:
Dear Roro, you can follow diagram, ie work back and forth as explained under each piece, without joining at the end of every row, then sew the seam on mid back (hat and neck warmer). The first stitch of each row is drawn in the chart, ie at the beg of puff sts start with 3 chains and end with 1 treble and at the beg of dc row, start with 1 chain and end with 1 dc in 3rd ch from previous row. (A.1 might have to be edited, but our design team is now on summer vacation - thanks in advance for your patience and comprehension). Happy crocheting!
20.07.2020 - 09:11